SEARCH FINESCALE.COM

Enter keywords or a search phrase below:

Revell 1:83 Mayflower

50226 views
601 replies
1 rating 2 rating 3 rating 4 rating 5 rating
  • Member since
    July 2014
  • From: Franklin Wi
Revell 1:83 Mayflower
Posted by Bakster on Sunday, May 3, 2015 10:37 PM

Greetings folks.  I want to try building this ship.  I have not built ships before, so I have some things to learn.

My main concern with this kit is the paint.  I want to create a realistic wood finish that looks weathered. Can someone offer some tips, or links, that could get me in the right direction?  Any refence images for paint schemes would be great as well.  Based on my research of the Mayflower, it seems that historians are not very sure as to the actual paint scheme that it had. The artwork on the box looks cool, but is it the most accurate reference that we have?

The rigging will be another learning curve for me, and I see that some of the plastic rigging may have to go bye bye.  Any info or tips along this line would be helpful. Aftermarket stuff?

Lastly, I feel, that the vacuum formed sails that came with this kit look like garbage.  The fabric weave is massively out of scale. I know already that I will have to fabricate something that will be closer to scale. If anyone has ideas along this line, please let me know.

Thanks in advance.

Steve

  • Member since
    September 2012
Posted by GMorrison on Sunday, May 3, 2015 10:50 PM

In order- there's been a CLINIC on wood painting techniques here on this very forum in the last year. Take a look at threads about the Black Swan, Cog, Carrack, Nina/Pinta and others.

Premolded rigging is worse than no rigging.

There are no "aftermarket" parts for this kit. But there are plenty of sources for rigging and such supplies, all of which you will see in the above.

Ditch the sails. Making new ones for an "under sail" condition is really hard. No sails would be fine.Furled sails can be a plan, but it would take some thought. many ships of this era lowered the yards and sails rather than the more contemporary practice of sending sailors aloft to stow them.

But it's been a great year for 15th-16th-17th century builds around here.

That's a great kit, I love the figures.

 Modeling is an excuse to buy books.


  • Member since
    November 2009
  • From: Twin Cities of Minnesota
Posted by Don Stauffer on Monday, May 4, 2015 8:30 AM

One way to create the wood look above waterline is to paint with one color of brown or wood, then dry brush another shade over highlights.  Or, I know a friend who actually paints plastic ship models with wood stains, via brush.  That looks pretty good.

As far as rigging, leave sails off, depicting at anchor long enough to unbend sails.  Yeah, ditch the rigging and do shrouds and ratlines with thread.  Some aftermarket blocks may add some in appearance over plastic blocks, but the plastic ones can be painted to look pretty reasonable.

Good thread is getting a bit hard to get- Model Expo is still a good supplier, and some of us are using fly tying monofilament for the real thin stuff.

Don Stauffer in Minnesota

  • Member since
    July 2014
  • From: Franklin Wi
Posted by Bakster on Monday, May 4, 2015 9:11 AM

Hey Don and GMorrison, thanks for the input.  This is all really good advice.  I will look closer for the CLINIC and techniques.  Dry brushing makes sense, and the wood stain sounds intriguing.  It sounds like I will have to do some experimenting to get the look I want.

Having the sails furled is a good idea as well. I really wanted to have full sails, but furled looks to be the way to go.

Yes, I think the plastic blocks should be decent enough.  I wish I knew all the terminology of things.  There are some plastic triangular rope structures that I think should be made by scratch.  What are those structures called?

The kit comes with thread. Don--you mentioned Model Expo as a source for thread.  Is there a reason not to use the thread that came with the kit?  Is it out of scale? Other?

I have a ton to learn with regard to ships, and so I am pretty ignorant on the subject.  That's not going to stop me from jumping in though, and thanks again for the help!

Steve

  • Member since
    November 2003
  • From: Virginia
Posted by Mike F6F on Monday, May 4, 2015 10:22 AM

Steve,

A Quick primer on sailing ships.

There are two types of rigging, standing and running.  Standing rigging was used to support the masts and did not, as a general rule, move once rigged.  These lines were tarred and modelers usually paint them black or a dark brown.  Running rigging as it sounds was used to adjust the spars to catch the wind for sailing on the ship's desired course.  These lines ran through the blocks and were hauled by the sailors on deck.

Standing rigging consisted of shrouds and stays.  Shrouds generally run athwart ships (side to side.)  They supported the masts from port to starboard. Stays tend to support the masts in a fore and aft manner.  The triangle shaped plastic pieces you refer to are shrouds.  The lines going across are the ratlines sailors used to climb to go aloft.

Running rigging was attached to the yards and to the sails.  If you want to build you model without sails that will limit some of the running rigging you'll need to use.

Enjoy jumping into sailing ships.  It is different from other modeling and there is plenty of help here.  You can post photos and ask for help.  There are lots of folks who'll pitch right in and help you as you go along.

Rigging will require some new tools.  You'll possibly need some longer tweezers, etc., as you get to the steps that will require them.

Take the model one bite at a time and have fun with it.

Mike


"Grumman on a Navy Airplane is like Sterling on Silver."

  • Member since
    September 2012
Posted by GMorrison on Monday, May 4, 2015 10:31 AM

It's a good choice.

Kit provided thread is generally suspect. There are exceptions of course, but it's usually sewing thread or string.

What you want to avoid is fuzziness. The simplest way to do that is to get some rigging thread. Model Expo is a good source.

Or take what you have and wax it. Draw it across a candle and work it in by dragging it through your fingertips. You'll see a difference right away.

 Modeling is an excuse to buy books.


  • Member since
    September 2005
  • From: Groton, CT
Posted by warshipguy on Tuesday, May 5, 2015 8:06 AM

I have used waxes such as Burt's Bee's Lip Balm successfully when all I had was thread or string.  Also, try rigging the shrouds and ratlines yourself instead of using those provided in the kit. You will have much better results after some trial and error.

Bill

  • Member since
    November 2009
  • From: Twin Cities of Minnesota
Posted by Don Stauffer on Tuesday, May 5, 2015 9:00 AM

Most kits do not give you many options on size of threads.  You should use at least three sizes of thread,  in each of two colors (black and light tan/off white).  Most kits only give you the thicker sizes.  Not familiar with that kit, but if there is no fine thread, ME is a good place to look for alternate thread.

Don Stauffer in Minnesota

  • Member since
    July 2014
  • From: Franklin Wi
Posted by Bakster on Tuesday, May 5, 2015 9:00 AM

Hey everyone...  I want to give a big thanks for all the advice.  Already, you have given me information that is moving me much farther along in terms of how to approach this build. I really needed that. You will see me popping up on this posting from time to time.  

I am looking forward to starting this build.  I will start with the hull, hopefully, by this weekend.

Thanks again!

Steve

  • Member since
    July 2014
  • From: Franklin Wi
Posted by Bakster on Tuesday, May 5, 2015 9:12 AM

Say Don--

I believe I had seen two threads with this kit.  One being black, and the other white.  

Thanks for the tip about the three sizes, another thing learned. When I get that far, I will order the thread from ME. I may be checking in with you folks again before I place that order. I am sure I will have more questions.

Thanks!

Steve

  • Member since
    July 2010
  • From: Tempe AZ
Posted by docidle on Friday, May 8, 2015 12:07 AM

Steve,

The threads that GM recommended you'll want to take a look at are some of these.

The first are DavidK's excellent build of the 1/72 Black Swan. The next is his build log of the Imai Santa Maria and finally his Imai Golden Hind. He has also done an Imai Spanish Galleon and Chinese Junk with threads on both of those too and you will want to follow his current Soleil Royal WIP. He did the Swan before he started using the artist oils over acrylic and then started using oils after a VERY brief tutorial on the Santa Maria. As you can see, he has mastered the technique.

cs.finescale.com/.../1814727.aspx

cs.finescale.com/.../150712.aspx

cs.finescale.com/.../159954.aspx

Another weathering master is Rod Millard. He was the modeler who inspired me to try oil on acrylics among other tricks. His ships are amazing and well worth a look. His Catalan Ship log is here and you can see all his ships on www.modelshipgallery.com just look up his name.

cs.finescale.com/.../160320.aspx

And finally if you would like to check out some of my logs you are more than welcome to. Although I have to warn you, the Nina and Pinta log is really bloody long but a great cure for insomnia. I hope some of this helps and remember, everyone on the forum are more than willing to give help and advice if asked.

Steve

cs.finescale.com/.../1607292.aspx

cs.finescale.com/.../150254.aspx

cs.finescale.com/.../155458.aspx

cs.finescale.com/.../150812.aspx


  • Member since
    July 2014
  • From: Franklin Wi
Posted by Bakster on Friday, May 8, 2015 9:07 AM

Hey Steve--thanks for all this.  This will be really helpful.  I will look through all of this and see what I can learn.  You guys are great.  Thank you!

Steve

  • Member since
    July 2014
  • From: Franklin Wi
Posted by Bakster on Saturday, August 1, 2015 12:39 PM

Greetings Folks.  I am still here, and I am still working on this.  I am currently focused on the stern.  That section has three windows, of which are molded in solid brown plastic.  From what I can tell, the actual ship had glass panes in them.  Thus, I want the windows to be transparent.  The windows are pretty tiny, and that limits me to what I can pull off to fix the problem, without destroying the intricate detail.  After all said and done, I decided to make a whole new piece out of clear resin. Then, I will attach it to the hull, and I will mask the windows during paint. Time will tell if my plan works.

Learning to work with molds and resins ate up a bunch of my time. I tried a couple of mold compounds and I found one that worked pretty well.  Once the mold hardened, I made some castings.  My first attempts had some bubbles that reached clear through to the surface of the piece. In short, they formed divots on the surface, and ruining the piece. After some experimenting though, I was able to cast a decent copy.

I did have an oops in all this.  In making the mold it is often recommended to use modeling clay to set the master piece in.  In my case, I used Sculpey clay. This was a mistake.  When it came time to pull the piece out of the clay, I found that the clay turned the plastic to goo! There were gooey strings and all! It was quite the sight. It was a bit of a bummer because I wanted to keep that piece intact, just in case my master master plan failed. Unfortunately, the plastic melted enough that is compromised the strength of the piece. In light of the goo scenario, it seems that I am committed to the resin piece.

Question: What is the best method to join the resin piece to the styrene hull? These have two dissimilar properties. I am thinking epoxy to make that connection. Do you guys have any thoughts on that? Any possible concerns?

Here are some images of the process.

Below:  This was earlier on and before tackling the stern.  The two hull sections are glued.

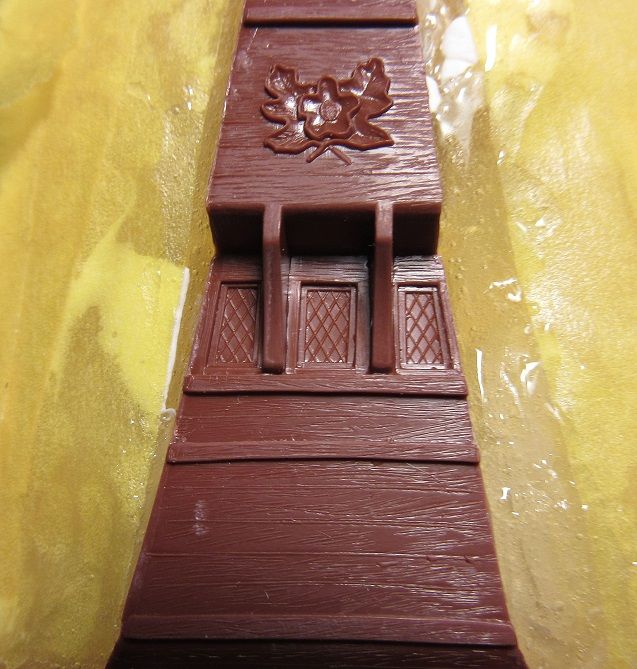
Below:  Here is a closeup of the stern section showing the windows.

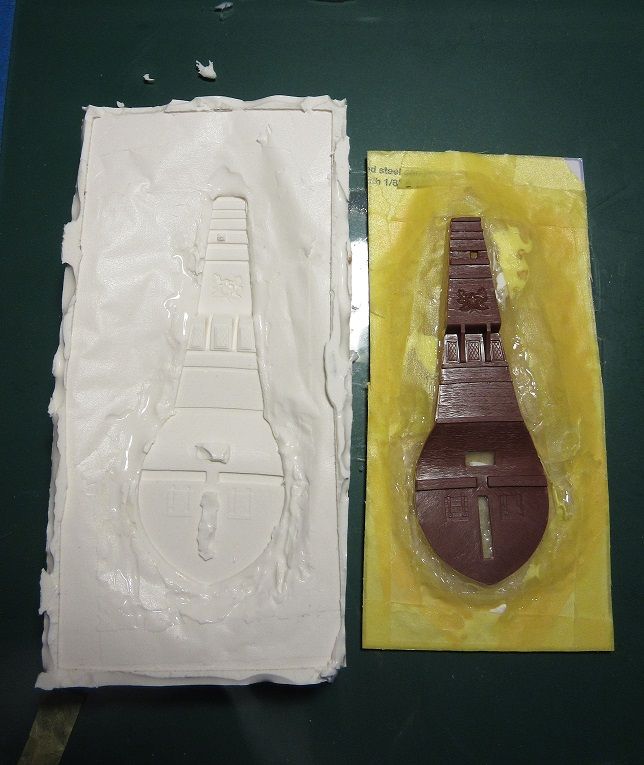
Below: The mold is cured and the master is removed.  BTW...this is not when the gooey accident happened.  I used a different mold compound prior to this, and it was then that the clay ruined the backside of the piece. For this mold, I epoxied the piece to the cardboard. 

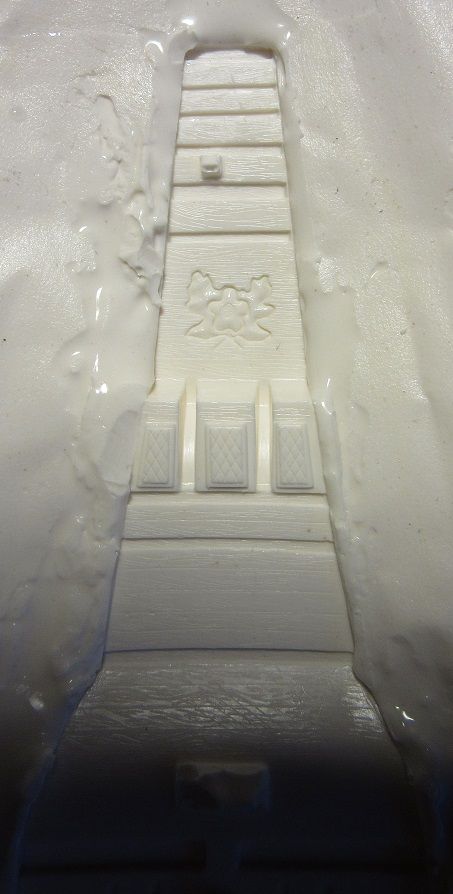
Below: You can see how well the mold captured the intricate detail.

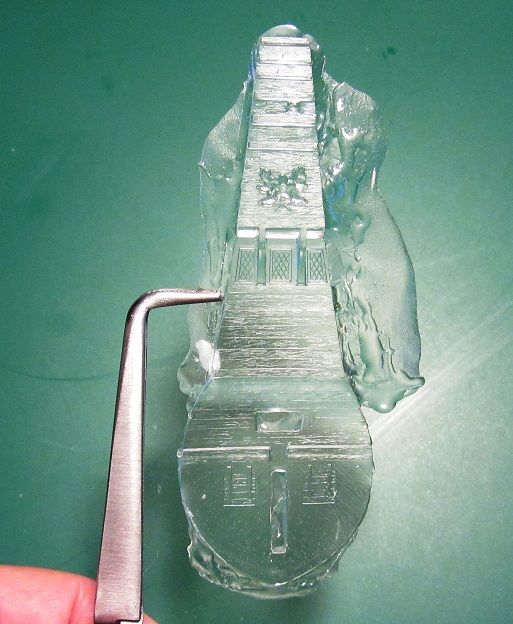
Below:  Here is the resin cast.  I have some cleanup work to do.

  • Member since
    March 2005
Posted by philo426 on Saturday, August 1, 2015 5:57 PM

For the rear windows on my wooden Ersatzia,I used blue celluloid from a binder to simulate stained glass and I epoxied brass wire to simulate the frames.      

  • Member since
    July 2014
  • From: Franklin Wi
Posted by Bakster on Saturday, August 1, 2015 9:37 PM

Philo, that is a good idea, and it looks great on your project.  I thought about doing something similar, but I was too concerned about damaging the surround details in the process of removing the window sections. So I opted to make a mold so that I can make several copies.  I will at first try masking the windows, and maybe try painting the latice work.  I might even try using clear paint to simulate stained glass.  If that all fails, I can try removing the windows and do as you did.  Since I have a mold now, and I can make many copies of that section, it is less of a concern if I mess it up. I can just start over.  

Thank you for your tip!

  • Member since
    March 2005
Posted by philo426 on Saturday, August 1, 2015 9:45 PM

Thanks! Yes it is wise to make multiple copies until you refine your technique!

  • Member since
    July 2010
  • From: Tempe AZ
Posted by docidle on Thursday, August 6, 2015 1:39 AM

Steve,

That is some amazing work you've done! It looks too beautiful to paint. 

I trick I have used on this type of windows was something like Philo's but I used the brass wiring from a faucet screen or a section of wire screen door material. I then measured what I needed, cut and then used Crytal Clear to give the old window effect. Here is an example, although looking at it, I see that I could have lined up the wire better. 

Another, easier trick is to use a Silver paint pen from an Art Store, or online to draw on the metal parts. With a light touch it comes out really nicely.

Here is an example from my Santa Maria log.

Steve


  • Member since
    March 2005
Posted by philo426 on Thursday, August 6, 2015 8:46 AM

Looks good!Great idea!

  • Member since
    September 2005
  • From: Illinois: Hive of Scum and Villany
Posted by Sprue-ce Goose on Thursday, August 6, 2015 9:10 AM

Great idea using the clear resin ! Big SmileYes

  • Member since
    July 2014
  • From: Franklin Wi
Posted by Bakster on Thursday, August 6, 2015 6:37 PM

Hey Sprue-ce Goose, thank you.

  • Member since
    July 2014
  • From: Franklin Wi
Posted by Bakster on Thursday, August 6, 2015 6:50 PM

Steve, thank you sir!

What you did on the Santa Maria piece looks really good.  I like it.  Thanks for showing what you did. Smile If I for some reason can't pull off the direction that I am going, I will look at your technique. 

  • Member since
    July 2014
  • From: Franklin Wi
Posted by Bakster on Sunday, August 9, 2015 8:13 PM

Today, I took several hours to clean up the resin piece.  Fortunately, no mishaps in that process.


Below: Test fitting the piece.  It fits about as well as the kit piece.  The only issue is that the resin piece is thicker.  I need to remove some material from the backside of the piece. You can see how the top part of the piece is forward of where should be.  Overall though, I am very pleased with it.


  • Member since
    March 2005
Posted by philo426 on Sunday, August 9, 2015 9:33 PM

That will work for sure!great idea!

  • Member since
    July 2014
  • From: Franklin Wi
Posted by Bakster on Monday, August 10, 2015 9:15 AM

Thank you, Philo.  My fingers are crossed as I move forward.  

Indifferent

  • Member since
    July 2010
  • From: Tempe AZ
Posted by docidle on Monday, August 10, 2015 10:56 PM

Steve,

It is interesting to see the same issues on the transom with your resin mold. It is a tad thick at the upper levels and shallow at the keel. I remember glueing it and checking it every couple of minutes to make sure everything including the rub rails were aligned.

It is looking great so far and have you decided how you are going to paint her? I used a great deal of Tamiya tape painting her like the old box top has her.

Also, I always use pinstriping tape to mask the the line for the antifouling paint. You probably already know this thick but I found that it follows the complex curves of the hull really nicely and if you burnish it you'll get no bleed, at least it worked for me. I used 6mm Tamiya tape starting half way up the pin tape to cover the the hull and then blue Painter's tape over that.

Steve


  • Member since
    July 2014
  • From: Franklin Wi
Posted by Bakster on Tuesday, August 11, 2015 10:26 PM

Hey Steve, thanks for chiming in.  

Yes, this section has a difficult fit.  I think to make everything align, I will have to glue the part on a section at a time.  

Funny that you should ask about the paint.  Just the day before I decided that I should get serious about how I will paint it. Whether to go with the paint design of the Mayflower replica, or a more bare bones look.  For some reason, I have an image in my mind of the ship not being as ornate as how the replica is painted.  As you know, I recently toured the Pinta and Nina replicas.  Well, I talked to the tour guide about my build, and my dilemma. He told me that ships built in the 1600s could, and did, have some ornate paint schemes.  So, it's possible the builders of the Mayflower replica have it right, and it is not just for show.  For grins, I sent an email to the Mayflower Foundation asking some questions.  We will see if they respond.  It doesn't hurt to ask!  Geeked

Thanks as well for the tips about the tape.  That is greatly appreciated!  

Steve


  • Member since
    August 2009
  • From: MOAB, UTAH
Posted by JOE RIX on Wednesday, August 12, 2015 11:36 AM

Hi There Steve. Just your ole buddy Joe finally tuning in to check out your progress. And,, Holy Moses, I am simply floored to see what you have been doing on your Mayflower. That is some really amazing stuff you are pulling off. The clear resin cast is jaw dropping. What a unique and clever option.

I regret that I am absolutely no help at all as sailing ships are not my forte. Yet, I am getting a kick out of watching what you are doing and taking in all the great info and tips everyone else is offering up. I'm following you the rest of the way my good friend and I can see that I'm in for one glorious ride.

"Not only do I not know what's going on, I wouldn't know what to do about it if I did". George Carlin

  • Member since
    July 2014
  • From: Franklin Wi
Posted by Bakster on Wednesday, August 12, 2015 10:08 PM

Hey, Joe!  It is great to hear from you!  Thanks for the kudos my friend.  I appreciate your enthusiasm for the build.  Yes sir, stay tuned. This greenhorn (me) will push the envelope of greenhornship. I decided to put my methods and struggles out there so that other greenhorns like me, might pick up some tips from the more advanced builders helping me. If I could start this thread over I would call it something like, Ship Building 101.  Hopefully, my ship doesn't sink before it hits water. I have a lot to learn, and as you know, almost anything can happen, especially when attempting new things. I promise to plod through it though, at all costs.

I must stop by your GB and see how things are progressing on your P-47.

Thanks for chiming in, Joe.


Steve

  • Member since
    August 2009
  • From: MOAB, UTAH
Posted by JOE RIX on Friday, August 14, 2015 9:09 AM

Thanks for piping me aboard my good friend. Yeeeah....That don't appear to be no "greenhorn" type activity you've got going on there to me. Looks like a seasoned vet at work.

"Not only do I not know what's going on, I wouldn't know what to do about it if I did". George Carlin

  • Member since
    September 2005
  • From: Groton, CT
Posted by warshipguy on Sunday, August 16, 2015 4:45 PM

The Rigging of Ships

Steve,

Perhaps it is a bit early, but you will need to be careful about the placement of the yardarms if you choose to furl your sails.  I went back through this thread to be sure that this hasn't been mentioned given  the outstanding advice from everyone here. Generally speaking, the yards should be lowered.  There are several great references you could use as a guide.  The first is by R.C. Anderson called The Rigging of Ships In the Days of the Spritsail Topmast, 1600-1720, followed by George Biddlecombe's The Art of Rigging, both of which are usually available on Amazon.  I have also found that George F. Campbell's The Neophyte Shipmodeller's Jackstay, is an essential reference; it is available from Model Expo. Finally, I also use Wolfram zu Mondfeld's Historic Ship Models, although this can be a more controversial reference.

You are doing exceptional work!

Bill Morrison

JOIN OUR COMMUNITY!

Our community is FREE to join. To participate you must either login or register for an account.

SEARCH FORUMS
FREE NEWSLETTER
By signing up you may also receive reader surveys and occasional special offers. We do not sell, rent or trade our email lists. View our Privacy Policy.