SEARCH FINESCALE.COM

Enter keywords or a search phrase below:

Trumpeter USS North Carolina 1/350

9629 views
74 replies
1 rating 2 rating 3 rating 4 rating 5 rating
  • Member since
    July 2014
Posted by modelcrazy on Monday, July 9, 2018 6:52 PM

OK, thanks for that.

Steve

Building a kit from your stash is like cutting a head off a Hydra, two more take it's place.


http://www.spamodeler.com/forum/

  • Member since
    August 2017
Posted by laskdjn on Monday, July 9, 2018 5:31 PM

Another note, M.C., I'd also put more structural support in the hull for the main deck, it was a little flimsy.

  • Member since
    February 2016
  • From: Western No. Carolina
Posted by gene1 on Monday, July 9, 2018 4:12 PM

Mike, You did a beautiful job on your No. Carolina. There were 2 ships I never built that I wanted to, the No. Carolina &  the Indiana. My brother & his best friend joined the navy in late 1943 & my brother was on the Indiana & Bill, his friend was on the No. Carolina. They actually got to see each other several times when they were in Ulithi, I believe it was, for supplies & beer.  

  • Member since
    July 2014
Posted by modelcrazy on Monday, July 9, 2018 9:44 AM

Thank you, I'll save this info for reference. I'm excited to start mine as soon as I get a few other projects out of the way.

Steve

Building a kit from your stash is like cutting a head off a Hydra, two more take it's place.


http://www.spamodeler.com/forum/

  • Member since
    August 2017
Posted by laskdjn on Monday, July 9, 2018 9:03 AM

modelcrazy


Is there something I should look out for when building mine?


In regards to your question, follow the instructions carefully.  There are many parts that can go in backwards without a problem.....and not notice until a month and a half later when you start to put smaller parts on and figure out that something's not right.  I'm not sure which paint scheme you're gonna be shooting for, but my intent(never got to paint it) was to leave the superstructure off the hull of the ship until after paint.  The second deck wood planking can go on way earlier than indicated in the instructions, basically, I'd throw that on right after you put the bulkhead detailing plates on the first deck, this will give you a much better shot at getting a nice seamless joint on that, otherwise I got a lip and it took a lot of work to get rid of that.  Same goes for the bottom section of the hull(unless you're going waterline), I put that on first as was suggested earlier in this thread, and I thought that was a fantastic move.  That also holds true for the superstructure, I think the best bet would be to construct each section(there's 3: fore, mid, and aft) in whole, including the bulkhead detailing, then sand it all smooth at once, I tried to sand after placing each deck and that didn't work out great.  I found that putting on the 1" and 40mm gun shielding on before the sea boxes on helped a lot in locating where they where meant to be located.  With regards to the mooring cleats, Trumpeter provides extras, but don't get complacent, they're tiny and they will zing into parts unknown.  The fit of the main turrets isn't fantastic, so be prepared for some filling and sanding on those.  To get the second deck of 5" guns to sit on the deck properly, you'll need to drill into the main deck sections, that took my cordless drill with a 7/16" bit(I think) no time.  Speaking of the hull, the fit isn't the best on that,  I think the best play on that would be to cut the center supports, glue the bow and the stern first, then individually glue each section at the cross brace(which means you'll have to construct some sort of internal structure for the bottom of the hull, unless you're going waterline).  Lastly, I dunno if you're planning on using photo etch, if you are, God bless you.  I originally got Tom's Modelworks, but found it lacking and wound up just buying the Eduard set.  Speaking of which, there are so many tiny pieces, some no larger than half a grain of rice.


That's all I can think of off the top of my head.  If you have any questions, please don't hesitate to ask.

  • Member since
    August 2017
Posted by laskdjn on Monday, July 9, 2018 8:06 AM

I'll give it a shot.  But it's the observation deck/director mounts of the aft superstructure behind funnel #2.  I made sure to provide ample glue to every possible mating surface in that interface.


Will the freezer also help with the photo etch that's connecting the two parts with CA? 

  • Member since
    June 2014
  • From: New Braunfels , Texas
Posted by Tanker - Builder on Monday, July 9, 2018 6:21 AM

Hi !

This may sound silly as heck . Put the whole thing in the freezer . Let sit for two whole days and try part removal while cold . It may work !

  • Member since
    July 2014
Posted by modelcrazy on Sunday, July 8, 2018 7:47 PM

I'm truly sorry to hear that. That is such a shame when that happens, especially when you've put in so much hard work. Crying

Is there something I should look out for when building mine?

Steve

Building a kit from your stash is like cutting a head off a Hydra, two more take it's place.


http://www.spamodeler.com/forum/

  • Member since
    August 2017
Posted by laskdjn on Sunday, July 8, 2018 5:27 PM

I'd have to somehow figure out a way to cut the top part of the aft superstructure from the lower part, I glued it -very- securely.  I just don't see a way without doing even more irreparable damage

  • Member since
    July 2014
Posted by modelcrazy on Sunday, July 8, 2018 4:46 PM

Oh no Surprise, there must be a way to repair it.

Steve

Building a kit from your stash is like cutting a head off a Hydra, two more take it's place.


http://www.spamodeler.com/forum/

  • Member since
    August 2017
Posted by laskdjn on Sunday, July 8, 2018 4:36 PM

So, while doing dinner work on the aft mast this morning, I noticed that I put the top part of the aft superstructure on backwards....so, this one is done and I botched it.


I'm pretty sure the mistake is irreparable.  However, I still owe my brother a USS North Carolina.  Plus, I love the ship and it's story, plus my family is from North Carolina, so I'll be attempting this again in the near future.  I learned a lot about model ship building and model building in general on this, hopefully next time I'll do her justice.

  • Member since
    June 2014
  • From: New Braunfels , Texas
Posted by Tanker - Builder on Monday, June 18, 2018 12:05 PM

Hi;

 As far as marking the waterlines I still use a very old tool I got many years ago . It was and is made for sailing vessels .So it has an adjustable end .You take the end and set it at say 20 degrees . Set the point for the correct waterline at midships .

 As you go to fore and aft keep the line straight .This will even allow you to go under the counter ( stern ) and get a nice form at the stern and the bow . The depth of Boot stripe is set by three things number one being ,  Full wartime load .

  Expended fuel and stores and ammo load and again fuel . If you are light on fuel as in destroyers you are in trouble if too much of the rusty bottom shows in a roll !

  • Member since
    August 2017
Posted by laskdjn on Sunday, June 17, 2018 2:34 PM

This is all fantastic information and I appreciate all of you sharing it with me.  Thank you.

  • Member since
    September 2012
Posted by GMorrison on Saturday, June 16, 2018 7:03 PM

There could also be a yard brace to each end of the yard. Long wave radio would have a separate receiving and transmitting wire.

Having a halyard "to the top of everything" is extremely useful for sending someone up to fix things like anchor lights that aren't themselves at the top of everything.

 Modeling is an excuse to buy books.


  • Member since
    July 2014
Posted by modelcrazy on Saturday, June 16, 2018 6:33 PM

Capn,

I forgot about the Sunday Ensign. Being an ET3, 2 and 1 on Coast Guard cutters, may main concern were the radars and radio antennas. The QM's took care of the flags and pennants. My job was equally mysterious to them as theirs to me LOL.

Steve

Building a kit from your stash is like cutting a head off a Hydra, two more take it's place.


http://www.spamodeler.com/forum/

  • Member since
    November 2005
  • From: Formerly Bryan, now Arlington, Texas
Posted by CapnMac82 on Saturday, June 16, 2018 6:01 PM

modelcrazy
The other lanyards, usually white rope, will have the pennants hauled up and down to spell out some alien tonuge that only signalmen and quartermasters can understand

Harumph.  Also, those of us tasked to instruct wig-wags and QM, too Smile

Real short answer:  Typically three signal halyards per side.

They run from the "flag bags" to a yard arm, usually the lowest/longest on the foremast.

(You will have to decide if your scale used is worth showing those halyards doubled through the blocks (pulley for you lubbers) at the yard.)

The radio call sign of the ship is flown by way of four flags on one of the halyards (unless under radio silence).  The call sign might be flown while at anchor.


Modelcrasy's point is well taken, though.  There's just not much "rigging" on WWII ships as a rule.  Not in the same sense as the rigging used to support masts, stacks, and the like on pre-WWII ships.

So, other than the (very limited) use of long wavelength (generally longer than 10m) radio antennae, the only lines are those used to hoist flags.

As a point of order, USN practice was to run a halyard up to the top of everything.
The highest point would have hoisted the Commissioning Pennant.  These come in 7 sizes proportionate to the size of the ship (A Size 7 is about 5' long, a 1 is about 21'). 

The second-hgihest point would carry a Burgee--which is the flag of the Flag Officer aboard (or the appointed squardon Commodore).

Highest point on the Main mast carries the National Ensign.  These are also sized to the ship; capital ships having a Sunday, a Battle, and a Storm ensign (Sunday Ensigns are the full length of the aft flagstaff).

In combat, a National Ensign will be flown from every mast, usually the Sunday from the foremast, and the Battle from the Main mast.

To add a wrinkle, there is also "Dress Ship."  This is where eery pennenat and flag is cleaned out of the signal lockers and strung together for the top of the Jack-staff to the Foremast, across to the Mainmast, and down to the Flagstaff aft.  There's a plan of pennants, square flags, and swallow-tailed flags (although the signalmen always try to sneak in a rude or vulgar word or too in the array).

  • Member since
    September 2012
Posted by GMorrison on Friday, June 15, 2018 10:26 PM

1943Mike

GM, I think it's the Borodino.


Laskdjn,

Builder 2010 does some incredible work. ModelCrazy's builds are outstanding too. It's great to see so many knowledgeable people chiming in here. I'm always learning from their posts.


That's correct Mike.

Yes, that Missouri is really fantastic. I don't use wood decks too much except on  a few pre-dreads.

On sailing ships 1/144 or larger I lay them with strip basswood. Larger scale and I own a little precision table saw.

 Modeling is an excuse to buy books.


  • Member since
    December 2010
  • From: Salem, Oregon
Posted by 1943Mike on Friday, June 15, 2018 7:35 PM

GM, I think it's the Borodino.


Laskdjn,

Builder 2010 does some incredible work. ModelCrazy's builds are outstanding too. It's great to see so many knowledgeable people chiming in here. I'm always learning from their posts.

Mike

"Le temps est un grand maître, mais malheureusement, il tue tous ses élèves."

Hector Berlioz

  • Member since
    March 2012
  • From: Louisville, KY
Posted by Builder 2010 on Friday, June 15, 2018 6:27 PM

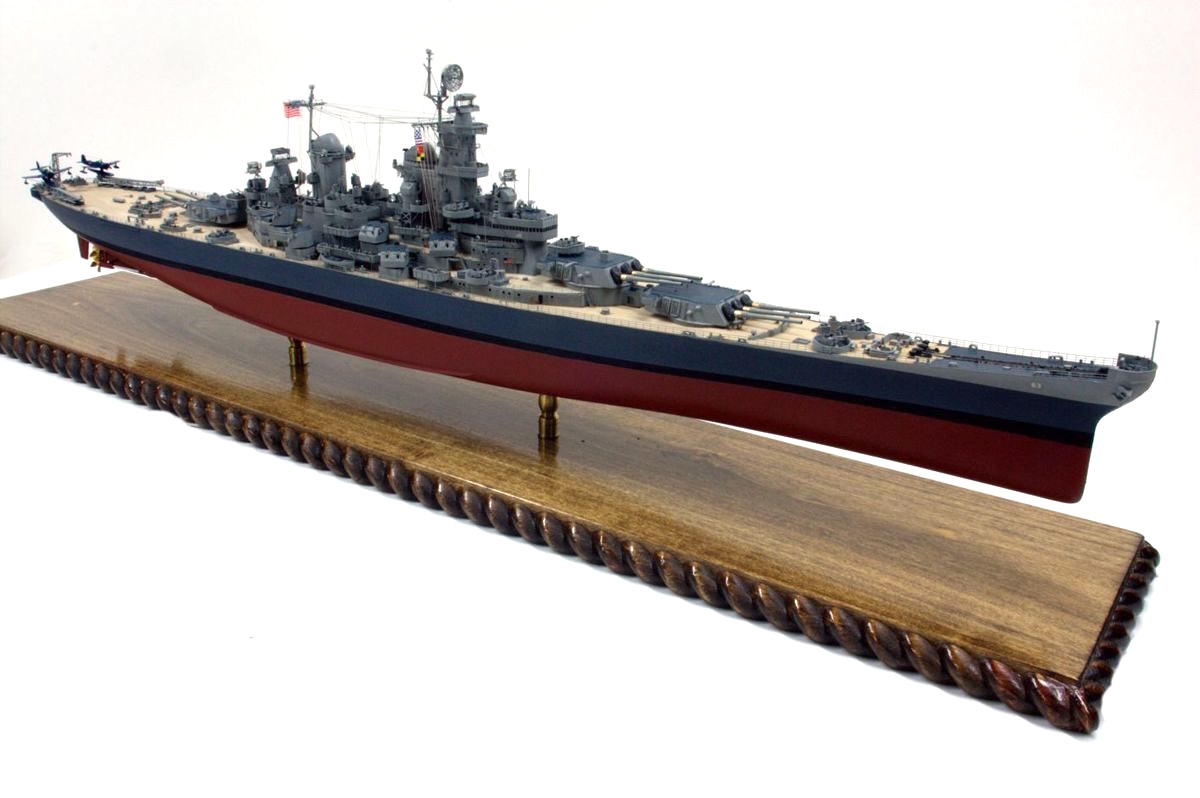
I used Laser Decks wood decking for my Tamiya Missouri. I did not want to paint them deck blue. If I did, I wouldn't have used them. Instead, I picked a date where the decks were natural wood, but all the other armanment/radars were pretty much in WW2 condition. That particular date was between Sept and Oct 1945 after the Surrender on the way to Pearl when the sailors scraped the blue paint off the decks. The deck blue continued on all the non-wood horizontal surfaces.

The model uses mostly Eduard PE, but a word of warning. Eduard's PE is very accurate and the bend points are etched so it can only bend there. The normal thickness is 0.010", but is reduced to 0.005" at the etched bend points. Because of this, it breaks very, very easily. I had some of the more curvy pieces fall apart into three pieces making installation a total nightmare. It's also a bit brittle being half-hard brass. You can reduce the breakage by annealing it. You anneal it by heating with a torch until it briefly turns red. A word of caution, the annealed brass PE is very soft and defoms very easily. It's the reason they don't use the soft stuff to begin with.

Tom's Model Works does not etch the bends, but in their case some of the etching cross-sections are so fine as to be unusable. I recently (Wednesday) finished a Trumpeter Essex and used Gold Medal Models PE and was generally satisfied with it, but Eduards inclined ladders are more detailed. Tom's inclined ladders expect you to bend the steps (another nightmare...at least for me). I've used some Alliance Model Works products, but being Chinese, it's hard to get customer service if you have a problem. Both Eduard and GMM, their customer support is terrific!

There are other PE companies on the Market now including Fly Hawk and others which are producing very complex sets of PE for battleships. They are expensive and I have no experience with them. There is also a new product on the market that you should consider: 3D printed 20mm guns which are pristine, delicate and pretty accurate. They already have thin splinter shields and shoulder rests and will save you hours of screwing around with brass details too small to handle.

I've started using gel CA to hold PE. It seems counter-intuitive, but it gives you more working time, stays put, and lets you use very small droplets... in other words, it gives you control that thin CA doesn't. You can then harden it with a tooth pick dipped in accelerator.

For long railings, I use small pieces of Tamiya 4mm masking tape and tape the railng to the hull in enough spots to stabilize it. In this case I do use thin CA applied very sparingly on either side of the masked areas, but NOT touching the tape. You don't want to glue the tape to the ship! After I've tacked the railing and it's nice and straight, I start removing the tape and glue each area that's now exposed. In this way you get a nice railing and don't drive yourself crazy.

I used MicroMark Pressure Sensitive Adhesive (PSA) to hold the wood decks, but it did occassionally let go and I had to inject more strong cements to keep it down. Gluing wood to styrene is not an ideal situation.

I've developed ways to solder all my PE antennas to mast and have even resorted to making all the masts and yards out of soldered brass. I do not expect most modelers to go this route. I'm good at soldering and have some pretty sophisticated equipment with which to do it. It does make very stable assemblies which hold up nicely for a long time.

There are lots of other details you can add to a battleship that really set it off. Most overhanging gun tubs have poles supporting them. These can be made with 0.021" brass wire. Masts are often stayed with guy wires. I did these using High-E guitar strings held iwith J-B Weld epoxy. Don't cut guitar strings with your sprue cutting flush cutters. It's hard than the pliers and will leave little half circles on both blades ruining the pliers. You need a plier that has a hardened cutter designed for this use. I did find that my Channel Lock needle nose pliers that have a cutter are hard enough to cut hardened piano wire.

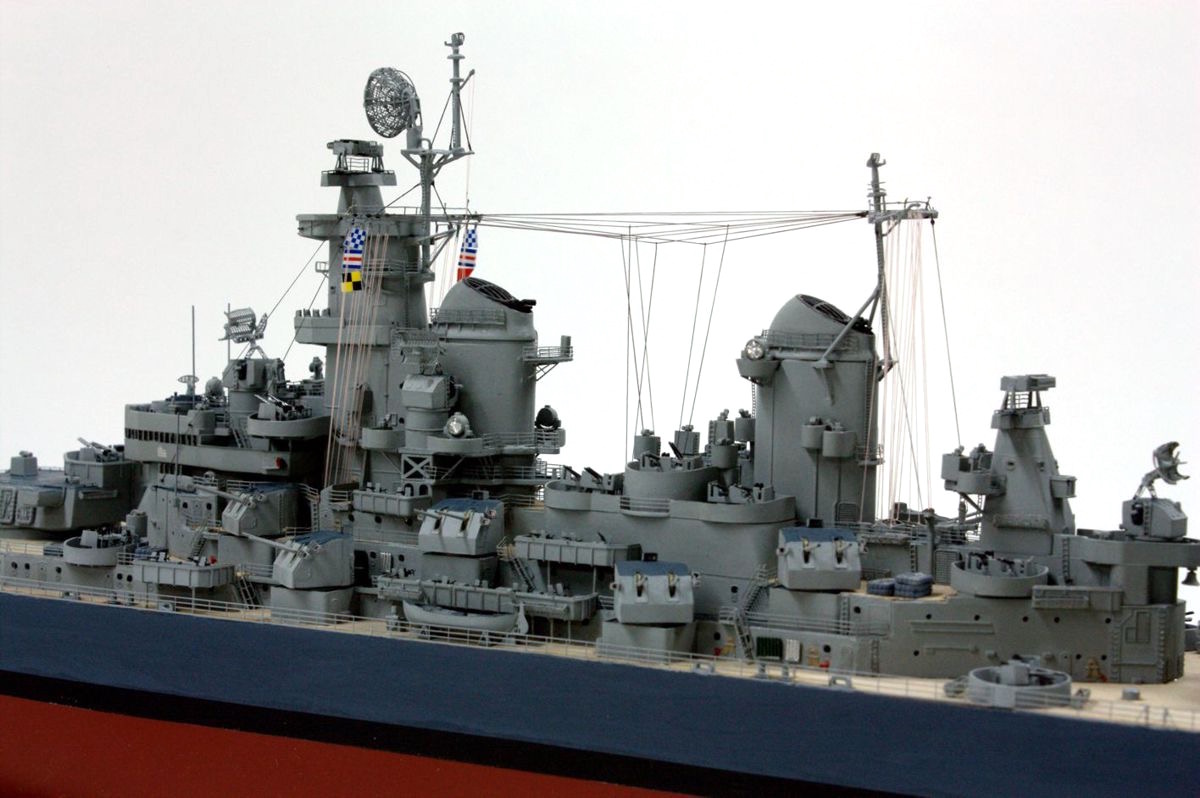
All rigging is done with fine-gauge E-Z Line. It is Lycra fiber and is totally elastic. It glues instantly with any kind of CA, and if you bump it, it just moves out of the way. It holds its tension forever. My Missouri is now 6 years old and shows no deterioration whatsoever.

Good Luck. If you have any more questions, I'd be glad to field them via private message.

  • Member since
    August 2017
Posted by laskdjn on Thursday, June 14, 2018 8:35 AM

GMorrison

On the subject of lay out of boot toppings and draft marks...


Extra points for reading the name of the ship.


I'm gonna go with Russian Words I Can't Read for 800, Alex.

  • Member since
    September 2012
Posted by GMorrison on Wednesday, June 13, 2018 7:52 PM

On the subject of lay out of boot toppings and draft marks...

Extra points for reading the name of the ship.

 Modeling is an excuse to buy books.


  • Member since
    July 2015
Posted by JOSEPH E NIMEE on Wednesday, June 13, 2018 7:28 PM

"i would check on wood decking, it changes everything."

ONLY if you WANT natual wood finish, but if you plan to paint the deck in deck blue, or ocean gray or blue, etc... as most of WWII ships were painted, then it makes no difference and aftermark deck is a waste of money. 

If you are building the ship as it appears now, in 2018 in Willmington, NC, than yeah a natual wood deck would be fine... but if you are building it as a WWII ship the deck is actually painted Dark Sea Blue and Ocean Gray in what is called "Measure 32 or 18D" scheme depending what year. https://www.ibiblio.org/hyperwar/OnlineLibrary/photos/sh-co-mk/camouflg/usn-wwii/3--bb3.htm

StrikeEagle15

  • Member since
    July 2014
Posted by modelcrazy on Wednesday, June 13, 2018 2:38 PM

laskdjn
Thank you for the detailed explanation.  That explains a lot.  So basically, I can rig her up any way that looks even reasonably plausible based on old pictures and I'll be good.

Finally a short answer. Yes.

Steve

Building a kit from your stash is like cutting a head off a Hydra, two more take it's place.


http://www.spamodeler.com/forum/

  • Member since
    December 2003
  • From: 37deg 40.13' N 95deg 29.10'W
Posted by scottrc on Wednesday, June 13, 2018 10:51 AM

The more I have started rigging 1/700 ships, the less complex and daunting rigging the Cuttysark and Constitution looked.  With a sailing ship, every line has a mechanical function that that requires A=B+C and everything seems to logically fall into place, on a steel ship, most of the lines, in exeption of the hallards for signaling, are for mast bracing or for electronics, not my forte'. 

Thanks Steve for the detailed explaination.

Scott

  • Member since
    August 2017
Posted by laskdjn on Wednesday, June 13, 2018 8:49 AM

modelcrazy


laskdjn

Where can I find information on proper rigging?  What lines go from where to where? 


Ships and electronics were constantly changing or modified in the field for in drydock. One picture or reference will not be the same as another. While the LF long wire antennas (for low frequency Morris) or HF antennas for radios stayed pretty much the same, flag lanyards were constantly being broken, replaced, moved, omitted or added. One reference will not show the same as another.You have basicity 3 different lines.
Stays, which are used to stabilize the mast/yard etc. and don’t change position very often.
Antennas, Long Wire low frequency LF for coded transmissions, and HF high frequency shorter, usually whip antennas for radio use. These will also stay around as long as the radios have not been changed too much.
And finally the lanyards, which are used for flags and pennants. Now remember, while the ship in in port the Colors fly at the stern staff and the union jack at the bow staff, once all the lines are released from the dock and the ship is under her own power, the union jack is hauled done and stowed and the Colors are hauled down from the stern and a smaller ensign is raised on the top mast. The other lanyards, usually white rope, will have the pennants hauled up and down to spell out some alien tonuge that only signalmen and quartermasters can understand


So now that I have completely discouraged you, Wink this is what I and most other ship builders do. Look for images of say, the NC or her sisters and try to find pictures of her mast, or at least a picture you can expand. I will start to look for something that goes with my time frame I.E. pre-refit 1943, but usually end up downloading anything I can find to get a full picture of what I'm working with. Once I have all my references in front of me I start at the top and work down. Once done, it looks like a reasonable facsimile of the actual thing. That's the best advice I can give. And don't worry, There isn't a person on the forum that can tell if you are wrong (Well maybe one or two but they won't say that you messed up, non of us know for sure Propeller

Thank you for the detailed explanation.  That explains a lot.  So basically, I can rig her up any way that looks even reasonably plausible based on old pictures and I'll be good.

  • Member since
    July 2014
Posted by modelcrazy on Wednesday, June 13, 2018 1:03 AM

laskdjn

Where can I find information on proper rigging?  What lines go from where to where? 


Ships and electronics were constantly changing or modified in the field for in drydock. One picture or reference will not be the same as another. While the LF long wire antennas (for low frequency Morris) or HF antennas for radios stayed pretty much the same, flag lanyards were constantly being broken, replaced, moved, omitted or added. One reference will not show the same as another.You have basicity 3 different lines.
Stays, which are used to stabilize the mast/yard etc. and don’t change position very often.
Antennas, Long Wire low frequency LF for coded transmissions, and HF high frequency shorter, usually whip antennas for radio use. These will also stay around as long as the radios have not been changed too much.
And finally the lanyards, which are used for flags and pennants. Now remember, while the ship in in port the Colors fly at the stern staff and the union jack at the bow staff, once all the lines are released from the dock and the ship is under her own power, the union jack is hauled done and stowed and the Colors are hauled down from the stern and a smaller ensign is raised on the top mast. The other lanyards, usually white rope, will have the pennants hauled up and down to spell out some alien tonuge that only signalmen and quartermasters can understand


So now that I have completely discouraged you, Wink this is what I and most other ship builders do. Look for images of say, the NC or her sisters and try to find pictures of her mast, or at least a picture you can expand. I will start to look for something that goes with my time frame I.E. pre-refit 1943, but usually end up downloading anything I can find to get a full picture of what I'm working with. Once I have all my references in front of me I start at the top and work down. Once done, it looks like a reasonable facsimile of the actual thing. That's the best advice I can give. And don't worry, There isn't a person on the forum that can tell if you are wrong (Well maybe one or two but they won't say that you messed up, non of us know for sure Propeller


Some examples of my past ships, I hope these help

1/350 Academy Indianapolis 

Trunpeter 1/350 USS Prinz Eugen


Steve

Building a kit from your stash is like cutting a head off a Hydra, two more take it's place.


http://www.spamodeler.com/forum/

  • Member since
    August 2017
Posted by laskdjn on Tuesday, June 12, 2018 11:36 PM

Where can I find information on proper rigging?  What lines go from where to where? 

  • Member since
    August 2017
Posted by laskdjn on Sunday, June 10, 2018 11:03 PM

modelcrazy

I the case of complex camo schemes, like the Carrol, I mask and paint the superstructure first then add the railing. Personally, I like to complete the subassemblies prior to attaching them to the deck, but that's me.


I'm doing the same, I plan on breaking up the super structure into the fore, mid and aft sections, then also painting the guns and the hull separately.


I started putting railing on, then I started thinking about painting and the follow on process, hence why I asked the question.

  • Member since
    July 2014
Posted by modelcrazy on Sunday, June 10, 2018 9:30 PM

I the case of complex camo schemes, like the Carrol, I mask and paint the superstructure first then add the railing. Personally, I like to complete the subassemblies prior to attaching them to the deck, but that's me.

Steve

Building a kit from your stash is like cutting a head off a Hydra, two more take it's place.


http://www.spamodeler.com/forum/

JOIN OUR COMMUNITY!

Our community is FREE to join. To participate you must either login or register for an account.

SEARCH FORUMS
FREE NEWSLETTER
By signing up you may also receive reader surveys and occasional special offers. We do not sell, rent or trade our email lists. View our Privacy Policy.