SEARCH FINESCALE.COM

Enter keywords or a search phrase below:

scratch 1/32 Horatio Phillips Multiplane WIP *Updated 8/22*

26919 views
78 replies
1 rating 2 rating 3 rating 4 rating 5 rating
  • Member since
    December 2007
  • From: Bridgeview, Illinois
Posted by mg.mikael on Thursday, July 30, 2009 1:23 PM

I finally got started with the engine/boiler, that meant scavenging for parts. Luckily, I had a few ideas in my head for what I was planning to use so that saved some time. Plus I found some parts I thought I would have to make myself, so that was a real time saver.

Here's a pic of all the random parts I gathered so far. It doesn't look like much now, but in due time it will start to look like something.Wink [;)] The oil barrel (in pieces) you see there(from Tamiya's 1/35 Jerry can Set) will be made into the boiler itself. The two white Lego pieces that are slightly cuved like bowls, will be the end pieces of the boiler. The flat green piece of styrene you see there(which came from my 1/35 Zvezda scout car, it was orginally the armored radiator slats) will be going to make a top plate on the boiler(where the piston rods come through.) Finally the tie-tag you see there(came from one of those Christmas toys that is impossible to open) will be used to make the exhaust pipe. Since it has the metal in it, it easily keeps it shape, thus perfect for making it curve the way I want.

I sanded off all the markings/ridges that make the oil barrel look like an oil barrel. Thus creating something that looks more like a boiler instead. Then I took the two lego pieces and cut/sanded off all the placement bumps so they lay perfectly flat.

Then it's just a simple action of attaching them to the former oil barrel. Thus creating a simple boiler that still has curved ends and detail. Note: the end pieces aren't permanetly on since I still have to do some drilling and etc.

Finally I made a list for myself, so I know what I have left to do just on the steam engine itself. As you can see I still have a lot of drilling, sanding, modifying, and scavenging ahead of me. Though at least I found some rivets in a stash kit that look perfect, so I'll save some time there.Big Smile [:D]

All comments and questions welcome!!Smile [:)]

"A good plan executed now is better than a perfect plan next week." - George S. Patton

  Photobucket 

  • Member since
    December 2007
  • From: Bridgeview, Illinois
Posted by mg.mikael on Saturday, July 25, 2009 9:03 PM

vetteman42- Thanks for the comments! Great to hear my build is encouraging you to try out some scratching techniques.Cool [8D]

Luftwoller- Thanks for the very kind comments!Blush [:I] I hope when finished this build is a stunner(because it will for sure will be one of a kind.)

"A good plan executed now is better than a perfect plan next week." - George S. Patton

  Photobucket 

  • Member since
    February 2007
  • From: Bournemouth UK
Posted by Luftwoller on Saturday, July 25, 2009 3:36 AM

Hi MG. This has the makings of being a real eyepopping build. Ive seen pics of the mulitiplane but never a model, and in 1/32 this is going to be a showstopper.

Sorry about not responding sooner. I know how disheartened a builder can feel if he feels like hes been rabbitting on to himself for post after post. Anyhoo, look how many views the post has.

...Guy

..'Your an embarrassment to the human genus, makes me ashamed to call myself Homo'.
  • Member since
    July 2008
  • From: USA California
Posted by vetteman42 on Friday, July 24, 2009 11:49 PM

I have been watching your build from the beginning mg.mikael with great interest and envying your skills. I still feel I have trouble figuring out which end of my knife cuts in my scratch building attempts. Your build and a few others have inspiared me to try and build some skills in this area of modeling. Keep up the good work.


Randy So many to build.......So little time

  • Member since
    December 2007
  • From: Bridgeview, Illinois
Posted by mg.mikael on Friday, July 24, 2009 5:37 PM
 Buckeye wrote:

Interesting subject and build.  I have enough trouble putting kits together let alone try something like this!

Mike

Thanks for the comments, Buckeye. Glad you like the subject.Smile [:)]

"A good plan executed now is better than a perfect plan next week." - George S. Patton

  Photobucket 

  • Member since
    February 2007
  • From: Brunswick, Ohio
Posted by Buckeye on Friday, July 24, 2009 11:07 AM

Interesting subject and build.  I have enough trouble putting kits together let alone try something like this!

Mike

  • Member since
    December 2007
  • From: Bridgeview, Illinois
Posted by mg.mikael on Friday, July 24, 2009 9:17 AM

sfcmac- Well it's good to know my thread's not the only one suffering from slow traffic.

fermis- Thanks for checkin' in and for the comments! For a second there I was worried no one else(other then sfcmac) was followin' the WIP. Well I hope I don't dissapoint when I 'pull down the blinds'.Wink [;)]

"A good plan executed now is better than a perfect plan next week." - George S. Patton

  Photobucket 

  • Member since
    January 2009
  • From: hamburg michigan
Posted by fermis on Thursday, July 23, 2009 11:26 PM

 We're all watching silently. Afterall, if we were to throw out a couple awesomes and fantastics, what great words would we have when this bird gets done. Seriously though, it's comming along nicely, I myself was wondering if this was still going, glad to see that it is! Can't wait to see the "blinds" go up......er....would it be down? Very nice, I'm learning a thing or two!!


              FERMIS

  • Member since
    October 2004
  • From: League City, Texas
Posted by sfcmac on Thursday, July 23, 2009 5:50 PM

 I wouldn't sweat it too much MG!  Much more a sign of the summer season than a reflection of your work. I have noticed that replies are down all over. More than likely your just a victim of timing I'd say!

 Well maybe you better check your deodorant... Laugh [(-D]

  • Member since
    December 2007
  • From: Bridgeview, Illinois
Posted by mg.mikael on Thursday, July 23, 2009 5:05 PM

 sfcmac wrote:
 I wondered if you had been making any progress lately MG!  Such a unique build that you are doing stellar work on. I really enjoy looking over what your doing. Inspires me when I have to go beyond whats in the box to get the results I want! Thumbs Up [tup]

Glad your enjoying the build so far, sfcmac. Thanks for the kind comments!!!Cool [8D] 

Man I wish more modeler's like you checked in. This thread has been dead quiet with barely any comments/posts/views. Heck during my last update I didn't have a single response.

"A good plan executed now is better than a perfect plan next week." - George S. Patton

  Photobucket 

  • Member since
    October 2004
  • From: League City, Texas
Posted by sfcmac on Thursday, July 23, 2009 1:02 PM
 I wondered if you had been making any progress lately MG!  Such a unique build that you are doing stellar work on. I really enjoy looking over what your doing. Inspires me when I have to go beyond whats in the box to get the results I want! Thumbs Up [tup]
  • Member since
    December 2007
  • From: Bridgeview, Illinois
Posted by mg.mikael on Thursday, July 23, 2009 12:51 PM
Yep, I got all three wheels completley finished up, thus now construction moves to parts above the main frame.Big Smile [:D] The axles are painted a mix of black and steel. The support truss is simply Floquil Weathered Black. Oh and if you're wondering the wheels don't move, sorry to dissapoint(would have been to much extra stress on the lone front wheel support.)

Yep, those wheels look nothing like those gears anymore. I applied a layer of nano glue all over the gears surface(including the sides of where it's not touching the o-ring. After that dried, I ran into a small problem. The glue expands(bubbles up) where ever theirs moisture. It must have not been dry or something because in a few areas the glue bubbled up.Dunce [D)] So to resolve the problem, I took good-ole Elmer's glue and filled in the hub area to make it a nice smooth surface(had to use a good amount.) After all that dried I painted the hub ModelMaster Neutral Gray, the wheels Floquil weathered black, and finally took an extra fine sharpie to the area between the hub and wheel.

With the wheels painted I could finally attach them. I took a few hours and did some dry-fitting. For the rear axle, I then dabbled on some nano glue to the axle tips and put on one of those black pieces I drilled out, then the wheel, and then the other black cap piece.(I added those small black painted pieces inorder to ensure the wheel doesn't go crooked.) For the lone front wheel the process was pretty much the same, except alot of adjustments had to be done when the glue was drying.

All comments and questions welcome!Smile [:)] Construction now looks like it will move to the engine/bolier.

"A good plan executed now is better than a perfect plan next week." - George S. Patton

  Photobucket 

  • Member since
    December 2007
  • From: Bridgeview, Illinois
Posted by mg.mikael on Thursday, July 9, 2009 3:33 PM

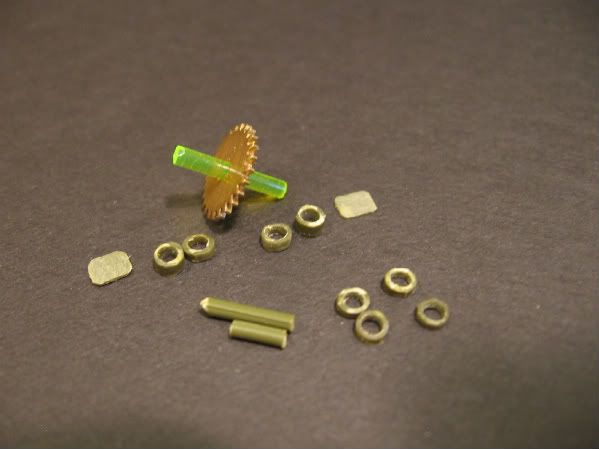
Sorta been awhile since my last update, but I didn't really have that much to show for. I had started on the wheels almost a month ago, with this plan to make the tires out of rubber washers. This entitled cutting them to size, trimming the width, and inverting them......long story short this never really panned out.Dunce [D)] So only today, did I scrap that plan and moved on to a new one.

I finally went to the basement and got the o-rings out and to my amazement their was a size that was pretty much perfect for the gears.Shock [:O] I had thought about using o-rings orginally, but I didn't think I had any the right size....d'oh. So a month later of useless work, I finally got the wheels near completion.

O-rings come in many different sizes, and the set I have has about 225 pieces, with sizes all under an inch. So if you're looking for a specific size, you'll more then likely find it.
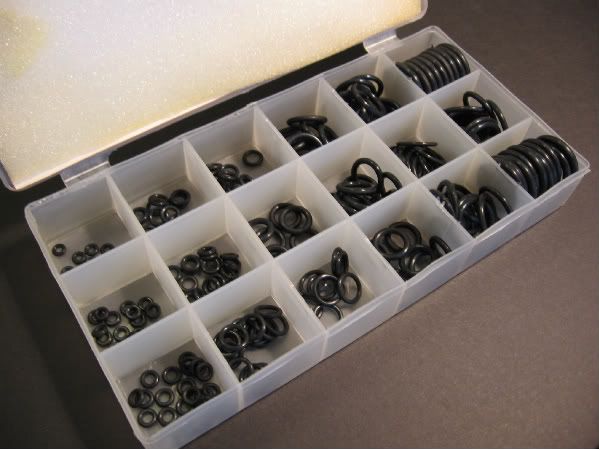
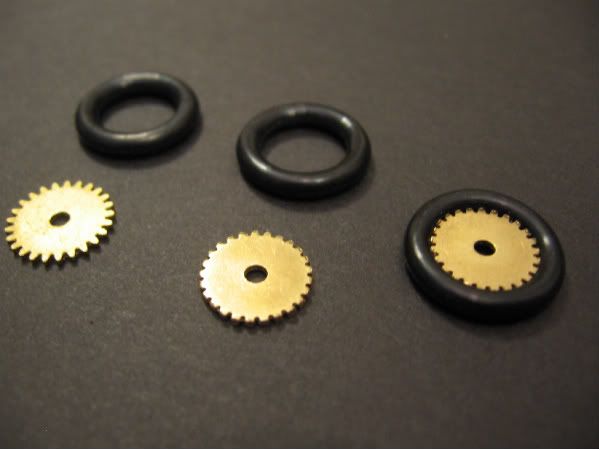
After finding the closest size to fitting my gears, I did some test fitting. This helped me figure out that the gears would have to be slighty smaller to fit inside the o-ring. Thus I got out the industrial files and started shaving down the brass teeth of the gear. I didn't shave the teeth flush off, since the o-ring wouldn't have a nice tight fit.
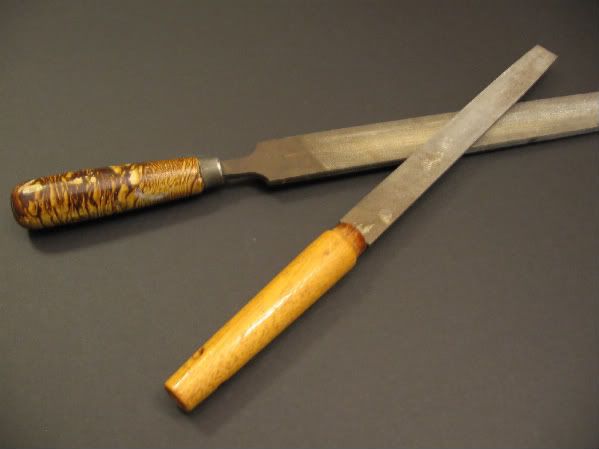
As for the files, any grit/groove is fine. However you'll want to use the ones with much bigger grits/grooves, that way it doesn't take you forever to shave down the teeth.
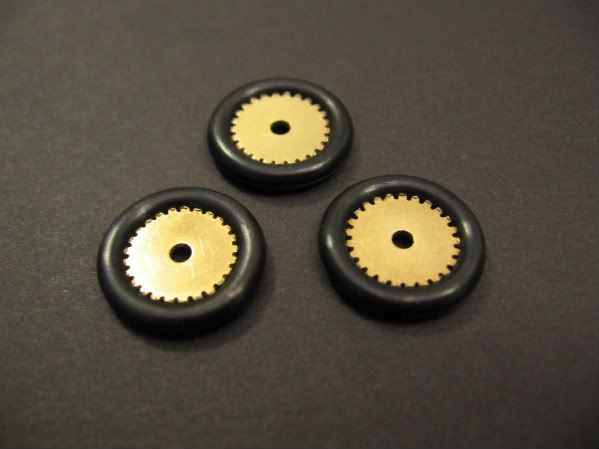
Then after the shaving down of the gear teeth, I slipped the o-rings around the gear. Thus making a wheel(even if it is a bit crude.) Now I have to actually glue the o-rings to the gear, which I have to do later today.
As for the axle supports, I've finished drilling out all the styrene and collecting all the pieces I need. Thus I can soon get to putting together the front axle, and putting on all three wheels.
All comments, questions, and suggestions welcome!Smile [:)]


"A good plan executed now is better than a perfect plan next week." - George S. Patton

  Photobucket 

  • Member since
    December 2007
  • From: Bridgeview, Illinois
Posted by mg.mikael on Wednesday, June 3, 2009 11:55 AM

 scorpr2 wrote:
Then you must be a great chess player!!!  I'm still learning to scratch build stuff, so watching this is very inspirational!  Keep it up.

Actually I'm a bloody terrible chess player that couldn't win to save his life.Blindfold [X-)] Seriously, I have trouble remebering all the rules and etc. like which piece can move where at what time. Anyways thanks for the comments and for checkin' out the build, scorpr2!Smile [:)]

"A good plan executed now is better than a perfect plan next week." - George S. Patton

  Photobucket 

  • Member since
    July 2007
Posted by scorpr2 on Tuesday, June 2, 2009 10:32 PM
Then you must be a great chess player!!!  I'm still learning to scratch build stuff, so watching this is very inspirational!  Keep it up.
  • Member since
    December 2007
  • From: Bridgeview, Illinois
Posted by mg.mikael on Tuesday, June 2, 2009 10:18 PM

 sfcmac wrote:
 I really ge a thrill out of watching you create complex parts out of things like lego's or whatever you see handy that can fill the bill.  Excellent brainwork and problem solving skills at work here!  It looks good too! Thumbs Up [tup]

Thanks for the comments, sfcmac!!Cool [8D] Glad you're enjoying the build and my scratch skills. Believe it or not, in a weird sorta way scratching parts has sorta become like a chess match. For each random part I think of using, it's like I'm thinking ahead in a chess move, seeing which part can go where and what will get the best results. Weird......hope I'm not going crazy.Wink [;)]

"A good plan executed now is better than a perfect plan next week." - George S. Patton

  Photobucket 

  • Member since
    October 2004
  • From: League City, Texas
Posted by sfcmac on Tuesday, June 2, 2009 5:49 PM
 I really ge a thrill out of watching you create complex parts out of things like lego's or whatever you see handy that can fill the bill.  Excellent brainwork and problem solving skills at work here!  It looks good too! Thumbs Up [tup]
  • Member since
    December 2007
  • From: Bridgeview, Illinois
Posted by mg.mikael on Tuesday, June 2, 2009 5:29 PM

Sorry about the wait, I'll admit I sorta got lazy. Long story short it's been sittin' on my bench with me saying I'll get to it tommorrow and tommorrow didn't arrive untill almost a month later.Big Smile [:D]

I glued on the supports that hold the rear axle to the frame, along with connecting the axle to the supports. It took a bit longer then expected, since I had to do constant measuring with a ruler to make sure the support brackets weren't too close, not too far, but just right. That so the height of the wheels(later put on) is at the key amount. Also had to use a level to ensure the axle wasn't sagging to far to one side(which could later give the build a lopsided view.)

As for what glue I used, I couldn't use the standard glue that bonds stryene. So I first applied a little Elmer's Nano Glue, (basically Gorilla Glue), to the ends of the support brackets where it would be touching the wood. Then I took some Krazy glue and applied a tad over the Nano Glue. The Nano glue has almost a 4 hour setting timeShock [:O], so I needed something to bond it quick to make sure it wouldn't move when setting(I also couldn't wait that long for the Nano glue to dryWink [;)].) I then reapeated this process when connecting the axle itself to the supports.

I also started work on the front wheel. I already have an axle for it(using the clear green Lego rod I used for the supports on the rear axle.)  I also made the parts where the supports will touch on the axle. To make these parts, I simply took a piece of sprue and cut it. Then made another cut to get a small piece that sorta looks like a pancake. Taking that piece I drilled it out to fit the axle aka clear lego. Just be sure not to drill to quickly or you'll crack the fragile piece.

All comments, questions, and suggestions welcome!Smile [:)]

"A good plan executed now is better than a perfect plan next week." - George S. Patton

  Photobucket 

  • Member since
    December 2007
  • From: Bridgeview, Illinois
Posted by mg.mikael on Sunday, May 10, 2009 8:43 AM
 scorpr2 wrote:

WOW!!!!  That's some amazing work!  And to think, I have trouble putting a kit together!  You are a true inspiration.  Keep us posted on all of your work.  I will be watching!

Thanks a million for the very supportive and kind comments. Your way too kind, scorpr2.Blush [:I]

"A good plan executed now is better than a perfect plan next week." - George S. Patton

  Photobucket 

  • Member since
    July 2007
Posted by scorpr2 on Saturday, May 9, 2009 6:00 PM

WOW!!!!  That's some amazing work!  And to think, I have trouble putting a kit together!  You are a true inspiration.  Keep us posted on all of your work.  I will be watching!

  • Member since
    December 2007
  • From: Bridgeview, Illinois
Posted by mg.mikael on Saturday, May 9, 2009 5:42 PM

I finally got around to cutting and trimming all the axle support braces(aka the clear green plastic). After a bit more sanding the clear green pieces will be glued down to the dark green stryene pieces(you see one of them on the build below), that way the axle support truss looks like it's attached to a small steel plate(will look like steel after painting) on the wood.

Here's a better pic of what I'm actually using to model the support metal plates on the wood, simply the part identification numbers cut off a sprue. Since their the perfect size, just a bit of sanding is needed and your done.Wink [;)]

As always, all comments and questions welcome!!Cool [8D]

"A good plan executed now is better than a perfect plan next week." - George S. Patton

  Photobucket 

  • Member since
    December 2007
  • From: Bridgeview, Illinois
Posted by mg.mikael on Saturday, May 2, 2009 6:25 PM

So here's my pile of random parts that will be goin' to making the wheels, support truss, and axle. Porbably don't see how or what the parts are gonna be used for, so let me explain.Wink [;)] The gears(from a computer CPU) will go to makin' the three wheels. The stainless steel rod(also from a computer CPU) will go to makin' the rear axle. The white plastic rods(from an old lego set) will be used for the axle support truss holder. The clear green rod(also from an old lego set) will be used for the axle support truss itself since it's the same radius as the steel axle.  

To make the part that connects the support truss coming from the wood frame to the axle I took the end of one of the white plastic rods. Snipped off the round ends, then enlarged the hole on one side, and drilled out the other side in order to slide the steel axle in. It's a perfect fit and probably no glue will be needed. 

Then I made some measurements to how high I want the wood frame off the ground. After getting the height I wanted I put a glob of silly putty on each side of the frame where the axle will be. Then I pushed the axle into the silly putty to get the correct height. Then it was just a matter of taking the green clear rod and snipping it too a much smaller size. Then the work of cutting and sanding to fit the support rods has begun. By the way, I'm still not done yet on that green rod you see in the pic.

All comments, questions, and suggestions welcome!!Smile [:)]

"A good plan executed now is better than a perfect plan next week." - George S. Patton

  Photobucket 

  • Member since
    December 2007
  • From: Bridgeview, Illinois
Posted by mg.mikael on Saturday, April 25, 2009 9:04 PM

 sfcmac wrote:
Looking good MG!  That wood working stuff you are pulling of is very cool. Looks like a lot of work but your results are stunning! Bow [bow]

Thanks so much for the kind words, sfcmac, it encourages me to go the extra mile when scratching parts.Smile [:)] 

"A good plan executed now is better than a perfect plan next week." - George S. Patton

  Photobucket 

  • Member since
    October 2004
  • From: League City, Texas
Posted by sfcmac on Saturday, April 25, 2009 1:43 PM
Looking good MG!  That wood working stuff you are pulling of is very cool. Looks like a lot of work but your results are stunning! Bow [bow]
  • Member since
    December 2007
  • From: Bridgeview, Illinois
Posted by mg.mikael on Saturday, April 25, 2009 1:30 PM

After sanding and timming down the support "planks" to fit in between the two main "planks", I was finally able to get out the glue.(Had to trim the edeges of some pieces to have a curve.) I used Elmer's Probond Interior Wood Glue, it's easy to wash and wipe off if you make a mistake before it dries.Thumbs Up [tup] I guess you could use Elmer's White Glue, but I wasn't gonna take the chance since the two main "planks" are pretty tense and want to pull away.

Here's a pic of the finished frame! It's suprisingly sturdy, and the glue holds perfectly.Cool [8D] After gluing, I sanded down the areas where a bit of excess glue dried and sanded down some areas in the wood that were not perfectly flat.

Now it's one to the axles and wheels in scratching. The wheels look like their gonna have to be scratched, since the parts I planned to use(gears from a computer CPU) were too small. The axles shouldn't be too much of a problem though. Then I have to figure out the wheel supports that connect the axle to the frame. Might use stretched sprue if wood doesn't work well. Oh well, trial and error I guess. Thanks for looking.

"A good plan executed now is better than a perfect plan next week." - George S. Patton

  Photobucket 

  • Member since
    December 2007
  • From: Bridgeview, Illinois
Posted by mg.mikael on Monday, April 20, 2009 7:10 PM

vetteman42- Thanks for checkin' out my build!Smile [:)]

multiplane- Again thanks for that photo........replied to your PM.Wink [;)]

"A good plan executed now is better than a perfect plan next week." - George S. Patton

  Photobucket 

  • Member since
    April 2009
Posted by multiplane on Monday, April 20, 2009 1:41 AM


Thanks for the welcome. Am looking forward to seeing the model come together! 

Cheers,
Paul

  • Member since
    July 2008
  • From: USA California
Posted by vetteman42 on Sunday, April 19, 2009 11:44 PM

Nice start on this build. I will be keeping an eye on this one.


Randy So many to build.......So little time

  • Member since
    December 2007
  • From: Bridgeview, Illinois
Posted by mg.mikael on Saturday, April 18, 2009 5:23 PM

It was just about perfect outside today. 70's, sunny, and with a slight hint of humidty here in the Chicagoland.Cool [8D] Thus this meant I finally was able to go outside to do some sawing of support "planks" for the main frame.

To get the final positioning of the two main "planks" I had to do some simple mathematics....what fun.Dunce [D)] Basically done by doing some measurements of the wing frame and eyeing it. Since there are no dimensions out there of the positioning of the two main "planks." But the overall result I believe was not that bad. (Had to tape down the frame so I wouldn't lose the positioning I wanted.)

To cut the support truss for the main frame, you'll need a miter box and a saw(almost any saw should suffice.) For the support "planks" I used the same wood and same size, 0.20 X 0.30. (In order to save time I cut this piece at the same time I was cutting the wood that I would later use for the two main pieces.)

To make sure you don't get too much splintering of the edges or cracking, you should slightly notch all the sides of the wood you'll be cutting with a razor blade.

Here's all the support "planks" for the main frame cut to about the needed size. (Yeah, I know it looks more like a ship then a plane currently.Big Smile [:D]) Make sure your cuts are a bit bigger then you need. I made sure of that, since I still need to sand down the edges to have a slight curve, in order to fit perfectly in between the two main "planks."

Now I have to get out some sanding paper, might use an electric sander if need be, to get all the support planks to fit. All comments, question, and suggestions welcome!Smile [:)]

"A good plan executed now is better than a perfect plan next week." - George S. Patton

  Photobucket 

  • Member since
    December 2007
  • From: Bridgeview, Illinois
Posted by mg.mikael on Saturday, April 18, 2009 4:24 PM

multiplane- First of all, Sign - Welcome [#welcome] to the forums! Secondly, thanks for that contemporary photo of the multiplane. It gives me a much better perspective/angle of what I'm building. Never knew their were large wings on the top and bottom of the wing frame......oh well, I'll react and build accordingly.Smile [:)] Thanks again for the photo, never seen that one when I was researching my build.

sfcmac- Thanks for lookin' in on my build!!Cool [8D]

"A good plan executed now is better than a perfect plan next week." - George S. Patton

  Photobucket 

JOIN OUR COMMUNITY!

Our community is FREE to join. To participate you must either login or register for an account.

SEARCH FORUMS
FREE NEWSLETTER
By signing up you may also receive reader surveys and occasional special offers. We do not sell, rent or trade our email lists. View our Privacy Policy.