SEARCH FINESCALE.COM

Enter keywords or a search phrase below:

Messerschmitt BF109 GB 2012

245479 views
1198 replies
1 rating 2 rating 3 rating 4 rating 5 rating
  • Member since
    January 2007
  • From: Cherry valley il.
Posted by invertman on Tuesday, July 3, 2012 5:54 PM

hey guys, was wondering if i may join,with an airfix bf 109 e.the trop version.in 1/48 scale. i havent been on here in quite awhile,but did have a good time with some group builds.

  if you want permission for a test flight.... the answer is "no".

  • Member since
    April 2010
Posted by Theuns on Sunday, July 1, 2012 10:53 AM

Try again! LOL!


BF109001.jpg ICM 1/48 BF 109 F2

ICM 1/48 BF 109 F2


Have to learn the new pic posting format!


Theuns

  • Member since
    April 2010
Posted by Theuns on Sunday, July 1, 2012 10:47 AM

Wow Mustang, just love the detail you have there, especially the scratches the paracute harnass made on the seat pan!

On my side I have decided tocall it a day with trying to make this 1/48 ICM 109 F-2 any nicer. I have been filling and sanding/re-scribing for longer than I care to, so I am going to do final light sanding after the canopy is on and slap the paint on it LOL!

The fine pinholes in the putty of the wingroot will hopefully be sorted with paint, if it doesn't I really don't care to much.

i803.photobucket.com/.../BF109001.jpg

i803.photobucket.com/.../BF109002.jpg

Theuns

  • Member since
    April 2005
  • From: Australia
Posted by taxtp on Sunday, July 1, 2012 3:55 AM

Can I jump in with this little thing please ?

It's the Academy 1/72 Emil.

Cheers

Tony

I'm just taking it one GB at a time.

  • Member since
    March 2012
  • From: Corpus Christi, Tx
Posted by mustang1989 on Sunday, June 24, 2012 12:36 PM

I painted the cockpit floor a silver and then applied the RLM66. After that came the rubbing,scratching  and chipping to give the interior that "worn and used" look. After that came the seat belts, rudder pedals, cannon and flap/trim wheel and chain assys.


 Forum | Modelers Social Club Forum (proboards.com) 

  • Member since
    March 2012
  • From: Corpus Christi, Tx
Posted by mustang1989 on Sunday, June 24, 2012 12:32 PM

Thank you to all. You know I found out the hard way AGAIN that no matter how much hard work I do on all of this stuff that it doesn't amount to anything if it doesn't fit all together nicely. Thankfully I made it all come together as you will see in the upcoming photos. Today I start by posting some photos of the interior which I started at about the time I thought I was through with the engine. Again the first few are grainy because of the phone as my camera but get better as I started using a real camera. The first two pics of the interior using Verlinden's VEP2062 update set with the Eduard Luftwaffe seat belt kit.


 Forum | Modelers Social Club Forum (proboards.com) 

  • Member since
    February 2011
  • From: Bent River, IA
Posted by Reasoned on Sunday, June 24, 2012 10:25 AM

Yeah, one more Ditto

Science is the pursiut of knowledge, faith is the pursuit of wisdom.  Peace be with you.

On the Tarmac: 1/48 Revell P-38

In the Hanger: A bunch of kits

  • Member since
    July 2011
  • From: minnesota
Posted by handiabled on Sunday, June 24, 2012 8:03 AM

p38jl

nice job,,Toast


                                                            Ditto Yes Cool

  • Member since
    January 2003
  • From: Hancock, Me USA
Posted by p38jl on Sunday, June 24, 2012 7:55 AM

nice job,,Toast

[Photobucket]

  • Member since
    October 2008
  • From: Georgia
Posted by Rigidrider on Sunday, June 24, 2012 7:50 AM

Mustang... Superb! Beautiful work...

When Life Hands You A Bucket Of Lemons...

Make Lemonade!

Then Sell It Back At $2 Bucks A Glass...

  • Member since
    December 2011
  • From: AZ
Posted by Luft Modeler on Sunday, June 24, 2012 12:09 AM

Again, all I can say is WOW! The hose clamps give a really nice touch!

I also have to thank working on cars for a living in supplying tid bits for modelling, mainly wiring from O2 sensors work really well, diodes from old chip boards, and also the protective insulation for the O2 sensor wires work well in some applications.

  • Member since
    March 2012
  • From: Corpus Christi, Tx
Posted by mustang1989 on Saturday, June 23, 2012 10:49 PM

and lastly for today.....my favorite one. Engine  and firewall assy


 Forum | Modelers Social Club Forum (proboards.com) 

  • Member since
    March 2012
  • From: Corpus Christi, Tx
Posted by mustang1989 on Saturday, June 23, 2012 10:31 PM

Hans von Hammer

 Tucohoward:

http://i964.photobucket.com/albums/ae122/tucohoward/107_1482.jpg


Indifferent

Ya gotta be sh*ttin' me...

Hans,

 Your friggin hilarious


 Forum | Modelers Social Club Forum (proboards.com) 

  • Member since
    March 2012
  • From: Corpus Christi, Tx
Posted by mustang1989 on Saturday, June 23, 2012 7:39 PM

Then I added the firewall. I had to remove the trunnion mounts from the kit firewall and epoxy them onto the resin firewall from Verlinden. Then came a total remake of the ammo boxes because they wouldn't fit between the engine mounts! The aftermarket world for models is as bad as the aftermarket world for real live vehicles! Mod after mod to get the mod to work. Anyhow here is a pic of that.


 Forum | Modelers Social Club Forum (proboards.com) 

  • Member since
    March 2012
  • From: Corpus Christi, Tx
Posted by mustang1989 on Saturday, June 23, 2012 7:08 PM

mustang1989 - with the better quality pics can really see another awesome engine coming together

jgeratic1: Thanks for the comments. The new camera really brought it out a little bit. Still have more to post to catch up to the 6 month marker.


 Forum | Modelers Social Club Forum (proboards.com) 

  • Member since
    March 2012
  • From: Corpus Christi, Tx
Posted by mustang1989 on Saturday, June 23, 2012 3:01 PM

Hans von Hammer

 pzl66:

 mustang1989:

Then a photo of the guns on the engine. The coolant hoses/ lines are made of copper wire to start with, the rubber hose sections are made of electrical wire heat shrink and heated to clamp good onto the copper wire. The clamps are made of spare photo etch sprue and when I ran out of that .022" solder flattened and rolled.

http://i1061.photobucket.com/albums/t469/bf109g430mm/Trumpter%20Bf109%20Engine%20Pics/engine005.jpghttp://i1061.photobucket.com/albums/t469/bf109g430mm/Trumpter%20Bf109%20Engine%20Pics/Engine003-1.jpg


Where is the jaw dropping smilie when you need it! Awesome work!!


Got ya covered...

http://img.photobucket.com/albums/v233/HansvonHammer/Humor/Smilies/th_eek2.gif

Thanks all you guys. I didn't have my weathering technique down quite pat and the engine is already closed up in the fuselage but will be working on weathering throughout the rest of the build.


 Forum | Modelers Social Club Forum (proboards.com) 

  • Member since
    June 2008
  • From: Iowa
Posted by Hans von Hammer on Saturday, June 23, 2012 1:56 PM

pzl66

 mustang1989:

Then a photo of the guns on the engine. The coolant hoses/ lines are made of copper wire to start with, the rubber hose sections are made of electrical wire heat shrink and heated to clamp good onto the copper wire. The clamps are made of spare photo etch sprue and when I ran out of that .022" solder flattened and rolled.

http://i1061.photobucket.com/albums/t469/bf109g430mm/Trumpter%20Bf109%20Engine%20Pics/engine005.jpghttp://i1061.photobucket.com/albums/t469/bf109g430mm/Trumpter%20Bf109%20Engine%20Pics/Engine003-1.jpg


Where is the jaw dropping smilie when you need it! Awesome work!!

Got ya covered...

  • Member since
    June 2008
  • From: Iowa
Posted by Hans von Hammer on Saturday, June 23, 2012 1:52 PM

p38jl

 Hans von Hammer:

 pzl66:

 Manstein's revenge:

When I was the German Naval Attache' to Japan in the late '30's I was given my own fighter in "Cherry Blossom Red" while participating on http://i1016.photobucket.com/albums/af282/chadhill/JapaneseBF109.jpgsea-manuevers on the Zuiho...
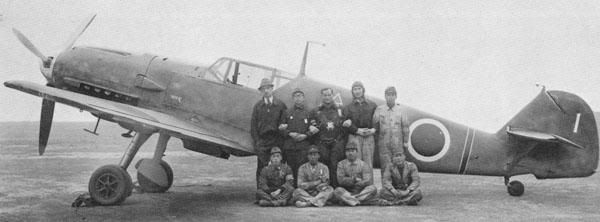


Is that you on the far left standing up? Or were you the one taking the picture?


Trivia: What was the Allied code-name for the Jap Bf109 ?

Ten-Thousand Hammer-Marks to the person who names it within 24 hours..


  MIKE

No more phone-calls, please.. We have a winner.. (Sorry Handi, he beat ya by three minutes..)


  • Member since
    April 2006
  • From: ON, Canada
Posted by jgeratic on Saturday, June 23, 2012 1:30 PM

mustang1989 - with the better quality pics can really see another awesome engine coming together.

Theuns - looks like a lot of work for a much lauded kit.  I too am finding this Hasegawa kit won't be a quick build.

 I've opted for Fusion's resin replacement spinner.  Lines up fine height wise to the fuslage, but as can be seen by the red areas, will require some sanding to achieve a flush fit.

Also problems with the wing/root fit.  Towards the back end the wing is falling below the fuselage root.  I've already sanded about 0.5mm indicated by the green arrow.  Could do more but this might result in a concave appearance in the belly area.

As I'm building in the wheels up position, some carving is required in the tail wheel area.  As indicated in this photo, the strut should be located as part of an open area, and not an individual hole as provided in the kit.

Also have a question to the  109 experts on the radiator flaps.  From what I gather here, during level flight  they are slightly open, but is it both top and bottom or just one or a variation?   Any idea what position when in a dive during a dogfight?

regards,

Jack

  • Member since
    December 2011
  • From: AZ
Posted by Luft Modeler on Saturday, June 23, 2012 1:13 PM

mustang1989

Then a photo of the guns on the engine. The coolant hoses/ lines are made of copper wire to start with, the rubber hose sections are made of electrical wire heat shrink and heated to clamp good onto the copper wire. The clamps are made of spare photo etch sprue and when I ran out of that .022" solder flattened and rolled.

http://i1061.photobucket.com/albums/t469/bf109g430mm/Trumpter%20Bf109%20Engine%20Pics/engine005.jpghttp://i1061.photobucket.com/albums/t469/bf109g430mm/Trumpter%20Bf109%20Engine%20Pics/Engine003-1.jpg

Where is the jaw dropping smilie when you need it! Awesome work!!

  • Member since
    April 2010
Posted by Theuns on Saturday, June 23, 2012 12:16 PM

Hi guys. I have been batling with this ICM 1/48 F2 for some time now and after seeing that the cowling will be a difficulty in the making I decided to plainly hide all engine detail and just glue the cowl closed.

This in itself was not so easy as it just didn't want to line up nicely atall so I will have to do allot of sanding to get it right and then re-scribe the panel detail. Same thing with the wingtips, they are to thin for the wings so I need to build up with filler and sand to shape.

So a "fun filled" time lies ahead for me LOL!

1/48 BF 109 F

ICM 1/48 BF 109 F


I just love the "SS" camo , never seen that before but I like it!

Same with the stunning engine detail of the Trump  109 above :-)


Theuns


  • Member since
    March 2012
  • From: Corpus Christi, Tx
Posted by mustang1989 on Saturday, June 23, 2012 11:52 AM

Then a photo of the guns on the engine. The coolant hoses/ lines are made of copper wire to start with, the rubber hose sections are made of electrical wire heat shrink and heated to clamp good onto the copper wire. The clamps are made of spare photo etch sprue and when I ran out of that .022" solder flattened and rolled.


 Forum | Modelers Social Club Forum (proboards.com) 

  • Member since
    March 2012
  • From: Corpus Christi, Tx
Posted by mustang1989 on Saturday, June 23, 2012 11:49 AM

Ok I don't know any other way to do this because I didn't take any pictures until I had the guns AND the coolant hoses/ lines installed so I'll show the guns first before painting or assy. I paid around 12 bucks for these things and they were worth every penny. I was so glad I didn't go with the box parts! Ok Ok I guess I need to work on cleaning my hands better before photos but hey, I'm a GM mechanic! I work with them so forgive me.

Here are the guns:


 Forum | Modelers Social Club Forum (proboards.com) 

  • Member since
    March 2012
  • From: Corpus Christi, Tx
Posted by mustang1989 on Friday, June 22, 2012 4:01 PM

After that I started using parts from the Verlinden Bf109 update set for this crate. This is the beginnings of the firewall test fit and installation which took up ungodly time! Mod after mod was involved here. So much for the update being a plug and play thing eh? At this point I also installed the oil reservoir and added the supply and return lines.


 Forum | Modelers Social Club Forum (proboards.com) 

  • Member since
    March 2012
  • From: Corpus Christi, Tx
Posted by mustang1989 on Friday, June 22, 2012 3:50 PM

After that I installed the generator and the supercharger. I got the screen for the supercharger off of a 1998 Chevrolet 4.3 distributor after I performed a service recall on it. Hey whatever works right? I cut the screen to the proper diameter, drilled out the existing molded screen and installed this one... Oh yeah forgot to mention I installed the engine mounts after that. My weathering and aging processes are still in the works. Picking up a few skills here and there from you guys here in the past few weeks as I read


 Forum | Modelers Social Club Forum (proboards.com) 

  • Member since
    March 2012
  • From: Corpus Christi, Tx
Posted by mustang1989 on Friday, June 22, 2012 3:46 PM

Ok....the harness


 Forum | Modelers Social Club Forum (proboards.com) 

  • Member since
    March 2012
  • From: Corpus Christi, Tx
Posted by mustang1989 on Friday, June 22, 2012 3:44 PM

We start by posting a couple of pictures from the engine. At first the pictures are grainy because I was using my phone to take pictures with. I eventually bought an actual camera. I started with the base engine and installed the coolant tanks, exhaust  and wire harness between 12 Jan and 29 Jan


 Forum | Modelers Social Club Forum (proboards.com) 

  • Member since
    March 2012
  • From: Corpus Christi, Tx
Posted by mustang1989 on Friday, June 22, 2012 3:35 PM

Hey guys,

I've been on the forum for a few weeks now and stumbled across this build that started earlier in the year. I asked plz66 if I could join in since I started my build on 12 Jan of this year and he let me in. I'm looking forward to this as I have been encouraged by a few of the members here to join.

I am building the Trumpeter 1/24 Bf109K4 kit. I will start by posting a couple of pictures here and there and work up to the point that I am at now. I aint the model master from hell but can do better than the average bear. So a good hello to all here and once again looking forward to this, Joe


 Forum | Modelers Social Club Forum (proboards.com) 

  • Member since
    February 2003
  • From: Rothesay, NB Canada
Posted by VanceCrozier on Friday, June 22, 2012 9:39 AM

p38jl

are Hammer-marks good for trade in Buenos Aries ??Whistling

Yes, but Fermis-Bucks get you a better exchange rate.

On the bench: Airfix 1/72 Wildcat; Airfix 1/72 Vampire T11; Airfix 1/72 Fouga Magister

  • Member since
    July 2011
  • From: minnesota
Posted by handiabled on Friday, June 22, 2012 9:36 AM

Hans von Hammer

 pzl66:

 Manstein's revenge:

When I was the German Naval Attache' to Japan in the late '30's I was given my own fighter in "Cherry Blossom Red" while participating on http://i1016.photobucket.com/albums/af282/chadhill/JapaneseBF109.jpgsea-manuevers on the Zuiho...


Is that you on the far left standing up? Or were you the one taking the picture?


Trivia: What was the Allied code-name for the Jap Bf109 ?

Ten-Thousand Hammer-Marks to the person who names it within 24 hours..


                            Wasn't it a "Mike" ?

JOIN OUR COMMUNITY!

Our community is FREE to join. To participate you must either login or register for an account.

SEARCH FORUMS
FREE NEWSLETTER
By signing up you may also receive reader surveys and occasional special offers. We do not sell, rent or trade our email lists. View our Privacy Policy.