SEARCH FINESCALE.COM

Enter keywords or a search phrase below:

Completed: Spitfire Turns 80: 1/48 Tamiya, Eduard & Special Hobby

6187 views
74 replies
1 rating 2 rating 3 rating 4 rating 5 rating
  • Member since
    April 2015
  • From: New Hampshire, USA
Posted by UKguyInUSA on Thursday, May 5, 2016 10:01 AM

That's three beautiful Spitfires you put together there, Brandon...I love 'em!


Cheers Smile

Martin

  • Member since
    February 2011
  • From: Bent River, IA
Posted by Reasoned on Tuesday, May 3, 2016 1:52 PM
Sweet, very nice work and excellent information.

Science is the pursiut of knowledge, faith is the pursuit of wisdom.  Peace be with you.

On the Tarmac: 1/48 Revell P-38

In the Hanger: A bunch of kits

  • Member since
    November 2009
  • From: SW Virginia
Posted by Gamera on Tuesday, May 3, 2016 11:08 AM

BD: Thanks for the rest of the photos. Great work there on all three. Yes

"I dream in fire but work in clay." -Arthur Machen


  • Member since
    June 2003
  • From: Cavite, Philippines
Posted by allan on Tuesday, May 3, 2016 12:50 AM

Beautiful looking Spits!


The Mark IXc, when you said the Americans used it, was it RAF machine flown by Americans or a USAAF unit flying British machines?


No bucks, no Buck Rogers

  • Member since
    June 2014
Posted by BrandonK on Monday, May 2, 2016 10:17 PM

Very nice work. Three really nice kits that look just steller.

BK

On the bench:

A lot !! And I mean A LOT!!

2024 Kits on deck / in process / completed   

                         14 / 5 / 2  

                              Tongue Tied

  • Member since
    February 2012
  • From: Olmsted Township, Ohio
Posted by lawdog114 on Monday, May 2, 2016 10:09 PM
Wow! 3 in two months...lets rename your bench Castle Bromwich! Those are simply stunning. FYI- The key to Tamiya Red is more paint less thinner. I just used it on my Jug cowl. Thanks for the ride bud....

 "Can you fly this plane and land it?...Surely you can't be serious....I am serious, and don't call me Shirley"


  • Member since
    April 2006
  • From: ON, Canada
Posted by jgeratic on Saturday, April 30, 2016 11:13 AM

Brandon, great looking trio of Spitfires, and excellent tribute to their anniversary. Yes

----------------------

I don't know the story behind this particular RN-N, but the codes do indicate 72 Squadron of the RAF.  The kiwi is also a native bird of New Zealand, so it is likely a personal emblem and not of the unit as the Kiwi's did not have their own squadron during the Battle of Britain - though about 100 pilots had been sent to Britain by the time that event had started.

For some reason Xtradecal BoB decal set associates this aircraft with Australian Des Sheen, but his personal Spitfire was RN-J and his emblem was a boomerang on a white disc.  

regards,

Jack


  • Member since
    January 2015
Posted by BrandonD on Saturday, April 30, 2016 12:25 AM

Gamera, Johnny and Bob - thanks for the compliments and for looking. I appreciate it.

Mike - Someone else metnioned it maybe being a Kiwi. Until your post, I thought a Kiwi was a fruit. According to the Montex Masks, this is an RAF bird based at Gravesend in 1940, but I believe the bird is a personal marking (possibly a squadron marking), so I would assume that in this case the pilot must have been from New Zealand. Thanks for the info and the kind words!

-BD-

  • Member since
    December 2010
  • From: Salem, Oregon
Posted by 1943Mike on Friday, April 29, 2016 11:57 PM

Brandon,

I think you've done an outstanding job on all three kits!

Thanks very much for taking the time to write your evaluations of each kit - it's much appreciated!

Not knowing much (yet) about WWII aircraft, are the markings on your finished Tamiya version representative of an English RAF fighter? I'm only curious because of what looks like a Kiwi. I have a cousin who lives in New Zealand and I've had my picture taken under the sign of the Kiwi when I was in Christchurch about 13 years ago. That's why the bird on the fuselage piqued my curiousity.

Mike

Mike

"Le temps est un grand maître, mais malheureusement, il tue tous ses élèves."

Hector Berlioz

  • Member since
    February 2014
  • From: Michigan
Posted by silentbob33 on Friday, April 29, 2016 6:12 PM
Very nice finishes all around. I like what you did with the dot filters, I may have to try it sometime.

On my bench: Academy 1/35 UH-60L Black Hawk

  • Member since
    January 2015
Posted by BrandonD on Friday, April 29, 2016 1:36 PM

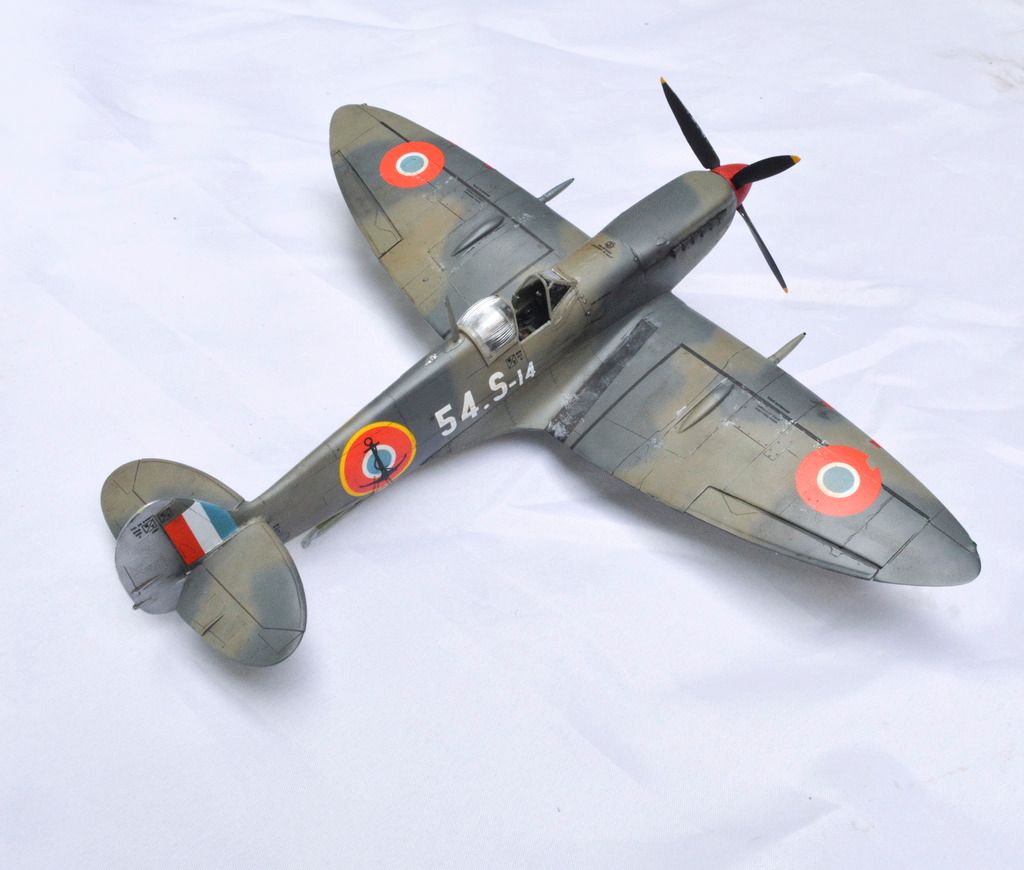
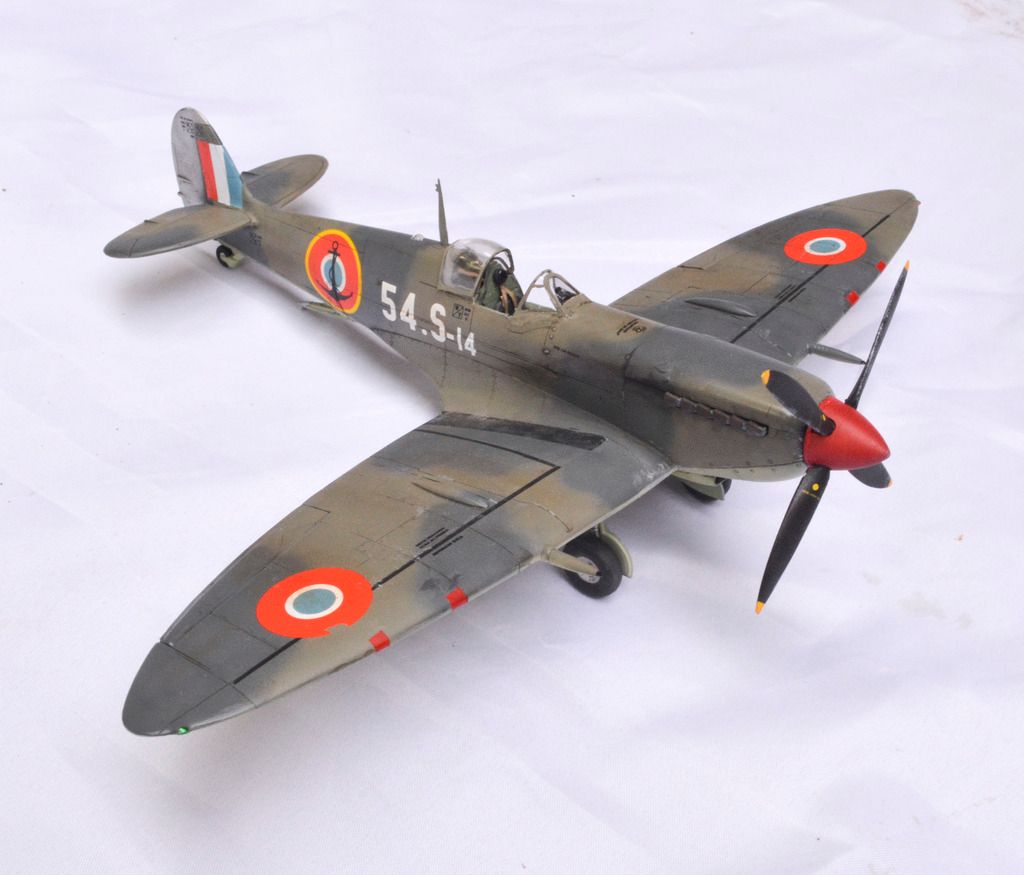
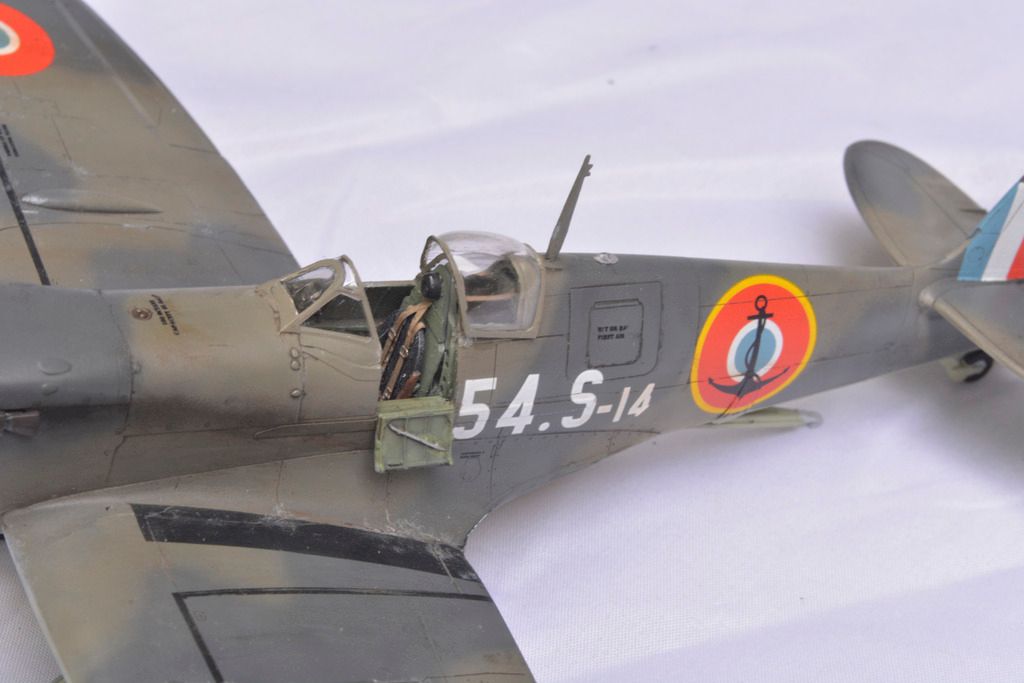
1/48 Special Hobby Seafire Mk.III, French Aeronavale and Irish Air Corps

This kit was fun, but it took a lot of work. That said, it's a short run kit, so that was expected. I enjoyed it, but even though I thought I was going carefully, there was one thing I didn't notice that kind of makes the end result a little janky. I paid $32 for it on sale, including shipping, which makes it the cheapest kit in the mix by about $18 because it included PE and harness, and the decals were pretty nice.

Pros: Included PE fret and acetate instrument detailing means this kit has excellent cockpit details, an included harness and a realistic instrument panel. What I believe are catapult mounts on the fuselage are PE and give a great look at the finish. The adhesive vinyl strakes that strengthen the fuselage for catapult launches and strengthen the area around the radio compartment door on the port fuselage behind the cockpit are really nice, and spares are provided! Recessed detail is nice, if less refined than Eduard and Tamiya in places. The decals were also very nice, for the most part.

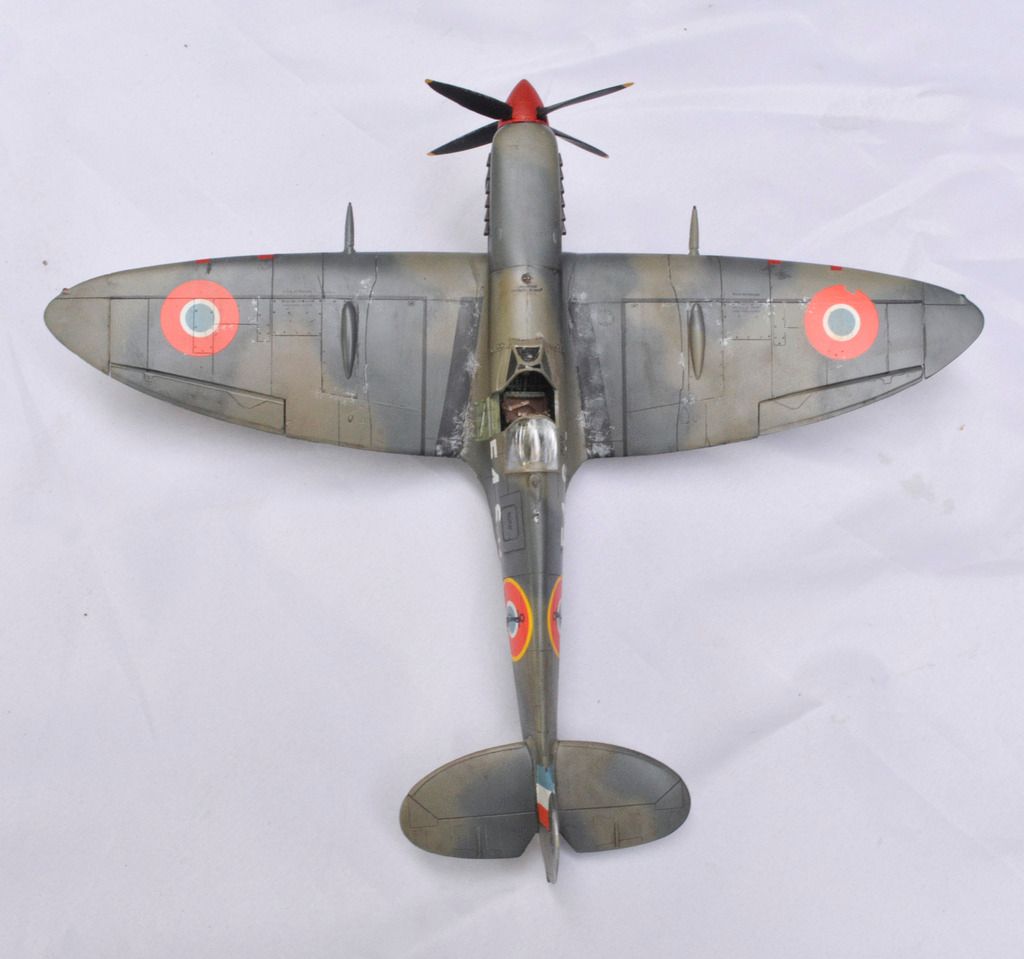
Cons: Large sprue gates and poor fit in many places make this one some work. The separate gun bay covers allow for multiple planes from the same molds, but the fit was really bad and took a lot of work to file, sand, smooth and fill to get right. The wing leading edges needed to be reshaped, and the fuselage was warped. Wing roots took a lot of work, most of which I was able to accomplish by test fitting, but filling was still required. The cannons were fine, but I used the Eduard pieces that were left over from my Mk.IX kit because they were pre-drilled (thanks, slide molding!) The wors part was the fuselage being warped. I clamped it together in what I thought was a good join, and only later realized the whole thing bends to one side, giving this Seafire a bit of a shark tail look (see top-down photo for what I mean). Now, this could have been corrected by heating the halves in water individually and clamping them flat to a piece of glass or something. Valuable lesson I will use in the future. Special Hobby also omitted most of the wheel well detail, which was an interesting oversight in a kit that othrwise gave more detail than the Tamiya Mk.I. The separate ailerons can be molded in different positions, but they are noticeably thinner than the wings around them and I added styrene to the bottom to make them match. The rudder is separate as well, but the elevators are molded with the horizontal stabilizers, which is mildly annoying, since, again, SPits sit with them down in most cases.

Despite all the work rescribing lines lost to sanding and making things fit, I did enjoy the build, and I built it as a French Aeronavale Seafire in use in Indochina/Vietnam in 1946. I did run into problems with the thin decals for the markings folding on me, and I used a second set of fuselage markings that the instructions don't acknowledge, but which match the style of the French ones. The roundel on the starbord wing didnt settle correctly and flaked a bit even after two clear coats. This could totally have been my error.

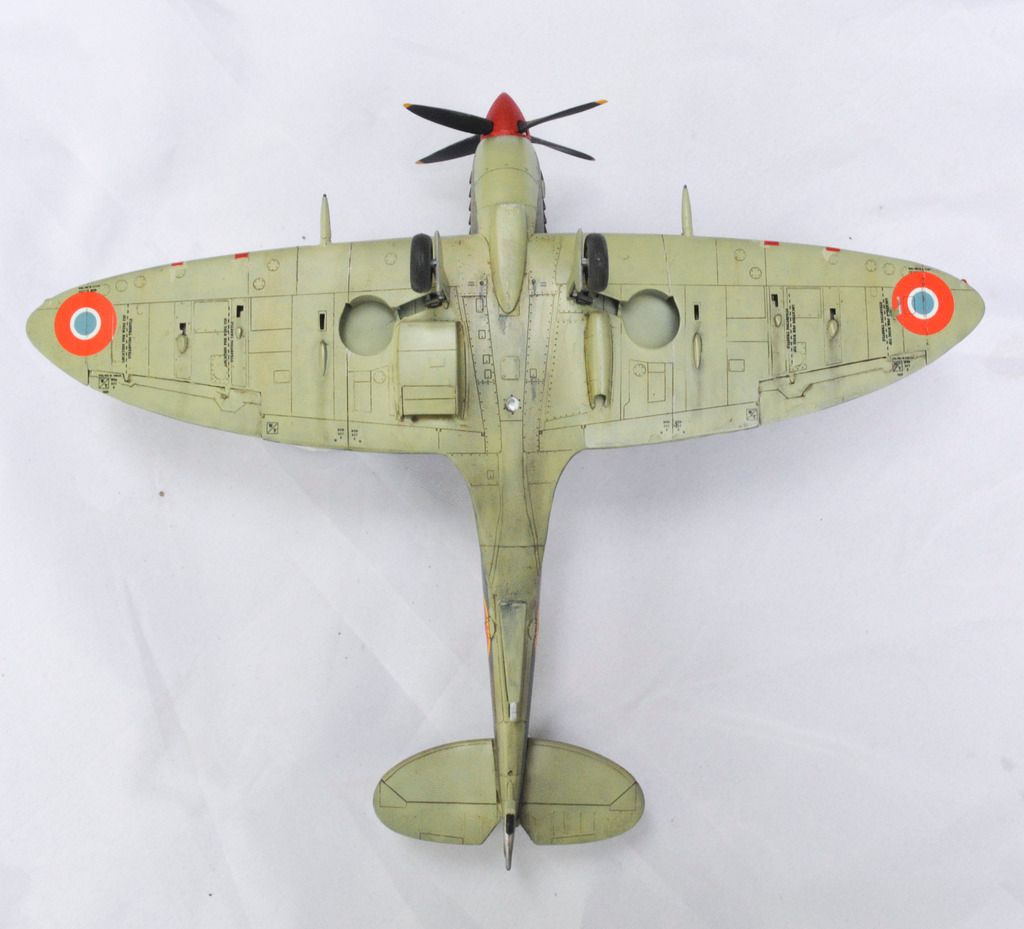
Paint: I used Model Master Dark Slate Grey for the greenish top color and a mix of Tamiya Dark Sea Grey and Rubber Black for the Extra Dark Sea Gray up top. Cockpit was Tamiya Cockpit Green, and the underside was Tamiya Sky. Spinner is Model Master Insignia Red. I stole prop decals from the Barracude Mk.I sheet for the blades here. Nice of them to provide enough for a four-blade prop.

Weathering: I used FLory Dark Dirt wash on the panel lines, then weathered it more with artist oils (burnt umber and raw sienna). The dark on the underside is Payne's Gray.
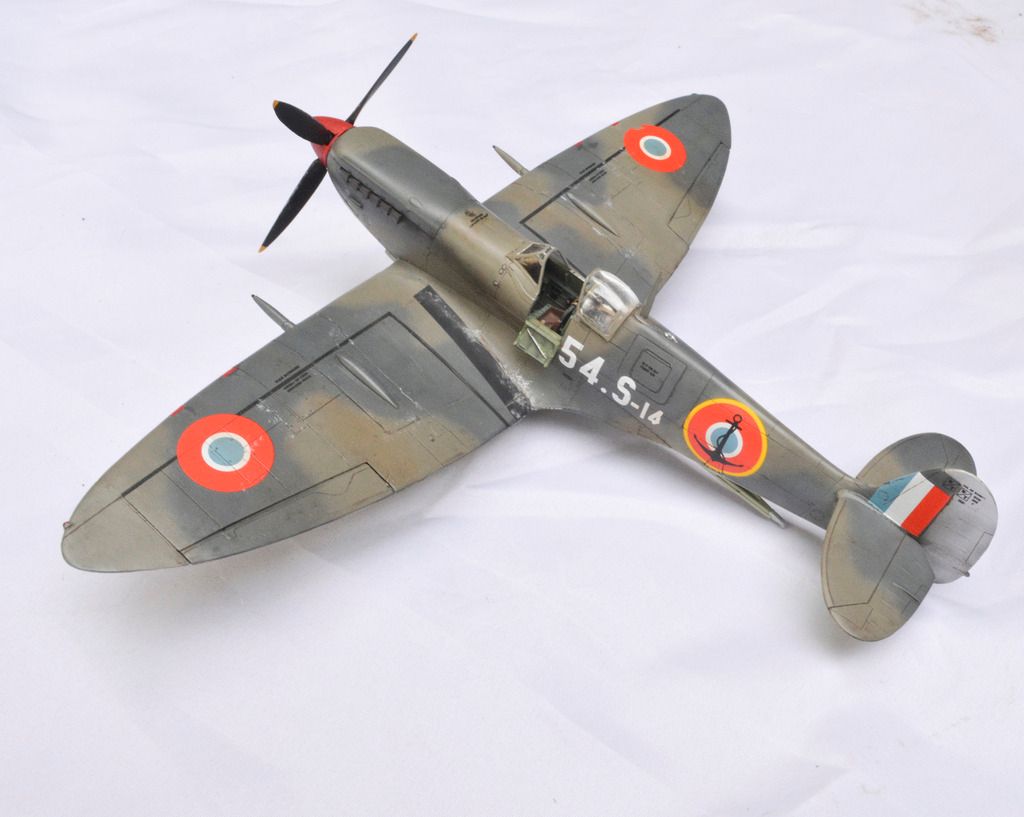
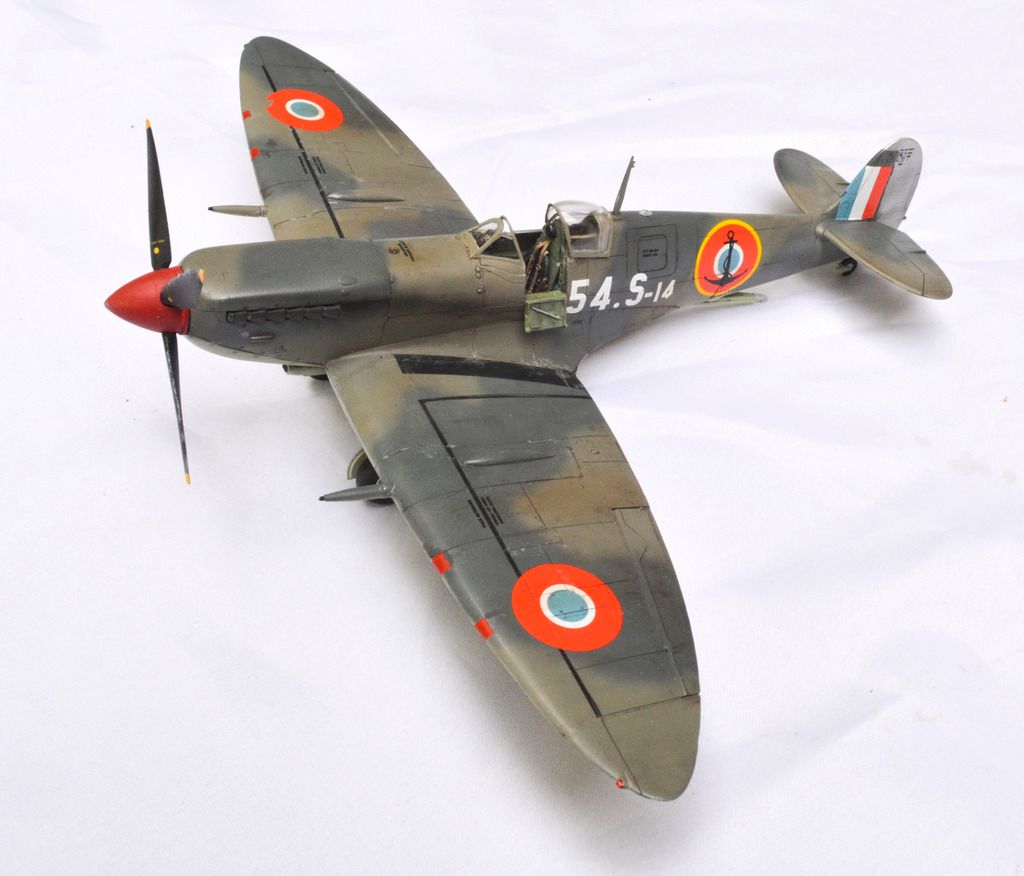
While this kit was the most challenging of the three, I would encourage people not to shy away from it. It's a short run kit, so comparing it to Eduard or Tamiya is unfair from a manufacturing standpoint, but fair from an "I have X amount of money and Y amount of time and want a Spitfire variant" standpoint. I've seen the Hasegawa Seafire Mk.III sprues, and this one seems like it gives you more bang for less buck, but probably more work, too. I'd recommend it with the caveat that it's not good for a novice, and I consider myself intermediate/average, and I still had issues with the warped fuselage. But I'm a sucker for French aircraft, so here it is.

-BD-

  • Member since
    January 2015
Posted by BrandonD on Friday, April 29, 2016 1:15 PM

1/48 Eduard Spitfire Mk.IXc (Early) Weekend Edition


This was my favorite kit of the three to build. The high parts count, excellent surface detail and great fit make it one of the best kits I've ever built. I spent $22 on the Weekend Edition kit. I then added the PE fret you find in the Profipack kit ($8) and the Eduard stencils, which weren't included in the kit decal sheet ($10). I also bought the Ultracast one-piece cowl because of the cowl seam on this kit ($10). That brings the cost of the kit to $50, which is about the same I spent all told on the Tamiya kit, and almost exactly what you can get the Profipack kit for if you opt for the one-piece cowling on that one (but I wanted these markings).

Pros: This is simply one of the best kits in any scale, in my opinion. It has a few questionable engineering choices, but the parts fit flawlessly and the molded detail makes for a fantastic finish. The high parts count allows for a lot of details to pop, and the decals (by Eduard) are easily as good as those produced by Cartograf. They snug down into rivet detail with just a little help from Micro Set/Sol, and the variety of separate parts means you can model the elevators dropped, and the rudder and ailerons are posable. Different canopies and cockpit doors for open or closed configurations make it look right regardless of how it's posed. For clipped-wing variants, the entire wingtip is molded in clear plastic, making the navigation lights look real nice (this isn't the case with the regular wingtips, which have molded detail). Slide molding means the exhaust pipes and gun barrels are already hollowed.

Cons: The most glaring con in this kit is the two-piece cowling top. The seam is a pain, and the nearby rivet detail makes it nearly impossible to sand it and get everything looking right without having to rescribe some of the details. The exhaust is also overengineered, with each side made up of four parts that must be added before the cowling is closed up (I used thinned white glue to hold the cowling in place for painting and only added the exhaust after the final painting and weathering, popping the cowling off and gluing it all together. Finally, the propeller lacks any means of staying in the plane. It's just a shaft that slides through a collar and doesn't quite sit right or stay in unless you midify it. I put one layer of Tamiya tape over the shaft, which provides enough friction to hold it in, allow it to spin and keep it in the right position. No harness is included in the Weekend Edition kit.

This was my favorite of the three in this build to actually build, even though I messed up a bit on it and didn't pay attention when I attached the fuselage, so the wings are slightly out of true with the horizontal stabilizers (which is only noticeable from dead front, thankfully).

This particular aircraft was used by the Americans in Tunisia, and had the British markings painted over. The color was unclear, and I used a mix of Dark Earth that came out looking vaguely like Olive Drab to define it separately from the RAF colors to show where the RAF markings were painted over.

Paint: I used Mr. Color Dark Earth and Middle Stone for the upper surfaces. The underside was Model Master Azure Blue, and the cockpit was Tamiya Cockpit Green.

Weathering: The model got a wash of Flory Dark Dirt after decals were sealed. I used Naples Yellow and Yellow Ochre artist oil paints to fade the paint and dirty up the underside, as well as ground up Yarka Sauce pastel chalks to add dust and streaks on the shell ejection ports. Paint chipping was dabbed on with a sponge.

I have one more Eduard SPitfire Mk.IX (a late one) in the stash, and while I am totally over painting Spits at the moment, I look forward to building this kit again in the future.

-BD-

  • Member since
    November 2003
  • From: Naples, FL
Posted by tempestjohnny on Friday, April 29, 2016 12:48 PM
Fantabulous. Great build and thread


  • Member since
    January 2015
Posted by BrandonD on Friday, April 29, 2016 12:23 PM

1/48 Tamiya Spitfire Mk.I

This is a fantastic kit I spent about $30 on at the local hobby shop. I added an HGW microtextile seat harness (about $8, I think) and aftermarket markings in the form of Barracuda stencils ($2.50) and Montex masks/decals ($12). For the mathematically challenged like me, that brings the final cost to $52.50.

Pros: The fit is typical Tamiya, which is to say excellent. The detail is good as well, and it's what you expect from the mid-'90s Tamiya kits. I like the variety of windscreen and canopy options that range from the short early style to the Malcolm style. It fits the Spitfire proportions to my eye, and I like the ease of building, from the cockpit that drops in after the fuselage is closed to the grooves at the wing roots that prevent any gap there and the exhaust pipes that drop in at the end of the build.

Cons: The small parts count (two sprues plus one clear sprue) makes the model somewhat simplified compared to the other two in this build. Spitfires almost always sit with their elevators dropped when on the ground (unless the control yoke latch is used), and Tamiya molded them flat with the horizontal stabilizers. If you want to change it, you need to be good with cutting or go aftermarket. The Cockpit walls are also shaped incorrectly, following the slope of the outer skin and not sitting in the oval barrel shape on the atual aircraft. With the cockpit open, it is noticeable, but not a big deal in my book. Another con, which is a con in all three of these kits, is the cowling being molded in two halves (in this case connected to the fuselage). It's a seam that would be easily remedied if they'd molded it separately as one piece like on their Mustang kits. But now I'm being picky. The decals are thick, but I did use the Tamiya stencils for the black half of the underside of the wings, and they layed down pretty good. No harness was included, nor was an instrument panel decal, and thepanel itself has no raised dial decals to drybrush, so I used the decal from the Eduard kit, as I was using a PE set for that one.

That seems like a lot of cons, but there are WAY more pros, and it was a VERY enjoyable build. Definitely the easiest of the three to complete.

This kit came in a close second in the build in my opinion, simply because I prefer the Eduard rivet detailing and cockpit detail, even without the aftermarket add-ons.

Paints: I primed in Mr. Surfacer 1500 black. The underside was shaded with Tamiya Rubber Black, and the white was a mix of Tamiya White with a drop of Light Grey thrown in to tone down the brightness. The upper surfaces were painted with Gunze Mr. Color Dark Earth and Tamiya RAF Dark Green 2. Cockpit was Tamiya Cockpit Green. The insignia were painted with Tamiya Yellow, Tamiya White, Tamiya Blue and Model Master Insignia Red. Lettering is painted with Tamiya Sky.

Weathering: The upper surfaces and white half of the underside received Flory Dark Dirt wash over a gloss coat for the panel lines. The Black half of the underside got a Vallejo Wash for White Vehicles, which was layed down and wiped off haphazardly to give some variation to the paintwork and highlight panel lines. Artist's oils were used to dirty up the paintwork a little bit, and ground up Yarka Sauce pastel chalks were used for the shell ejection port streaking and the dirt on the tires and underside.

All in all, I was really happy with this kit, and I think this is probably the best effort I've put forward so far, maybe tied with the Eduard one. It's a fun little Battle of Britain Spitfire that an sit on my shelf with the Airfix Hurricane.

-BD-

  • Member since
    November 2009
  • From: SW Virginia
Posted by Gamera on Friday, April 29, 2016 12:12 PM

Outstanding work on all three! Looking forward to the additional photos Yes

"I dream in fire but work in clay." -Arthur Machen


  • Member since
    January 2015
Posted by BrandonD on Friday, April 29, 2016 11:53 AM

Well, it's been almost two months, but the Spitfires are done. I'll post a few pics in this of the trio, then do a separate reply for each one with the pros and cons for those who may care.

Anyway, as a refresher, these are all 1/48. The one in the temperate land scheme is a Spitfire Mk.I by Tamiya, the desert scheme is a Spitfire Mk.IXc (early) by Eduard, and the third is a Seafire Mk.III by Special Hobby.

More pics coming.

-BD-

  • Member since
    February 2014
  • From: Michigan
Posted by silentbob33 on Friday, April 22, 2016 6:52 PM
Looking really good Brandon! I really like the effect the oils have, and your Mk.I looks great. I have the same kit in the stash so it was really nice seeing it come together here.

On my bench: Academy 1/35 UH-60L Black Hawk

  • Member since
    March 2013
Posted by patrick206 on Friday, April 22, 2016 2:23 PM

Brandon - What a well done WIP post, great detailed info and photos. The Spit's are beautiful, perfectly built and finished. What a guy, you're such a productive forum member, always a treat to see what you're up to. Thanks.


Patrick 

  • Member since
    November 2003
  • From: Naples, FL
Posted by tempestjohnny on Friday, April 22, 2016 1:46 PM
Awesome


  • Member since
    January 2015
Posted by BrandonD on Friday, April 22, 2016 12:42 PM

Here's an unveiling of the first completion - the Tamiya Mk.I with Montex masks and a mix of stencils (Barracuda and Tamiya, since Barracuda didn't provide white stencils for the blck underside).

I actually think this is the best I've done to date, and while there are some errors, I'm pretty happy with it. I try to do something new on each build, and this one had painted markings and codes and an HGW harness, both of which were new for me. It was also my first time using the Tamiya tape for curves, and I'm totally sold on that!

I should finish up the other two this weekend, and then I will get some actual shots of them individually and together.

-BD-

  • Member since
    January 2015
Posted by BrandonD on Tuesday, April 19, 2016 11:43 AM

Thanks, Lawdog. Yes, the paints are enamels, but I used the Tamiya gloss clear before and after decals, then used flat clear over all of it, so there's three layers of barrier between the turpenoid and the enamels.

And yeah - home stretch for sure!

-BD-

  • Member since
    February 2012
  • From: Olmsted Township, Ohio
Posted by lawdog114 on Saturday, April 16, 2016 6:25 AM
Very ambitious with the artist oils. I like it. Is that over an acrylic clear coat? I use alclad clear which is oil based., so I would imagine the turpenoid would eat through it. Looks like your in the home stretch bud.

 "Can you fly this plane and land it?...Surely you can't be serious....I am serious, and don't call me Shirley"


  • Member since
    January 2015
Posted by BrandonD on Saturday, April 16, 2016 1:34 AM

7474 - Thank you! I'm honestly ready to get them off the bench, as much fun as I am having.

For the roundels, I used Tamiya XF-3 Yellow, XF-2 White and XF-8 Blue. The red was Model Master Insignia Red (simply because I think it covers better than the Tamiya red, which I have trouble with over dark colors like blue and black).

I do like the way the roundels look painted, but I have to say that it's hard to tell the difference with the Eduard decals when pressed down and hit with two doses of Micro-Sol. In the pic below, the dark brown circle under it is paint, masked with the same Montex mask I used on the Mk.I.

My take, for what it's worth, is that painting is a FAR better option than using Tamiya decals or something else that's thick, but I won't be painting when I have Cartograf or Eduard decals in the box. The biggest challenge I found with the masks was laying them down without having the high contrast you get with the decal to make sure they are placed correctly.

-BD-


  • Member since
    December 2002
Posted by 7474 on Friday, April 15, 2016 7:23 PM

Incredible work BD, keep it up and I can't wait to see them finished soon. Can you tell me what paint brands and colors you use to paint the roundels? I want to start painting markings on my models. 

  • Member since
    January 2015
Posted by BrandonD on Friday, April 15, 2016 4:08 PM

Ok, I got a fair amount done on the Spits over the past week or so, and I'll start with the Mk.I.

It's all but finished now, and I got the underside weathered. I used Flory Dark Dirt wash for the white side of the plane, and Vallejo Wash for White Models for the black side to give it some contrast. I'd never worked with that before, but found it to be pretty nice/ I used ground up pastel chalk applied with a pointed Q-tip for the shell ejection ports, and then used raw sienna oil paints to dirty up the underside consistent with operating off a grass/muddy strip in England during the Battle of Britain.

Next up was the Eduard Mk.IX. After painting and decals (post above), I wanted to fade the thing a bit, so I used yellow ochre artist's oils applied in random dots to tone down the paint and hopefully make it look faded/operated out of a desert/sandy environment. This was my first time using this method, and I want to explore it more. Here it is in the middle of the process, as I was using turpenoid on a flat brush to streak it in the direction of airflow (I finished by wiping most of it off with a paper towel.

I probably put too much oil on it, but in any case, here is the result (the pic is a little washed out).

The underside got a similar treatment with two colors.

And after. I like how this plane retained one Brit roundel on the underside. Next up will be shell ejection port streaking and a bit of griminess from the engine.

This is a horrible pic, but shows where they all sit at the moment. The Mk.I just needs some chipping on the prop and walkways, and then it's done. The Mk.IX needs its legs, pants and feet attached, as well as the rudder and locks for the elevators (which I have posed in the down position to coincide with the control yoke placement). The Seafire Mk.III needs its arrestor hook painted and attached, some sort of fix to the starboard win roundel (maybe...) and its feet, radio mast, cockpit door and upper signal lamp.

That's all for now.

-BD-

  • Member since
    January 2015
Posted by BrandonD on Friday, April 8, 2016 1:10 PM

It's time to bring you up to speed on the Eduard Mk.IX, which is now painted and has decals.

Since this one is in USAAF service, the original British markings were painted over. To do this, I reused the Montex wing roundel masks, which saved me buyng a circle cutter and making my own out of tape. The fin flash was easy, with just a few strips of tape, and the fuselage lettering overpaint was done by cutting masks out of Tamiya Tape (I think it's the 20mm roll).

I have seen pictures with the paint being darker than the Dark Earth, so I mixed some Tamiya XF-1 with the Gunze Dark Earth (I really don't know the ratio) and layed it down. My first thought was that it was too dark, but in the end, I was OK with it.

Next up was clear coat (Tamiya Clear) and decals.

As this is the Weekend Edition kit, it doesn't come with stencils (their newer ones like the Bf-109 E-7 do come with stencils). I picked up an Eduard stencil sheet on sale and applied them and the excellent markings included in the kit.

I think Eduard decals are on par with Cartograf, and are the nicest kit manufacturer-made decals I've come across. The carrier film is minimal, they sing into panel lines nicely, and the registration is always crisp and spot-on. In fact, this is the only plane of thethree I didn't feel like I needed to paint the wing walk lines.

Just FYI if you buy this kit - the only markings included are the stars, the 8-ball, the writing on the nose, the fuselage lettering, the blackpatch on the port wing root and the instrument cluster. The stencil sheet is a must, as it includes the fuel capacity stencil, various hydraulic and oil stencils that show prominently, the wing walk lines and associated stencils, the machine gun patch covers and the underwing support marking stencils.

I ran into some silvering issues on some of the stencils I need to deal with, but once that's done, it'll be time to seal them with the second clear. The only other issue is that the8-ball sits a little high, but it sank down on the model and refused to move no matter how much Micro-Set I slathered it with, so it's going to stay there.

Anyway, this is how it sits now. Unfortunately, I don't think I'll get time to work on it this weekend.

-BD-

  • Member since
    January 2015
Posted by BrandonD on Friday, April 8, 2016 12:56 PM

Silentbob - Thanks. It was actually easier than it could have been. Montex does a good job, and the only trouble I ran into was when I inadvertently stretched the starboard roundel pattern and made it slightly oblong. Fortunately, fixing it was pretty simple. Oh, and there was a small problem when I didn't tape over the join where one circle went inside another. The gap was just big enough to allow a mist of red to get on the white, and I carefully fixed it with a brush. Both of those issues are easily avoided, though.

Hunter - Thank you, but you've definitely overplayed my skills. There are a few issues with each build, but hopefully they're minor enough to be unnoticeable. Getting to this point is more patience and method than skill, really.

Tempestjohnny - Thanks. I would go crazy doing three of them in the same scheme. As it is, I'm kind of tired of painting Spitfires now, but I am still having fun as all three head into the final stages.

-BD-

  • Member since
    November 2003
  • From: Naples, FL
Posted by tempestjohnny on Wednesday, April 6, 2016 9:14 PM
BD these are amazing. The fact that it is three completely different schemes makes it even more amazing.


  • Member since
    January 2016
  • From: A Galaxy Far, Far Away
Posted by Hunter on Wednesday, April 6, 2016 6:11 PM

Brandon - 

OMG!! You sir have some very serious skills! The paint work on your builds is flippin' awesome! I thank you for your commentary throughout the entire build...I have picked up a lot of tips and techniques I will put into my builds. Thank you for sharing, and again your work is absolutely awesome.


Mr. Skinner - Here is a perfect article for FSM! 

Hunter 


JOIN OUR COMMUNITY!

Our community is FREE to join. To participate you must either login or register for an account.

SEARCH FORUMS
FREE NEWSLETTER
By signing up you may also receive reader surveys and occasional special offers. We do not sell, rent or trade our email lists. View our Privacy Policy.