SEARCH FINESCALE.COM

Enter keywords or a search phrase below:

Completed: Spitfire Turns 80: 1/48 Tamiya, Eduard & Special Hobby

6187 views
74 replies
1 rating 2 rating 3 rating 4 rating 5 rating
  • Member since
    February 2012
  • From: Olmsted Township, Ohio
Posted by lawdog114 on Monday, March 7, 2016 9:25 PM
I look forward to the ride.

 "Can you fly this plane and land it?...Surely you can't be serious....I am serious, and don't call me Shirley"


  • Member since
    March 2015
  • From: Streetsboro, Ohio
Posted by Toshi on Sunday, March 6, 2016 6:33 AM

Nicely done sir, I'm looking forward to your progress.

Toshi

On The Bench: Revell 1/48 B-25 Mitchell


Married to the most caring, loving, understanding, and beautiful wife in the world.  Mrs. Toshi


  • Member since
    January 2013
Posted by BlackSheepTwoOneFour on Sunday, March 6, 2016 12:09 AM

Brandon - pick up the March issue of FlyPast magazine at your local Barnes & Nobles bookstore, The March issue will have features on the 80th Anniversary of the Spitfire. I know I'm getting mine soon. They may not get it right away, but watch for it in the coming weeks at least into April.

FlyPast is a U.K. based aviation magazine with tons of great articles on all kinda of aircraft. Each month they publish pages on s feature aircraft. I have several FlyPast magazines over the last couple years and I've enjoyed every one of them. Well worth getting your hands on it. Their subscription is like $75 in US dollars per year. Yikes!  

Just so you know, DON'T look for it in the model magazine section. You won't find it there. LOL! Look in the auto magazine section (Road & Track, Hot Rod, etc... well you get the idea). Most likely near Boating and / or motorcycles magazines. I usually find mine on the bottom row on the end along with other different avaition related magazines. While looking there, it's worth looking into other aviation related magazines like Aeroplane magazine for example. Even those are worth getting too. Check it out. 


  • Member since
    January 2016
  • From: A Galaxy Far, Far Away
Posted by Hunter on Saturday, March 5, 2016 5:07 PM

Hey Brandon - 

I'm really starting to like the Eduard kit. Per stage of the build the Eduard has more parts than the Tamiya kit but the detail of those extra parts really make's that kit and it's detail stand out. Great WIP and very informative view of each kit. Very well done....thank you for sharing Brandon.

Hunter 


  • Member since
    January 2015
Posted by BrandonD on Saturday, March 5, 2016 3:18 PM

Thanks for the interest, all.

I have an update on the landing gear bays (suuuper exciting, I know) and wings.
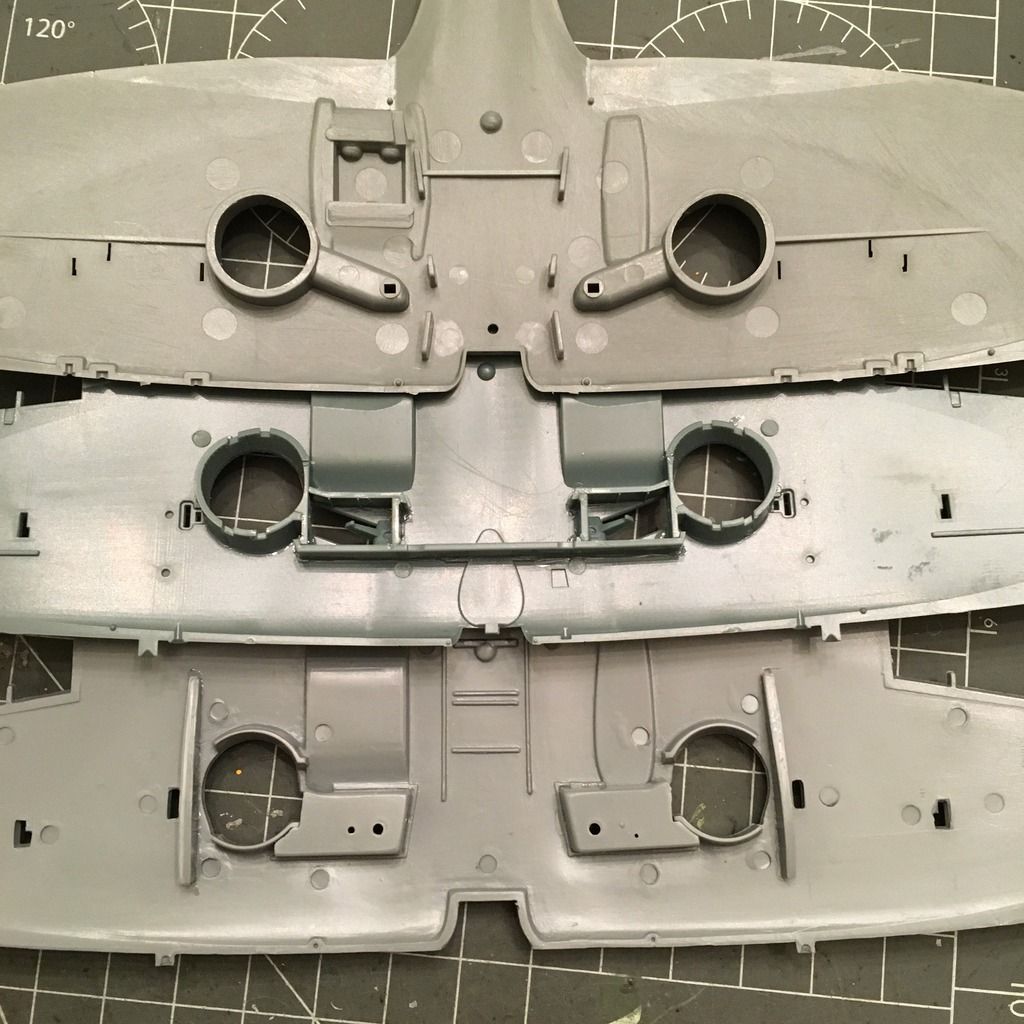
Parts count (counting lower wing)
Tamiya: 1
Eduard: 16
Special Hobby: 7

All three have the lower wing as a single part. Tamiya molded the gear bays into it (top). Eduard decided to make the gear bays complicated, but everything fits extrmely well, and theres a lot of depth and detail that the others just don't get. And it's a really easy assembly. Special Hobby left me scratching my head a bit. There are two boxy parts to house the legs, two end caps for those that have some rib detail, and two ribs, which don't close the outer section of where the wheels store.

Tamiya and Eduard both have the wheel well detail molded into the upper wings. Special Hobby seems to have phoned that part in on this one, and there is no detail. I don't really care, as mine sit on a shelf and never get seen from below, but others may want to add them in.
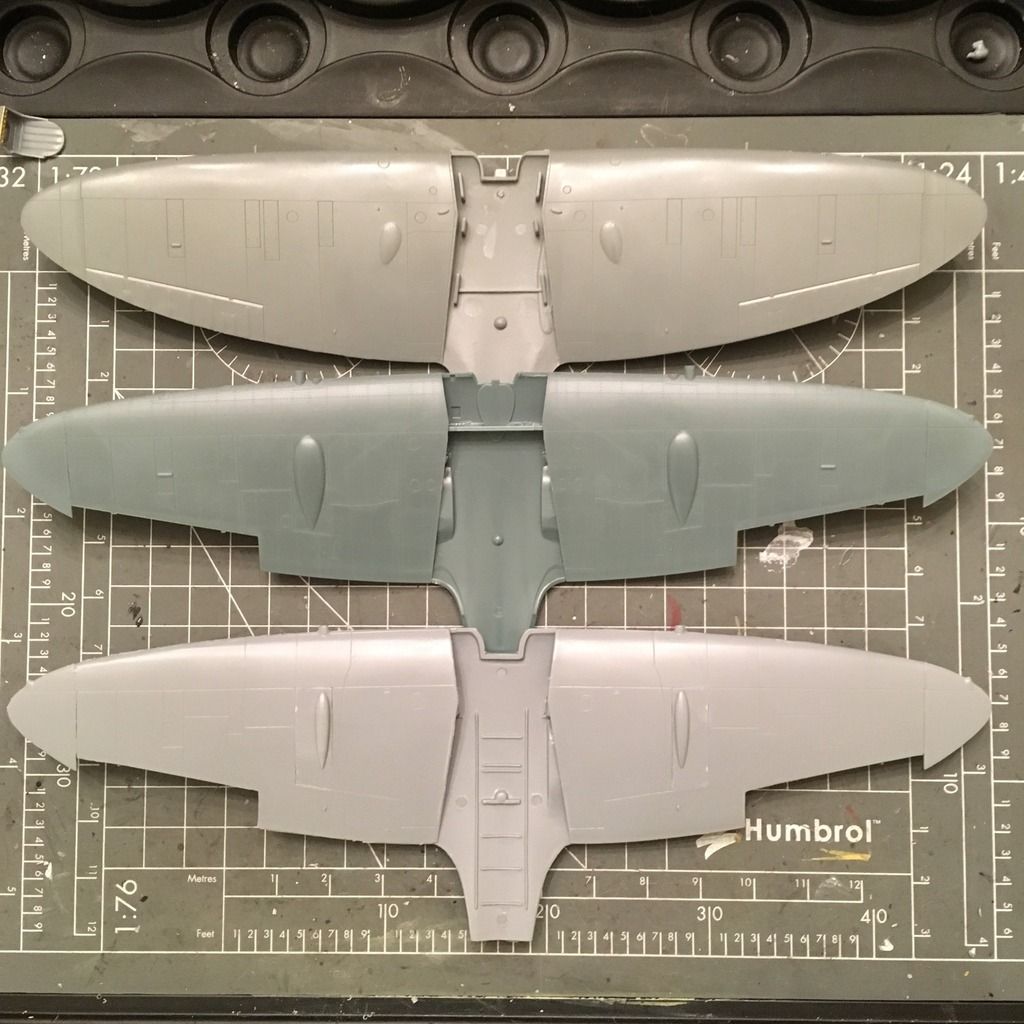
Parts count (Not counting lower wing or gear bay pieces)
Tamiya: 2
Eduard: 4 (+2 ailerons and weapons to come later)
Special Hobby: 6 (+2 ailerons and weapons to come later)

I got the wings together, and when laying them on top of each other, they are all almostexactly the same size. Eduard may be a bit thinner in the fuselage area, but it also goes together slightly differently at that join.

Tamiya's wings have the wintips molded to the top, and the lower wing fits flush. They went toether flawlessly, and even though the control surfaces are molded to the top and bottom, the trailing edges are nice and thin.

Eduard's top wing parts almost snapped into place. Fit was excellent, and the ailerons are molded separately, as are the wingtips. The flaps are top and bottom, but the top wing part has the 1mm-wide portion of the lower wing behind the flaps molded into it, and the trailing edge is nice and thin. The wingtips fit in with a tab, and it almost didn't need glue. (clipped wing variants can be made with this kit, using the clear plastic wingtips that give you a nice clear navigation light).

Special Hobby was significantly less polished on this part. The leading edges don't go together well at all, and there is almost an indentation instead of a rounded leading edge. This will require some putty. Also, the gun bay covers are molded separately, allowing different variants to be built from the same mold. This is fine if the parts fit, but these don't. I had to do a fair amount of trimming and test fitting before they got to where they'd fit, and then the curvature didn't match that well. I will try to hide it with putty, but this is probably going to show and look less polished. The wingtips aren't a perfect fit, either, and there's a step on one of the joins that needs cleanup. There is no locating tab, but the join itself is stepped, so it's easy to see where it goes.

The front scoops for all three are two-piece setups and all look to fit pretty well. I haven't added the Special Hobby one yet because I need to work on the wings a bit first.
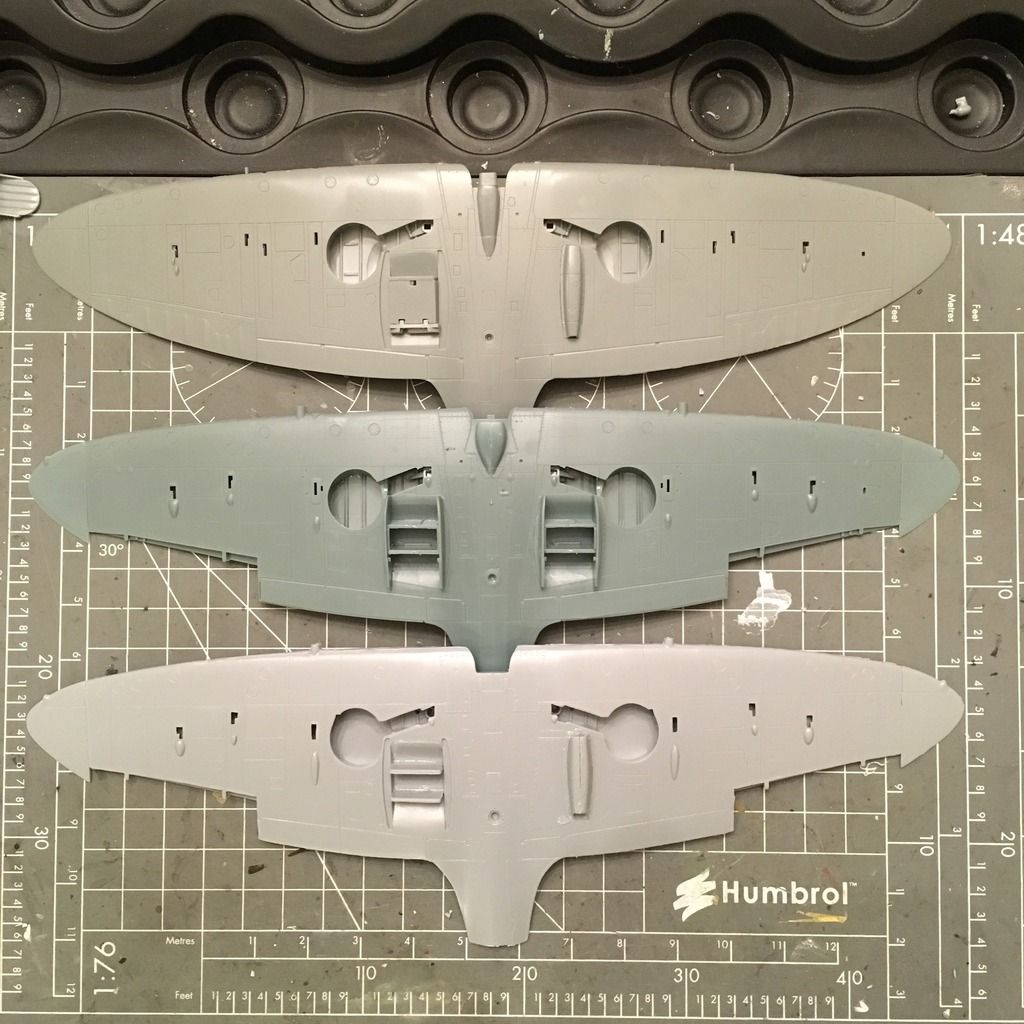
Parts count (counting the covers and front scoop that will be fit later)
Tamiya: 5
Eduard: 16 (plus two PE hooks to come later just inside of the scoops)
Special Hobby: 8

Tamiya handles the scoops with a one-piece design for the small one and a three-piece design for the large one (two screens and a cover). I left the cover off for painting purposes. Perfect fit.

Eduard provides left and right sides and front and back screens for each scoop. The tops are two pieces, with separate actuator arms for open or closed positions (so, seven parts for each scoop). Fit was flawless.

Special hobby provided the small one as two parts, which took some time to get to fit correctly into the slot in the wing. It also leaves a seam that needs to be cleaned up. The larger scoop is two screens and a two-piece cover so you can position it open or clised.

  • Member since
    June 2014
Posted by BrandonK on Saturday, March 5, 2016 2:50 PM

Noticable difference there. This will be interesting to see how each looks as they go together. Very cool.

BK

On the bench:

A lot !! And I mean A LOT!!

2024 Kits on deck / in process / completed   

                         14 / 5 / 2  

                              Tongue Tied

  • Member since
    March 2015
  • From: Streetsboro, Ohio
Posted by Toshi on Saturday, March 5, 2016 1:52 PM

A fantastic job as always!

Toshi

On The Bench: Revell 1/48 B-25 Mitchell


Married to the most caring, loving, understanding, and beautiful wife in the world.  Mrs. Toshi


  • Member since
    January 2016
  • From: A Galaxy Far, Far Away
Posted by Hunter on Friday, March 4, 2016 9:30 PM

UKguyInUSA

Cool! Three in one, sweet! In recognition, i was thinking of taking a break from my 1/32 Ju 88 and building the Spitfire prototype K5054 that made the first flight on March 5th 1936, if there is a model available?


Have fun building them!


Cheers :)

Martin


Hello Martin - 

I did find this site of the aircraft you are looking for...little pricey

http://www.scalemodelairplanekit.com/catalog/item/8905513/10072971.htm

Website with a bio of the prototype

http://aeroscale.kitmaker.net/modules.php?op=modload&name=Reviews&file=index&req=showcontent&id=7928

Hope this helped

Hunter 


  • Member since
    April 2015
  • From: New Hampshire, USA
Posted by UKguyInUSA on Friday, March 4, 2016 9:18 PM

Cool! Three in one, sweet! In recognition, i was thinking of taking a break from my 1/32 Ju 88 and building the Spitfire prototype K5054 that made the first flight on March 5th 1936, if there is a model available?


Have fun building them!


Cheers :)

Martin

  • Member since
    June 2013
Posted by bvallot on Friday, March 4, 2016 4:42 PM

So this is where you're tied up at!! =D  Very intersting post. I love watching match-ups.  I'll be sticking around for this. 

On the bench:  

Tamiya F4U-1  Kenneth Walsh


  • Member since
    January 2016
  • From: A Galaxy Far, Far Away
Posted by Hunter on Friday, March 4, 2016 2:27 PM

BrandonD

Hunter - The Tamiya Spitfire is a solid kit. I have the Mk.Vb as well, and when dry-fitting, both go together so well that you almost don't need glue. I haven't built one yet, but if you don't want to deal with the high parts count of the Eduard kit, I would definitely recommend Tamiya. I'm not sure how the Airfix kits are (If they're new tool, I am sure they are good), but the ICM one is a bit of a chore with fit at the wing root and no alignment pins.

I was actually just going to build the Seafire, but then I thought of how easy it would be to paint all cockpits at once, and that progressed to just doing all three at once.

-BD-


You are right Brandon, I just finished building the Tamiya Japanese Zero and the dry fit was so nice it almost could have been built without glue. I have read that the AirFix kit is very nice with great fit. I hope you enjoy building these kits...I know I will watching you.

Hunter 


  • Member since
    January 2015
Posted by BrandonD on Friday, March 4, 2016 2:03 PM

Hunter - The Tamiya Spitfire is a solid kit. I have the Mk.Vb as well, and when dry-fitting, both go together so well that you almost don't need glue. I haven't built one yet, but if you don't want to deal with the high parts count of the Eduard kit, I would definitely recommend Tamiya. I'm not sure how the Airfix kits are (If they're new tool, I am sure they are good), but the ICM one is a bit of a chore with fit at the wing root and no alignment pins.

I was actually just going to build the Seafire, but then I thought of how easy it would be to paint all cockpits at once, and that progressed to just doing all three at once.

-BD-

  • Member since
    January 2016
  • From: A Galaxy Far, Far Away
Posted by Hunter on Friday, March 4, 2016 1:52 PM

Brandon - 

Wow, three kits at once...very impressive. I have the Tamiya kit on my "wish list" so I'll be watching every moment. I really like your informative commentary on each kit. Thank you for sharing these builds. Hope you enjoy.

Hunter 


  • Member since
    January 2015
Posted by BrandonD on Friday, March 4, 2016 12:01 PM

Thanks, Gamera!

As far as ease of build, the Eduard will get more difficult. I think the exhaust pipes are over-engineered, and the cowling is a two-piece affair that makes eliminating the seam without ruining the rivet detail really difficult. Then again, the same seam will be present on both the Tamiya and Special Hobby kits, as the cowling is molded with the fuselage halves.

The other annoying part of the Eduard kit is the prop has nothing to hold it into the plane, and it falls out if you tip it. I may do something about that, but probably not.

In my opinion, the biggest advantages the Eduard kit has are the level of detail (it's 15-20 years newer than the Tamiya kit) and the separately molded control surfaces, which make the elevators easy to pose in their correct parked positions.

-BD- 

  • Member since
    November 2009
  • From: SW Virginia
Posted by Gamera on Friday, March 4, 2016 11:49 AM

Very cool BD, thanks for letting us follow along! 

I built the Tamiya kit a few years back and it's one of the best fitting, best engineered kits I've ever had the pleasure to build. I'm surprised to see the Eduard one tie it in ease of building. 

"I dream in fire but work in clay." -Arthur Machen


  • Member since
    January 2015
Completed: Spitfire Turns 80: 1/48 Tamiya, Eduard & Special Hobby
Posted by BrandonD on Friday, March 4, 2016 11:45 AM

Tomorrow, March 5, marks the 80th anniversary of the first flight of the Spitfire, and since I seem to have wound up with a bunch of them in my stash, I decided to go ahead and build three side by side and compare them.

The kits I've chosen are all 1/48 and are Tamiya's Mk.I, Eduard's Mk. IX Weekend Edition and Special Hobby's Seafire Mk.III. My bias is toward to Eduard kit being the best, but I expect the Tamiya to hold up well and the Special Hobby to be less polished. I did buy the PE set for the Eduard kit, and I ordered a Sutton Harness for the Tamiya kit.

I'll be building the Tamiya into something early war, maybe going as late as the Battle of Britain. The other two will be the box art - the U.S. one in 1943 in Tunisia and the French Aeronavale one in 1946.

Of course, it starts with the cockpit. I drilled out the lightening holes in the fuselage ribs that hold the seats on all three kits, then proceeded to build them up to the point where I'll need to lay down primer.

2

Top: Tamiya
Middle: Eduard
Bottom: Special Hobby

Each kit takes a different approach to the cockpit, and I like Eduard's best. Everything goes together so well, but it does have the highest parts count. Special Hobby did a nice job, with PE parts for the front of the seat and the tops of the rudder pedals. Tamiya is easily the simplest, with a small number of parts, but everything goes together in their typical fashion.

Parts count for what you see here:
Tamiya: 9
Eduard: 25
Special Hobby: 18

The cockpit sidewalls are also handled differently. Tamiya followed the curvature of the fuselage, which isn't nearly as accurate as the take Eduard and Special Hobby took, which is to make separate pieces for the lower portions of the fuselage interiors.

Parts count for what you see in the above two pics (counting fuselage halves)
Tamiya: 5
Eduard: 13 (counting the two parts for the tail wheel mount)
Special Hobby: 8 (And I left off one PE lever that no one would ever see)

Detail parts are varied, and while all include a separate throttle quadrant, oxygen tanks and a few other pieces, Eduard has the most separate detail parts, and its cockpit sidewalls have the most depth to them.

When it comes to fit, so far, Tamiya and Eduard are basically tied. The Tamiya seat and cockpit floor went together with slightly better snugness, but the sidewall detail attachment points were more open to the parts sitting in the wrong position. Special Hobby was pretty good, but one fuselage half was warped outward at the nose, which required significant clamping with the interior sidewall piece serving as a splint to hold it in place and bring it closer to straightness.

I think it will be fun to build these three, and they are all operated by different countries at different times in different markings, so it's sort of a one-man group build. If more of you want to join in the fun, I'd be happy to host a groupb uild that runs through the end of the year.

Thanks for looking!

-BD-

JOIN OUR COMMUNITY!

Our community is FREE to join. To participate you must either login or register for an account.

SEARCH FORUMS
FREE NEWSLETTER
By signing up you may also receive reader surveys and occasional special offers. We do not sell, rent or trade our email lists. View our Privacy Policy.