SEARCH FINESCALE.COM

Enter keywords or a search phrase below:

Completed: Spitfire Turns 80: 1/48 Tamiya, Eduard & Special Hobby

6187 views
74 replies
1 rating 2 rating 3 rating 4 rating 5 rating
  • Member since
    February 2014
  • From: Michigan
Posted by silentbob33 on Wednesday, April 6, 2016 3:42 PM
Looks really good! I don't know if I have it in me to mask and paint RAF roundles though.

On my bench: Academy 1/35 UH-60L Black Hawk

  • Member since
    January 2015
Posted by BrandonD on Wednesday, April 6, 2016 1:52 PM

Oh, and I just have the cowl tacked on for ease of painting. It will come off again so I can install the exhaust without annoying masking.

-BD-

  • Member since
    January 2015
Posted by BrandonD on Wednesday, April 6, 2016 1:50 PM

Thanks, Lawdog!

I've been working away on the Mk.I and the Seafire, but nothing really worth progress shots as yet. I also ran into a small problem where one ofthe wing roundels on the Seafire flaked a bit, and I need to fix that :(

On the Eduard Mk.IX, though, I managed to get paint on it last night.

Unfortunately, I have the elevators on upside-down (the actuator arms for the trim tabs are on the bottom, and they should be on thetop. On the bright side, I haven't glued them or the rudder in place, so it's an annoying fix, but an easy one. I'll re-prime it, spray the Azure, then mask and match the top camo pattern.

I also need to tough up the little tag of Middle Stone on the starboard wing and round it out slightly inboard of the cannon bulge. That should also be easy.

After that, I need to come back with a darker version of Flat Earth and spray the upper wing roundel outlines as well as the spaces for the fuselage lettering and fin flash where the USAAF painted over RAF markings. Then it's on to the clear coat.

The colors I have on this one are Model Master Azure and Gunze Mr. Hobby Dark Earth and Middle Stone for the top camouflage. I plan to weather it with oils, so we will see how that goes.

-BD-

  • Member since
    February 2012
  • From: Olmsted Township, Ohio
Posted by lawdog114 on Friday, April 1, 2016 9:15 PM
Outstanding.....

 "Can you fly this plane and land it?...Surely you can't be serious....I am serious, and don't call me Shirley"


  • Member since
    January 2015
Posted by BrandonD on Friday, April 1, 2016 4:03 PM

Quick update on the Mk.I markings. I got all the roundels, wing walk lines, fuselage lettering and fin flash painted, then glossed it with Tamiya clear. Then I applied the decal that came with the Montex set (the bird) and applied stencils. I have the Barracuda stencil set, which is nice, but it doesn't include white markings, so I used the Tamiya stencils for those, and cut them around the markings. The wing stabilizer location markings are all Tamiya, but the rest are Barracuda, and they went down very well.

I cleared it again at lunch and will hopefully get the Flory wash on it tonight, though I'm not sure what I want to do for the black. I may pick up a Vallejo white wash or some light oil paint.

-BD-

  • Member since
    January 2015
Posted by BrandonD on Friday, April 1, 2016 3:58 PM

Thanks, Lawdog. After moving on with the colors and markings, I am liking them more and more. They might be worth the time after all.

-BD-

  • Member since
    February 2012
  • From: Olmsted Township, Ohio
Posted by lawdog114 on Wednesday, March 30, 2016 8:45 PM
Outstanding. I started paint my roundels too. It looks so much better.

 "Can you fly this plane and land it?...Surely you can't be serious....I am serious, and don't call me Shirley"


  • Member since
    January 2015
Posted by BrandonD on Wednesday, March 30, 2016 3:34 PM

Lunch painting session was a success, as I got the fuselage letters painted and fixed the out-of-round portion of the starboard wing roundel that made the red portion off-center. Fortunately masking it off was easy.

As for the fin flash, the masks don't want to sit down against the horizontal stabilizer root, so I will mask with regular Tamiya tape and paint them later.

-BD-

  • Member since
    January 2015
Posted by BrandonD on Wednesday, March 30, 2016 12:46 PM

I decided I didn't like the amount of gray in the white portion of theunderside, so I re-masked it and shot a heavily thinned coat of white over it to lighten it, and I'm happier with the results now.

I also masked the upper surface camouflage, and I can say this picture perfectly captures why I hate hard-edged camo and why I love Tamiya tape for curves. It was super easy to work with, and it didn't allow any seepage underneath it, even though in places I shot right at the tape.

For the markings on this one, I got a set of Montex masks and painted them. I am mostly happy with the results, but I have to say it was really tedious to work with, and it was hard to align them perfectly. With the high-quality decals being thin and laying down into panel lines so well, I see these as a good alternative to thick kit decals (like Tamiya's), but probably not my go-to markings option unless I want to do a really worn look that is just easier with paint.

Today I hope to spray the fuselage lettering and get some of the tail flash done, which I stupidly forgot about when I had the paints loaded up.

I have a set of Barracuda stencils for the plane, and while I thought of laying them down before the markings, I decided not to, as the decal edges would likely show under the paint. I will try to cut them around the decals and see how that works. I also plan to paint the wing walk lines.

-BD-

  • Member since
    January 2015
Posted by BrandonD on Monday, March 28, 2016 4:47 PM

Ok, I got the clear on the Seafire and then went about decaling this weekend. The decals were, for the most part, very nice. They laid down smoothly and really sank into the recessed detail. However, even with Micro Set beneath them, there wasn't much room to maneuver them, and I was glad Special Hobby supplied another aeronavale plane's markings, as the one I intended to do folded on itself and became a mess.

I have since added a panel line wash and flat coat, and I painted the prop spinner today. I used a mix of Tamiya tape, Montex vinyl msk and liquid mask for the canopy, and I have to say my favorite is the Montex mask, with the Tamiya tape being a close second. I felt the liquid mask didn't give as sharp of a line as I'd like, and was kind of a pain to get on the piece.

For the Tamiya Mk.I, I painted the underside colors of split black and white. I cut the white a little with neutral gray (5:1 white:gray), and it might look a little too gray now. I may go back and mask it off again and spray a super thin coat of white to lighten it. Not sure if I have the patience for that, though...

With theunderside masked, I shot the Gunze Dark Earth on the upper surfaces this morning (yay for a day off of work!)

It's been drying for several hours now, and I should be able to mask it and get the dark green on this evening.

The Eduard kit needed some final filling and sanding on one part, and I primed it, hopefully for the final time, this morning. I should get color on it tomorrow evening.

-BD-

  • Member since
    January 2015
Posted by BrandonD on Monday, March 28, 2016 4:40 PM

Thanks, Lawdog!

Colin - the cowls were on my doorstep when I came home friday. What a perfect, drop-in fit. I thought the Eduard would be ready to go, but the filler shrank a bit on the hood, so I had to do some more sanding and filling. It *should* be good to go now, and I primed the cowl. Hopefully I can get paint on it in the next day or so.

-BD-

  • Member since
    January 2012
  • From: Barrie, Ontario
Posted by Cdn Colin on Sunday, March 27, 2016 4:51 PM

Very glad I could help.

I build 1/48 scale WW2 fighters.

Have fun.

  • Member since
    February 2012
  • From: Olmsted Township, Ohio
Posted by lawdog114 on Saturday, March 26, 2016 8:03 PM
Looking great. Agreed, the cowl on the Eduard kit is tricky....silly design. I like the painted walkway lines.

 "Can you fly this plane and land it?...Surely you can't be serious....I am serious, and don't call me Shirley"


  • Member since
    June 2014
Posted by BrandonK on Saturday, March 26, 2016 11:12 AM

These are coming along really nicely. The paint is looking fantastic. This is a really cool build.

BK

On the bench:

A lot !! And I mean A LOT!!

2024 Kits on deck / in process / completed   

                         14 / 5 / 2  

                              Tongue Tied

  • Member since
    January 2015
Posted by BrandonD on Friday, March 25, 2016 5:52 PM

Well I have been doing a lot of fitting, sanding, building, etc., and all are now in various stages of paint.

The Special Hobby Seafire took the most work with the wing-to-fuselage seam, as it didn't close up properly, and there was a prominent step at the join. I shaved it somewhat, and then used Tamiya putty to smooth it out.
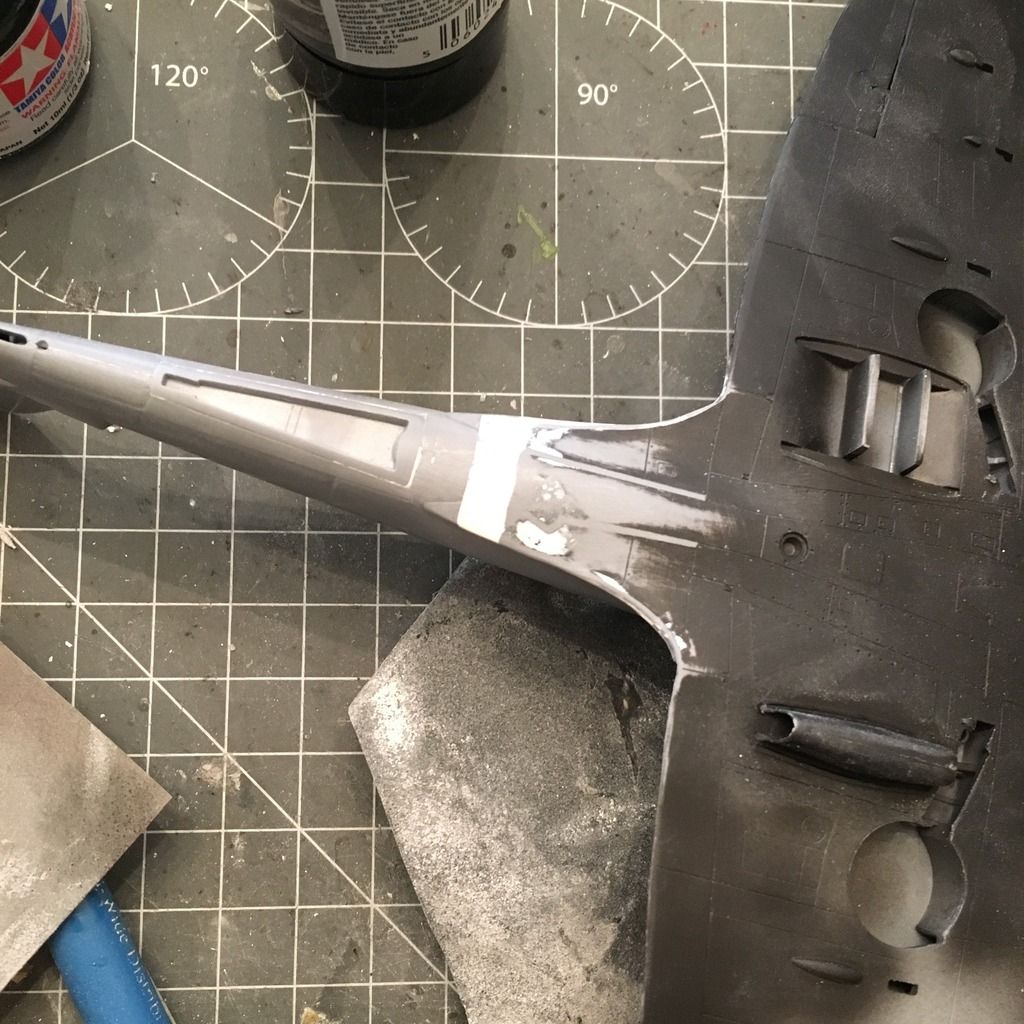
In the end, it doesn't look like I changed the profile much, if at all, and while it was a lot of work, I am pretty happy with the result.

I then got all three constructed and primed with Mr. Surfacer 1500 black.
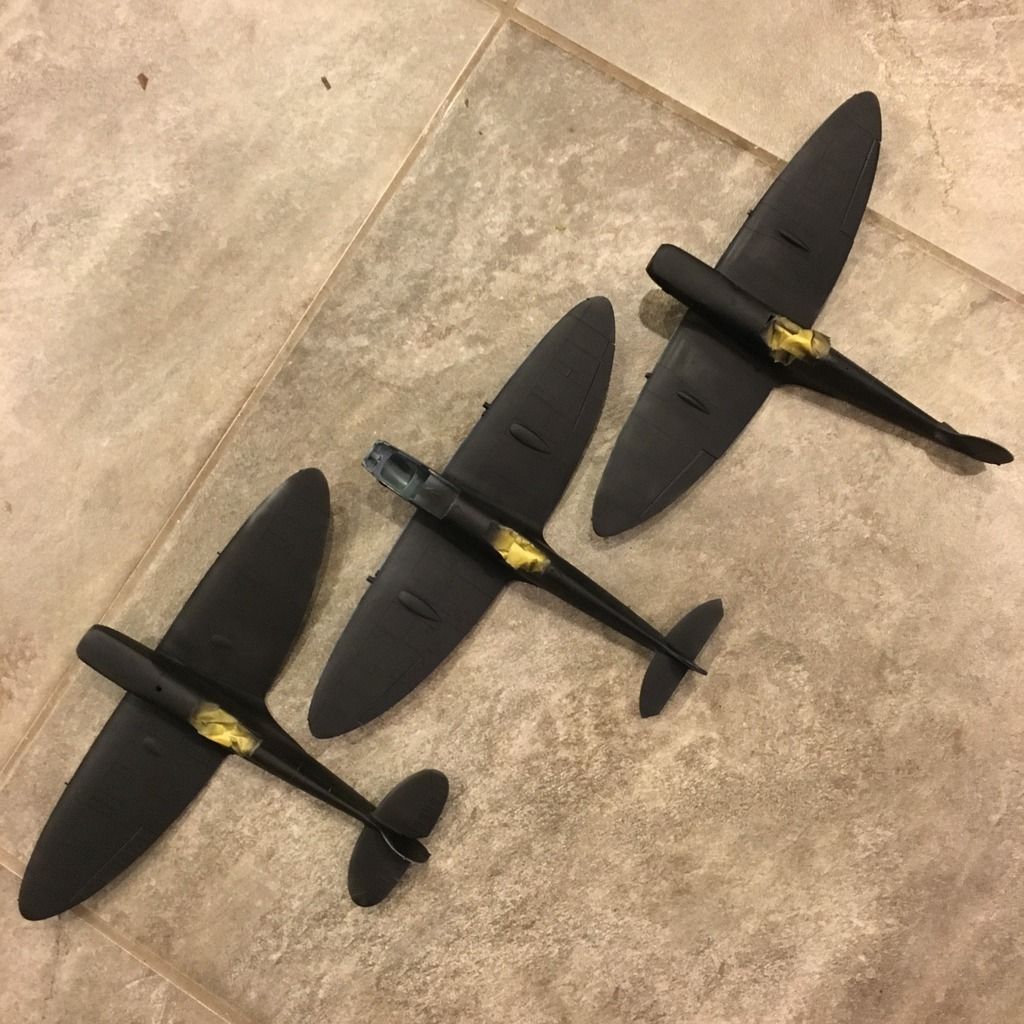
The Tamiya kit went together the easiest, and the Eduard was next. The only knock against Eduard I have is the two-piece cowling, which is a victim of its own success in a way. The other two kits have the same cowling seam, but they don't have the rivet detail present on the Eduard, so even though they still need sanding and filling, it somehow feels like less of a problem. With Eduard already using slide molding on the kit, I wish they had just done more of that and made the cowl one piece. Oh well, the Ultracast resin one is on the way (the part is NOT unbuildable - I'm just lazy).

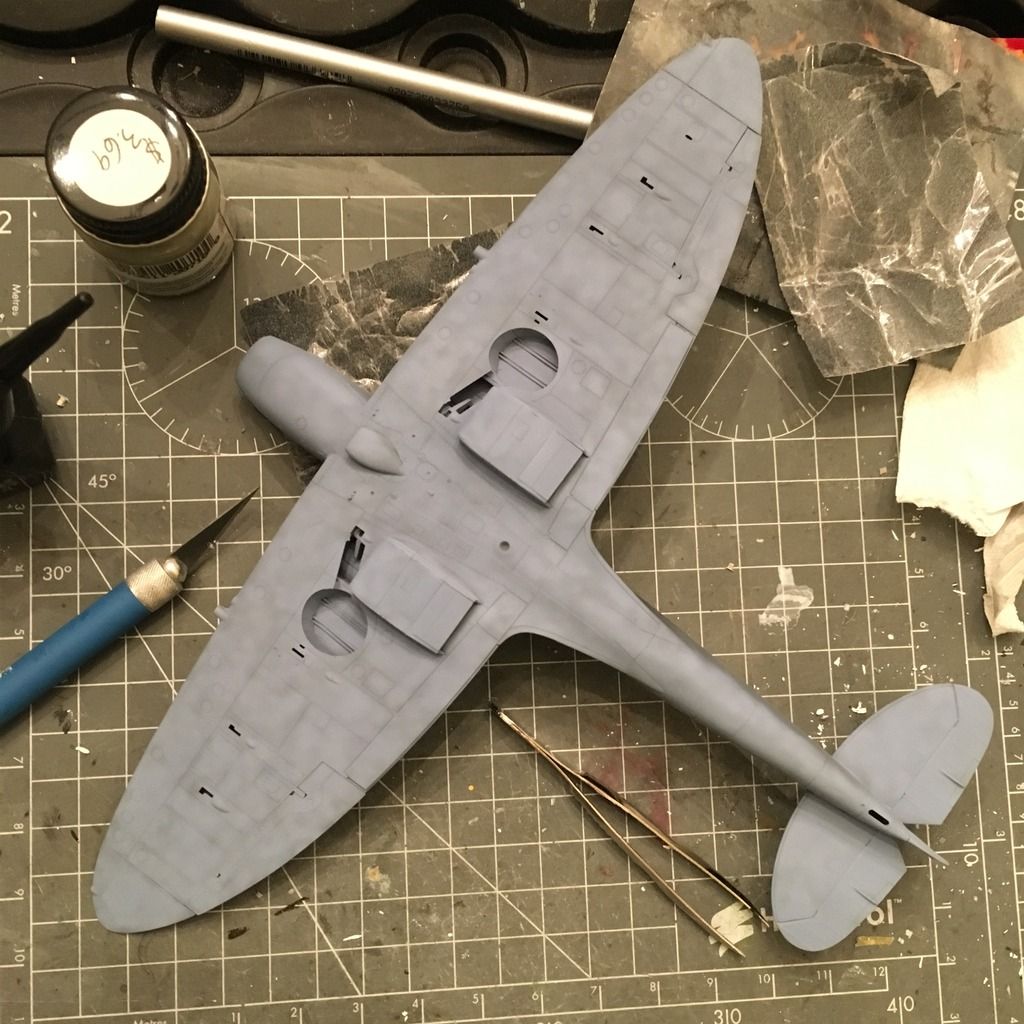
The next thing I did was paint the Model Master Azure Blue on the underside of the Eduard Mk.IX.
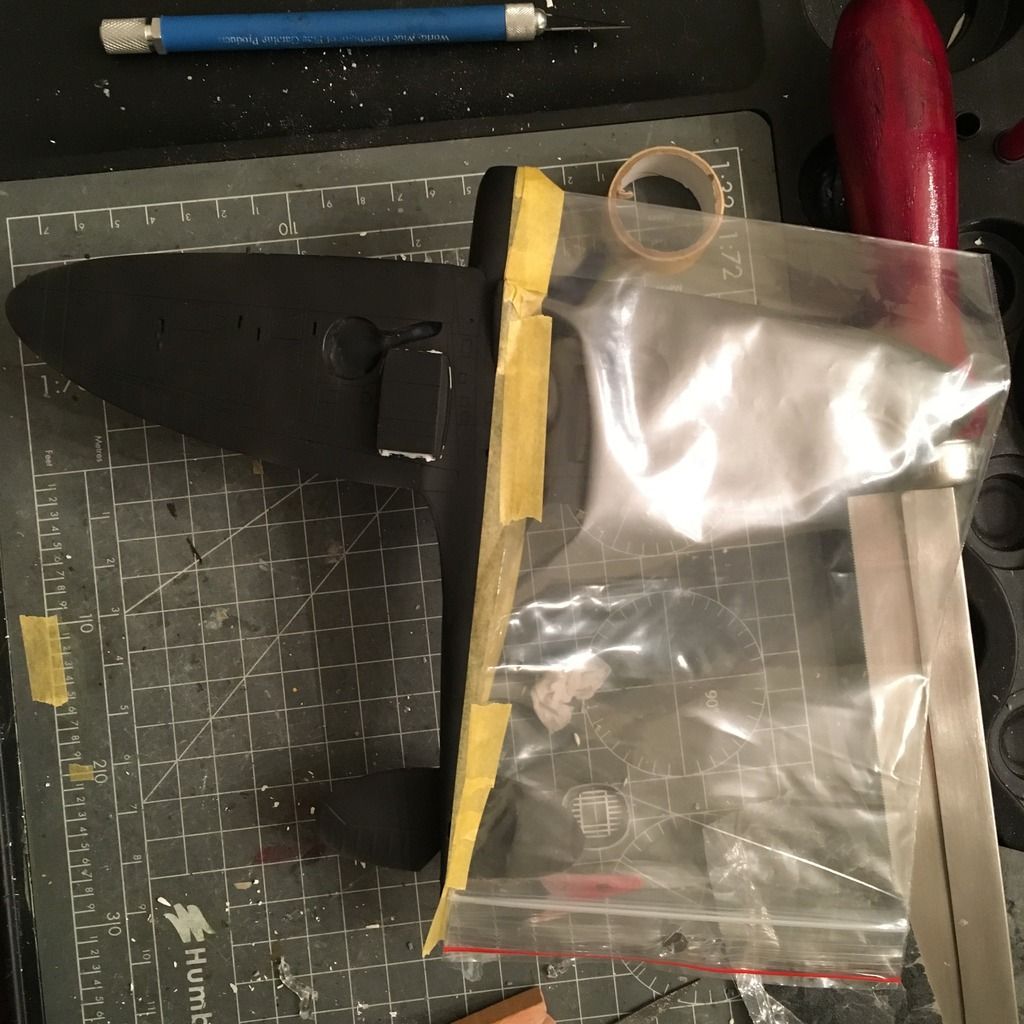
When it came time to paint the Tamiya one, I went with a black/white underside to go with some Montex markings I have. I used Tamiya Medium Blue to mottle the black-primered surface, and then I came back with a blend coat of Tamiya Rubber Black to even it out, give some depth and not appear so starkly black. You'll get a pic of it once I finish the white, which the photo below shows the masking for. Yes, as I was masking, I kind of wished I hadn't filled the fuselage seam...
On the Seafire, I painted the underside Tamiya Sky. It took the most work to get to the paint stage, but I guess I got on a roll with it, and I masked the underside and shot the top colors last night.

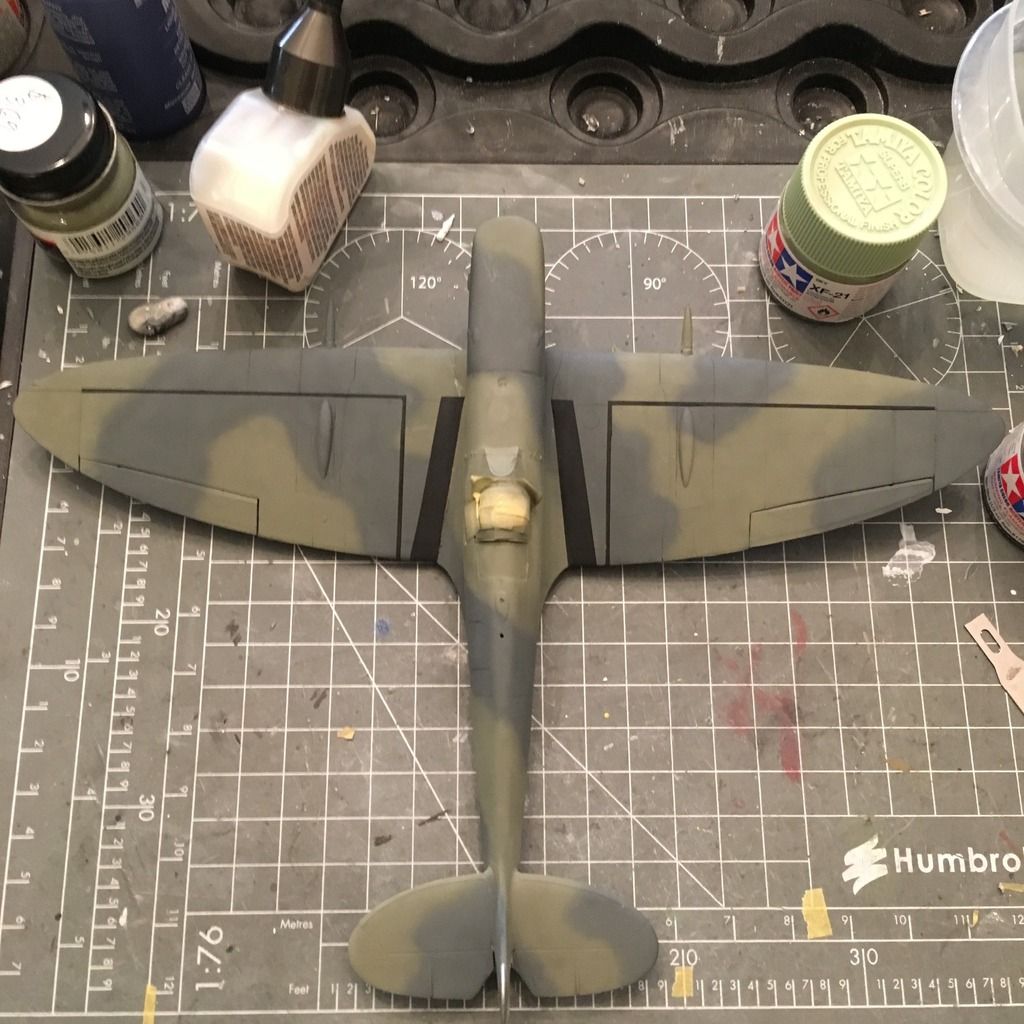
Though it's in French Aeronavale markings, it wears its Fleet Air Arm scheme, and after spraying the rudder Alclad Duraluminum (it was replaced on this particular plane and left in doped silver), I shot Model Master Dark Slate Gray for the upper surface camouflage. In the past, I've always waited for one color to dry before masking and shooting the next, but I decided to see if I could freehand the pattern, and I mixed Tamiya Dark Sea Gray 3:1 with Tamiya NATO Black to get an approximation of Extra Dark Sea Gray, and I sprayed that on freehand.
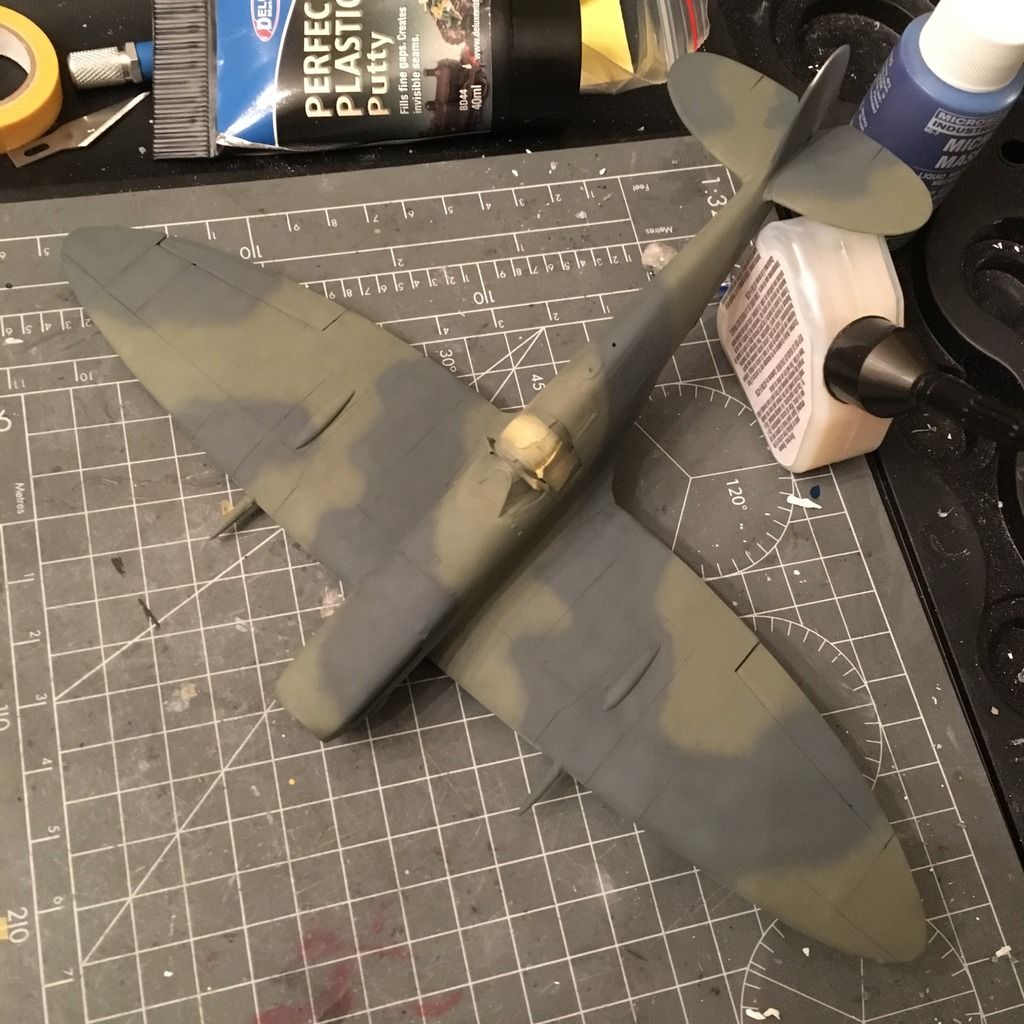
With that done, I masked the wing walk lines and the black strips at the wing roots, then shot them at lunch today (and fixed a little bit of the camouflage on the cowling and starboard horizontal stabilizer.
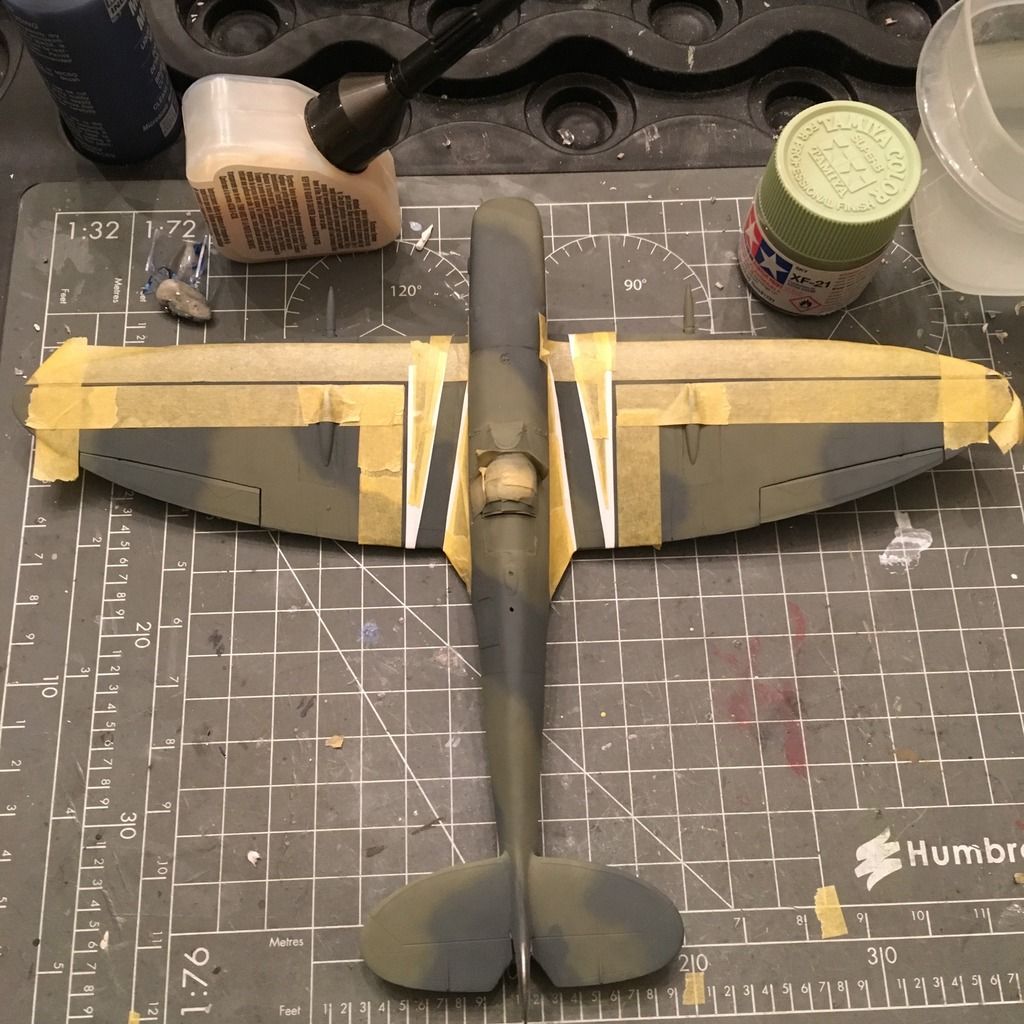
After painting it, I pulled off the masks. I think the wing walk lines are a little thick but not enough for me to worry about redoing them, and I will shoot a gloss clear on it hopefully tonight.
One thing to note about the Special Hobby Seafire that I really like: The strakes along the fuselage and the strenghtening piece around the panel behind the cockpit are provided as vinyl self-adhesive parts, and they work great (you get a spare of each piece, too). As I understand it, these were to strengthen then airframe for catapult launches. They're a nice touch and complement the PE parts well.

-BD-

  • Member since
    January 2015
Posted by BrandonD on Friday, March 25, 2016 5:34 PM

Colin - thank you so much! I had seen those before, but the fact that the exchange rate worked in my favor made me pull the trigger, so now I am just waiting on it to show up. I actually ordered two, since I have another Eduard Mk.IX in the stash, and not dealing with the split cowl is worth it to me.

-BD-

  • Member since
    January 2012
  • From: Barrie, Ontario
Posted by Cdn Colin on Saturday, March 19, 2016 6:37 AM

Speaking of the upper cowl, Ultracast makes a one-piece resin block to replace the Eduard parts.

http://ultracast.ca/products/48/264/default.htm

Prices are Canadian, so it would be about 3/4 price in American.

I build 1/48 scale WW2 fighters.

Have fun.

  • Member since
    March 2015
  • From: Streetsboro, Ohio
Posted by Toshi on Saturday, March 19, 2016 4:27 AM

You're doing a fantastic job on the trio!  I love the attention to detail, excellent.  I'm anxious to see more.

Toshi

On The Bench: Revell 1/48 B-25 Mitchell


Married to the most caring, loving, understanding, and beautiful wife in the world.  Mrs. Toshi


  • Member since
    January 2015
Posted by BrandonD on Saturday, March 19, 2016 2:36 AM

Thanks, Lawdog. I still haven't got them nearly as nice as yours, but it's what I aspire to.

No real updates as of now. I got the fuselages all assembled and the wings on. I'm just in seam cleanup purgatory at the moment, namely on the cowling of all three kits and the rear of the wing-to-fuselage join on the Seafire, which has a pronounced step I am working on smoothing.

Hopefully I can make good progress tomorrow, as well as pick up some paints. I seem to be lacking in Azure and Slate Gray.

-BD-

  • Member since
    February 2012
  • From: Olmsted Township, Ohio
Posted by lawdog114 on Thursday, March 17, 2016 2:39 AM
Looking sweet bud. You nailed the interior color.

 "Can you fly this plane and land it?...Surely you can't be serious....I am serious, and don't call me Shirley"


  • Member since
    January 2015
Posted by BrandonD on Tuesday, March 15, 2016 12:15 PM

I got the rest of the offices done last night.

The Tamiya kit basically assembled itself when I blinked after dropping the cockpit in from the underside, and it's sitting on the bench now acting all smug because it has wings and the others have clamps holding them together.

The Eduard fuselage halves went together, but on test fit, there was a 1mm gap forward of the instrument panel. I ran into the same issue when I built the Mk.VIII, and I believe it has to do with the PE panel being slightly oversized (or I am mounting them too high up). That said, I filed it down some, and had to take off part of the plastic, but that made the fuselage halves come together nicely, even if I had to hold them with a clamp as I let the glue set overnight.

The Special Hobby fuselage halves are pretty warped, and after installing the cockpit, I only glue the rear part together, using tape and clamps to keep everything tight. The arrestor hook housing was a perfect drop-in fit on the lower part of the fuselage, which nicely takes away from dealing with seam work on the bottom, and the beveled edges keep it from falling into the model. I will glue the forward halves of the fuselage together tonight, add the fuel cap, and hopefully get the wings on.

Parts count:
Tamiya: 1 (plus the decal, and a one-piece gunsight to come at the end)
Eduard: 6 (3 PE parts, and 2-piece gunsight to come)
Special Hobby: 10 (4 PE parts and 3 acetate parts, with gunsight to come at the end)

Tamiya Mk.I on the left, Eduard Mk.IX in the center and Special Hobby Seafire is on the right. As far as instrumentation, I prefer the acetate gauges (Special Hobby) over painted PE (the Eduard in the center) or decals (Eduard decal on a Tamiya panel on the right) because I feel like they look the most realistic. I fudged the placard on the top right with paint, and I hit the highlights for the yellow on the right side. The compass housing was PE, and it has a nice scale look to it, I think. The silver highlights are from a Prismacolor pencil. You can see the Eduard decal didn't fit the Tamiya panel very well, but Tamiya offered neither a decal nor any raised detail on the gauges, so there's nothing for drybrushing to highlight. The way it sits in the pit makes it not noticeable that the gauges are a little off.

Parts Count (not including fuselage halves)
Tamiya: 5
Eduard: 8
Special Hobby: 6

The cockpit walls are pretty similar. The Special Hobby Seafire (on the bottom) went together like the Eduard (in the middle), and are much more accurate than the Tamiya in shape.

I had reservations about the Seafire after cracking into it, especially with the fit issues on the wings, but I'm cautiously optimistic that despite all that, it will come together nicely.

-BD-

  • Member since
    January 2015
Posted by BrandonD on Monday, March 14, 2016 4:23 PM

Thanks, Bish!

-BD-

  • Member since
    December 2002
  • From: Bury St Edmunds, Suffolk, England
Posted by Bish on Monday, March 14, 2016 3:53 PM

Some really impressive work there BD.

I am a Norfolk man and i glory in being so


On the bench: Airfix 1/72nd Harrier GR.3/Fujimi 1/72nd Ju 87D-3

  • Member since
    January 2015
Posted by BrandonD on Monday, March 14, 2016 3:47 PM

Ok, so now the office chairs.

Tamiya went together with the least work because everything fit and there's few parts. Unfortunately, they didn't see fit to provide even a decal harness, so I bought one of the textile ones from HGW. It took me about two hours to assemble, but it was worth it. I think.

Once that was assembled, I added it to the seat, then gave it a wash to dirty it up a bit. I am keeping the Tamiya pretty clean, as it's a 1940 bird and didn't have too much time to get filthy.

The Eduard harness went together well, and the seat area was easy to assemble and a joy to build. Again, this is the Weekend Edition with the PE set, which comes with the Profipack, but I purchased separately (a sale made buying the kit and PE separately a better deal than the Profipack, which doesn't have the markings I wanted anyway).

The Special Hobby seat area went together a bit differently than the other two, with the seat adjustment lever mounted to the framework behind the seat, and I had to bend it slightly to keep it from pushing the seat off-center (no biggie). Special Hobby also provided a Sutton harness in PE, but unpainted.

Now these are basically ready to go into their cockpits. And yes, I have since glued the lap belts down, as we can't have them floating like they are here. I used Micro Kristal Klear for all the PE and fabric joints.

From left to right, we have Tamiya Mk.I, Eduard Mk.IX and Special Hobby Seafire Mk.III.

Parts count:
Tamiya: 7 (plus 30 - yes, 30 - in the Sutton harness)
Eduard: 22 pictured, plus 3 to make up the behind-the-seat framework (four of which is the PE harness)
Special Hobby: 20 (of which 4 are the Sutton harness, with one harness piece still to come).

Anyway, at this point, I still give the lead to Eduard. Eduard didn't provide the top straps for the rudder pedals, but everything else goes together so well that I still give them the edge on detail and. Tamiya fit is great, but Special Hobby has more detail, so I rate it in the No. 2 spot for the cockpit.

-BD-

  • Member since
    January 2015
Posted by BrandonD on Monday, March 14, 2016 3:37 PM

Hi all,

Sorry for the lack of updates I got a little sidetracked painting a Wildcat and then was busy away from the bench.

This is a quick update on the wing of the Special Hobby Seafire. I knew that given it's a short-run kit, it wouldn't fall together like the Eduard and Tamiya ones. So I spent some time sanding, clamping, filing and filling. In the end, I had to file the surface where the wing meets the fuselage, then sand the top down to eliminate a 0.5mm step that would be a pain to fill later. Also, the ailerons were noticeably thinner than the wing, so I added 0.010" styrene sheet to the bottom and rescribed the panel lines. I also sanded and filled the seam on the oil cooler scoop. It took quite a bit of work, but it's ready for primer.

Next up is the office work.

-BD-

  • Member since
    January 2003
  • From: Poland
Posted by Aleksander on Tuesday, March 8, 2016 12:59 PM

UKguyInUSA

Cool! Three in one, sweet! In recognition, i was thinking of taking a break from my 1/32 Ju 88 and building the Spitfire prototype K5054 that made the first flight on March 5th 1936, if there is a model available?

 Have fun building them!

 Cheers :)

Martin


I've found 1/48 resin AlleyCat model

Recommended!

  • Member since
    November 2009
  • From: SW Virginia
Posted by Gamera on Tuesday, March 8, 2016 10:25 AM

Thanks for keeping us updated on this BD! 

I'm going to have to look up one of the Eduard kits next time I have a hankering to build a Spit. I'll say that their F6F Hellcat kit that I built last year was fantastic. 

And I do have a few Special Hobby kits in the stash though I don't think a Spit though. I need to drag one out and build it one day... 

"I dream in fire but work in clay." -Arthur Machen


  • Member since
    January 2013
Posted by BlackSheepTwoOneFour on Tuesday, March 8, 2016 9:14 AM

UKguyInUSA
 
Hunter
 
UKguyInUSA

Cool! Three in one, sweet! In recognition, i was thinking of taking a break from my 1/32 Ju 88 and building the Spitfire prototype K5054 that made the first flight on March 5th 1936, if there is a model available?


Have fun building them!


Cheers :)

Martin


Hello Martin - 

I did find this site of the aircraft you are looking for...little pricey

http://www.scalemodelairplanekit.com/catalog/item/8905513/10072971.htm

Website with a bio of the prototype

http://aeroscale.kitmaker.net/modules.php?op=modload&name=Reviews&file=index&req=showcontent&id=7928

Hope this helped


Thanks for the links Hunter, much appreciated! Damn, $225.00 is too pricey for my purse, but it would be a nice addition to a collection for an avid Spitfire fanatic.


Cheers Smile


You think $255 is expensive? I'd love to get me one of these for my front yard. LOL!

http://gateguardsuk.com/home/3545187

This company based in the UK makes full size Spitfire replicas as gate guards. Last I checked to inquire how much to build and ship to the USA - $20,000!!! That doesn't even include having to build a base to display it. LOLOLOLOLOL!!!

  • Member since
    April 2015
  • From: New Hampshire, USA
Posted by UKguyInUSA on Monday, March 7, 2016 10:12 PM

Hunter
 
UKguyInUSA

Cool! Three in one, sweet! In recognition, i was thinking of taking a break from my 1/32 Ju 88 and building the Spitfire prototype K5054 that made the first flight on March 5th 1936, if there is a model available?


Have fun building them!


Cheers :)

Martin


Hello Martin - 

I did find this site of the aircraft you are looking for...little pricey

http://www.scalemodelairplanekit.com/catalog/item/8905513/10072971.htm

Website with a bio of the prototype

http://aeroscale.kitmaker.net/modules.php?op=modload&name=Reviews&file=index&req=showcontent&id=7928

Hope this helped


Thanks for the links Hunter, much appreciated! Damn, $225.00 is too pricey for my purse, but it would be a nice addition to a collection for an avid Spitfire fanatic.


Cheers Smile

  • Member since
    April 2015
Posted by Mopar Madness on Monday, March 7, 2016 9:53 PM

An ambitious project.  Can't wait to see the end results!

Chad

God, Family, Models...

At the plate: 1/48 Airfix Bf109 & 1/35 Tamiya Famo

On deck: Who knows!

JOIN OUR COMMUNITY!

Our community is FREE to join. To participate you must either login or register for an account.

SEARCH FORUMS
FREE NEWSLETTER
By signing up you may also receive reader surveys and occasional special offers. We do not sell, rent or trade our email lists. View our Privacy Policy.