SEARCH FINESCALE.COM

Enter keywords or a search phrase below:

Tamiya 1:48 Wildcat F4F-3 Conversion (Complete)

12315 views
104 replies
1 rating 2 rating 3 rating 4 rating 5 rating
  • Member since
    June 2014
Posted by BrandonK on Saturday, January 21, 2017 3:45 PM

Wow, this is a daunting task you've set yourself up for. Your work thus far is awesome. I love the details you been adding, very nice!

BK

On the bench:

A lot !! And I mean A LOT!!

2024 Kits on deck / in process / completed   

                         14 / 5 / 2  

                              Tongue Tied

  • Member since
    June 2013
Posted by bvallot on Saturday, January 21, 2017 2:45 PM

Thanks everyone. If you can put up with all the tiny PE, it's certainly worth it. Next time I just might try all of this scratched out of plastic styrene. Provided you have super thin strips to work with all of this can be done in plastic and would be more forgiving to fiddle with later.

John, my soldering skills are novice at best. Much of what you see is put together with CA. Many of these parts are just too small and I'm not aware of any home-oriented soldering set up that could attach these pieces and maintain their scale of detail.

Johnny thanks! He just started crawling not two nights ago. He's getting so big so quickly. The JPS conversion does have a set of two intercoolers to correct this. So I will be tending to that. I never realized what a Frankenstien this Wildcat was going to turn out to be. I don't believe I've mentioned it yet but I will be robbing other parts from the HB kit as well. Tamiya left out the engine mount and oil tank also. The HB parts match up perfectly with Tamiya's firewall. The holes I predrilled allow the rest to settle in without any fuss. There may be a couple of small things that I overlooked, but between the JPS set and the two extra parts from the HB kit everything ought to be in order. Tamiya did put together a great kit afterall. =]

On the bench:  

Tamiya F4U-1  Kenneth Walsh


  • Member since
    July 2016
  • From: NYC
Posted by Johnny1000 on Saturday, January 21, 2017 8:58 AM

Congrats on the (growing) baby.

This is looking really good. You've got a lot of fun things happening in there.

The PE in the wheel well really helps overcome some iffy detailing in the kit. Are you planning on addressing the missing intercooler? (The Tamiya kit only includes one, when the F4F had one on each side, right next to the wheel well opening.)

Cheers

-J


  • Member since
    January 2015
  • From: Katy, TX
Posted by Aggieman on Friday, January 20, 2017 7:54 PM

Fantastic work. The PE really adds to that kit.

  • Member since
    December 2002
  • From: Northern California
Posted by jeaton01 on Friday, January 20, 2017 6:02 PM

That's going to add a lot to the model, Britt.  I wish I had a resistance soldering setup, that would be the best for PE work.  I use a small soldering iron now and try to be neat.  Try is the operative word.

John

To see build logs for my models:  http://goldeneramodel.com/mymodels/mymodels.html


  • Member since
    February 2014
  • From: Michigan
Posted by silentbob33 on Friday, January 20, 2017 5:18 PM
That PE in the landing gear bay really adds to the kit. I can't wait to see more of this.

On my bench: Academy 1/35 UH-60L Black Hawk

  • Member since
    June 2013
Posted by bvallot on Friday, January 20, 2017 1:30 PM

Finally got to put some real work in the cockpit this week. Here's where I'm at:

 Untitled by Britt Vallot, on Flickr

Eduard's PE seat is a really nice addition to the tub. Soldered it together...in hindsight, CA might be the better way to go.

 Untitled by Britt Vallot, on Flickr

Built up the railing for the fuel tank for underneath the cockpit floor. I also put in a pair of L angle parts to strengthen this spot. I learned my lesson about underengineering something when altering the design. That's why I'll also be redoing my Hellcat soon too. =]

 Untitled by Britt Vallot, on Flickr

Here is the Eduard PE part for the front of the gearbay. It's cut and made for the Hobby Boss kit but it fits pretty well over the Tamiya part. Some modification will be needed for the wheel well.

 Untitled by Britt Vallot, on Flickr

Presto! About two and a half hours later and I'm pretty sure I don't have any fingerprints left to put anywhere. One point of recommendation, if you don't have an Etchmate or bending tool for these very tiny and delicate parts, then I would recommend a butterknife or large kitchen knife to aid you in your bends. You really only get one shot at getting it right...too many bends and you'll likely break it. It's definitely an upgrade to this section of the plane. 

 Untitled by Britt Vallot, on Flickr

Here's all of that together.

Since the cockpit floor is opened up, I took this moment to detail the very bottom. The PE part didn't fit this section very well, and I happen to like this a little better. I couldn't find a picture of this part of the aircraft so I settled for Eduard's rendition as printed on the PE part. The spacing seemed to match up and make sense.

 Untitled by Britt Vallot, on Flickr

 Untitled by Britt Vallot, on Flickr

 Untitled by Britt Vallot, on Flickr

That's that for now. Next up is to fix the step for the wheel well with my trusty router and get some primer on this bad girl. =]

On the bench:  

Tamiya F4U-1  Kenneth Walsh


  • Member since
    June 2013
Posted by bvallot on Tuesday, January 17, 2017 5:04 PM

Last night when I got home from work I mustered up the courage and snipped off those two tabs I spoke of and I believe it has made all the difference. This is the way I'll be tackling Tamiya Wildcat cockpits from now on and I'm happy to share it with everyone here.

 Untitled by Britt Vallot, on Flickr

 Untitled by Britt Vallot, on Flickr

 Untitled by Britt Vallot, on Flickr

So that's that. I'll be moving on to dressing up a few parts here and there, primer, and paint. =]

On the bench:  

Tamiya F4U-1  Kenneth Walsh


  • Member since
    June 2013
Posted by bvallot on Tuesday, January 17, 2017 4:39 PM

I did...rather unsuccessfully. I may have been rushing it a bit too much. The wing snapped in half just passed where the aluminum spar ends. It was a clean break and possibly salvageable, but I'm already over it. I may try my hand at mending it later down the road. I've got some thoughts on how I'd do it.

I missed your post on the Wildcat. I'll have to go dig for it. =] And thanks...he's getting big fast. I'm already looking forward to the first one of these we get to do together. 

On the bench:  

Tamiya F4U-1  Kenneth Walsh


  • Member since
    February 2012
  • From: Olmsted Township, Ohio
Posted by lawdog114 on Monday, January 16, 2017 11:51 PM
Great subject Britt. Great kit too. I just did Le Blanc's not too long ago. Bummer about that conversion set. Have you tried dipping that in hot water and straightening it out? It works for plastic so it may work here too. I look forward to your progress. Congrats on the baby and welcome back.

 "Can you fly this plane and land it?...Surely you can't be serious....I am serious, and don't call me Shirley"


  • Member since
    December 2002
  • From: Northern California
Posted by jeaton01 on Monday, January 16, 2017 9:59 PM

bvallot

Hmm. That's curious John. You got two of the same set? And both were in bad shape?


Britt, one was OK, the other had the two faults.

John

To see build logs for my models:  http://goldeneramodel.com/mymodels/mymodels.html


  • Member since
    March 2015
  • From: Streetsboro, Ohio
Posted by Toshi on Monday, January 16, 2017 7:43 PM

What a great start!  I've always had an eye on this kit.  I'll be following!

Toshi

On The Bench: Revell 1/48 B-25 Mitchell


Married to the most caring, loving, understanding, and beautiful wife in the world.  Mrs. Toshi


  • Member since
    June 2013
Posted by bvallot on Monday, January 16, 2017 7:33 PM

Hmm. That's curious John. You got two of the same set? And both were in bad shape?


On the bench:  

Tamiya F4U-1  Kenneth Walsh


  • Member since
    December 2002
  • From: Northern California
Posted by jeaton01 on Monday, January 16, 2017 6:57 PM

Nice project, Britt, I like what you are doing with the cockpit.  I bought two of the Just Plane Stuff conversions.  One was Ok but the other was badly warped and looked like it had some shrinkage too.  Disappointed!  Better just to use up the Hobbyboss parts instead as I think you are.

John

To see build logs for my models:  http://goldeneramodel.com/mymodels/mymodels.html


  • Member since
    June 2013
Posted by bvallot on Monday, January 16, 2017 6:16 PM

So after some thought and a little refinement I went ahead and tweaked this cockpit floor a bit more and tried to push this as far as I could get comfortable with before ruining the fit or weakening this configuration. I've trimmed back more of the floor so that it better approximates the actual Wildcat flooring. I've left the tab on the left side just poking up so that it can be seen as to how much was shaved down.

 Untitled by Britt Vallot, on Flickr

 Untitled by Britt Vallot, on Flickr

After further review of this section, I'm beginning to wonder about what I'm seeing. I think after I have this all glued together (IP to left/right control surfaces to seating) I may take out that port section of floor all together. I don't believe it will impact the fit or integrity especially with the rest of Tamiya's cockpit engineering that is included on the fuselage. When you look at the pictures below it starts to become more clear that the only other thing present besides plumbing is the bracing for the fuel tank to the fuselage and cockpit floor bottom.

 Screen shot 2013-04-10 at 9.38.01 AM by Britt Vallot, on Flickr

 6-2 by Britt Vallot, on Flickr

So I think I'll remove this section entirely and leave the starboard part alone as it's entirely blocked out by the radio controls. Since there's so much on the left side of the cockpit in the way of trim, throttle, mixture and the refueling plumbing, I want to make all of this as visible as it can be.

Phew! All this surgery is getting me excited. =]

On the bench:  

Tamiya F4U-1  Kenneth Walsh


  • Member since
    June 2013
Tamiya 1:48 Wildcat F4F-3 Conversion (Complete)
Posted by bvallot on Saturday, January 14, 2017 11:46 PM

So it's been a while since I've been around the forum. A new house, a new little boy (our first), and a busy work schedule keeps me from doing much. I still have two mustangs I'm trying to wrap up as a matter of fact. I'm working on finishing the bases before posting anything more...I've run out of PSP matting and I'm waiting to get more. 

A few quick reads through what I've missed on the Aircraft section shows me a lot of attention on the Wildcat lately. And since I'm itching to do another radial engine, I suppose now is as good a time as any. I'll be doing my best to put together a -3 conversion of Butch O'Hare's "White F-15" that he flew on his MOH flight to protect the Lexington. This was one of the first planes I built a few years ago when I first started taking scale modeling a bit more seriously. Unfortunately, it broke during the move. So now I have the opportunity to build it even better. =]

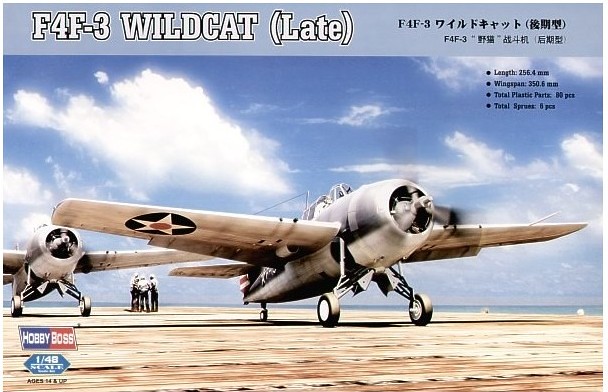
The Tamiya kit is by far the best out there in the 1:48 scale. It's a little skimpy in the undercarriage but I'll be trying my hand again at the Eduard AM for this. Last time around I just didn't have the tools or skillset for tiny stuff like this. I purchased a Hobby Boss -3 kit for cheap on Ebay that actually came with masking and an Eduard Cockpit PE set, but I'll doubt I'll use much from it. The cockpit from the Tamiya kit is actually pretty spot on for a change. The Hobby Boss kit will be robbed to utilize the wings. This part will take some scratchbuilding. I had acquired the rare JPS -3 conversion for the Tamiya kit, but my set had a bow in the port wing. I haven't had any response from Dave Schemel from JPS and in trying to fix this wing I ended up snapping it. Not very pleased about it. I've been looking forward to building this up for a while now. I will however be able to use other parts from the set like correcting the cowl, adding an intercooler, and a few other odds and ends. I feel pretty good about the Hobby Boss wings though, and with a little TLC I think they'll shape up nicely to make a nice -3 USN Wildcat.

The Kit

 Untitled by Britt Vallot, on Flickr Untitled by Britt Vallot, on Flickr
The Man
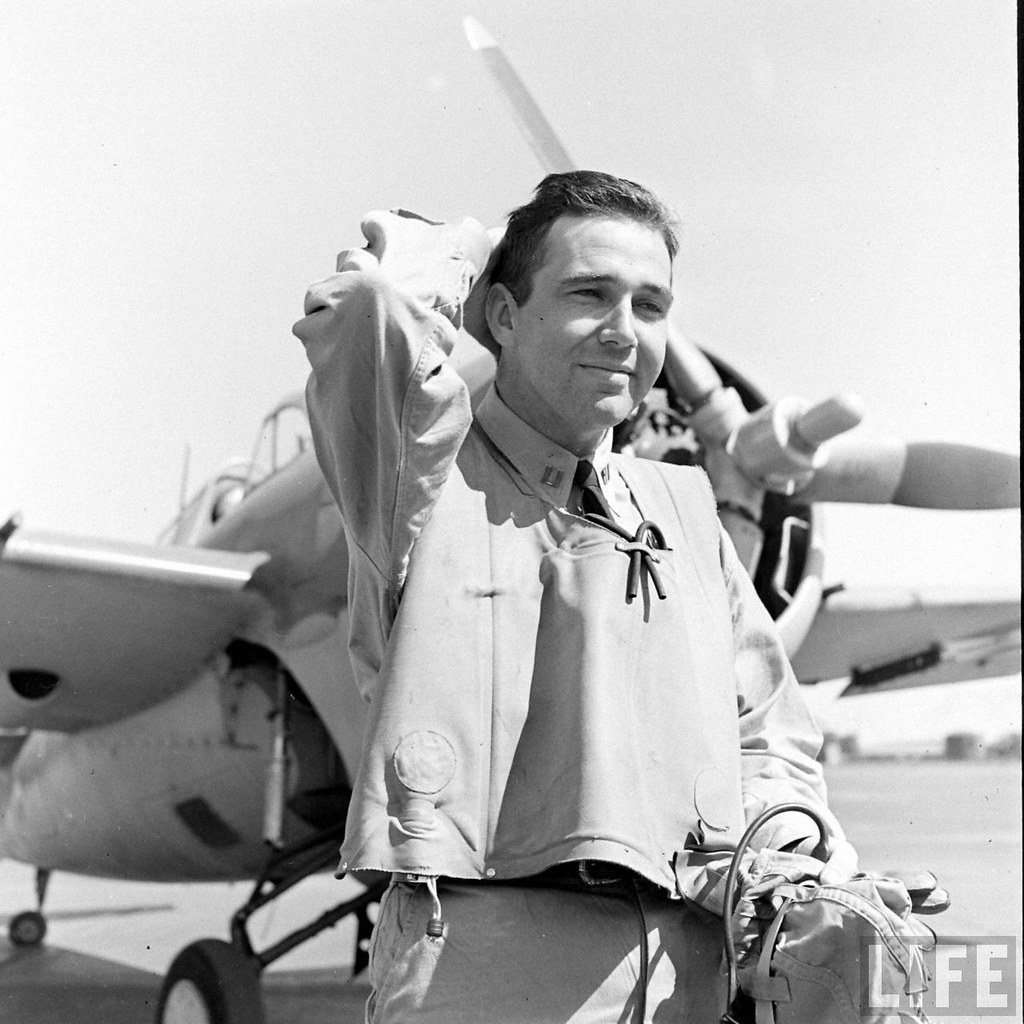
 Butch_O_Hare_1 by Britt Vallot, on Flickr

An already well-represented subject. And for good reason. Edward O'Hare became the Navy's first flying ace in WW2 by taking on a formation of about 9 heavy bombers headed toward the Lexington and downing 4 of them. He and Jimmy Thach would go on to re-write how to defend and attack against the Zero and O'Hare later got command of VF-6 on the USS Independence only a year later.

The AM

So I'm perking this kit up with a little bit of AM stuff mostly in an effort to vindicate myself from my first attempt. One thing I find with some of the Eduard PE is that it doesn't always show the depth behind certain objects like in the cockpits. So I will be fairly selective of what I use and what I scratch out. This is meant for the Hobby Boss kit but in comparing both kit parts (firewall, IP, etc.) the match up is nearly perfect which is better than you'd normally hope for...so there's some solace. Here are some stock photos of that set.
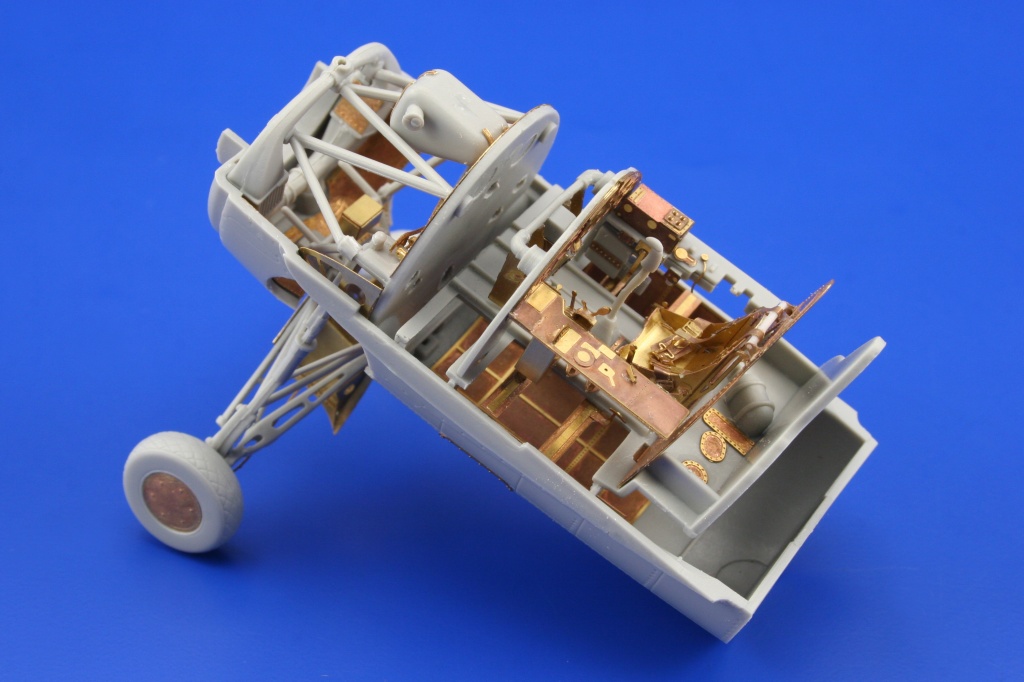
 Untitled by Britt Vallot, on Flickr

 Untitled by Britt Vallot, on Flickr
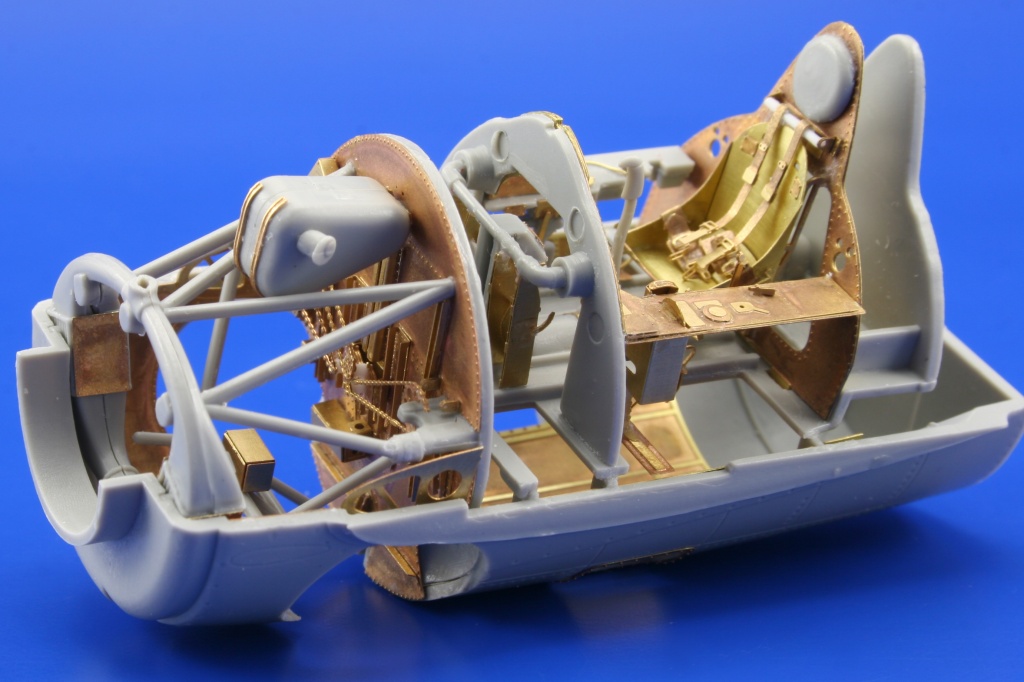
I chose the Vector engine set as I look to build up the exhaust manifold around it. This set already has the intake present, and I've been looking forward to trying it for a while.
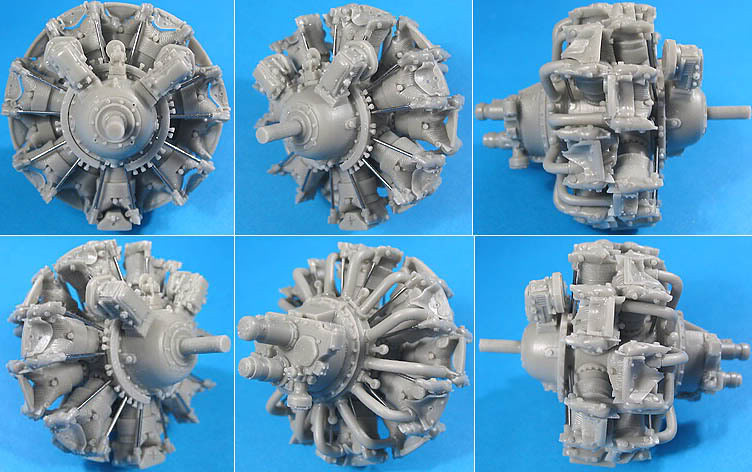
 Untitled by Britt Vallot, on Flickr

The set from JPS
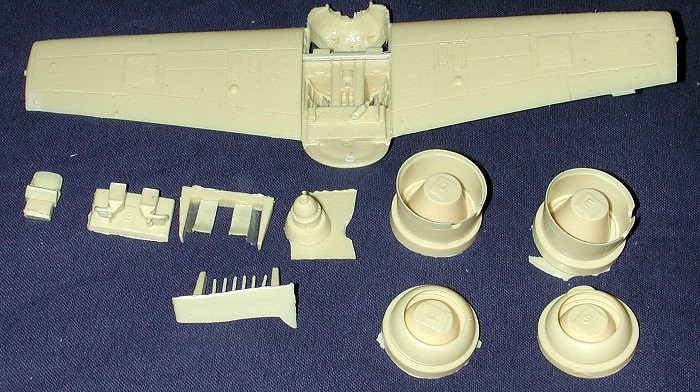
 Untitled by Britt Vallot, on Flickr

 Untitled by Britt Vallot, on Flickr
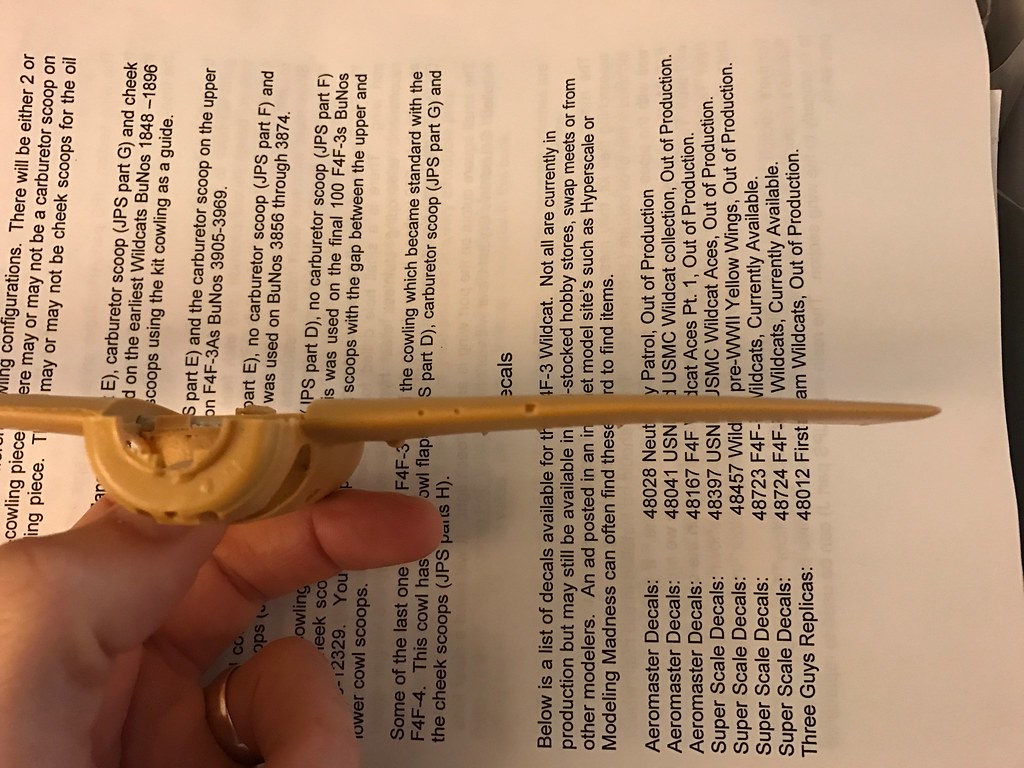
Note the downward bow. The other wing had a similar bow but was less severe. Very dissappointed about this.

Getting started:

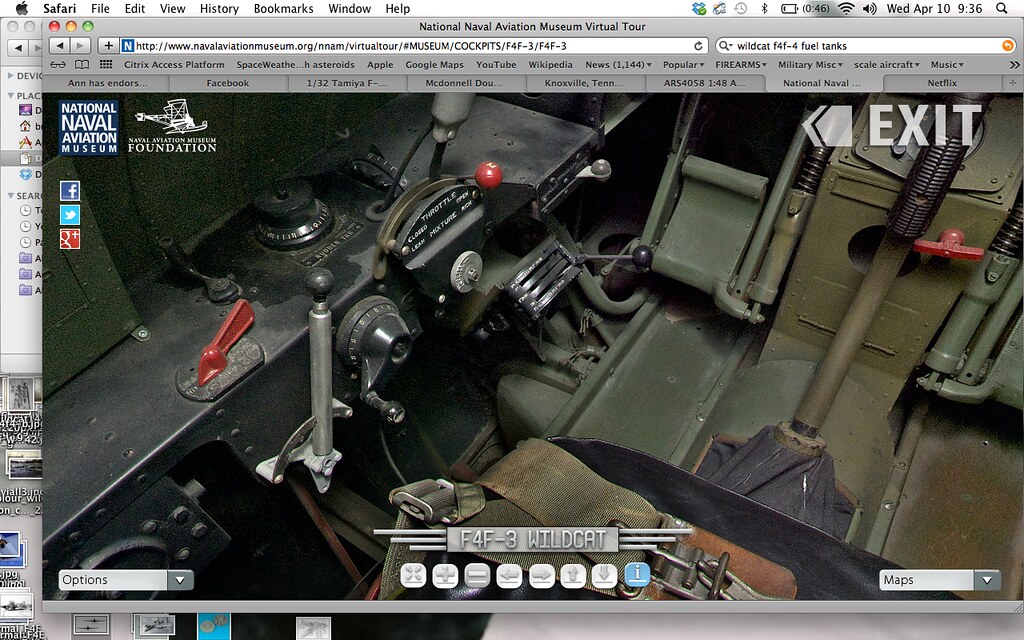
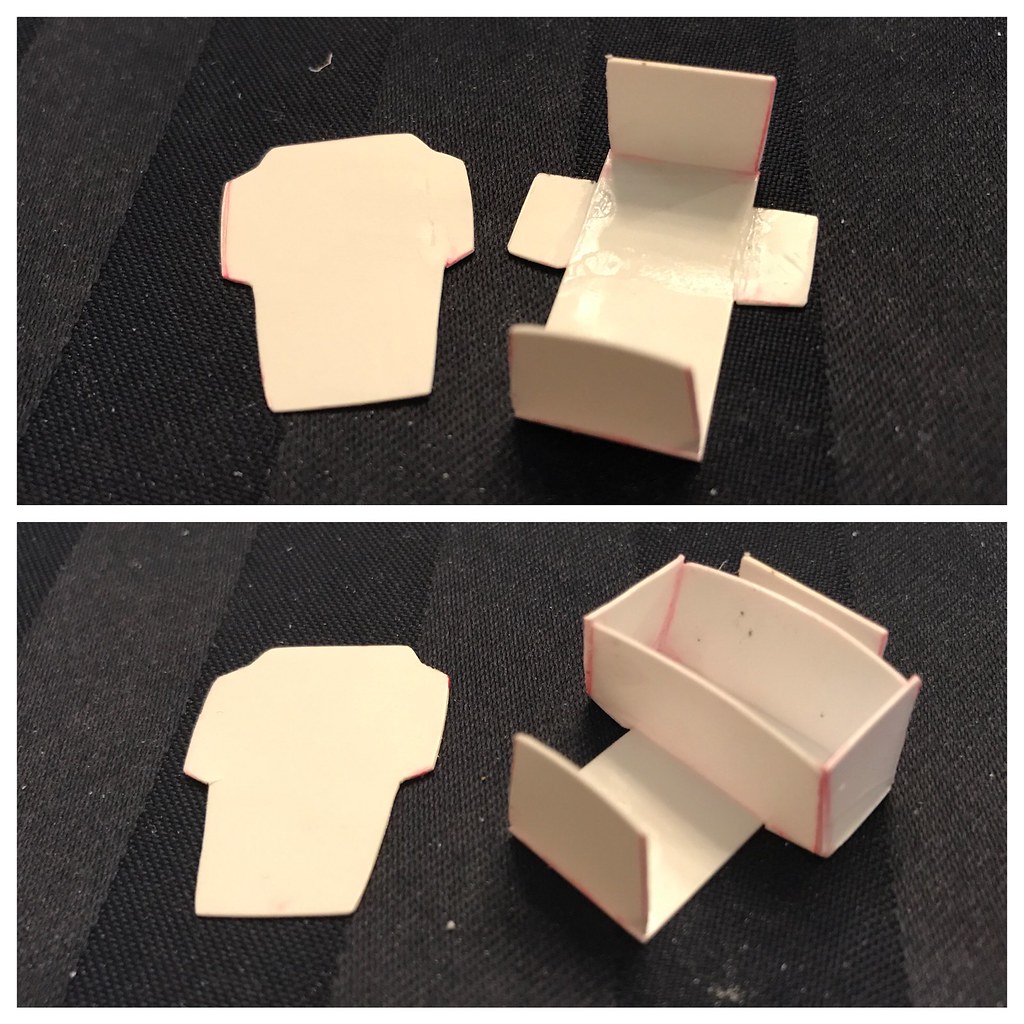
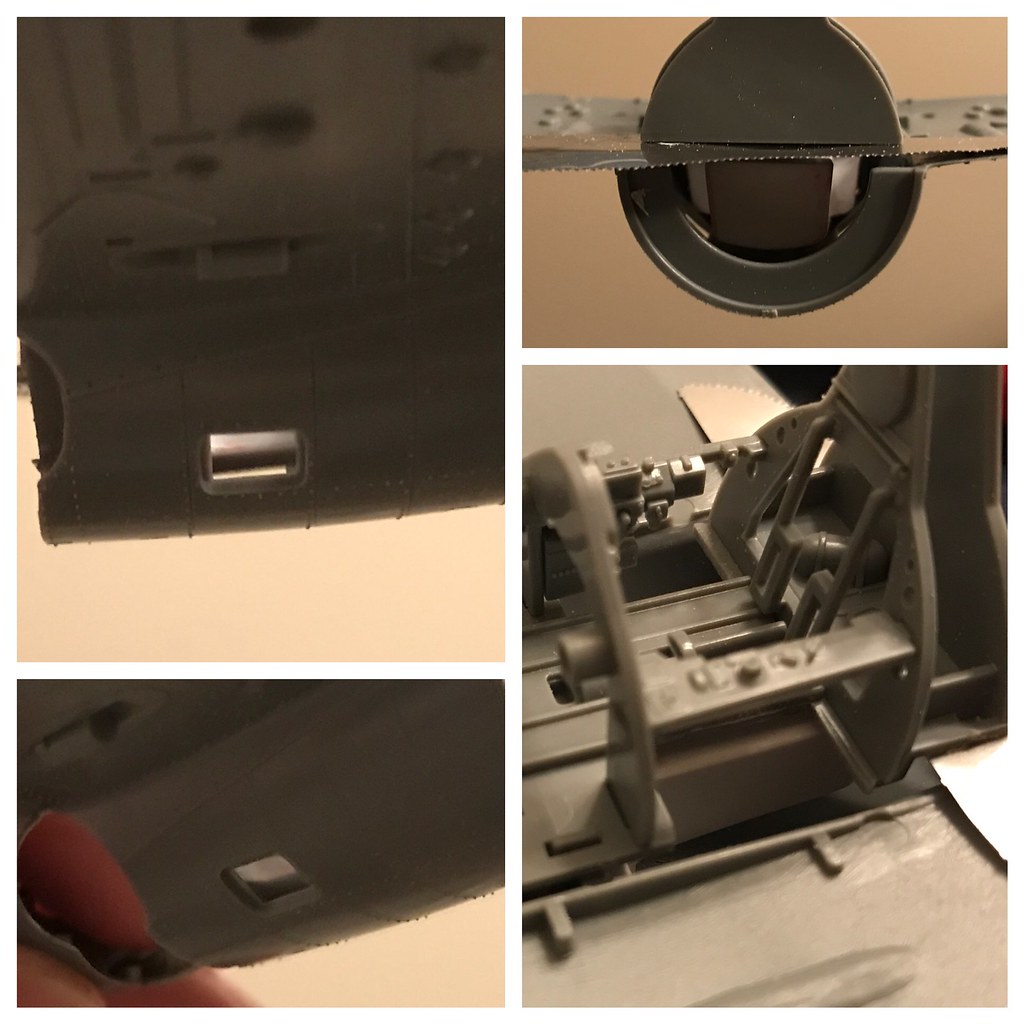
Always of course with the cockpit...but I have quite a bit of dry-fitting and customizing to fool with to accomodate the extra detailing I plan to do. The last thing I want to do is ruin Tamiya's brilliant engineering of this kit. The kit part for the floor is incorrect as many people already know. It's a breeze to fix...a couple of quick snips and some sanding and you're back in business. I will likely come back to tweak this some more, I just didn't want to get too far ahead of myself. One thing I'd like to mention here is the lack of a fuel tank from both the kit manufactuers or AM guys. With the two windows below the pilot's feet, there is a clear view into this section of the plane. Since I'm a stickler for detail, I thought it'd be silly for me not to throw something together here. A little bit of research gave me the shape and after a couple of hours (mostly interrupted =]) I scratched out a tank to fit underneath the cockpit floor.
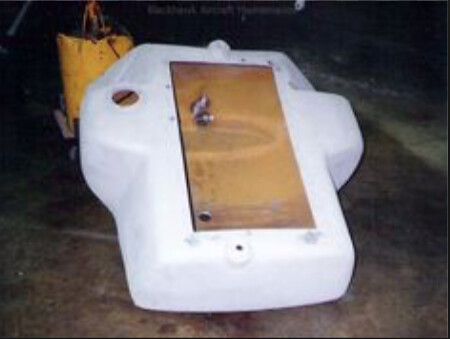
 Screen Shot 2017-01-14 at 9.32.04 PM by Britt Vallot, on Flickr
 Screen shot 2013-04-10 at 9.36.53 AM by Britt Vallot, on Flickr

If you note at nearly exactly the center of the picture, just to the left of the flooring and just below the controls, you'll see the top of the tank where the plumbing to refuel it goes. That helped me to confirm the shape of this tank for this particular series.
 Untitled by Britt Vallot, on Flickr

 Untitled by Britt Vallot, on Flickr
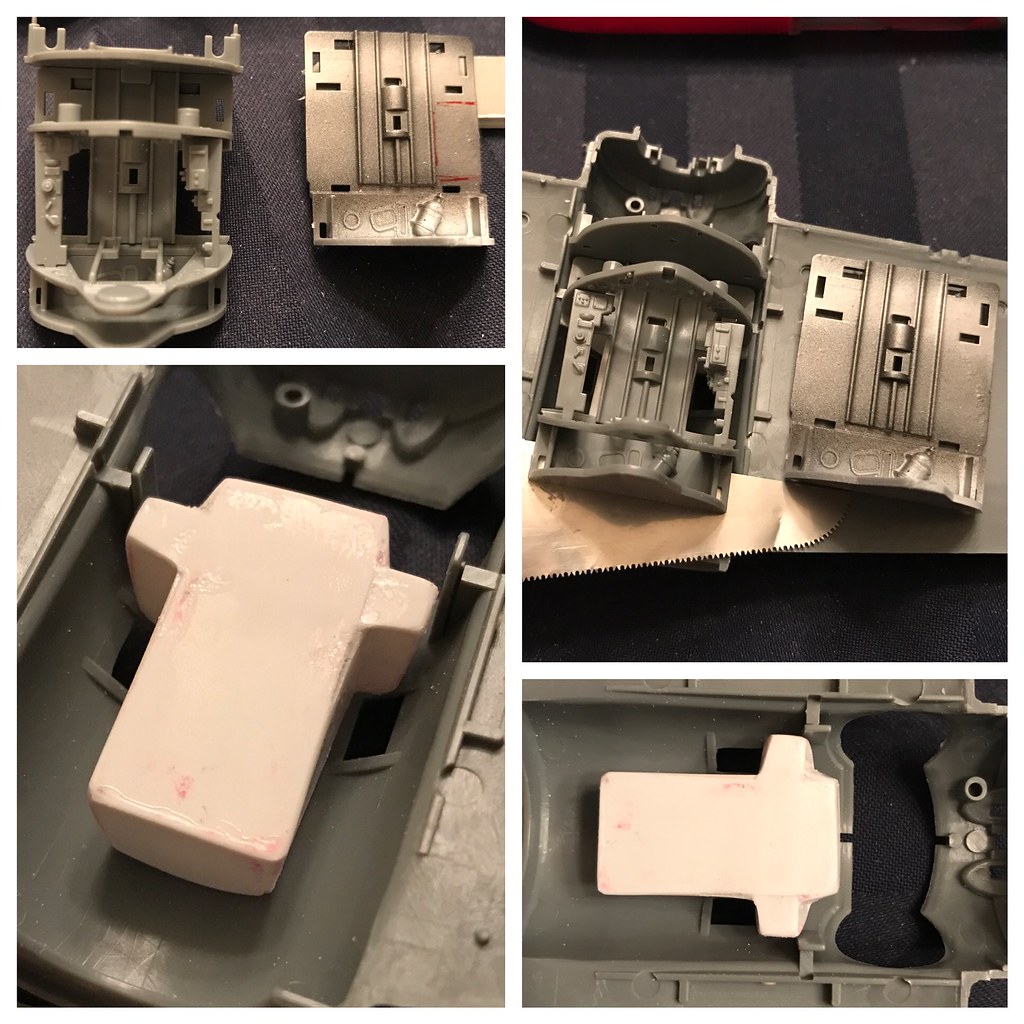
Here I thought I'd also show the difference between kit cockpit and the cutaway floor correction. An easy fix that changes nothing about how the cockpit sets up...makes you wonder how Tamiya could've missed that in the first place. 
 Untitled by Britt Vallot, on Flickr

 Untitled by Britt Vallot, on Flickr
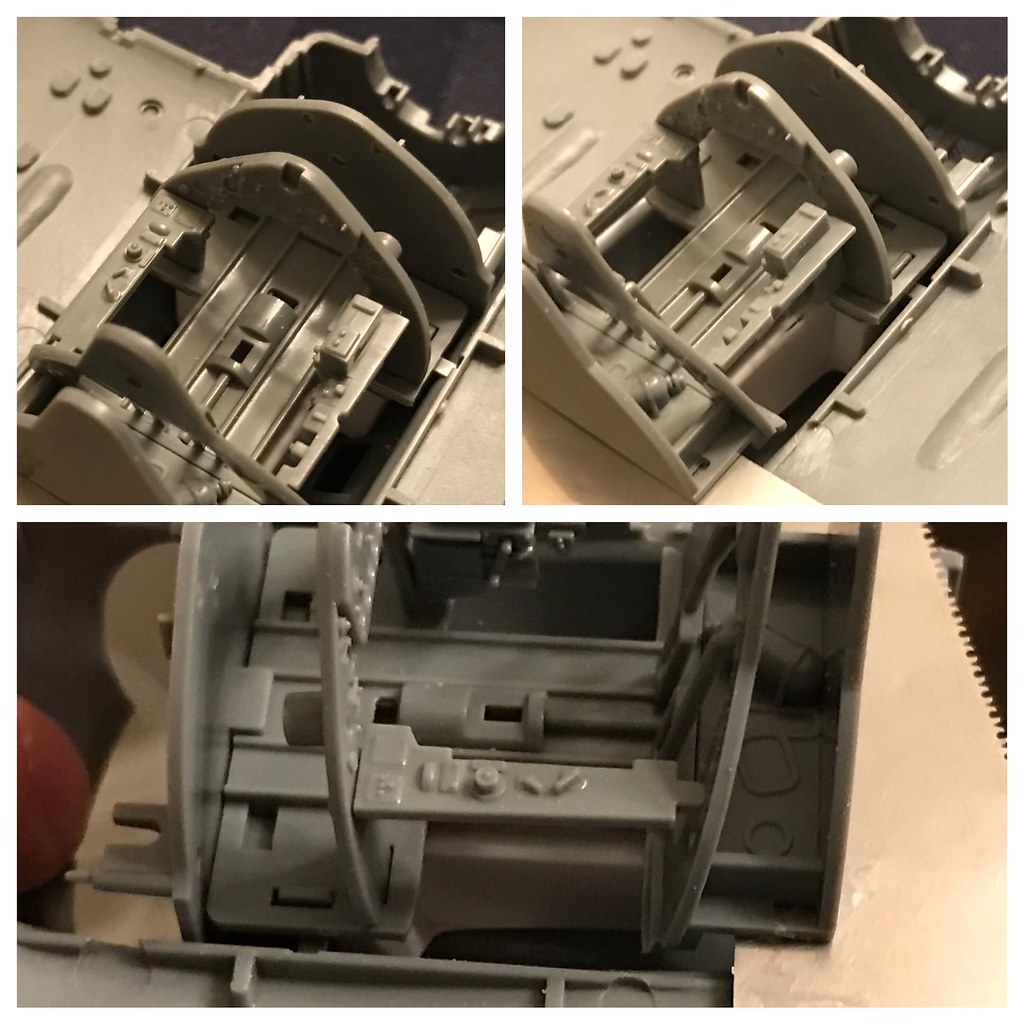
And that's about where I am at the moment folks. Some cockpit work is coming next and later will come some primer. Then, perhaps some of this PE stuff I've got to play with. =]

On the bench:  

Tamiya F4U-1  Kenneth Walsh


JOIN OUR COMMUNITY!

Our community is FREE to join. To participate you must either login or register for an account.

SEARCH FORUMS
FREE NEWSLETTER
By signing up you may also receive reader surveys and occasional special offers. We do not sell, rent or trade our email lists. View our Privacy Policy.