SEARCH FINESCALE.COM

Enter keywords or a search phrase below:

2015 Messerschmitt Bf 109 Group Build

181151 views
2798 replies
1 rating 2 rating 3 rating 4 rating 5 rating
  • Member since
    October 2008
  • From: Georgia
Posted by Rigidrider on Friday, June 5, 2015 6:39 PM

Steve... it indeed looks good! Like Joe says... Just take it easy. Shoot... If I don't knock off the pitot tube atleast 3 times I feel something is wrong! lol...

Any way, I finally got all my parts rounded up and got a start. This is an Academy 1/48 Bf109 G and there really isn't a lot to the kit although is a good sound base to start with. This one likely wont take long, and the magic will be in the paint and detail, But... Here we go.....

The Tru Detail cockpit parts...

All cut and cleaned...

painted and worn...

And lastly getting some of the major components ready to assy. That's all for now, Gotta say, I do like the tru detail sets in resin. Very nice to work with except for the large extra pieces of resin that need to be cut and sanded away. But still nice.

Thanks all! More later...

Doug 

When Life Hands You A Bucket Of Lemons...

Make Lemonade!

Then Sell It Back At $2 Bucks A Glass...

  • Member since
    April 2005
Posted by Thunderbolt379 on Saturday, June 6, 2015 12:03 AM

Doug, it looks great! The Academy G is a reboxed Hobbycraft, yes? Is that cockpit set #48-491? I have a sudden yet to drop one of those in myself! Which G subtype will this be???

Cheers, M/TB379

http://worldinminiature.blogspot.com/

  • Member since
    January 2015
Posted by BrandonD on Saturday, June 6, 2015 12:47 AM

Doug - amazing job on that kit. Looks like maybe the G-6? I picked that one up a few weeks ago on consignment, and it came with a resin/PE pit of unknown origin. It looks like fun to build, though.

I know the old Hobbycraft kits aren't up to the standards of something like an Eduard, Hasegawa or Tamiya, but one of theirs was the first kit I airbrushed when I came back to the hobby, and I really just find them a total blast to build. I hope you have as much fun with yours as I did with the two I've built.

Are you doing the trop version with the umbrella, or are you going another route? The umbrella cracks me up.

-BD-

  • Member since
    December 2002
  • From: Bury St Edmunds, Suffolk, England
Posted by Bish on Saturday, June 6, 2015 1:33 AM

That's TD pit looks rather nice, don't think I have used one of theirs before. Does look very similar to the detail in aires sets.

I am a Norfolk man and i glory in being so


On the bench: Airfix 1/72nd Harrier GR.3/Fujimi 1/72nd Ju 87D-3

  • Member since
    October 2008
  • From: Georgia
Posted by Rigidrider on Saturday, June 6, 2015 6:12 AM

Morning...  

Mike , yes it is the 48-491 kit, I will have to shave off the molded in details of the fuse sides of the kit, and trim back the pit area at the back near the storage area to get it to fit in. I guess I could just move the assembled pit forward a bit, but I think it will look better set back. The kit does look to be a rebox, and it was originally a G14.

Brandon, the original configuration is a G14, but instead of cutting the tail section off and replacing with the supplied taller unit, the unit I'm buildings is a G2, and I will keep the original tail, leave off the "bumps: for the mg 131s and retain the mg17s. Yes so far it looks like a nice kit, a bit much on the flash side, but a very nice fit. That umbrella is a trip, at first I wasn't sure what it was! But no, this will be a 1943 unit of Jg5 Petsamo Finland.

Hey Bish...

Yes it does (other then the color) look like an Aires kit and is slightly less detailed then an aires, but the tru-detail also has a better price tag then the aires. No knock on the Aires, they are great detail kits, but I just couldnt see spending 3 times the cost of the kit for a detail set. As with many of the lesser priced kits, and even some higher priced kits, they SCREAM for additional detail. This kit had NO riveting at all and I spent about an hour with a pounce wheel tool adding rivets, but thats OK, thats part of the hobby.

Well time for a refill on the morning coffee! Thanks guys, more in a bit.

Doug

When Life Hands You A Bucket Of Lemons...

Make Lemonade!

Then Sell It Back At $2 Bucks A Glass...

  • Member since
    December 2002
  • From: Bury St Edmunds, Suffolk, England
Posted by Bish on Saturday, June 6, 2015 6:56 AM

I don't find the price difference to great over here, about  £1 for a 72nd pit and about £2 for 48th, and I do like that Aires gives a nice little PE fret as well. But I do have a few TD sets to use.

I am not really into the rivets myself, they do look nice when done, and I have been looking into it the last few months after seeing jay's work, but I don't think its for me.

I am a Norfolk man and i glory in being so


On the bench: Airfix 1/72nd Harrier GR.3/Fujimi 1/72nd Ju 87D-3

  • Member since
    April 2005
Posted by Thunderbolt379 on Saturday, June 6, 2015 8:33 AM

Thanks, Doug, I think I might lay in that set and use it on the Hobbycraft G-10 in Croatian markings on next year's build roster.

M/TB379

http://worldinminiature.blogspot.com/

  • Member since
    December 2009
  • From: Laurel, MD
Posted by Tucohoward on Saturday, June 6, 2015 1:51 PM

Doug, nice work on the cockpit. Really like your painting on the molded on belts. Not easy.

Jay

The Mighty Mo says no.

  • Member since
    October 2008
  • From: Georgia
Posted by Rigidrider on Saturday, June 6, 2015 5:00 PM

Thanks Jay... yeah, a 10/0 brush and a magnifying visor (for my old @ss) is a must! Lolol...

When Life Hands You A Bucket Of Lemons...

Make Lemonade!

Then Sell It Back At $2 Bucks A Glass...

  • Member since
    October 2008
  • From: Georgia
Posted by Rigidrider on Saturday, June 6, 2015 5:06 PM

Bish... no doubt Aires makes a good set, but the best price I could find here was about 20 dollars and the TD was like 8 bucks, also the Aires as you said adds a few other goodies. I also like the CMK kits, and pe on a 48th kit is almost a no can do for me any more, lolol...

When Life Hands You A Bucket Of Lemons...

Make Lemonade!

Then Sell It Back At $2 Bucks A Glass...

  • Member since
    December 2002
  • From: Bury St Edmunds, Suffolk, England
Posted by Bish on Saturday, June 6, 2015 5:14 PM

20 bucks, relly that's is pricey. Your TD stuff is a bit cheaper than here, I found there 48th pits for about £8 while the Aires are around £10. Swings and roundabout's I guess. I think TD might be US based, I know Aires is in Europe, that might well explain the differences.

I am a Norfolk man and i glory in being so


On the bench: Airfix 1/72nd Harrier GR.3/Fujimi 1/72nd Ju 87D-3

  • Member since
    September 2013
Posted by Raven728 on Saturday, June 6, 2015 7:59 PM

Tonight I worked on the wing assembly, then went ahead and attached the wings to the fuselage. Fit overall was excellent. There was a bit of a step at the wing roots but adjusting the dihedral a tiny bit should fix that. I also had to pull the engine firewall part out of the fuselage and reset it to its correct height as the fuselage section forward of the cockpit wouldn't fit down to meet the main fuselage. That was a bit touch and go but turned out ok, other than a bit of a step on either side that I attempted to putty over.

Note the molded-on pitot. Hmm  I was half-tempted to cut if off, but I want to see if I can keep it on there for the duration. Machine guns haven't broken off (yet)!

- Steve

  • Member since
    March 2012
  • From: Corpus Christi, Tx
Posted by mustang1989 on Sunday, June 7, 2015 5:09 PM

Doug: Man you're off to a great start with that cockpit pal!!! Lots of detail there!!!

Steve: Moving right along I see. Go slow and you'll be A-OK. Yes

Sorry I haven't been around for a bit but I've been out of pocket for the last couple of days. Me and my family went to a lake cabin for the weekend and it was great !!! Spent the whole weekend not doing a damn thing except relaxing and it was long overdue. No demands on our time, no computer and definitely no family/ relatives nagging at us. Just straight up family time. Big Smile

The cabin:

The pier:( the view right outside of the cabin)

and the scene out on the pier at sundown:

I didn't catch a thing but I had a great time!! Cool 


 Forum | Modelers Social Club Forum (proboards.com) 

  • Member since
    December 2009
  • From: Laurel, MD
Posted by Tucohoward on Sunday, June 7, 2015 5:25 PM

Joe, that looks awesome. Glad you were able to get some R+R.

Jay

The Mighty Mo says no.

  • Member since
    October 2008
  • From: Georgia
Posted by Rigidrider on Sunday, June 7, 2015 5:56 PM

Where did you set up your travel building bench Joe? Lolol...

When Life Hands You A Bucket Of Lemons...

Make Lemonade!

Then Sell It Back At $2 Bucks A Glass...

  • Member since
    March 2012
  • From: Corpus Christi, Tx
Posted by mustang1989 on Sunday, June 7, 2015 7:31 PM

Man Jay......it was! Now..............it's back to benchtime! lol

Doug: LOLOLOLOL! I don't know if I coulda got away with that ! Wink


 Forum | Modelers Social Club Forum (proboards.com) 

  • Member since
    May 2013
  • From: Indiana, USA
Posted by Greg on Monday, June 8, 2015 10:49 AM

Doug, good looking cockpit.

Steve. coming along nicely.

Joe, perusing your camping pics, the palm tree really surprised me. Living up here in the frozen north where camping is rather popular, just never connected camping with palm trees. Paradise

Looks like great fun, and glad to hear it was.

  • Member since
    September 2003
  • From: Northern hemisphere - most of the time-
Posted by blkhwkmatt on Tuesday, June 9, 2015 1:17 AM
Guys, I haven't been on here in a while, but I have been watching in. Still amazing seeing the work that is going on here. I still have not taken better pictures of the F that I completed a while ago but will post the one that I think should be in the gallery for the time being.  or  Either one will work for now, but I will attempt to get better shots later on this week if work allows.

Quidquid latine dictum sit, altum videtur!!! - Anything said in Latin sounds profound!


  • Member since
    April 2005
Posted by Thunderbolt379 on Tuesday, June 9, 2015 1:23 AM

Sweet! I've got a handle on where to grab that decal sheet for my collection...

M/TB379

http://worldinminiature.blogspot.com/

  • Member since
    March 2012
  • From: Corpus Christi, Tx
Posted by mustang1989 on Tuesday, June 9, 2015 4:52 AM

Greg: It's always good to see you. Hope all is well in your neck of the woods and yes sir, it was fun.Big Smile

Matt: I'll get you temp posted right now. I like that bottom picture as it shows a great view of that terrific camo scheme that you pulled off. Awesome work! Totally awesome!


 Forum | Modelers Social Club Forum (proboards.com) 

  • Member since
    March 2012
  • From: Corpus Christi, Tx
Posted by mustang1989 on Tuesday, June 9, 2015 4:57 AM

Gotcha posted Matt! Will be lookin' for those pics when you're ready...................and possibly another build? Wink


 Forum | Modelers Social Club Forum (proboards.com) 

  • Member since
    May 2013
  • From: Indiana, USA
Posted by Greg on Tuesday, June 9, 2015 12:16 PM

That's a very cool camo job, Matt.

  • Member since
    October 2008
  • From: Georgia
Posted by Rigidrider on Tuesday, June 9, 2015 8:54 PM


Well I got a bit more done today...

Got the fuse halves together, and the pit is fit into the kits mount area. Being a cockpit not for this kit, I set it back abit to make a good fit. I suppose I could have moved it forward a bit, but its done now, I just had to trim the walls and the rear area a bit. 

As usual, minor gaps at the wing root, The plastistruct piece seen here for filler is only .010 thou. thickness so as I said, very minor.

And same on the starboard side.

a curved round rifling file and some liquid cement smoothed it right out.

Got the legs on...

And the 76 on the underside

Well that's about all for now... Thanks for looking...

Doug 


When Life Hands You A Bucket Of Lemons...

Make Lemonade!

Then Sell It Back At $2 Bucks A Glass...

  • Member since
    March 2012
  • From: Corpus Christi, Tx
Posted by mustang1989 on Tuesday, June 9, 2015 9:05 PM

Man you've got this down to a friggin' art Doug!!


 Forum | Modelers Social Club Forum (proboards.com) 

  • Member since
    October 2008
  • From: Georgia
Posted by Rigidrider on Wednesday, June 10, 2015 4:49 AM

Lol...like the little clip there, there isnt much in the way of part count, but I like the way its going together so far. I figure it will likely take about 5 times longer to paint and detail though...

Thanks,

Doug

When Life Hands You A Bucket Of Lemons...

Make Lemonade!

Then Sell It Back At $2 Bucks A Glass...

  • Member since
    September 2003
  • From: Northern hemisphere - most of the time-
Posted by blkhwkmatt on Thursday, June 11, 2015 1:21 AM

mustang1989

Gotcha posted Matt! Will be lookin' for those pics when you're ready...................and possibly another build? Wink

It is a posibility...  I have comitted to two 1/32 scale Mustangs for that GB, one of which is the new Tamiya D/K.  Taking my time with that one so that  I dont mess it up.

Might, just jump back in with a K-4 or G-10 (1/32 scale) that are sitting in my stash.  I did purchase an AM kit from Russia that is a one piece resin replacement for the panels from the cockpit forward - above the engine exaust as well as a resin prop / spinner. 

Oh so tempting....

Gotta get the 'stang done first though.


Thanks for all the kind words on the scheme, was a challenge to get right, and I am still not 100% happy with how it turned out.  The light color over the dark is very hard to get right, and it just isnt in some places.  Think that perhaps I might go from light to dark if I were to try it again.

<Matt

Quidquid latine dictum sit, altum videtur!!! - Anything said in Latin sounds profound!


  • Member since
    April 2014
  • From: Australia
Posted by lostagain on Thursday, June 11, 2015 7:30 AM

Doug

You are racing along again there - on the second (or third, or fourth) lap, and I am barely out of the blocks.

Matt,

That is a great scheme there, from here it doesn't look like you had trouble with it.

Mustang, 

That looked very hard to take, only a lot jealous.

TB379,

Your E 4 has come up so well, the painting and decals are great. I could not pick it as 1/72 without you telling me.

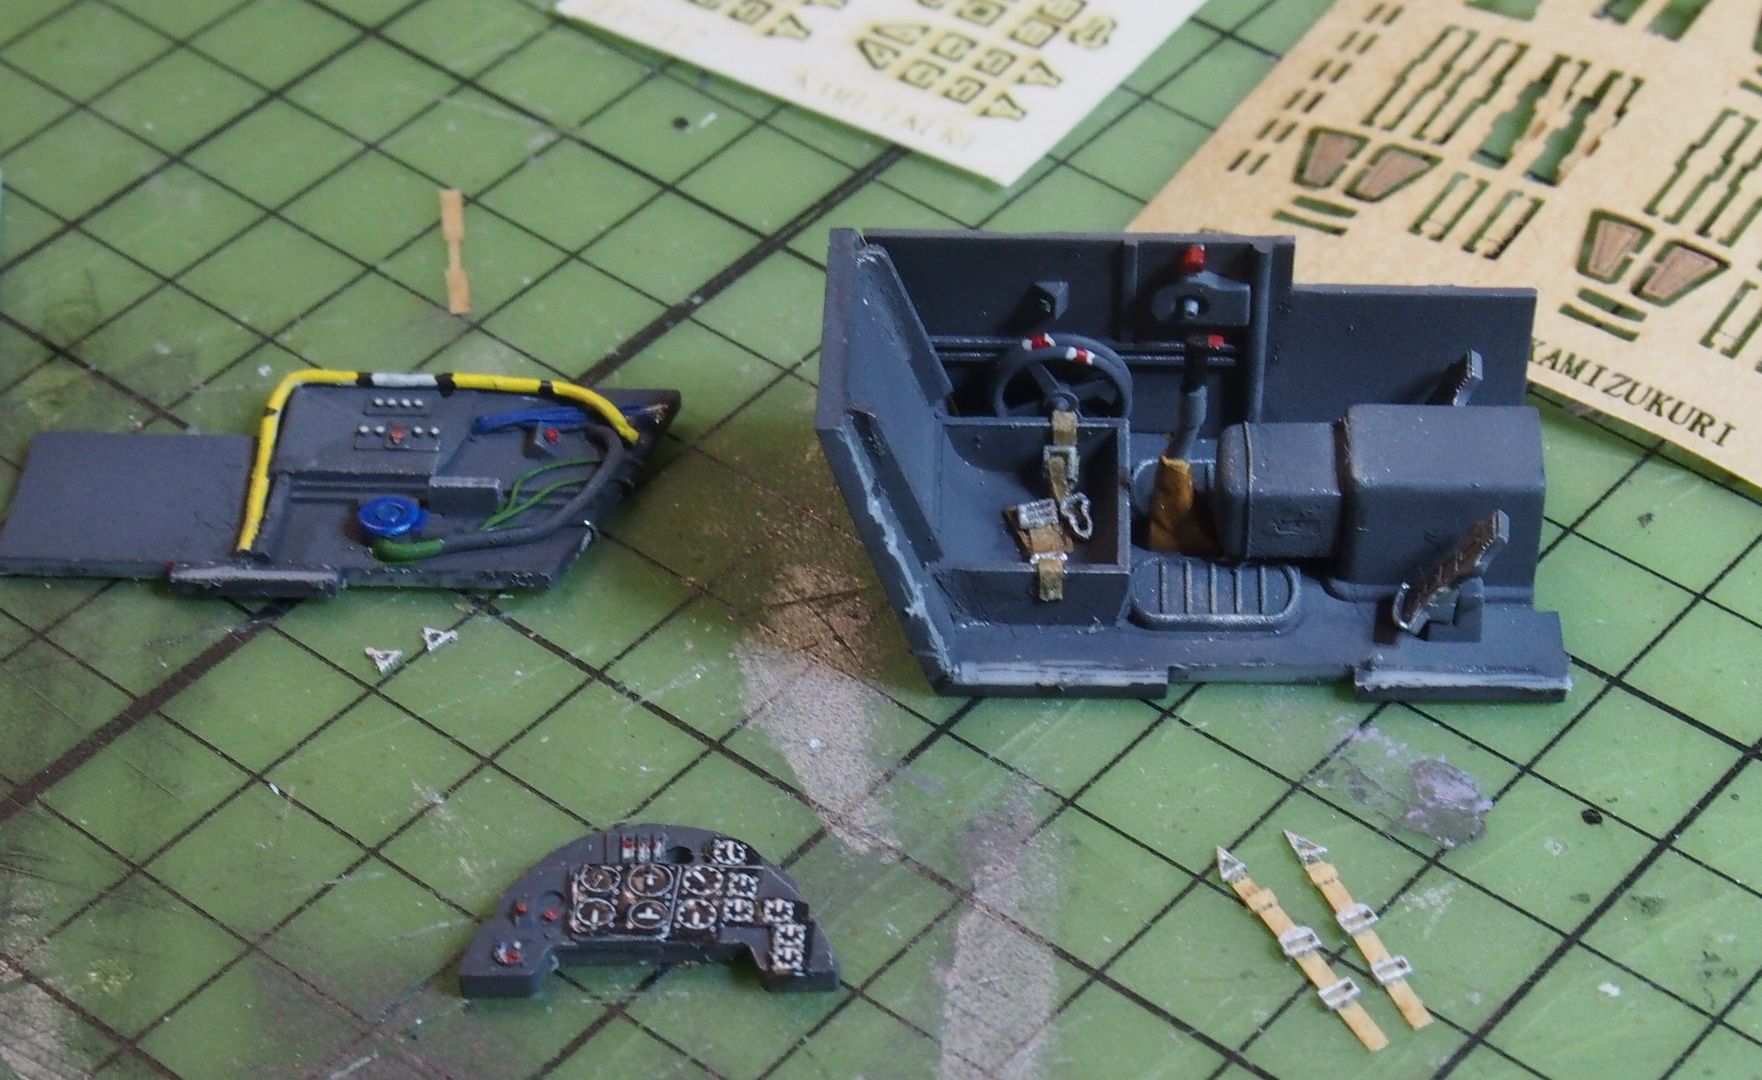
The G 2 continues on, the cockpit was finished of and put into the closed up body.
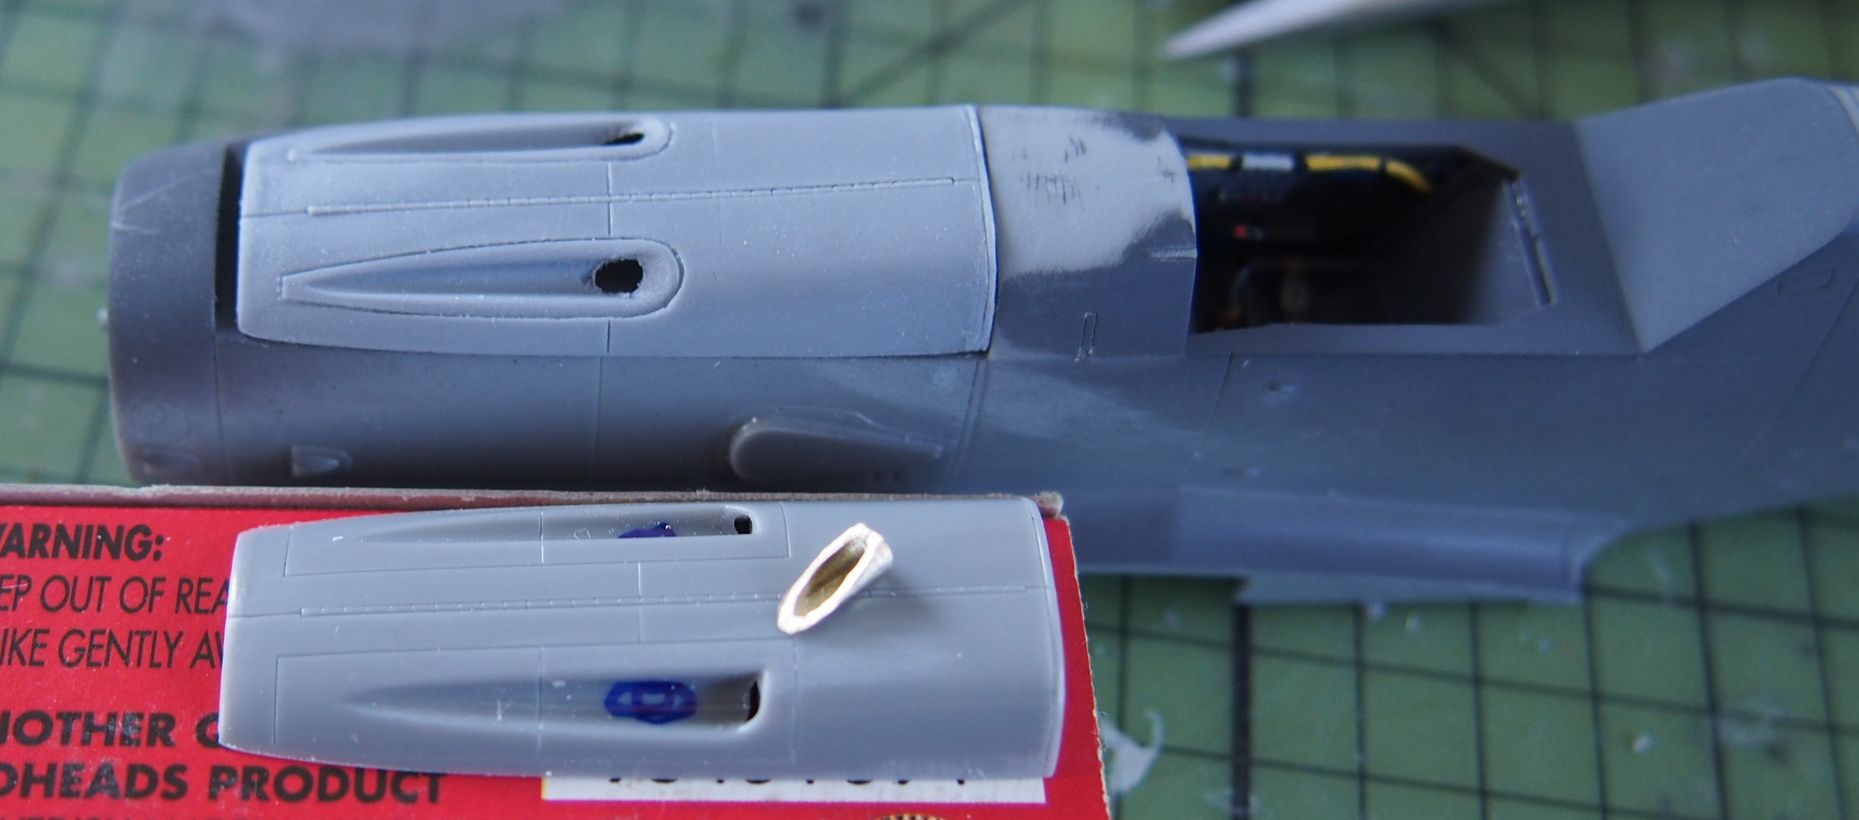
Then I tried to put the MG coaming on the nose. the kit contains a resin one specifically for this variant. But it doesn't fit. So now I have the choice of shimming and blending the resin or modifying the plastic one for a different variant. And I haven't helped myself by over sanding the deck in front of the windscreen.
  • Member since
    March 2010
  • From: MN
Posted by Nathan T on Thursday, June 11, 2015 8:44 AM

lostagain

Doug

You are racing along again there - on the second (or third, or fourth) lap, and I am barely out of the blocks.

Matt,

That is a great scheme there, from here it doesn't look like you had trouble with it.

Mustang, 

That looked very hard to take, only a lot jealous.

TB379,

Your E 4 has come up so well, the painting and decals are great. I could not pick it as 1/72 without you telling me.

The G 2 continues on, the cockpit was finished of and put into the closed up body.

Then I tried to put the MG coaming on the nose. the kit contains a resin one specifically for this variant. But it doesn't fit. So now I have the choice of shimming and blending the resin or modifying the plastic one for a different variant. And I haven't helped myself by over sanding the deck in front of the windscreen.

Typical Hasegawa resin parts being worthless! I'd say just line up the panel lines and fill in the rest with card stock, and sand carefully.


  • Member since
    May 2013
  • From: Indiana, USA
Posted by Greg on Thursday, June 11, 2015 11:44 AM

Good looking cockpit, lostagain.

Do hope you keep us posted on what you end up doing with the engine cowling. That's a bad fit indeed.

Yo Doug, re your .010" styrene strip at the wing root, is that a ten-thousanths thick sheet that your sliced off, .010" square, round, or what?

  • Member since
    October 2008
  • From: Georgia
Posted by Rigidrider on Thursday, June 11, 2015 12:02 PM

Hey Greg... good to hear from you... no this comes in a pkg of about 5 or 6 strips about8 in long and these just happen to be .010 x .015 pre sized. I have an assortment of several different sizes. I get mine at the local Hobby Town hobby shop, but a good source is hobbylinc.com. under supplies.

Hope that helps...

Doug

When Life Hands You A Bucket Of Lemons...

Make Lemonade!

Then Sell It Back At $2 Bucks A Glass...

JOIN OUR COMMUNITY!

Our community is FREE to join. To participate you must either login or register for an account.

SEARCH FORUMS
FREE NEWSLETTER
By signing up you may also receive reader surveys and occasional special offers. We do not sell, rent or trade our email lists. View our Privacy Policy.