SEARCH FINESCALE.COM

Enter keywords or a search phrase below:

3RD ANNUAL SECRET SANTA GROUP BUILD FOR AIRCRAFT

139672 views
1219 replies
1 rating 2 rating 3 rating 4 rating 5 rating
  • Member since
    December 2003
  • From: Indiana
Posted by hkshooter on Sunday, March 15, 2009 8:57 PM

Slacker's huh? I completed my build on Jan 1, 09. You'll have to go back to page 49 to see it. NOW who's the slacker?Wink [;)]

Congrats on moving into the man cave, Drew! You going to break a bottle of bubbly on the door jam before you enter?Thumbs Up [tup]

  • Member since
    October 2006
  • From: Iowa
Posted by Mist086 on Sunday, March 15, 2009 8:36 PM
 firesmacker wrote:

Very Nice John!Thumbs Up [tup]

So what? It's you and me so far? Come on you slackersWink [;)]

Look back 1 page.  My Rhino is almost done.  Wash is applied and am waiting for a couple of launch rails to arrive to put on the missiles.

  • Member since
    May 2003
  • From: Abbotsford, B.C. Canada
Posted by DrewH on Sunday, March 15, 2009 7:13 PM

Very nice work John! Thumbs Up [tup] Another top notch build.

 My son has two more hockey games to go for the year - tonight and tomorrow am. I have one more week of techs in the shop then I'm moving into my hobby room Make a Toast [#toast]

Take this plastic and model it!
  • Member since
    September 2008
  • From: North Carolina
Posted by WarHammer25 on Sunday, March 15, 2009 6:28 PM

Nice job John! Looks great. Thumbs Up [tup]

The only easy day was yesterday - U.S. Navy Seals
  • Member since
    September 2007
  • From: Crystal Lake, IL
Posted by firesmacker on Sunday, March 15, 2009 6:03 PM

Very Nice John!Thumbs Up [tup]

So what? It's you and me so far? Come on you slackersWink [;)]

  • Member since
    September 2004
  • From: Vernon, BC, Canada
Posted by razordws on Saturday, March 14, 2009 10:00 PM
Nice work John.  That Do 17 is a strange looking bird but you sure did a great job as usual.  Thumbs Up [tup]Thumbs Up [tup]

Dave

jwb
  • Member since
    February 2006
  • From: Parkton, NC
Posted by jwb on Saturday, March 14, 2009 3:08 PM
Great work on that Do-17! It's neat how from the side it is so skinny, but from above it has such a wide look.

Jon Bius

AgapeModels.com- Modeling with a Higher purpose

"For I know the plans I have for you," declares the Lord, "plans to prosper you and not to harm you, plans to give you hope and a future." ~ Jeremiah 29:11

  • Member since
    September 2006
  • From: From Vernal UT OH YEA!!
Posted by raptordriver on Saturday, March 14, 2009 2:44 PM
Jon great work!Thumbs Up [tup]

Andrew


  • Member since
    December 2002
  • From: Northern California
Posted by jeaton01 on Saturday, March 14, 2009 12:27 PM

Bill, I have this bottle of paint mixed up for the tires from RLM 66, flat black, and a bunch of other colors, and whan it gets empty I'll have to re-invent my tire color supply.  I tweak it a little to fit my mood on one model or another.  The skiddy looking thing is part of the step from a Monogram Fw-190 used to replicate an antenna I saw in may pictures of the Do-17 and other German WW II aircraft.  Can't remember the name of the radio it serves.

Steve, other than fixing the banana shape and altering the fit of the cowlings, it was pretty straight forward.  The plastic the kit is molded from is very workable, I liked that.  The instructions, clear parts, and decals are the weakest parts of the kit.  The building process is on my web site, if you want more than this bit.

http://yolo.net/~jeaton/mymodels/do17z/1do17z/1do17z.htm 

John

To see build logs for my models:  http://goldeneramodel.com/mymodels/mymodels.html


  • Member since
    December 2003
  • From: Indiana
Posted by hkshooter on Saturday, March 14, 2009 12:42 AM

Nice build, John. I likeee a lot. Makes me want to add some German stuff to the to do list.

Good looking progress on the super bug, Mist.

  • Member since
    July 2003
  • From: waynesboro va, via Ireland
Posted by sidure on Saturday, March 14, 2009 12:28 AM

John, really great job on the 17. It really looks the bizz and its a great looking build. I dont see any flaws in it, the construction and finish are great. Good job. How was the build by the way, any major problems with the kit

Steve

  • Member since
    March 2007
  • From: Carmel, CA
Posted by bondoman on Saturday, March 14, 2009 12:17 AM
Very nice, John. Looks like the real thing. What color did you use on the tires? Looks like Floquil engine black- just right. And what's that skiddy looking deal just forward of the array on the ventral side? Great model. I see the hand of the obsessive- we know us when we see us- in the placement of the mark on the tail fin, oh just so.
  • Member since
    December 2002
  • From: Northern California
Posted by jeaton01 on Friday, March 13, 2009 8:20 PM

I do believe my Do-17Z can be called finished.  I like the way it came out.  I tried a pin wash for weathering and I think it worked pretty well, and is easy and forgiving to do.  As usual the cruel eye of the camera reveals things I don't see until I have the photos to prove my ineptness.  So I will keep trying to do better and be happy with where I am at.  In one photo the prop is off center, but they are "good spinners".  My granddaughter is away this week so there are no running photos this time because she supplies the wind for that....

Full build details are on my web site here:

http://yolo.net/~jeaton/mymodels/do17z/1do17z/1do17z.htm


John

To see build logs for my models:  http://goldeneramodel.com/mymodels/mymodels.html


  • Member since
    October 2006
  • From: Iowa
Posted by Mist086 on Friday, March 13, 2009 6:31 PM

Well i'm back.  Not when i said i was gonna be, but you all know what life's like.  Good to see progress and to finally see you again Jon.  I'm up to the wash stage, and when that's done i'll attach all the missiles, landing gear and burner cans.  The seats are True Detail Resin.  Really nice for the price.  ON TO THE PICS!!!


jwb
  • Member since
    February 2006
  • From: Parkton, NC
Posted by jwb on Sunday, March 8, 2009 2:41 PM

Hey guys-

I ain't been kidnapped by aliens.... Smile [:)]

Like Bill said, things have really been taking off at Agape, so I've been spending a lot of time there.

And he may have misunderstood me..... I'd thought after the 2nd SSBG I'd not do another....  then a few guys wrote me some very encouraging words, and that led to number 3- and if everyone is enjoying things, I see no reason why there won't be a number 4!! Wink [;)]

(It's only March and I'm taking #4 already- LOL!)

And I have been checking in on the progress- great work on everyone's part!

I'll make sure to drop a line more often- don't want you guys thinking I've abondoned ship! Smile [:)]

Jon

Jon Bius

AgapeModels.com- Modeling with a Higher purpose

"For I know the plans I have for you," declares the Lord, "plans to prosper you and not to harm you, plans to give you hope and a future." ~ Jeremiah 29:11

  • Member since
    December 2002
  • From: Northern California
Posted by jeaton01 on Sunday, March 8, 2009 1:03 PM

Another update.   Basic construction is done, spent about 5 hours yesterday masking all the bee-eye facets, the centers have masking film on them.  The exhaust locations are changed from what the kit had.

John

To see build logs for my models:  http://goldeneramodel.com/mymodels/mymodels.html


  • Member since
    March 2007
  • From: Carmel, CA
Posted by bondoman on Saturday, March 7, 2009 10:44 PM

I talked to Jon today. His other ministry the Agape forum has kind of gone off the charts, 38000 hits, 131 countries, he doesn't have enough hours in the day let alone the year to crawl through what gets posted.

He does a nice thing and I'll remind you that this isn't so much a build as an opportunity to give. This was probably the last SS he'll do, as he's under water right now with members needing support from the others that Agape hosts. Drop him a line, he'll appreciate it I'm sure.

  • Member since
    October 2006
  • From: Iowa
Posted by Mist086 on Saturday, March 7, 2009 9:13 AM

Well i havent died, but work has kept me humpin.  Progress is coming along on the Rhino.  Got to the decal stage, but havent had time to upload pics yet.  I do that later today after i get some more finishing touches done, 


Goood looking progress on all of your kits guys.


Jim

  • Member since
    December 2003
  • From: Indiana
Posted by hkshooter on Friday, March 6, 2009 10:50 PM

Yeah, this build kind of died. Seems our leader flew the coup.

Good work, John. I may have to build that kit someday. Dont' know if I want to go with the CA kit or not.

  • Member since
    May 2003
  • From: Abbotsford, B.C. Canada
Posted by DrewH on Friday, March 6, 2009 11:42 AM
Very nice work John Cool [8D] Indeed that is a some participation required for that kit. Well done!
Take this plastic and model it!
  • Member since
    June 2003
  • From: Caput Mundi
Posted by Avus on Friday, March 6, 2009 1:15 AM

At least some one is keeping this GB going.

Great work John!
It might be fictional but I like how the interior tured out and the engine-detailing is great, too.

Klaus

Thanks to ImageShack for Free Image Hosting

  • Member since
    March 2007
  • From: Carmel, CA
Posted by bondoman on Friday, March 6, 2009 12:57 AM

John, those cowling supports are a nice touch. As I looked at them, it reminded me of something I'd seen.... oh, I know, the Fw-200 Condor. A quick google search reveals that both the Do-17 and the FW-200 were powered by... BMW 323 Fafnir 9 cylinder radials, P and R series respectively but the same general layout. And it's been my experience in research that cowlings tend to follow their contents rather than be a part of the airframe design, for good reason.

Here's a Condor pic:

You can just barely make out the cowling supports, but they're kind of shiny so I think your choice of aluminum works well.

Cowl flaps, it looks to me from a few sources that the early ones had them, models M and P.

  • Member since
    December 2002
  • From: Northern California
Posted by jeaton01 on Friday, March 6, 2009 12:11 AM

Thanks Chris.  I say again, it is a fictional interior, just for fun.  I don't have real good references for this one.  I've done a bunch of seam work, did a good job of removing a nasty step where the tailplanes mate to the fuselage, then found a photo of the area, and there should be a step.Disapprove [V]  Oh well, there will be no step on my version.  I do have some good info on the engines, so I removed the Hobbycraft pushrod detail which is way oversize and made new pushrod housings out of .020 rod.  The cowl nose is attached by 10 brace rods that are on the front of the engine in a 5 pointed star arrangement, so I did that in .010 rod.  Lots of cutting and fitting under the magnifier there. Looks cool, I think.  Painted them natural aluminum, I want them to show, but they probably were RLM 02.  I filled all of the panel lines indicating cowl flaps because the 17Z did not have any.  I made styrene disks that fit over the engine mounting stubs, because I want to move the cowls a bit forward to get a gap between them and the nacelles and the disks will be what hold the cowls in position and centered.  I relocated the engine intakes to the right side on both engines, which is how Dornier intended it.  And that's  how it is, March 5, 2009.  Good night.


John

To see build logs for my models:  http://goldeneramodel.com/mymodels/mymodels.html


  • Member since
    December 2002
Posted by Bossman on Wednesday, March 4, 2009 11:23 AM

Nice Chiropractic work Dr. John ...   and nice job on adding detail to the interior too.  Impressive !

Chris

  • Member since
    December 2002
  • From: Northern California
Posted by jeaton01 on Wednesday, March 4, 2009 1:19 AM
That's right.  I just made one pass across with a saw blade in that dremel tool in the picture, leaving just a little on each side so things didn't go left or right.  If you don't have the kit already, you may want to look at the new Classic Airframes Do-17 kit first, don't know what it costs but it has a better cockpit.  I think maybe the fuselage is deforming when it is popped out of the molds, I have several of the Hobbycraft kits and none have exactly the same warpage.  The fuselage top is straight as it should be.

John

To see build logs for my models:  http://goldeneramodel.com/mymodels/mymodels.html


  • Member since
    December 2003
  • From: Indiana
Posted by hkshooter on Tuesday, March 3, 2009 10:28 PM
Hey John, that bend is why I've always avoided that kit. So if I understand correctly, you cut a portion out of the belly of the fuse behind the wing and bent the rear of the fuse down and glued it?
  • Member since
    December 2002
  • From: Northern California
Posted by jeaton01 on Tuesday, March 3, 2009 3:54 PM

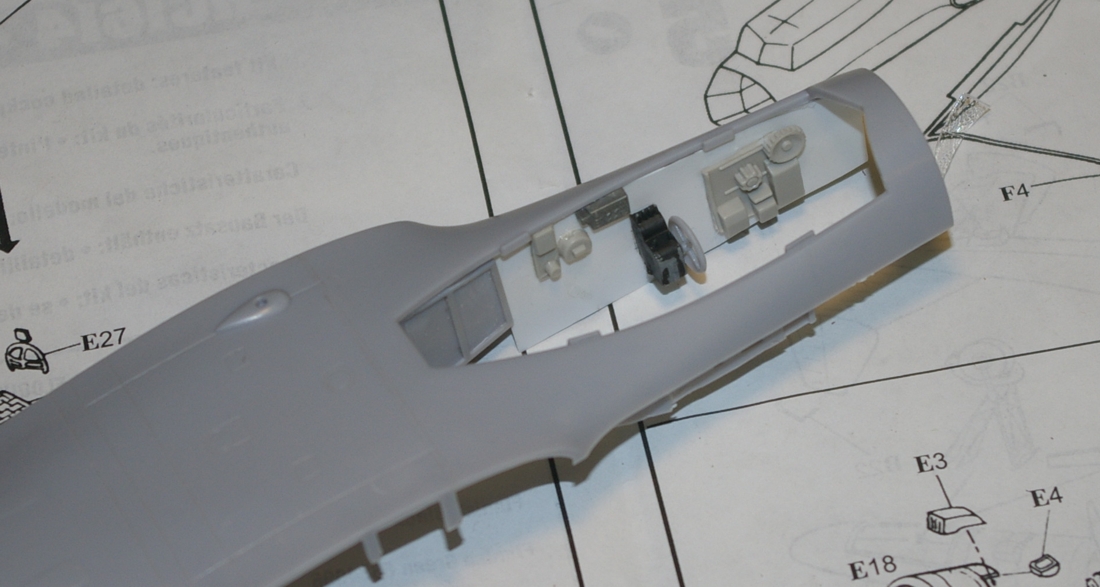
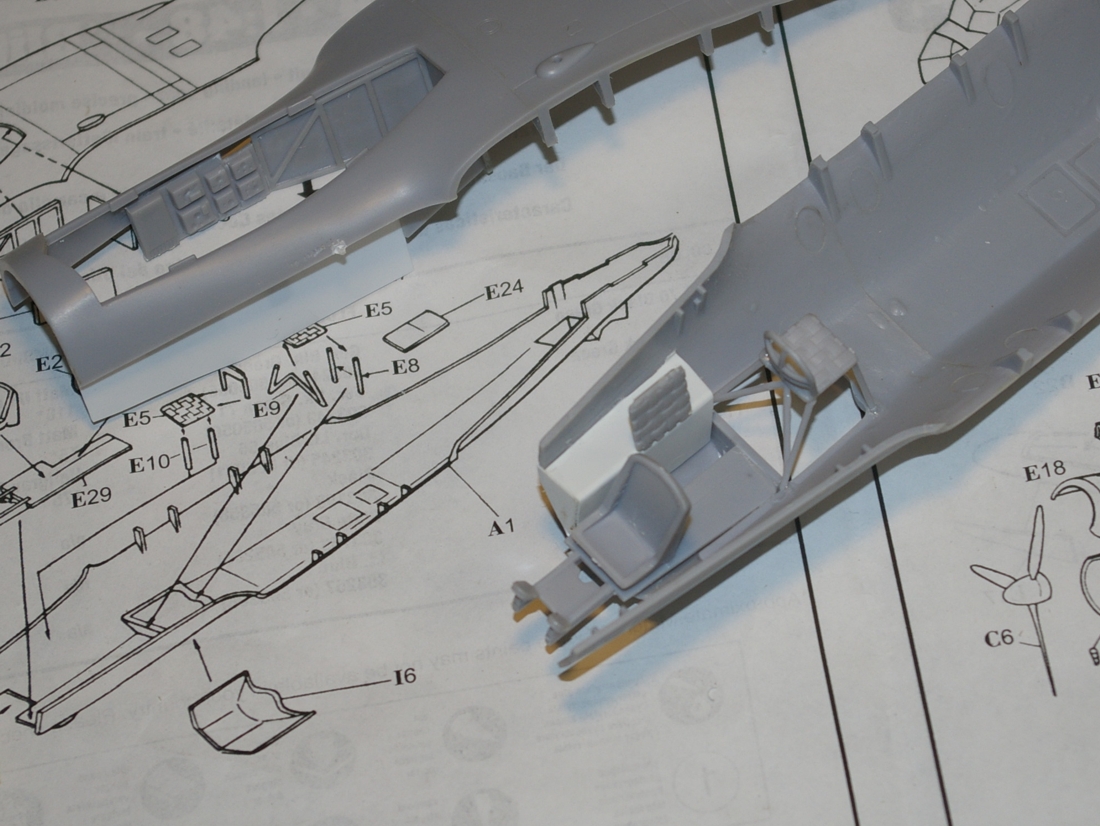
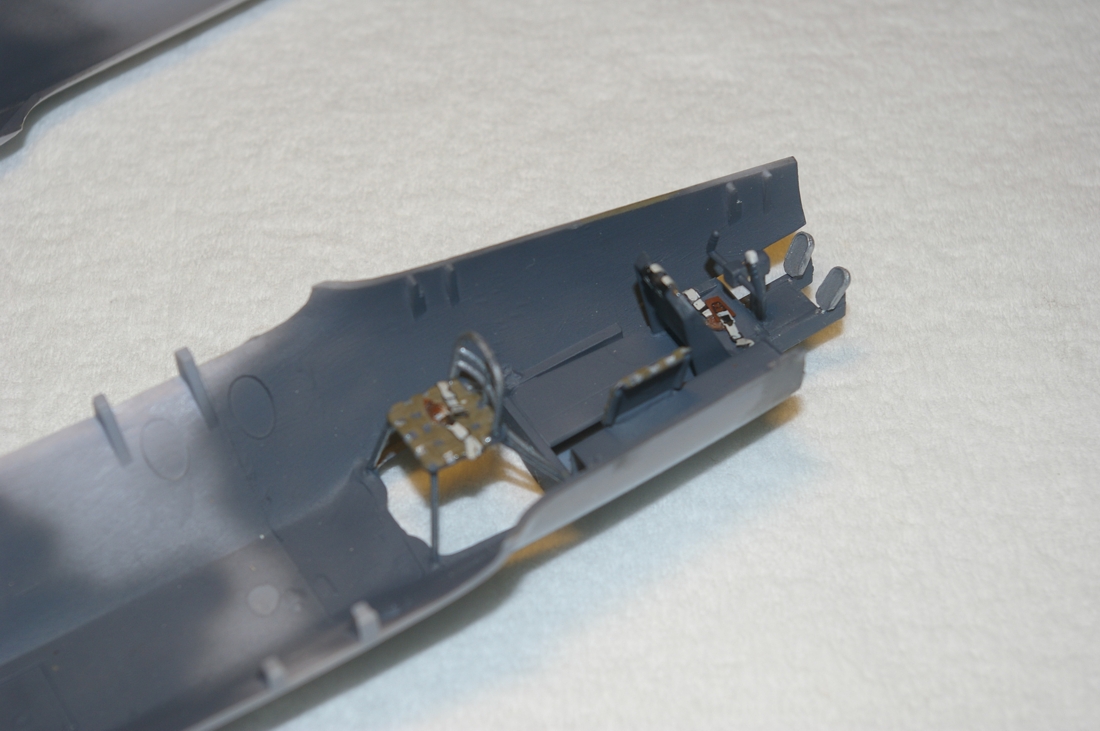
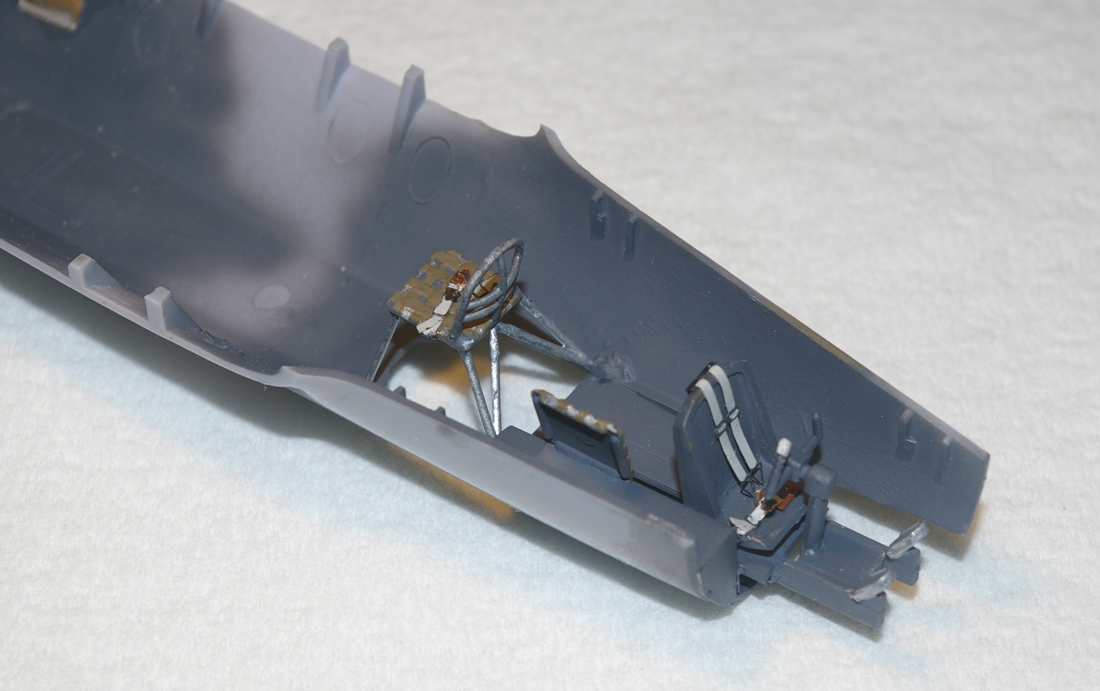
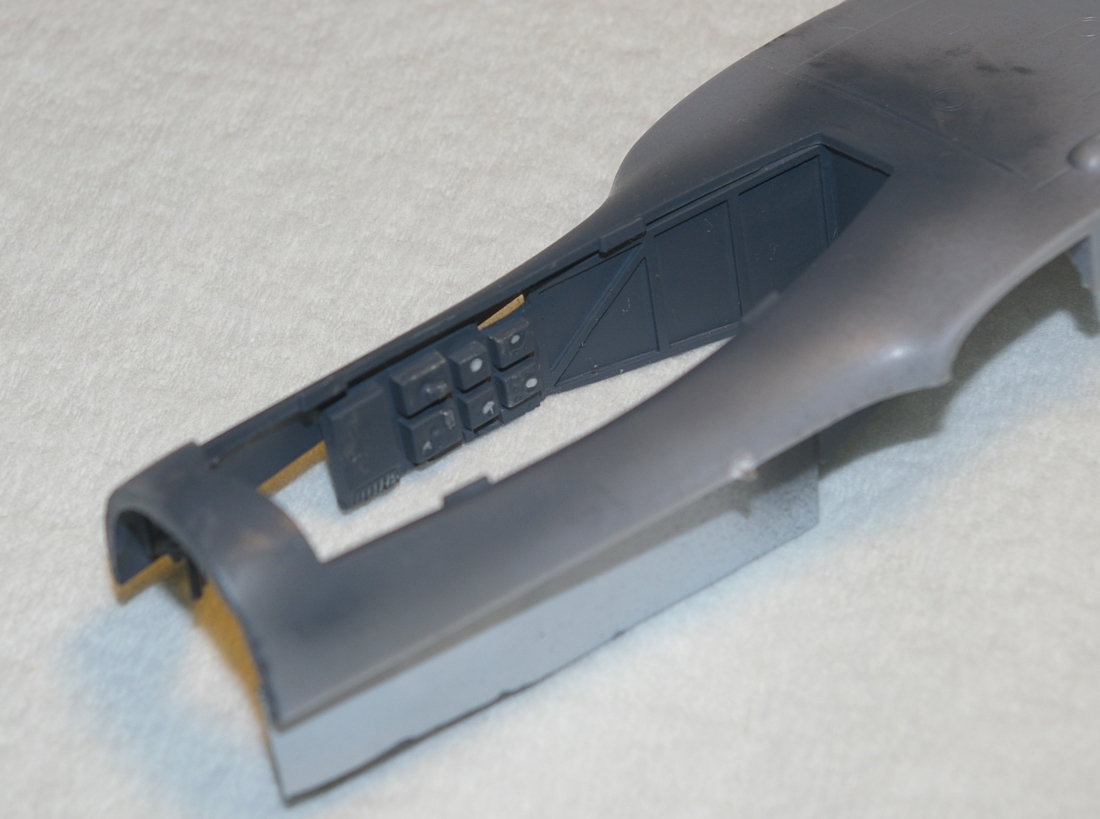
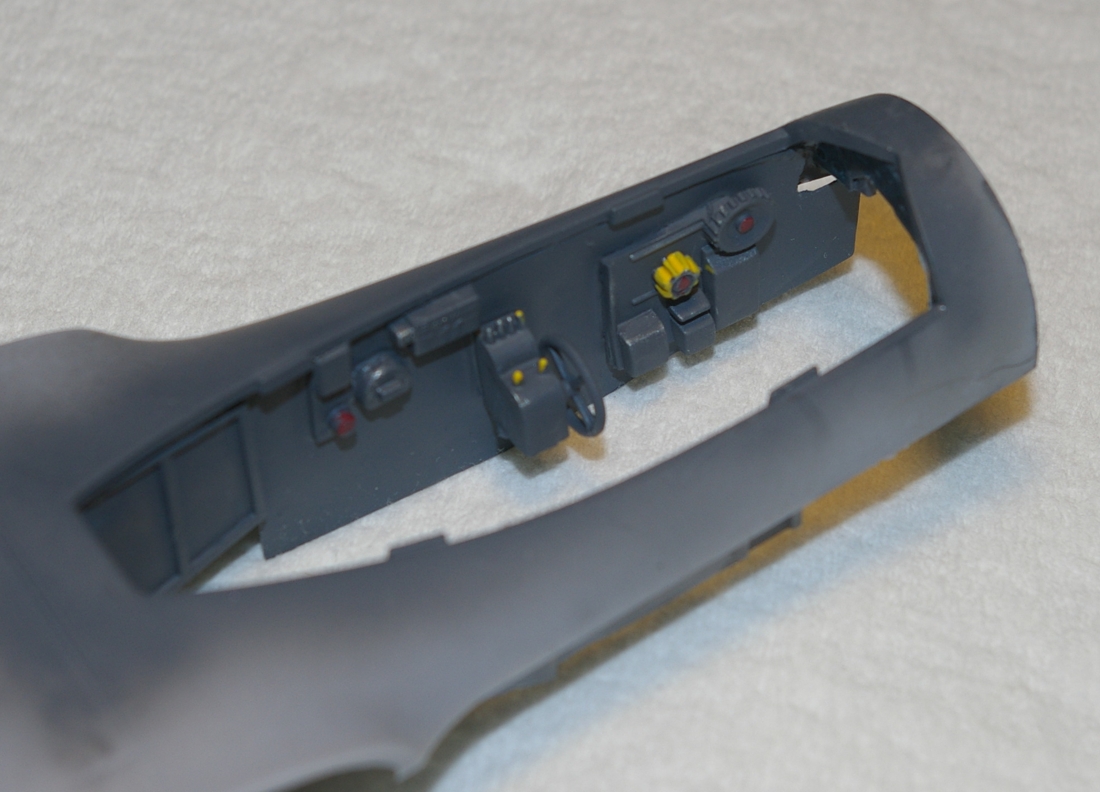
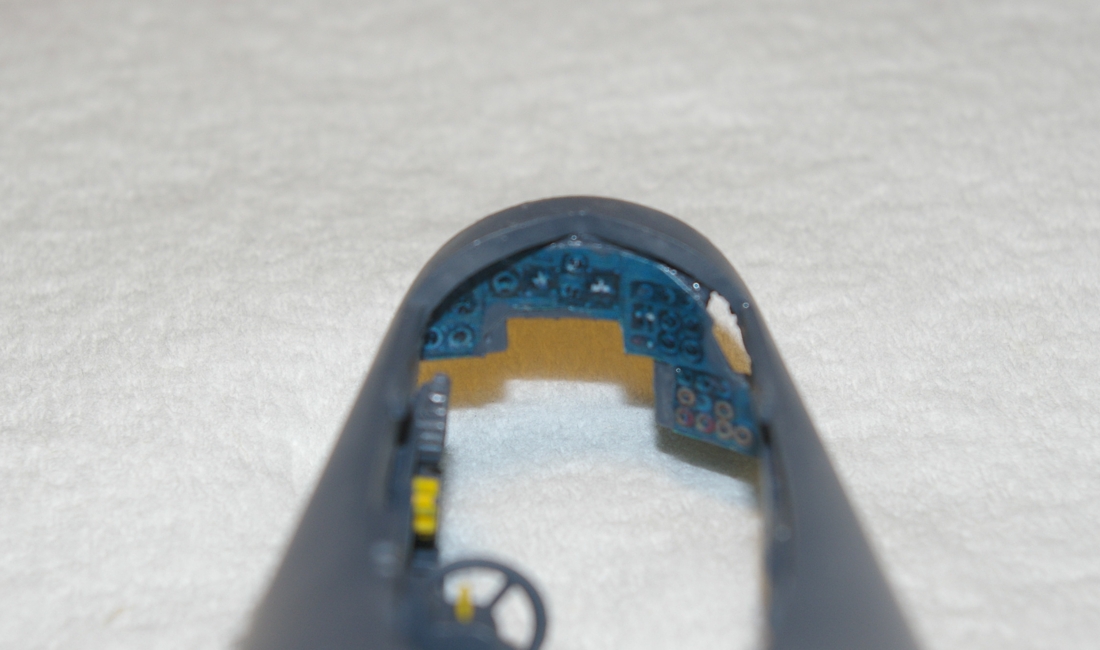
Got started on the Do-17Z  sent to me by Zipmeister, Steve Arnold.  It's going pretty well.  As with most Hobbycraft kits it is light on cockpit detail, so I am having fun adding stuff here and there, bits of left over P-47 sidewalls, a B-25 recycled throttle quadrant turned sideways, whatever looks about right.  I am not trying to replicate the original in any exact manner, I just want to make it look busy in a German sort of  way.  I found a couple of good reference sites on the web.  One guy really did a fine job on the kit so I stole his instrument panel and printed it with a color laser printer on photo paper, I think it came out well.  I have fitted the Squadron canopy set and Futured them.  I added Eduard seat belts. 

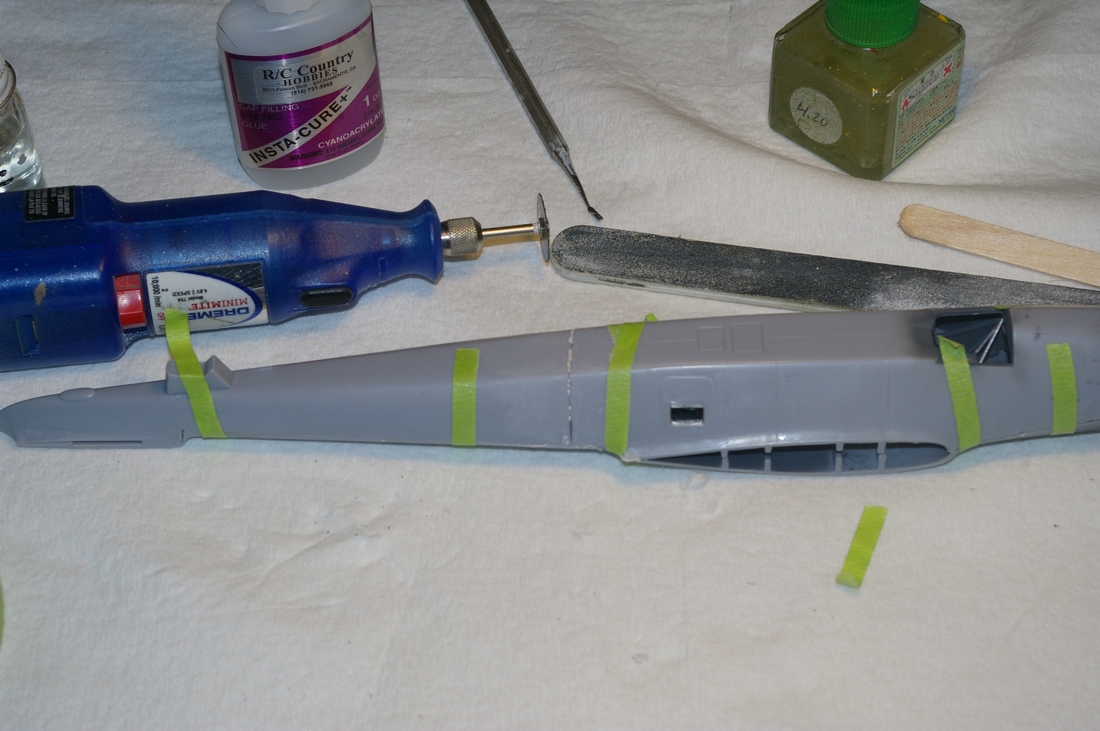
The last photo is there to show a way to fix a flaw in the Hobbycraft kit.  I think this is the newest release, and it is less affected than earlier releases by having an upward warp to the lower fuselage half.  As I saw in another modeler's build, I cut the fuselage bottom aft of the wing root after gluing the front section, and then glued it to the top, conforming to the shape of the fuselage top.  The bend seems slight, but if the fix isn't made the airplane will look like a tired old horse. I just made a crude cut with a saw in my dremel, and superglued the joint.


John

To see build logs for my models:  http://goldeneramodel.com/mymodels/mymodels.html


  • Member since
    November 2006
  • From: Bedfordshire, England
Posted by ollie on Wednesday, February 25, 2009 6:19 PM
My Zero is still sitting on my bench awaiting some ansers from a Japenese aircraft expert.
www.overthefencephotography.co.uk - aircraft photos.
  • Member since
    December 2003
  • From: Indiana
Posted by hkshooter on Tuesday, February 24, 2009 11:39 PM

Mmmm.....peefortysevennnnnnnn........

Nice job, fella. Been a while since I've seen that version built inspite the fact that at least two manus issue the kit with those markings.

Anyone seen Jon? Has he forsaken us?

  • Member since
    May 2003
  • From: Abbotsford, B.C. Canada
Posted by DrewH on Tuesday, February 24, 2009 8:23 PM
Hey Jeff - Absolutely fantastic! A great build and great finish on this timeless brute. Well done. Thumbs Up [tup]
Take this plastic and model it!
JOIN OUR COMMUNITY!

Our community is FREE to join. To participate you must either login or register for an account.

SEARCH FORUMS
FREE NEWSLETTER
By signing up you may also receive reader surveys and occasional special offers. We do not sell, rent or trade our email lists. View our Privacy Policy.