SEARCH FINESCALE.COM

Enter keywords or a search phrase below:

1,000 Roadwheels - 2009

154804 views
1823 replies
1 rating 2 rating 3 rating 4 rating 5 rating
  • Member since
    April 2005
Posted by Thunderbolt379 on Monday, May 4, 2009 12:11 AM

Mobious -- that dio really has the Shep Payne (sp?) feel! The rubble is incredible -- I would so love to try my hand at this sort of thing. Fantastic work!

I just won the old Tamiya Brummbar on eBay for a bargain price, so short of the Flakpanzer IV I have all their old-tool Mark IV derivatives now. It'll be interesting to see what I can work through in the rest of the year!

WIP pics of the StuG coming soon, all zim's on now!

Cheers,

Mike/TB379

http://worldinminiature.blogspot.com/

  • Member since
    November 2006
  • From: Coastal Maine
Posted by dupes on Monday, May 4, 2009 9:09 AM

Mobious - your base is GREAT! Any chance you could give some sort of tutorial on how you did it? Materials, colors, techniques, etc?

And since you won't be needing that first one you made that was too small, I'm sure I could find some very willing builds that would perch on top of it quite nicely. Let me PM you my address, I'll get your "mistake" off of your hands! Smile,Wink, & Grin [swg]

  • Member since
    April 2005
Posted by Thunderbolt379 on Monday, May 4, 2009 9:21 PM

Hi all,

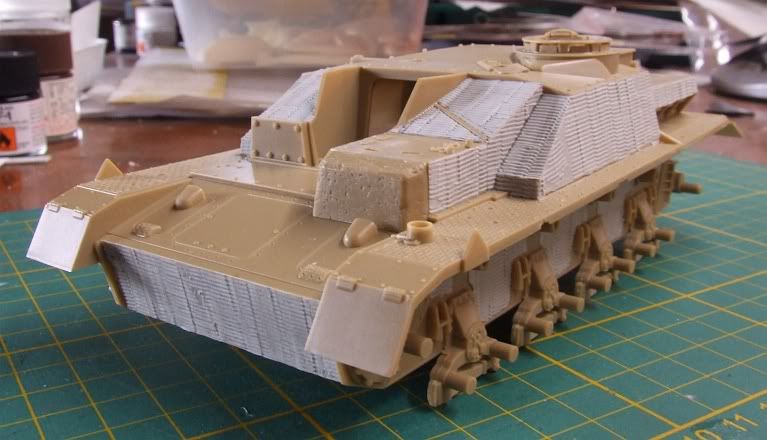
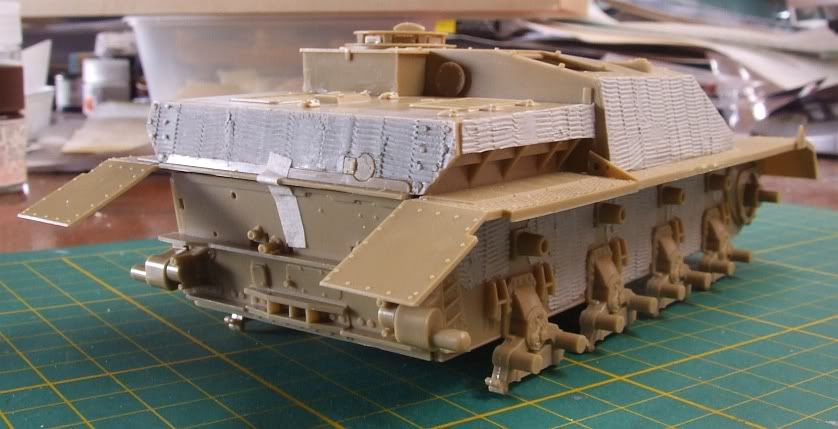
WIP shots as promised:

Photobucket" border="0" />

Photobucket" border="0" />

I considered adding zimmerit to the lower areas of the stern plate, but finally decided not to. Glen Philips was probably working from reference photos for the choices he made, and the variety of applications seems infinite, with lots of parts-swapping resulting in functional but 'patchwork' tanks. I found a shot in Kevin Hjermstad's book of a late Panzer IV which seems to have been rebuilt in this way, in a huge hurry: the rear fenders, superfluous to survival, had a coat of zimmerit, while the engine upper rear plate, critical to survival, did not. So, I decided to follow the original build-up from '91 in this aspect and leave the lower stern plate as-is.

I had meant to have a few stern fittings in place but I hit a snag last night. I test-fitted the muffler, the first subassembly I built a while back, and found I had the mounts out of alignment. I'd glued the end caps on the wrong notch or something -- with CA, of course. I tried debonding them with acetone, but that was no-go, the bond was rock-solid. I looked around on the web to see if I could buy Tamiya replacement parts, but it turns out that is a service inside the US only, everywhere else we are refered to our national agents, and the agent in Australia has no such service ('parts' refers to spares for R/C cars only.) I considered swapping the muffler for parts from other kits, since they share them in common, or even modifying and substituting Italeri's muffler, then building the Italeri kit with the alternate exhaust arrangement. In the end it was a simple fix... I put the assembly in the vice (gently!) and separated off the incorrect endcap with a razor saw, cleaned up the surfaces with a file and CA'd the cap back on at the right angle. There, all done!

Before joining the hull halves I need to check my StuG III book for the sort of internal detail visible through the MG gunner's hatch, build in a wall or whatever and box the sponson with sheet stock, add some paint in there, and get the optical sights and gun installed. I'll probably pre-paint and weather the gun receptable and the underside of the mantlet, which is what I did with the StuG III, perhaps from the same paint-mixing as will do the wheels. From that point I can box her up and do the main masking.

I also sprayed the tracks a few days ago, along with the Merkava tracks, so I have the wash and drybrush finish to do on those.

Looking forward to getting her into color!

Cheers,

Mike/TB379

http://worldinminiature.blogspot.com/

  • Member since
    January 2008
  • From: Hickory, NC
Posted by Bushi on Tuesday, May 5, 2009 4:15 PM

I have a slight problem and also a question. Last night while working on my DAK PZ IV F-1 I accidently tuned over a entire bottle of Testors liquid cement on the upper super structure.Banged Head [banghead] To say the least it has slightly ectched the entire surface including the fenders. It is bad enough that it has warpage issues which the glue seemed to help staighten out as one of the fenders now fits better. Has any one else done any thing like this and what did you do about it?

Any advice will be very helpful!!!

Bushi

  • Member since
    September 2007
  • From: Relocating
Posted by Mobious on Tuesday, May 5, 2009 4:22 PM

 Hey Dupes, Stumpy's old home has a new residence in the form of a VW Kubel and a couple landsers I'd had laying around since an ill fated attempt at a Barbarossa dio. As for the materials the street, sidewalk and final rubble coat are plaster, the bulk of the rubble is Sculptamold, similar to Celluclay. The colors are mostly browns with red browns for the brick and a touch of good ol nuetral Panzer Grey. I tried to keep the colors complimentary to the subject. 

 Thunderbolt, The zimm really has me motivated to try it on the early JgdPzIV. Nice job on the bolt heads on the rear plate too. The StugIV is looking very cool. Looking forward to seeing paint.   

 Thanks for the comments. They are greatly appreciated. I'll try to get pics up when I get nearer to finishing. I plan on keeping tuned into the GB to see the very cool stuff being built.

"It's a problem of applied physics" Roy Brown

  • Member since
    February 2008
  • From: ladner BC Canada
Posted by stick man on Tuesday, May 5, 2009 6:04 PM

Nice base Mobious are you going to add figures??

Cool looking zimm TB.

Smile [:)]

I'm 15 and I model I sk8board and I drum what could be better.
  • Member since
    May 2006
  • From: Queensbury,NY
Posted by panzer88 on Wednesday, May 6, 2009 5:48 PM

mobious- Stumpy's new base is awesome, they look great together

moose- Your panzer IV is coming along very nice. I can't wait to see some paint on her.

thunderbolt- nice job on the stug IV. You did a great job adding the zimm, especially since you had to cut it to size yourself.

dupes -Fantatsic job on that little jagdpanzer. If you didn't say anything I would've thought it was 1/35. I was so impressed, I ran to my storage unit and dug out a couple of my Dragon 1/72 kits to try out in the near future.

And to everyone I may have missed, beautiful builds and keep them coming


  • Member since
    December 2006
  • From: t.r.f. mn.
Posted by detailfreak on Wednesday, May 6, 2009 10:11 PM
BUSHI:how the heck did you spill a bottle of liquid cement !!doesnt look to swell now i suppose.dont worry youll figure out what to do.cover the exposed areas with snow or stowage and its fine.never lose the outlook you had when you started.Thumbs Up [tup]

[View:http://s172.photobucket.com/albums/w1/g-earl828/]  http://i158.photobucket.com/albums/t104/cycledupes/1000Roadwheels4BuildBadge.jpg

  • Member since
    September 2007
  • From: Relocating
Posted by Mobious on Thursday, May 7, 2009 12:17 AM

 Hey Bushi, Sorry to read about the mishap. I've knocked over a bottle of Tenax before, but fortunately only the bench was in harms way.  

 Thanks Stick Man and Panzer88 for the positive comments.

 Stickman, I did decide to add figures and go for a dio. I was planning on using 2 figs from DML's desperate defense and a commander. Added down spouting and started on the landsers. The detail in the Gen 2 figures is very nice. I did manage to loose one of the landsers arms during a lull in the action. I'm sure it will turn up in a day or 2 after I find a suitable replacement. Oh, I've added the rubble to Ol'Stumpy and am pretty pleased with the placement. I used epoxy putty to form the piles and worked it up and around the bricks and sculpted in texture, added a few bits of real rubble, then added sand fixed with white glue. After painting it should really begin to tie the Brummbar to the base.

 thanks again for the positive comments, it really helps keep me motivated to finish. The last time I actually finished a dio, I still had hair on my head and not in my ears!

"It's a problem of applied physics" Roy Brown

  • Member since
    December 2006
  • From: t.r.f. mn.
Posted by detailfreak on Thursday, May 7, 2009 6:10 AM
hey mobiuos:i really like what you did with the brummbar.if you dont mind my saying,it could use some more debris.to everyone,great work so far.p.s,the panzer 4 g,has been selected for readers gallery.notified last week,now i must up my level of work.i didnt think that i would ever get that far as the g wasnt quite completely finished.but i did submit photos of her good side.hopefully have some progress picks soonon the brummbar and the big e.Thumbs Up [tup]

[View:http://s172.photobucket.com/albums/w1/g-earl828/]  http://i158.photobucket.com/albums/t104/cycledupes/1000Roadwheels4BuildBadge.jpg

  • Member since
    November 2006
  • From: Coastal Maine
Posted by dupes on Thursday, May 7, 2009 9:12 AM
 panzer88 wrote:

dupes -Fantatsic job on that little jagdpanzer. If you didn't say anything I would've thought it was 1/35. I was so impressed, I ran to my storage unit and dug out a couple of my Dragon 1/72 kits to try out in the near future.

Hey, thanks man! Big Smile [:D] Means a lot coming from you, I'm a big fan of your stuff. Can't wait to see what you do with those little 3-inch beasts...which ones do you have kicking around? 


  • Member since
    April 2005
Posted by Thunderbolt379 on Friday, May 8, 2009 8:07 AM

Hi all,

WIP, the StuG is moving along. Here she is with a batch of subassemblies done and the tow cleats and track hanger added to the bow over the zim:

Photobucket" border="0" />

I'm not getting much of a clear shot at the bench lately so I'm just working in bits and pieces. However I have had a chance to do some background research and check out the Acadmy IV H/J. It's definitely Tamiya's early offering, simply with a name change on the sprues, I'd know those parts anywhere. The running gear sprue is in common with their other Panzer IV kits.

Now, the kit depicts an H, but without skirts, which is odd to say the least (no wonder they retooled it!). My references showed up only a single H or J without stand-off armor around at least the turret, and that was a wreck in a French village, possibly a J. If I'm going to build an H I'll use the newer kit, so my options for a potentially un-skirted IV are: postdate it to a J (delete the traverse motor muffler and most of the visors/pistol ports, use the late-style drive and idler, the latter pulled from the Academy track link set, and, if early production, use zim) or backdate it to a G (relocate the antenna mast to the forward starboard side, divide the commander's hatch, use the early style drive wheel sourced from the Italeri Jagdpanzer, and any other details that come to light). In either case I'll need to be sure the hubcap type matches, though I notice Don Greer did not build in that difference in his profiles.

So while the kit should build quick and easy, there will be some pushing and pulling to do to develop an accurate mark. I can also look at Bison or Echelon for an interesting scheme, so this promises to be an entertaining project. I'm not sure when this one will be on the bench, though, as the Brummbar might be arriving in a few weeks. We'll see what happens, and in the meantime I'll crack on with the StuG, the Merkava and that Bf 109 K-4 at long last. Oh, and maybe get some decals on that Corsair!

Cheers,

Mike

http://worldinminiature.blogspot.com/

mmc
  • Member since
    February 2007
  • From: Newcastle upon Tyne, England
Posted by mmc on Friday, May 8, 2009 9:35 AM

Just had a look through the thread and there's some great builds going on, can't wait to see all the finished builds at the end.

Mark

  • Member since
    November 2006
  • From: Coastal Maine
Posted by dupes on Friday, May 8, 2009 10:33 AM

Mark - I'm pretty fired up to see the year-end wrapup myself...even if the GB ended now it would be pretty impressive. Think what it'll be like in 8 more months!!! Cool [8D]

Thunderbolt - looking good, man. Get some paint on that puppy! Wink [;)]

mmc
  • Member since
    February 2007
  • From: Newcastle upon Tyne, England
Posted by mmc on Friday, May 8, 2009 3:21 PM

I'm still hoping to go for my 3rd stripe, I'm also putting a dio together using my Nashorn, I'll post some pics once it's all done.

Mark

  • Member since
    December 2003
  • From: Colorado
Posted by psstoff995 on Friday, May 8, 2009 9:50 PM
Speaking of 8 more moths- guess I have time to join in a 1/3 of the way through? My second year of college is over and I'm hoping for some modeling spare time this summer. If it's ok- put me down for Dragon’s Imperial Series StuG IV (Early Type), s’pose I can start clearing out the stash before I run out of room to put any new purchases Blush [:I]

I’ll be floating around here looking for some nice StuG reference (or just piggybacking on Thunderbolt’s build Whistling [:-^])

-Chris

US Army Infantryman

  • Member since
    September 2007
  • From: Relocating
Posted by Mobious on Saturday, May 9, 2009 2:45 AM

 Hey Thunderbolt, Where are all the road wheel thingies? A question about the Tamiya StugIV, How is the cast texture on the Saukopf mantlet?

 I managed to get the lid off Ol'Stumpy and stuff this cat in the hole.

 You'd never believe the stilts that dude has strapped to his feet in order to get him to set proper in the commander's hatch.

 I was considering adding a 2nd Grenadier w/panzerfaust to the scene, doing the typical pointing thing. I've also been considering adding remnants of the 2nd story to the bombed out building.

 comments/suggestions?

 I just thought this angle was kinda cool, but it really shows the dust that's been kicked up during construction.


 Thanks to Wing_Nut, I've been trying the manual focus for the first time. It really gets annoying all the buzzing of the auto focus.  

"It's a problem of applied physics" Roy Brown

  • Member since
    April 2007
  • From: Schroon Lake, NY
Posted by SMJmodeler on Saturday, May 9, 2009 11:51 AM
 Mobious wrote:

I was considering adding a 2nd Grenadier w/panzerfaust to the scene, doing the typical pointing thing. I've also been considering adding remnants of the 2nd story to the bombed out building.

comments/suggestions?

YES: Add a third guy and place him in a way that he completes the triangle that you want the viewer to focus within.  NO: On the remants, the "negative space" is perfectly juxtaposed to the weight of the tank. My My 2 cents [2c] of course...even if it sounds too artsy-fartsy...

This is a real winner mobious, fantastic execution all-around!

  • Member since
    November 2006
  • From: Coastal Maine
Posted by dupes on Saturday, May 9, 2009 4:12 PM

 psstoff995 wrote:
Speaking of 8 more moths- guess I have time to join in a 1/3 of the way through? My second year of college is over and I'm hoping for some modeling spare time this summer. If it's ok- put me down for Dragon’s Imperial Series StuG IV (Early Type), s’pose I can start clearing out the stash before I run out of room to put any new purchases Blush [:I]

psstoff995 - never too late to join! As long as it's done before the end of the year, you're good. And the more the better. Wink [;)]

Mobious - wow man, this keeps getting better and better. Dang.

  • Member since
    September 2007
  • From: Relocating
Posted by Mobious on Saturday, May 9, 2009 6:17 PM

 Thanks for the input SMJ, I've added the 2nd grenadier w/panzerfaust and located him just to the left of the first. I changed the 1st grenadiers left arm and added a teller mine. I believe the tellar mines were used for anti tank. I also repositioned his head to look in the direction the grenadiers are walking.  

 Thanks Dupes for the positive comments. I'll be getting started on figure painting, and maybe tie up some loose ends cargo.

"It's a problem of applied physics" Roy Brown

  • Member since
    December 2003
  • From: Colorado
Posted by psstoff995 on Saturday, May 9, 2009 9:32 PM
 dupes wrote:

psstoff995 - never too late to join! As long as it's done before the end of the year, you're good. And the more the better. Wink [;)]

Sounds good to me- I'll get started on that StuG as soon as I get back home Thumbs Up [tup]

-Chris

US Army Infantryman

  • Member since
    April 2005
Posted by Thunderbolt379 on Sunday, May 10, 2009 8:03 AM

Mobious -- fantastic dio, man! Superbly realistic!

Re the cast texture: that's an interesting point. Basically, Tamiya didn't try to tool it, which is a little puzzling given the subtle texture they had tooled into their early Panther previously. It's beautifully smooth, so I'm looking at using the liquid glue technique. I've never done it before but it sounds starightforward. I'll try it on some scrap plastic first -- brush on glue, let it soften the surface, then stipple the texture in with a stiff brush and let the plastic resolidify.

Cheers,

Mike/TB379

http://worldinminiature.blogspot.com/

  • Member since
    January 2008
  • From: Hickory, NC
Posted by Bushi on Sunday, May 10, 2009 4:19 PM

Hey everyone!!! I hope everyone had a wonderful Mother's Day!!!!

Mobious The build looks great, and everything looks good in threes or fives. Try to stick with odd numbers.

Well here is my update. The build is going ok besides the mishap earlier this week. Still have not been able to get all of the warpage out, so I will deal with it the best I can.  I believe I have figured out how to deal  with glue mishap, so everyone will have to wait till I paint it up to see. Here are the pics so everyone take your best shot and all comments welcome and encouraged.

Bushi


  • Member since
    September 2007
  • From: Relocating
Posted by Mobious on Sunday, May 10, 2009 9:55 PM

 Thanks Bushi, I did add the 2nd grenadier and he really balanced everything out. I was afraid he would have added to much weight(if you will) to the one side, but by turning the head of the other grenadier, the viewer is directed back out to the front again. At least I am, LOL. I'm about 3/4 of the way on painting the Huns. Not my best effort, but I think they'll do.

  I was going to suggest maybe trying to block sand the top plate with 600 grit, then finish it off with 1500. It would be tricky to sand with all the detail in place. Aside from that maybe scratch building a new one, which is an adventure in itself. Trust me on that one.  Anyhow, looking forward to seeing how you've decided to finish the area.

 OBTW, were teller mines painted or a metal finish?

"It's a problem of applied physics" Roy Brown

  • Member since
    January 2008
  • From: Hickory, NC
Posted by Bushi on Sunday, May 10, 2009 10:28 PM
 Mobious wrote:
 

  I was going to suggest maybe trying to block sand the top plate with 600 grit, then finish it off with 1500. It would be tricky to sand with all the detail in place. Aside from that maybe scratch building a new one, which is an adventure in itself. Trust me on that one.  Anyhow, looking forward to seeing how you've decided to finish the area.

Thanks for the idea I had thought about that. I have about 15 9x11 sheets of 2000 grit from the place I work at, so I might try making a mini block out of a popsicle stick and cut down some sheet to fit. Oh I work at a sandpaper manufacturer so gatting sandpaper not a problem. But usually buy at the company woodworking shop.

Bushi

  • Member since
    September 2007
  • From: Relocating
Posted by Mobious on Monday, May 11, 2009 12:10 AM

 Hey Bushi, I use a machined steel block, IMO it works better than wood. It keeps a nice sharp edge on the paper.

 Here's the crew. Almost finished.


 Comments, suggestions?


"It's a problem of applied physics" Roy Brown

  • Member since
    December 2003
  • From: Colorado
Posted by psstoff995 on Monday, May 11, 2009 5:58 AM

Hmmm... only comment I can think to make that is a critique would be darkening up the 5oclock shadow area on the Panzerfaust trooper. His cheeks look a little white and his lips a little rosy, might just be a preference- as everything else is definitely top notch. Very nice figures- and the dio is awesome!

-Chris

US Army Infantryman

  • Member since
    April 2005
Posted by Thunderbolt379 on Monday, May 11, 2009 7:45 AM

Mobious -- you insire me to at least attempt figures. Yours really look the part, and bring the dio to life! I'd like to put the loader figure in the MG hatch of the StuG, so it's worth a shot. I painted the uniform of the figure in the first armor kit I ever built and it came out great, but I could never face tackling the skintones, then I had a go at a camo battledress for an Abrams project a couple of years ago and the result was way below the standard I'd hoped for and I've never tried figures since. I've read figure painting tutorials but it always seems like I'm trying to do a makeup job with a cement trowel, if you know what I mean. It might be appropriate for Madonna, but not for an SS Obersturmfuhrer.

If I'm going for an open hatch I need to put something under it to be seen around the figure, so I checked my StuG III books for details. I'm not going to spend a lot of time scratchbuilding in there because if the figure comes out below par I might end up closing the hatch anyway. The most obvious detail is the rear wall of the fighting compartment, which if it's anything like the III ran down to the deck plates with various details and an MP-40 in clips on the back wall, while the superstructure over the sponson was hollow for various bits of equipment, and painted either white or a beige-like shade. The problem with the wall is that the platform for the figure to stand on is secured under the rear decking, thus interfering with installing a sheetstock bulkhead.

It's coming along to crunch-time for a decision on these details, but I can procrastinate a bit longer, I have the mantlet to texture and the template job on the wheels to do (they're all still on the sprue, I can't decide whether to laboriously remove the molding line from all 36 of them, then find 36 mounting sticks as painting handles for the tire phase, or forget the mold seams and spray them on the tree). Adding the sighting periscopes is the last job before I can close the hull.

Hopefully I'll have some progress to post before long.

Cheers,

Mike/TB379

EDIT: I textured the mantlet tonight and the good news is the liquid glue technique seems to work like a charm. I'll know better with some paint on it, but so far it looks great, needing at least two applications overall, and vigorous stippling with an old hogbristle brush, trimmed short for stiffness, to create the texture.

http://worldinminiature.blogspot.com/

  • Member since
    November 2006
  • From: Coastal Maine
Posted by dupes on Monday, May 11, 2009 10:00 AM

Bushi - your build is looking good so far...did that warpage work itself out a bit when you put the upper hull on?

Mobious - your figs are sweet. Are you an acrylics guy, or oils/enamels?

Thunderbolt - I hear you about needing motivation to paint figs...and about the problems with faces. Mine end up looking like mannequins or bad circus clowns. I'm working on it though! Approve [^]

  • Member since
    January 2008
  • From: Hickory, NC
Posted by Bushi on Monday, May 11, 2009 1:15 PM
 dupes wrote:

Bushi - your build is looking good so far...did that warpage work itself out a bit when you put the upper hull on?

Dupes _ Thanks for the comments, and yes some of the warpage did come out but not all. I hope that when I attach the upper to the lower it will straighten out more. I am having to putty the bottom of the turret an part of the main gun to fill the seams, I have started cutting and cleaning the tracks OH WHAT FUN!!!! Banged Head [banghead] LOL. At the moment I seem to be jumping back and forth on the different sub assemblies. One thing I did do was to scratch build the grab handles on top of the turret by using fly tying weight. You need to be careful with this as it is soft. Plus it was what I had on had. Will post some more picks in a day or so.

Mobious - Thanks for the idea on the machined  block.

Bushi

JOIN OUR COMMUNITY!

Our community is FREE to join. To participate you must either login or register for an account.

SEARCH FORUMS
FREE NEWSLETTER
By signing up you may also receive reader surveys and occasional special offers. We do not sell, rent or trade our email lists. View our Privacy Policy.