SEARCH FINESCALE.COM

Enter keywords or a search phrase below:

Regia Aeronautica GB II (06/15/09 to 06/15/10)

261190 views
3232 replies
1 rating 2 rating 3 rating 4 rating 5 rating
  • Member since
    October 2004
  • From: League City, Texas
Posted by sfcmac on Thursday, July 30, 2009 2:22 PM

Ok Pmed ya again Guy!  here's a joke!

Knock Knock.....

who's there?

Old Lady!

Old Lady Who?

I didn't know you knew how to yodel? Laugh [(-D]Laugh [(-D]Dead [xx(]

never mind jeeze. Tough crowd! Black Eye [B)]

Kinda like the joke about the pencil with the broken lead?

It was pretty pointless!

  • Member since
    March 2006
Posted by simpilot34 on Thursday, July 30, 2009 10:39 PM
Yeah and like this one. A horse walks in to a bar, bartender comes over and asks, " Hey buddy, why the long face?"Laugh [(-D]Black Eye [B)] I see what you mean Aaron!
Cheers, Lt. Cmdr. Richie "To be prepared for war, is one of the most effectual means of preserving the peace."-George Washington
  • Member since
    March 2007
  • From: Carmel, CA
Posted by bondoman on Friday, July 31, 2009 12:38 AM

Dumb blonde joke:

Who died first, Thelma or Louise?

Thelma. Louise had to stop and ask for directions.

  • Member since
    February 2007
  • From: Bournemouth UK
Posted by Luftwoller on Friday, July 31, 2009 10:45 AM

Oh my God, look what happens when my backs turned....but if you cant beat em, as they say,

What do you call a Frenchman in Beach sandals?.....Phillipe Phillop

Aah well, it made me laugh.

...Guy


..'Your an embarrassment to the human genus, makes me ashamed to call myself Homo'.
  • Member since
    March 2006
Posted by simpilot34 on Friday, July 31, 2009 10:55 AM
 Luftwoller wrote:

Oh my God, look what happens when my backs turned....but if you cant beat em, as they say,

What do you call a Frenchman in Beach sandals?.....Phillipe Phillop

Aah well, it made me laugh.

...Guy


Laugh [(-D]

Cheers, Lt. Cmdr. Richie "To be prepared for war, is one of the most effectual means of preserving the peace."-George Washington
  • Member since
    February 2007
  • From: Bournemouth UK
Posted by Luftwoller on Friday, July 31, 2009 4:33 PM

You know i was mentioning that id like the MPM Do-24, well i looked for it on Hannants website. No sign, but burger me if under Special Hobbies, 'Future releases' there was a Do-24T. Do Special Hobby have a website? Id like to know when its to be released.

...Guy

..'Your an embarrassment to the human genus, makes me ashamed to call myself Homo'.
  • Member since
    September 2003
  • From: South Central Wisconsin
Posted by Daywalker on Friday, July 31, 2009 7:26 PM

WOOHOO!!!

I finished the 109 today, finally!  Paints used are Tamiya and Gunze, with kit supplied decals.  The decals have a bit of silvering, but I snuggled them down as best as I could.  Also, I think the pitot tube is bent a little too much, but trying to straighten it meant possibly breaking the wing seam so I left it as is.  Built as a machine flown with 365 Squadriglia, 150 Gruppo Autonomo in July 1943.  The Hasegawa kit included parts to convert the G-6 in the box to a G-4, but the resin parts looked like they were designed for an entirely different model. Confused [%-)]  So, I built it as a G-6 figuring the G-4 in the squadron was replaced with a G-6 at some point. Wink [;)]  Thank you Aaron, for giving me this kit!  I enjoyed it immensely, bet you thought I would NEVER finish it! Big Smile [:D]

This also marks the very first time I have finished a model in markings other than those from the country of origin. Approve [^]

Frank 


  • Member since
    December 2005
  • From: back seat of your car with duct tape streched out
Posted by soulcrusher on Friday, July 31, 2009 7:35 PM

I love it Frank. I have been looking foward to seeing this one done for a long time. As you know I also purchased this kit when I saw you were building it because it looked cool. I do not know how I am going to make my build look as good as yours but I still have two G 55's and a Me 109 G-6 in marking for the 2nd Squadriglia with the devil head squadron symbol on the nose to build. Then I might tackle the G-4 if I have time. So whats next for part II Frank or are you going to back to play with those bent wing thingies?

                                                                                  SoulcrusherPirate [oX)]


  • Member since
    March 2006
Posted by simpilot34 on Friday, July 31, 2009 7:39 PM
Frank she is a beaut mate! Absolutely stunning build!!!! Well Done!!!Bow [bow]Thumbs Up [tup]Make a Toast [#toast]
Cheers, Lt. Cmdr. Richie "To be prepared for war, is one of the most effectual means of preserving the peace."-George Washington
  • Member since
    October 2004
  • From: League City, Texas
Posted by sfcmac on Friday, July 31, 2009 8:18 PM

 Frank that is just perfect!  I actually think you got it finished pretty quickly really!  You have so much going on  and it looks just like the pics I have seen of them as always you never disappoint! Bow [bow]

Makes a really great counterpart to Mike's 109 with the post July 1943 markings to see one that has the earlier insignia as well just really rounds it out to me.

Only problem is you'll have Guy and SC rushing to make one now! Whistling [:-^]

 Well I am motivated enough now to take a short break from the  Dark Sea and Slate Gray schemes of the Royal Navy and do something Italian to clear my mind!

 It is screaming build me since FRAnk tempted me with the pic a few pages ago! Evil [}:)]

A new molded kit I believe. Not another brand reboxed it comes with the box art as a Framable picture and a 48 page booklet that pretty well covers any ref you need for it.  Very nice.

The Model itself seems simple enough and having good details although there is no resin or PE in the box the decals for 6 different Aircraft markings( 2 German) 

 are there and it has that cool bomb!

Chris those are some fine looking builds!!!!! Thumbs Up [tup] 

Well nuff yapping better get to breaking sprue if I am gonna keep up!

  • Member since
    December 2005
  • From: back seat of your car with duct tape streched out
Posted by soulcrusher on Friday, July 31, 2009 9:38 PM

Looks strangely familiar there Sarge. Looks like my Re 2000 except with a little something special hanging underneath it. That should be a real cool build. Looking foward to seeing how good this one is. I might have to aquire one.

                                                                                        SoulcrusherPirate [oX)]


  • Member since
    October 2004
  • From: League City, Texas
Posted by sfcmac on Saturday, August 1, 2009 12:24 AM

 I was hoping you'd take a close look at it SC! I was wanting to see how it compared to your red nosed beauty!

No resin or PE in this kit. Pretty straight forward with two trees of parts and a fret of clear for the canopy and gunsight.

Right off the bat it has you cut out 2 panels one in each side of the fuselage. Marked well from inside ,then add two plastic boxes to create compartments to which acess hatches will be added later.  Oddly nothing for the inside of the compartments and no explaination of what they held. 1st Aid? Radio Equip? Dunno?

7 parts make up the pit. Detail isn't bad. The seat has molded on seatbelts that look ok. I Ignored them as I will add a figgie (not included Boo!)

The instructions are clear. 12 steps in all. Moves fast as the fuse gets closed up at the end of step 2.

 Actual pictures of the parts and not drawings but well done and easy to see.

Decals are included for the IP. So far the only real issue is the over simplified painting instructions.  Says the inside is all pale green.  The booklet shows it to be more of the standard colors and layout we see with most other Italian aircraft pits we have done here, So I went with what I know.

The decals are all separately numbered for each instrument but I really can't see a diff in them. I put them in as instructed though. Added a dash of color and made the panels black as in the booklet  photos.

Closed it all up and called it quits for the night More surgery is required to add a panel in each wing as well. Odd stuff? Maybe it is a prep for aftermarket goodies?  Page after page in the booklet had very detailed technical drawings. Complete systems like the fuel, o2 and even the linkages are all shown in great detail. Even structural construction stuff.  Way deep if you wanted to create a torn bird and get it's guts made spot on!

Well more tomorrow. Gotta make a figure as Guy says he wants to see a John Travolta version of himself in the seat, Sorry Guy we have laws here in Texas that keep us from scaring the kiddo's you know?

 He also told me to hurray up and get building or he will use some strang style of martial arts he studied for years to handle my back pain woes. Some strange oriental word... what was it? Oh yeah Kama Sutra! Mischief [:-,] Laugh [(-D]Make a Toast [#toast]

  • Member since
    March 2006
Posted by simpilot34 on Saturday, August 1, 2009 3:25 AM
Aaron, that is already looking to be a very nice build you got there!!!! I like the newer Italeri kits that have bookies with them! I have the 1/72 CR.42 and I put the kit aside for a few hours just pouring over the stuff in the book!!! Looking forward to a new day with new pics!!!!!!!!Thumbs Up [tup]Make a Toast [#toast]
Cheers, Lt. Cmdr. Richie "To be prepared for war, is one of the most effectual means of preserving the peace."-George Washington
  • Member since
    February 2007
  • From: Bournemouth UK
Posted by Luftwoller on Saturday, August 1, 2009 9:48 AM
 Daywalker wrote:

WOOHOO!!!

I finished the 109 today, finally!  Paints used are Tamiya and Gunze, with kit supplied decals.  The decals have a bit of silvering, but I snuggled them down as best as I could.  Also, I think the pitot tube is bent a little too much, but trying to straighten it meant possibly breaking the wing seam so I left it as is.  Built as a machine flown with 365 Squadriglia, 150 Gruppo Autonomo in July 1943.  The Hasegawa kit included parts to convert the G-6 in the box to a G-4, but the resin parts looked like they were designed for an entirely different model. Confused [%-)]  So, I built it as a G-6 figuring the G-4 in the squadron was replaced with a G-6 at some point. Wink [;)]  Thank you Aaron, for giving me this kit!  I enjoyed it immensely, bet you thought I would NEVER finish it! Big Smile [:D]

This also marks the very first time I have finished a model in markings other than those from the country of origin. Approve [^]

Frank that is gorgeous. Everything looks perfect from my monitor. The paint and weathering are just sublime. If any decals did silver, try the trick i gave Bodie. Run a brand new scalpel blade through the silvery bit and then hit it with some sol. Works a treat. I dont get silvered decs any more. One technical question. Did the G-6's not have a seam on the top of the fuz? There was a definitive post on this, ages ago. I cant remember for the life of me.

Aaron, your working at a fantastic rate on knots on this bird. Ive seen a fair few Italieri kits with all the manuals and stuff. They look good enough its just theyre a little pricey over here. At your current building rate, i ought to type faster as its going to be finished by the time i click 'post'. As for John Travolta...mmm....i have been likened, believe it or not, to Will Farrel. When my hairs not down to the nub, its curly!!! Dont tell anyone though.

...Guy

..'Your an embarrassment to the human genus, makes me ashamed to call myself Homo'.
  • Member since
    September 2003
  • From: South Central Wisconsin
Posted by Daywalker on Saturday, August 1, 2009 10:12 AM

Thanks fellas, glad you like her!  Guy- the G-6's also had the seam on the top and bottom of the fuse, but I elected not to use a heavy wash in the panel lines on this one so they don't show up very well.  I used the scalpel trick on the decals 4 or 5 times, but a couple of the spots just wouldn't pull down.  The worst of it is on the wing bottom national insignia, but I can live with it.

SC- I'm gonna take a break from Group Builds for a bit, have been building only for them (except the FW-190 I did earler this year) for the last three years.  Gonna have a look at the stash and pick out something I haven't built one of yet. Wink [;)]  I will still be around, as there is all kinds of good stuff to watch here!

Aaron- Your 2002 is looking awesome!  PM inbound. Thumbs Up [tup]

Frank 


  • Member since
    December 2005
  • From: back seat of your car with duct tape streched out
Posted by soulcrusher on Saturday, August 1, 2009 1:48 PM

Understandable their Frank. So you are going to go freestyle! I have been doing almost nothing but GB's for a while now because for some strange reason I can not pick a kit out of the stash on my own anymore. GB's and all of my freinds here {like Aaron sending me a kit} have been giving me some direction and input to keep me on track and building kits instead of staring at the stash and scratching my head. For the first time in a long time I have only one kit in progress.

Aaron that sounds like an unusual kit their. I always like to know the history of the plane I am building and that booklet looks nice. I think I am going to have to build something soon that has alignment pins just to give my sanding sticks a break. These short run CA and SH kits are nice to build due to unusual subject matter but I think I need to build a Tamagawa kit soon just to give myself a break. I am really intersted in seeing how different your Italerie Re 2002 is to the CA Re 2000 kit. I am sure it is aot easier to build.

Guy no progress pics on the G 55 yet? Let me know if you have trouble finding the CA Cr 32 at the store next week. I just happen to know someone who has one he is not using right this second. They are going to be hard to find since it had been OOP for a long time and CA has shut down for now. Just have a towel and a nice cup of tea waiting for me when I get there. Just do'nt try and serve me any of those awfull scones! Bloody awful things. Someone saw fit to bring those nasty things over to this side of the pond a while ago and now they have caught on over here toYuck [yuck]! Even my mom has taken to eating them with her coffee and she is 100% Italian!

                                                                                       SoulcrusherPirate [oX)]


  • Member since
    February 2007
  • From: Bournemouth UK
Posted by Luftwoller on Saturday, August 1, 2009 2:49 PM

How wierd is that. I rang my LHS and asked him today at lunch about a CR,32 and he didnt have one. Let me check another couple of sources as i know it will probably cost as much as the kit itself, to send anything this way, unless you are going to swim it over. If so ive plenty of towels and the good stuff...mmm...PG tips

This forum never ceases to amaze me with the generocity of the members. Im serious when i say theres an open invite to anyone of you that fancies coming over to blighty. Ill always have a cuppa on the go and a couple of good pubs to help you acquanit yourself with real beer.

...Guy

..'Your an embarrassment to the human genus, makes me ashamed to call myself Homo'.
  • Member since
    December 2005
  • From: back seat of your car with duct tape streched out
Posted by soulcrusher on Saturday, August 1, 2009 3:45 PM

Well it is an open offer Guy. If you can not find one its all yours. I have promised myself that I will make it over to your side of the pond. I am hoping sometime next summer if everything goes well. I checked out your little town on the internet and apparently it is quite a nice little town to visit with a nice beach and all. I have never lived more than 20 miles from the Atlantic Ocean in my life so it suits me well. I will definetly have some tea, high noon is it? I do not drink but I think I could make an exception in your case and have a Black and Tan wth you too at the local pub and mabye get acquianted with some of those nice English ladies tooBig Smile [:D]! Just tell them I am Scott BaioBig Smile [:D].

                                                                                     SoulcrusherPirate [oX)]


  • Member since
    December 2005
  • From: back seat of your car with duct tape streched out
Posted by soulcrusher on Saturday, August 1, 2009 10:08 PM

Well I layed down some color tonight on the G 55. I have all of the plane cover except for the Graygreen part. It is hard edge splintered so I think I will wait until tomorrow to mask over the grayviolet so I do not pull any paint up. Then my favorite part adding the mottleing on the fuselage side. Once thats all done I just have to mask of the white ID band and the yellow lower cowl. This plane is one colorfull paintjob and it should be an eye catcher when its done. I am finally getting inspired now that I can see it coming together.

                                                                                  SoulcrusherPirate [oX)]


  • Member since
    March 2006
Posted by simpilot34 on Sunday, August 2, 2009 3:25 AM
SC looking forward to seeing some pics soon!!!!
Cheers, Lt. Cmdr. Richie "To be prepared for war, is one of the most effectual means of preserving the peace."-George Washington
  • Member since
    February 2007
  • From: Bournemouth UK
Posted by Luftwoller on Sunday, August 2, 2009 8:45 AM

So Crusher, you may be coming to the UK. Woo Hooo....Ill get the kettle on. I dont know how the Laydeeees of Bournemouth will cope.

What scheme are you doing? Do you have a scan of the scheme?

...Guy

..'Your an embarrassment to the human genus, makes me ashamed to call myself Homo'.
  • Member since
    February 2007
  • From: Bournemouth UK
Posted by Luftwoller on Sunday, August 2, 2009 10:24 AM

Well, ive cleared the bench (Finished the staff car that came with the Mustang) and as with most of my builds, i jump on the pc for refs. I found the ultimate reference site for the G.55 (Next up), My question is this. Does the cockpit interior colour look right to you? I was led to believe it was more of a grey-green colour as with the 202 and the 205?

http://www.ams.vr.it/AircWalkAround/Museo%20Vignadivalle/Fiat_G.55/Fiat%20G.55%20Centauro%20pag%2005.htm

...Guy

..'Your an embarrassment to the human genus, makes me ashamed to call myself Homo'.
  • Member since
    October 2004
  • From: League City, Texas
Posted by sfcmac on Sunday, August 2, 2009 12:26 PM

Guy I am pretty sure you could star in a Cheech and Chong movie! Laugh [(-D] I think that scheme got posted by all of us at one time or another! 

 Well speaking of short term memory loss , where am I?

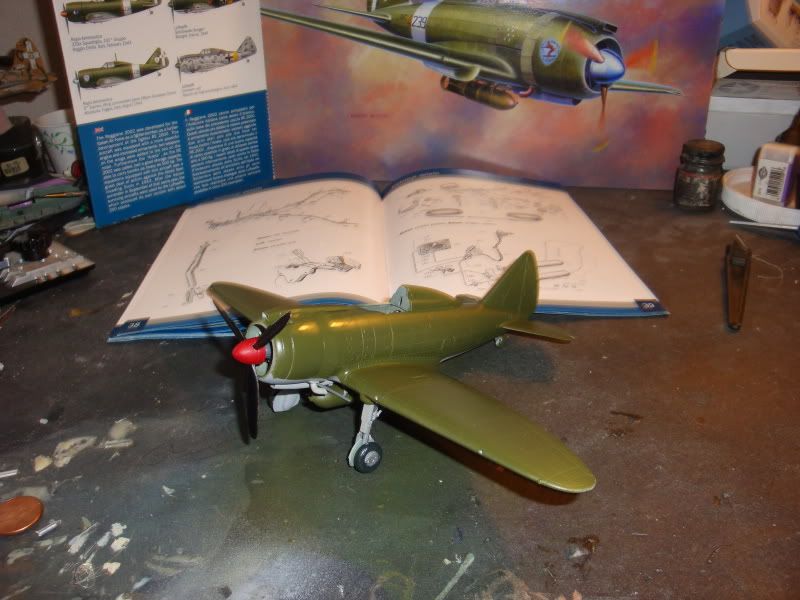
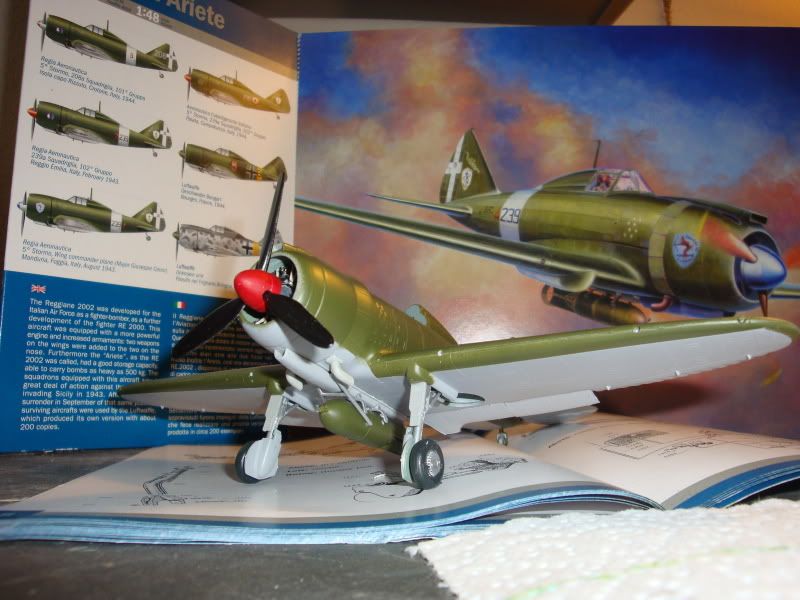
  Oh Yeah a Re 2002 Ariete.  A new 1/48 scale release by Italeri  cost $28 on pre order , although Frank told me Tamiya has released it as well in there own box adding some oil drums and figures then doubling the price. Dead [xx(] That would make for a major disappointment to many as this kit is on par detail wise comparable to the Monogram kits of the late 1970's.

 The simplicity of the kit is not really a bad thing in my eyes though.
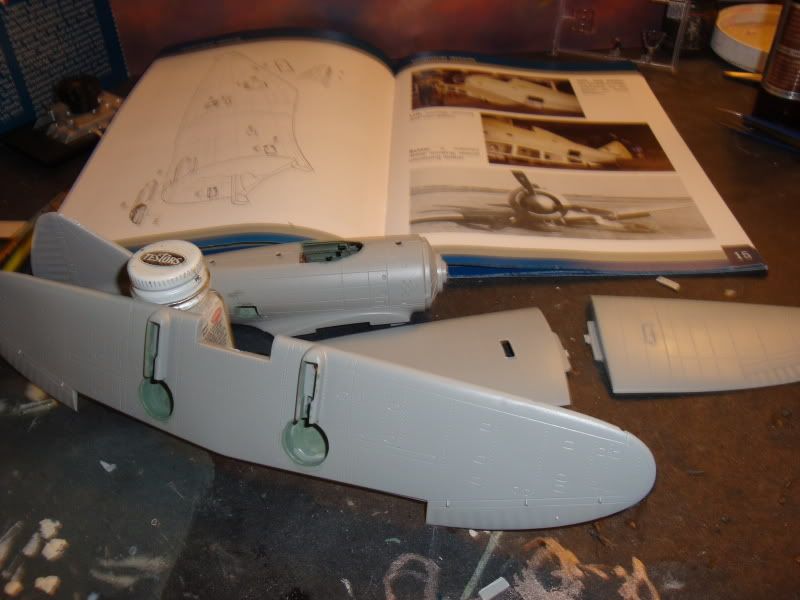
The wheel wells have 0 detail all smooth just like pick up lines from Scott Biao.
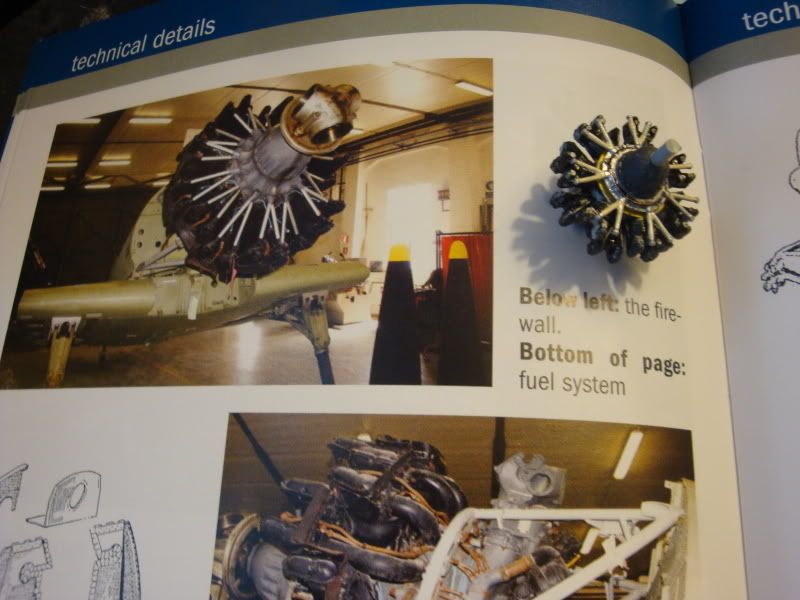
The engine looks to be good though especially compared to the pics in the booklet. Almost all the wiring is in the back hidden from view so no need to add any.

Looks the part to my eyes.
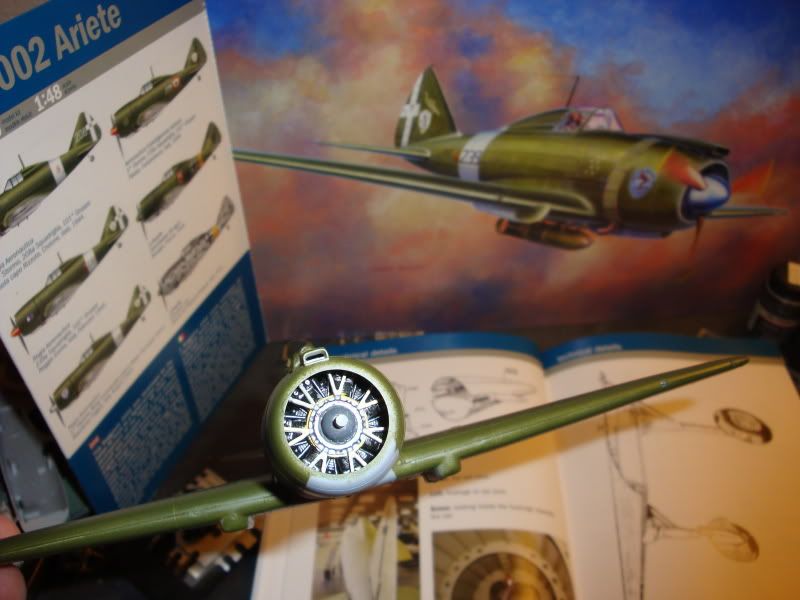
Holy cow where'd that paint come from? Looks nice.  Don't blink!
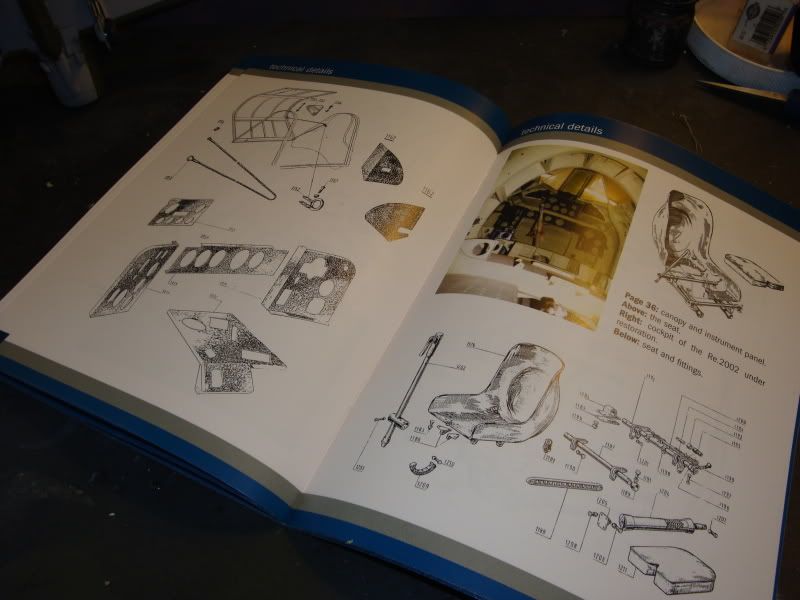
Back to the booklet which is as way deep.  I found it odd that they would include such schematics on every system then  not even attempt to represent them correctly.  The Pit detail is way off and should be closer to what we have seen in the 202/205's  and I mentioned that the paint directions are way way off as well.

My guess is they are setting it up for Aftermarket companies? It would really zing with some PE  and resin details . Heck a of a lot of room to see inside where as the other fighters I have built have tiny openings.
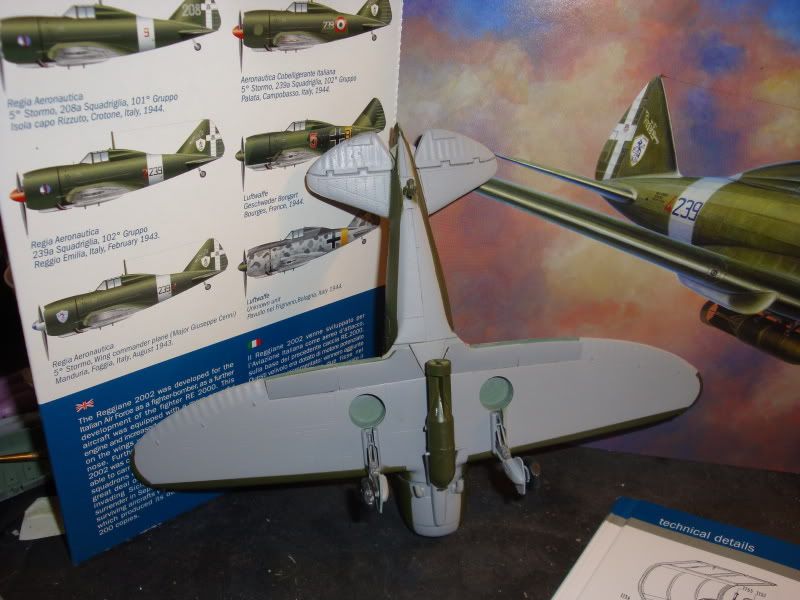
This is a Guy pic! All bombed up!

 The flaps have the option to be displayed dropped and have details molded in both sides.
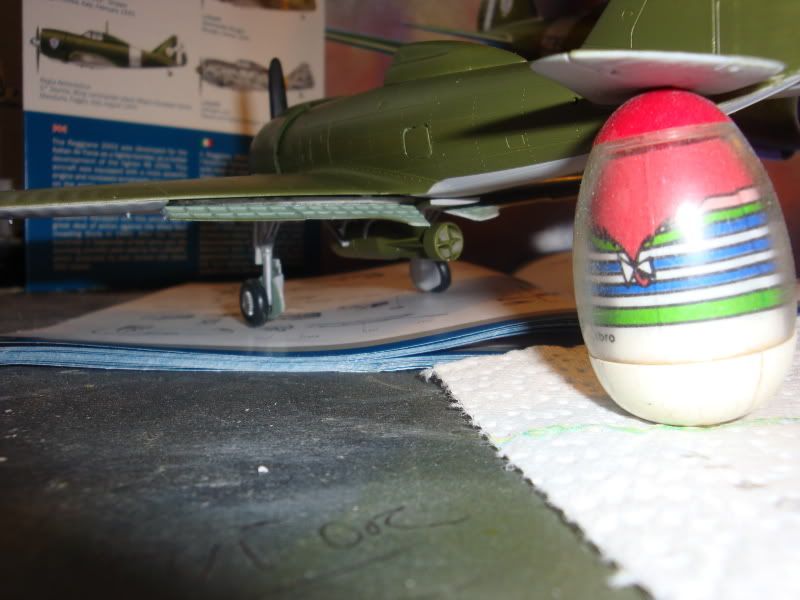
 It should be interesting decaling as the dark green schemes really show silvering.

The outside detail is really good. Whatyou cant see is that besides engraved panel lines there is a very faint trace of the framework under the stressed metal. Very nicely rendered and almost invisable as it should be.

So far it is building into a good looking model and I am almost sure that the lack of details and incorrect items are a set up for aftermarket companies. Why else add all the drawings of things like the fuel system and contol linkage extc? Like they are telling on themselves?

 Lots of potential here but don't go pay a lotta money for one.

  • Member since
    December 2005
  • From: back seat of your car with duct tape streched out
Posted by soulcrusher on Sunday, August 2, 2009 1:52 PM

Wow Aaron you are really tearing into that Re 2002. I think the wheel wells were faired over and smooth in the real thing so no fiddly bits and hoses to be added. It is hard to do much with the solid green upper camo color thats why I dresses mine up with the red nose. Even preshading with black just disapears underneath the green. That boolet looks like it is nicer than the kit itself. Mabye I will pass on this one as it does not seem to have impressed you much and I already have the 1/48 CA 2000 build and in the display.

Guy I really am going to try and make it over there next year. I have always wanted to visit and now that I'll have you as a tour guide I really have no excuse not to. I just have to learn the languageSmile [:)]. Will I have to pay for the bus rides or can you just look the other way when I board?Big Smile [:D] As for the interior color for the G 55 it is a green primer. I researched it and I could not find anything close to it so I mixed it up myself. I started with a straight yellow and then I added zinc chromate green a bit at a time until I got the correct shade of greenish/yellow. Like one of those  crazy Luftwaffe colors! The web site is what I used for reference. You can see some inaccuacies in the Special Hobby kit as far as the wheel wells go. There should be a large oval opening between the wheel wells and the shape of the faring at the front of the exhaust manifold are a bit off but can be fixed pretty easy. Here is the paint that the CA G 55 is going to carry.

The Special Hobby kit I am going to paint in the splinter scheme like the one you choses.

                                                                                     SoulcrusherPirate [oX)]


  • Member since
    March 2006
Posted by simpilot34 on Sunday, August 2, 2009 3:02 PM
Aaron that is some outstanding work!!! Really looks nice!!!Thumbs Up [tup]
Cheers, Lt. Cmdr. Richie "To be prepared for war, is one of the most effectual means of preserving the peace."-George Washington
  • Member since
    October 2004
  • From: League City, Texas
Posted by sfcmac on Sunday, August 2, 2009 4:13 PM

 Thanks Ritchie and SC! some body get Guy ! He got lost again? Go check the ladies room!

 It's not that I am unimpressed with the kit SC.  I actually think it is a great kit. Big opening to display the pit and a cool looking bird with decent fitting parts. No real headaches in the build yet. The REef book has just about everything you could think up on it. Schematics on every part and system so that can justify a $30 price tag maybe since it is a new release. But when compared to the detail of Hasegawa and Special hobby kits that cost around that you just may have something you want more is all.  Then if  Frank was corect about the price of the Tamiya rebox then I would say that is a deal killer. Not getting your $$$$ worth there at all. The fit is good but not a Tamiya standard we know.  What are they thinking anyways?  Just went to the Hobby stores and them kits is getting really pricey!

  • Member since
    February 2004
  • From: Weymouth, Dorset, UK
Posted by chris hall on Sunday, August 2, 2009 11:38 PM

The Macchetta is finished! The smoke ring decals took a few coats of Microsol , and even then there was some slight silvering in places. However, in real life, it's nowhere near as noticeable as it is n some of the photos, and in fact, looks like bare metal showing through the paint work along hinge lines.

After the camo decaling, the other markings went on uneventfully, and then it was just a matter of detail painting and final assembly. The u/c well decals actually looked quite effective. The collector ring and exhaust stubs were painted in Citadel Beaten Copper, dry-brushed with blue burned metal Tamiya weathering powder. The kit guns and w/t mast were overscale, so I replaced them with fine heat stretched sprue, and used the same material for the pitot heads and u/c retraction jacks, not provided in the kit. Finally, I used lycra rigging thread for the radio aerial wire.

Here are some piccies of the completed model. Notice the Tamiya paint jar for scale in the first one.

This was a quick and fun project, which took only six days, most of which was waiting for paint, varnish or decals to dry. Thanks for this gentle introduction to the wacky world of the Regia Aeronautica Italiana - the bug has bitten, and I plan to be beck in September!

Cheers,

Chris.


Cute and cuddly, boys, cute and cuddly!
  • Member since
    March 2007
  • From: Carmel, CA
Posted by bondoman on Sunday, August 2, 2009 11:47 PM

Nicely done Chris and Ciao, although where did you get that 5 gallon Tamiya barrel?

Regia is a good thing, and it seems to be some of the most interesting camo!

  • Member since
    March 2006
Posted by simpilot34 on Monday, August 3, 2009 2:53 AM
Chris that turned out beautifully!!!! What a lil gem!!!Bow [bow]Thumbs Up [tup]Make a Toast [#toast]
Cheers, Lt. Cmdr. Richie "To be prepared for war, is one of the most effectual means of preserving the peace."-George Washington
  • Member since
    February 2007
  • From: Bournemouth UK
Posted by Luftwoller on Monday, August 3, 2009 3:29 PM

Good news all around. Crushers coming to the UK and Aarons almost done on the Reggie. Geez, Aarons almost finished on the Reggie? How the heck did you manage that. It was only yesty or there abouts that you were breaking sprue? You are a spasmogorical Styrofactual Godlike Model master, par excellance. Plain green schemes are fun. So many fading options. Im not expecting one bit of silvering MR!

Chris, stunning work there, Big boy. I like the colour you got for the copper. Those citadel paints are fab. When i did mine, i dug a cockpit into the thing. I know, Im nutz...but not as nutz as Aaron. Looking forward to having you come back soon.

Crusher, did you look at the link i posted of the G.55 walkaround? That cockpit green colour was way spurious. According to Stormo, they say it should be the same colour as the 202 and 205, the Anticorozione green. Thats the colour ive gone with. Ive started on my pit and, as im off tomorow and wednesday, ill get some pics posted up.

...Guy

..'Your an embarrassment to the human genus, makes me ashamed to call myself Homo'.
JOIN OUR COMMUNITY!

Our community is FREE to join. To participate you must either login or register for an account.

SEARCH FORUMS
FREE NEWSLETTER
By signing up you may also receive reader surveys and occasional special offers. We do not sell, rent or trade our email lists. View our Privacy Policy.