SEARCH FINESCALE.COM

Enter keywords or a search phrase below:

War In The Pacific Group Build 2009 - 2010

225051 views
2012 replies
1 rating 2 rating 3 rating 4 rating 5 rating
  • Member since
    November 2003
  • From: Nashville, TN area
Posted by bobbaily on Saturday, August 22, 2009 5:38 PM

Thanks Sean.  This one is turning into a good challenge.  For example, I've salvaged thru the spare parts bin and found the better detailed drop tank from a previous Hasegawa P-40E build that I used the bomb on.  Cha-ching!

Arki-I agree.  Having build the Hasegawa P-40 before (and one in the stash, courtesy of a HobbyLobby markdown), the AMTech kit is a great alternative to the higher priced Hasegawa kit.  I can't believe the retail prices for them.  I can add a lot of extras for what a normally priced Hasegawa P-40 would cost....and still have some change.  Shame that AMTech went by the way side.  I would hope that someone would find the molds and market the E version, like Hobbyboss has done with the F/L version & Italeri with the N/M.

And next time I bid on one on eBay, I will ask if it comes with the 'corrected' fuselage! Wink [;)]

Bob


  • Member since
    October 2007
  • From: Inland Northwest
Posted by Summit on Saturday, August 22, 2009 4:14 PM

Thanks to everyone who commented on the Pics. I am glad you liked them.

Bob - I looks like to me you will have that P-40 whipped into compliance in No~Time Thumbs Up [tup]

I have a stack of the AMT P-40 varients myself stashed. One of my most favorite kits, and the Posters that comes with the P-40E is really cool also Thumbs Up [tup]


Sean "I've reached nearly fifty years of age with my system." Weekend GB 2008
  • Member since
    February 2004
  • From: Second City
Posted by arki30 on Saturday, August 22, 2009 4:12 PM

Laugh [(-D]

Well said.  They're not flaws, they're opportunities!  Built 3 or 4 AmTech P-40's, so been there, have the t-shirt.  Bummer you don't have the later production runs with the replacement fuselage.

Frankly, I like the AmTech P-40's considering they are fairly inexpensive and look like a P-40 when done.  Certainly putty skills are required however.   

Good luck! Make a Toast [#toast]

Building Now:

1/48 Academy Bf-109G6 - 100%

1/48 Tamiya F4U-1A - 5%

Upcoming:

1/48 Revell F-14D

  • Member since
    November 2003
  • From: Nashville, TN area
Posted by bobbaily on Saturday, August 22, 2009 3:56 PM

Thanks for all the encouragement guys.  I really appriciate it. Putty went on last night-I might get a chance to sand it down tonight.

Arki-I believe this is one of the early models-it has ALL the flaws...errr...opportunities to practice my modeling skills pointed out in the ModelingMadness review kit review.  Come to find out it is missing the British exhaust & engine covers.  Another eBay "Buyer beware".  Of course, that's not as bad as the AMT P-40N I picked up on eBay, sealed with retailers sticker and missing the complete fuselage!  Tried working out something, i.e., contacting the seller, but no replys.  Live & learn.  Anyway, I have another AMTech P-40E in the stash....purchased before I did a detailed reading of the Modeling Madness review and it is an early production run.  Oh well.  Problem I'm having now is that I'm fighting the urge to order the Eduard PE kit for this build.  In for a penny....in for a pound...

Cheers

Bob


  • Member since
    July 2003
  • From: Pennsylvania
Posted by jay12472 on Saturday, August 22, 2009 11:29 AM

Bob good job making that correction, would scare me way to much to try that

Jason

  • Member since
    February 2004
  • From: Second City
Posted by arki30 on Saturday, August 22, 2009 7:59 AM

Bob, every AmTech P-40 I've purchased and built had a replacement fuselage in the kit to fix that very issue.  Did yours not have that extra fuselage? 

If not, perhaps you have an early boxing before they caught the problem. Confused [%-)]

Building Now:

1/48 Academy Bf-109G6 - 100%

1/48 Tamiya F4U-1A - 5%

Upcoming:

1/48 Revell F-14D

  • Member since
    March 2006
Posted by simpilot34 on Friday, August 21, 2009 9:53 PM

Sean, those are some excellent pics of very important things!!! Thanks for sharing with us!!Thumbs Up [tup]

Bob, that does look better already!! Once filled and sanded, will look like a bought one!Thumbs Up [tup] You need breaks from life like this!! You're doing fine!!!Make a Toast [#toast]

Cheers, Lt. Cmdr. Richie "To be prepared for war, is one of the most effectual means of preserving the peace."-George Washington
  • Member since
    July 2004
  • From: Northern KY
Posted by mucker on Friday, August 21, 2009 9:22 PM

Sean: Excellent pictures. Very appropriate for this GB.

Carlos: That's AWESOME! By the way, you haven't told me your secret for making such realistic looking "wood" yet! Also, please tell me that isn't a Mitsubishi F1 kit on your bench...Wink [;)]

Bob: Hang in there. I've seen that kit built up nicely before.

  • Member since
    September 2003
  • From: South Central Wisconsin
Posted by Daywalker on Friday, August 21, 2009 8:30 PM

Charlie- Love that Seiran, well done!  From the photo, I can't really tell about the port wing upper roundel being out of register.  It looks like distortion from the curvature of the wing to my eyes.  I would call it a big success, thanks for sharing! Thumbs Up [tup]

Sean- Thanks for sharing those pics, especially the period photo.  You must be very proud of him. Approve [^]

Bob- You are a glutton for punishment my friend!  Looks like you are taking it in stride and winning the battle. Big Smile [:D]

Frank 


  • Member since
    September 2007
  • From: Relocating
Posted by Mobious on Friday, August 21, 2009 4:46 PM

 Hey Summit, thanks for sharing. Very cool stuff.Approve [^]Thumbs Up [tup]

 Hey Bob, Nice work realigning that tail section. Looking forward to seeing updates on one of my favorite WWII aircraft.

"It's a problem of applied physics" Roy Brown

  • Member since
    November 2003
  • From: Nashville, TN area
Posted by bobbaily on Friday, August 21, 2009 3:58 PM

Thanks for sharing some memories with us Sean.  Hopefully you have many more to share.

Against my better judgement, I've decided to build the AMTech P-40E instead of the Hasegawa kit.  Short story-I need to challenge myself while I'm job searching.  Althought the Hasegawa kit is somewhat challenging (tail insert and multiple 'plugs'), the AMTech will require a lot more filling & sanding-a lot of bad seams & fits. 

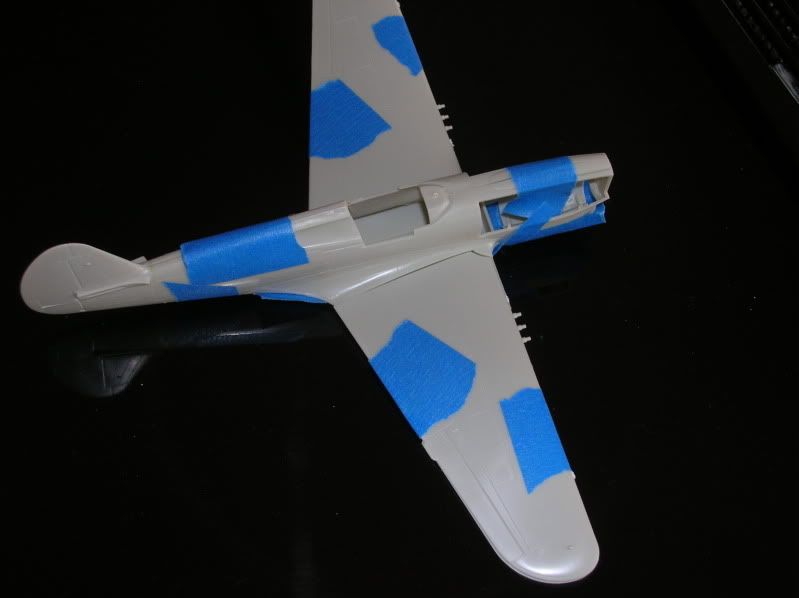
First I did a quick dry fit-nothing too bad.  The gap between the wing & fuselage should clean up when glued together...and provide the proper wing dihedrial (sometimes my spelling is worse than my modeling....)

I made the mistake of purchasing the kit on eBay first and then researching.  Had I researched first, then I probably would not have purchased it.  AMT/Ertil did the same thing as Hasegawa-different tail sections for different models.  However, AMT chose to do the assembly in the molds during production.  For the initial run, there was a mismatch.  Hopefully you will notice it here-

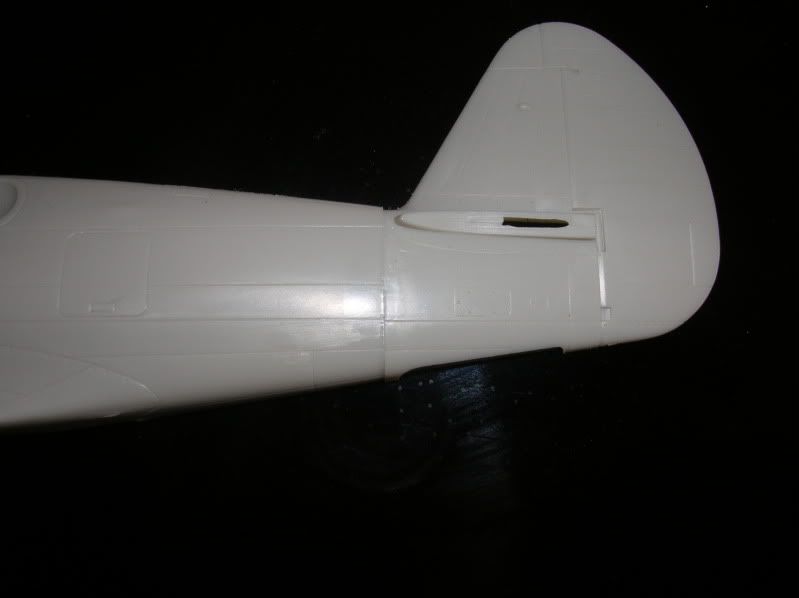
I probably could have gotten by with it, but I would know that it was there.  Therefore, I decided to seperate the tail and reattach.

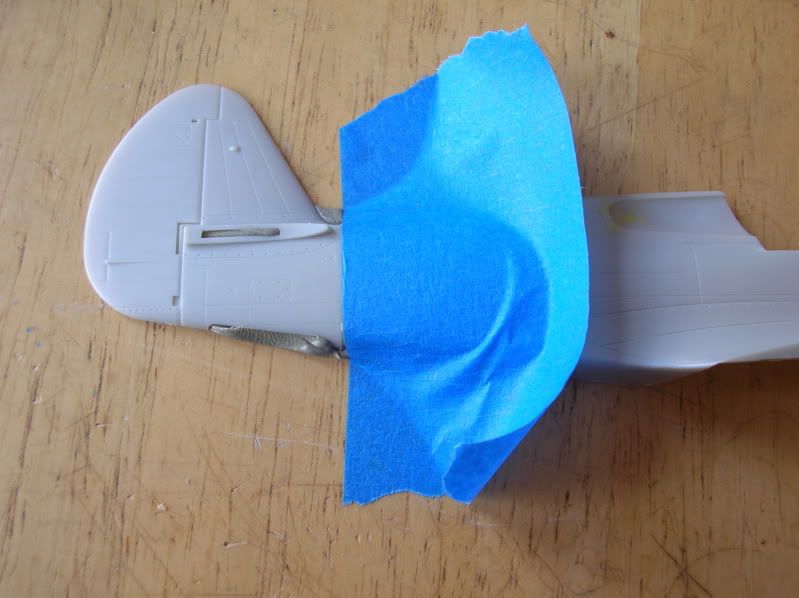
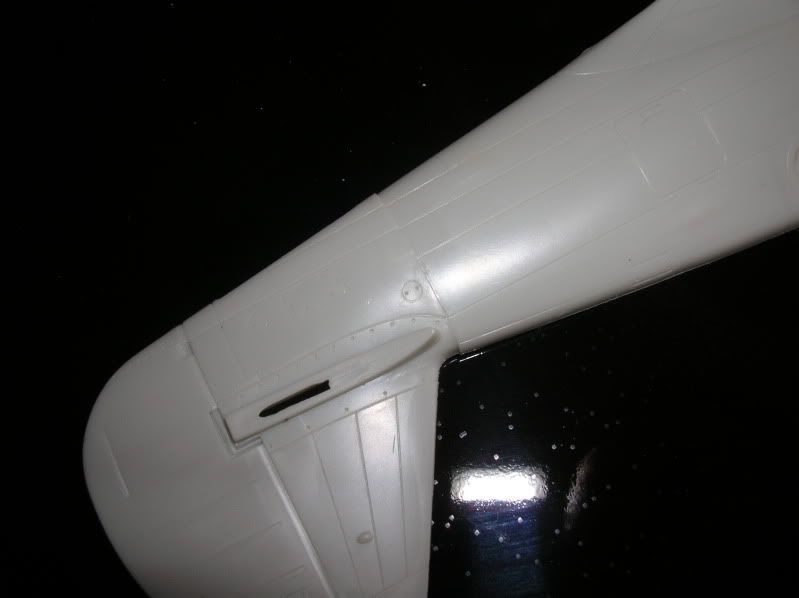
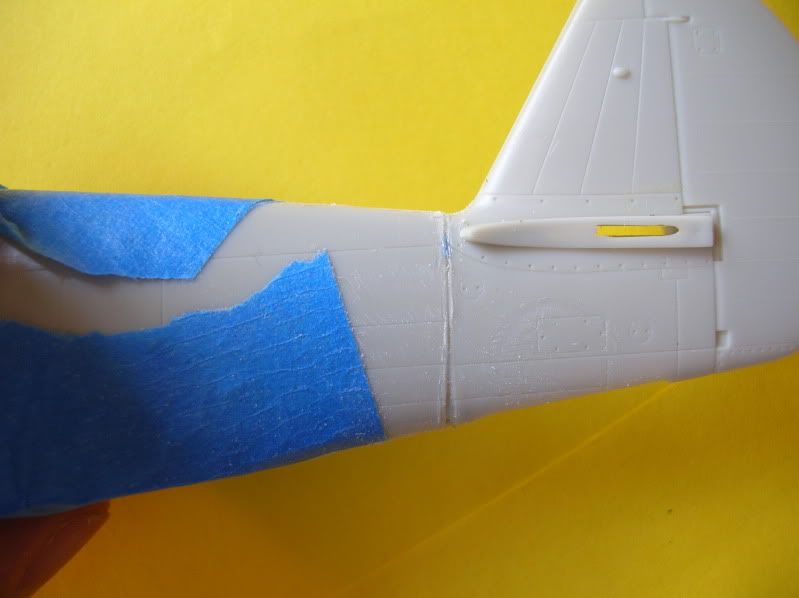
I filled the undersection with SillyPutty for support, taped it down and took the x-acto to it.  I probably should have tried the cotton sewing thread technique for a smoother cut.  Oh well, live and learn.  Here is the fuselage after I attached a strip of support styrene behind the fuselage and reattached the tail.  The seam is pretty bad, but nothing that can't be corrected with some Squadron putty & some serious sanding...and a little rescribing..

Ended up putting some styrene in the engine side cover openings...hopefully I can start work on the interior this weekend.  Side panels have good detail...seat has molded in belts (to be removed) and does not include the tube frame-I think I can fabricate that from wire or styrene.

If nothing else, it takes my mind off of looking for a job for a few minutes.....Whistling [:-^]

Bob


  • Member since
    October 2007
  • From: Inland Northwest
Posted by Summit on Friday, August 21, 2009 2:34 PM

Wow O Wow there has been some Really Fantastic progress in the last 9 days. I went and spent a week with my Dad. While I was there he sent his "Sea Chest" home with me for safe keeping (?)   Anyway I have possesion of all his Naval Uniforms, Ribbons , Many Pictures ect.

In the theme of this GB , I thought these folowing pics may be of interest . (least It gives me something to post until I break sprue)

Photobucket

Photobucket

And one of my all time favorite pics ~ BB-56 's Crew just a few months after being Commissioned !

Photobucket Yep I can find my dad in the lineup..Thumbs Up [tup]

Sean "I've reached nearly fifty years of age with my system." Weekend GB 2008
  • Member since
    September 2007
  • From: Relocating
Posted by Mobious on Friday, August 21, 2009 12:07 PM
 Outstanding work, Carlos. Very cool float plane. Tell the elves, if they're not busy, to head on over to my house. I've a deck that needs restaining. Seriously, that is a really nice build. Overall, it floats, flies, and you've built a great looking plane. The trolley adds in a positive way.Bow [bow]

"It's a problem of applied physics" Roy Brown

  • Member since
    March 2006
Posted by simpilot34 on Friday, August 21, 2009 11:18 AM
Carlos , That is awesome!!! SSSSSSUUUUUUHHHHHWWWEEEETTTT!!!! Man that dolly really does add to the whole build!!! WOWSERS!!!!Bow [bow]Make a Toast [#toast]
Cheers, Lt. Cmdr. Richie "To be prepared for war, is one of the most effectual means of preserving the peace."-George Washington
  • Member since
    July 2003
  • From: Pennsylvania
Posted by jay12472 on Friday, August 21, 2009 7:18 AM

Great Job! The wooden dolly really adds alot to the finished plane

Jason

  • Member since
    November 2003
  • From: Naples, FL
Posted by tempestjohnny on Friday, August 21, 2009 6:03 AM
 bobbaily wrote:
Nice build Charlie.  If you hadn't mentioned the decal problem, I would have never noticed.  The wood base adds a lot to the build also.  Very nice work.
I agree completely.  Well done


  • Member since
    November 2003
  • From: Nashville, TN area
Posted by bobbaily on Friday, August 21, 2009 5:57 AM
Nice build Charlie.  If you hadn't mentioned the decal problem, I would have never noticed.  The wood base adds a lot to the build also.  Very nice work.

Bob


  • Member since
    April 2005
  • From: Monster Island-but vacationing in So. Fla
Posted by carsanab on Friday, August 21, 2009 1:07 AM

Well the Seiran is 99.9% finished...I just waiting for the elves to finish painting the side ladder ..sure was a nice kit inspite the crappy decals...you might notice the closest wing hino...you can note the register off center...also the horiz stablizer stripes broke so some creative weathering took care of that. Only got this one pic...battery ran out...will get some more shots out.


Comments always welcomed.

 Photobucket

  • Member since
    September 2007
  • From: Relocating
Posted by Mobious on Wednesday, August 19, 2009 6:44 PM
hey Karl, Glad to read it wasn't too much trouble, looking forward to seeing the repair.

"It's a problem of applied physics" Roy Brown

  • Member since
    July 2004
  • From: Northern KY
Posted by mucker on Wednesday, August 19, 2009 2:46 PM

THat's good news, Karl...I'll be watching for more pics.

Calling Stikpusher..I just purchased a lot with 3 Otaki Hellcats and some resin & PE goodies. I hear the Otaki kit is a nice, simple kit. HOw do you find the build so far? I'm curious to hear your hands-on experience. Personally I've liked the Arii/Otaki kits I've built or seen before, but I've not seen the Hellcat kit up close before...

  • Member since
    July 2003
  • From: Bicester, England
Posted by KJ200 on Wednesday, August 19, 2009 2:35 PM

Thanks for the encouragement guys.

It was the very top layer of metallic that lifted, leaving the layer below intact.

The black gloss coat even survived my sanding of the metal coat above it!

That being the case I applied a coat of Future last night, then buffed out any marks such as dust tonight.

I've just hit it with another coat of the Gunze metal coat, and it's sitting curing on my desk.

So it looks salvageable.Smile [:)]

Think I'll give the post it notes a try, either that or de-tacking the Tamiya tape first.

Karl


Currently on the bench: AZ Models 1/72 Mig 17PF

  • Member since
    April 2005
  • From: Monster Island-but vacationing in So. Fla
Posted by carsanab on Wednesday, August 19, 2009 10:52 AM

Hey Karl...

Sorry to hear about the tape...I just used metalizers for the first time a few months ago. I was worried about gloss black being too slick too so I used tamiya's semi gloss in a spray can...worked great...no lifting it seems to have a bit of teeth to hold the metal even after a goof on my part..still I feel your pain..Censored [censored]

 Carlos

 Photobucket

  • Member since
    September 2003
  • From: South Central Wisconsin
Posted by Daywalker on Wednesday, August 19, 2009 6:38 AM

Karl- Man, that's a bummer about the paint lifting!  I can imagine your frustration over that one.  Hope you are able to get it sorted out and back on track soon.  I have heard wonderful things about the 1/48 Tamiya Zero, but have not gotten myself one yet.  I have the 1/32 kit, and a month before the 1/48 version was available, I had purchased three of the Hasegawa kits.

Jason- Like your work so far, isn't that Tamiya NATO black good stuff?  I love it. Big Smile [:D]

Frank 


  • Member since
    January 2006
  • From: Earth
Posted by DiscoStu on Tuesday, August 18, 2009 9:53 PM
KJ, I had a similar problem when trying to mask panels on an NMF build I did a while back.  Got so frustrated it ended up at the bottom of a trash can.  When I tried the technique again I used Post-it notes.  The adhesive on the paper is just strong enough to hold the mask in place while you paint, but not too strong that it won't lift. 

"Ahh the Luftwaffe. The Washington Generals of the History Channel" -Homer Simpson


  • Member since
    July 2004
  • From: Northern KY
Posted by mucker on Tuesday, August 18, 2009 8:30 PM

Jason, I like the effect so far! Keep the pics coming!

Karl, a bummer about the paint job. I've had that happen before and have narrowed it down to two things: either I didn't let the acrylic black and future cure long enough (48 hours minimum), or I did a poor job of using "plastic prep" on the surface prior to painting. I'm not sure if these apply to you, but hope they help.

Take a night off, have some Pusser's Navy rum, and you'll be ready for the repair tomorrow!

  • Member since
    March 2007
  • From: Carmel, CA
Posted by bondoman on Tuesday, August 18, 2009 8:12 PM
 KJ200 wrote:

The really annoying thing is, I tested this on an old Revell Fw190, and it worked fine with no lifting!

Obviously that gloss black was just too slick.

Karl

Correct me if I'm wrong, but it looks like the black came off too exposing white plastic. That bond was the problem, and could be a lot of things. Probably needed priming. Future top coat doesn't help anything as far as masking goes, as it will bring badly adhering paint with it.

What a great model, keep at it I think it's a good subject. Gosh were's the USN when we need it???

  • Member since
    March 2006
Posted by simpilot34 on Tuesday, August 18, 2009 8:03 PM

Karl, sorry to hear about the paint misfortune! Hopefully it can be mended without much heartache. Wink [;)]You can do it!

Jason, the Oscar is looking great! Love the subtle fading!!! Yes, the black does look good, the whole enchilada looks good!!Thumbs Up [tup]

Cheers, Lt. Cmdr. Richie "To be prepared for war, is one of the most effectual means of preserving the peace."-George Washington
  • Member since
    September 2007
  • From: Relocating
Posted by Mobious on Tuesday, August 18, 2009 4:07 PM

 Karl, I'm curious about the lifting. I've had similar problems masking over acrylics. I can relate to the trouble this causes, and still clueless as to why.

 TempestJohnny, Sorry about calling the Kingfisher a US floater, I read you're detailing this one in British markings. Looking forward to seeing one of her Majesty's floaters!

 Jason, Looking very good, the shading looks great.

"It's a problem of applied physics" Roy Brown

  • Member since
    July 2003
  • From: Pennsylvania
Posted by jay12472 on Tuesday, August 18, 2009 3:41 PM

Here are a couple of pics of what i got done.

I'm trying to add a little color differnce to try and make it more intresting. I still have to go over everything with the base color thinned downed, and see how everything turns out.

The black is nato black decided to gice a try and see how it looks, right now I like the look of it.

Jason

  • Member since
    July 2003
  • From: Pennsylvania
Posted by jay12472 on Tuesday, August 18, 2009 3:25 PM
 Daywalker wrote:

I seem to recall someone else asking me to put together a toot on how I do Tamiya tape seatbelts.  I do not think I ever did though! Blush [:I]  I am off this weekend, so I shall put one together and post it over in Aircraft. Big Smile [:D]

I will be looking foward to thisBig Smile [:D]

KJ thats to bad, do you have to sand everything back or can you just touch them up

Jason

JOIN OUR COMMUNITY!

Our community is FREE to join. To participate you must either login or register for an account.

SEARCH FORUMS
FREE NEWSLETTER
By signing up you may also receive reader surveys and occasional special offers. We do not sell, rent or trade our email lists. View our Privacy Policy.