SEARCH FINESCALE.COM

Enter keywords or a search phrase below:

FW-190 Reich Defender III 5/10-2/11

437478 views
1810 replies
1 rating 2 rating 3 rating 4 rating 5 rating
  • Member since
    March 2010
  • From: Brisbane
Posted by Julez72 on Monday, June 21, 2010 2:42 AM

Sorry Sim, i didn't reply to your picsEmbarrassed

Looking very nice there, very crisp and clean...A great start i would sayYesYes


  • Member since
    March 2006
Posted by simpilot34 on Monday, June 21, 2010 2:38 AM

Thanks, guys!!!!!

SC, hopefully your modelling buddy will come back!!!!Sad

Steve, she is a stunner mate!!!!! Toast

Cheers, Lt. Cmdr. Richie "To be prepared for war, is one of the most effectual means of preserving the peace."-George Washington
  • Member since
    March 2010
  • From: Brisbane
Posted by Julez72 on Monday, June 21, 2010 2:08 AM

Steve, outstanding buildYesYes very cool...I hope mine looks as good as that....


  • Member since
    December 2005
  • From: back seat of your car with duct tape streched out
Posted by soulcrusher on Monday, June 21, 2010 12:13 AM

She looks great Steve! I love the detail on the engine. Looks like it was worth all ofthe extra effort you put in with all of the open panels to show off the detail.

SoulcrusherPirate


  • Member since
    February 2004
  • From: Second City
Posted by arki30 on Sunday, June 20, 2010 10:56 PM

Gorgeous work, Steve. Yes

Building Now:

1/48 Academy Bf-109G6 - 100%

1/48 Tamiya F4U-1A - 5%

Upcoming:

1/48 Revell F-14D

  • Member since
    July 2003
  • From: waynesboro va, via Ireland
Posted by sidure on Sunday, June 20, 2010 10:47 PM

Ok, just a few just before I finish it up pics. I wanted to get them up as I am on the road working this week. Still need to put on the pito tube and aeriel wire. I left some of the panels posable for different looks. Hope to have final pics up next weekend

Ive also being doing a bit of a diorama for this one as I was building it

Steve

  • Member since
    January 2007
  • From: Cleveland, OH
Posted by Clebode on Sunday, June 20, 2010 4:37 PM

soulcrusher

...Heasgawa kit. They almost seem to build themselves....

SoulcrusherPirate

I second that Coach.  My BoB bird is a Hasegawa too, 1:32 scale.  Compared to the PCM/Rutman I think I could have de-sprue; cut a hole in the box;  add glue and shake to have the plane come out. 

Hugh

  • Member since
    December 2005
  • From: back seat of your car with duct tape streched out
Posted by soulcrusher on Sunday, June 20, 2010 4:26 PM

I guess we will have to wait for the final pictures Clebode. I will be over at the BoB GB sometimes next week to. I am also going to build a nice simple Me 109 E-3 1/48 Heasgawa kit. The almost seem to build themselves. See you over there buddy!

SoulcrusherPirate


  • Member since
    January 2007
  • From: Cleveland, OH
Posted by Clebode on Sunday, June 20, 2010 3:44 PM

Hello All,

This GB continues to roll like a fast freight.  Nice start Richie.  Nice and clean for 1:72! 

I've had to put off the final final for the Ta152.  I broke my detailing AB with a stupid move.  I twisted off the threads for the head inside the body!     Luckily, I was able to extract the broken piece without further damage.  However, the exhaust stains will have to wait until the new head arries next week. 

I am building a Bf109E-4 over at BoB 70th now.  That build is a breeze compared to the Ta152.

I shall return!  I have an A-5, a D-11 and a D-13 in the stash! 


Hugh

  • Member since
    December 2005
  • From: back seat of your car with duct tape streched out
Posted by soulcrusher on Sunday, June 20, 2010 2:33 PM

Looks like a good start Richie. Your modeling buddy looks very happy in that picture. My modeling buddy went out the door last Monday morning and vanished never to be seen agian. Really bummed me out all week. CryingSad

SoulcrusherPirate


  • Member since
    March 2006
Posted by simpilot34 on Sunday, June 20, 2010 9:10 AM

Well I have had a good night at the bench and got a fair bit done, well it looks like it anyway in this scale lol!!! First off i want to introduce my modelling buddy Scarlett.

and here's the progress on my 190, the office,

the fuse closed up with said office in place,

Tomorrow will sand and fill the seams and move on to the wingy things. Enjoy!Toast

Cheers, Lt. Cmdr. Richie "To be prepared for war, is one of the most effectual means of preserving the peace."-George Washington
  • Member since
    March 2006
Posted by simpilot34 on Sunday, June 20, 2010 12:25 AM

Julez72

Wow everytime i click here i'm bombarded with wip pics it's awesome keep at it fellasYes

Sim, buddy i'm not building a 1/72 kit, i'm going down the 1/48 eduard A-5 path....Nice start you made there too mateYes

Ditto

and my bad!! Propeller

Again great to see so much and quality progress!!!!Toast

Cheers, Lt. Cmdr. Richie "To be prepared for war, is one of the most effectual means of preserving the peace."-George Washington
  • Member since
    March 2010
  • From: Brisbane
Posted by Julez72 on Saturday, June 19, 2010 6:54 PM

Wow everytime i click here i'm bombarded with wip pics it's awesome keep at it fellasYes

Sim, buddy i'm not building a 1/72 kit, i'm going down the 1/48 eduard A-5 path....Nice start you made there too mateYes


  • Member since
    February 2004
  • From: Second City
Posted by arki30 on Saturday, June 19, 2010 12:45 PM

Small progress update of my own.  Everything is closed up, fit is very good. 

Ultracast seat painted.  No wash on it yet, but that will follow.

Next to begin painting the engine and assorted accessories to get the cowling on.

Cheers

Building Now:

1/48 Academy Bf-109G6 - 100%

1/48 Tamiya F4U-1A - 5%

Upcoming:

1/48 Revell F-14D

  • Member since
    December 2004
  • From: Yokosuka, Japan
Posted by luftwaffle on Saturday, June 19, 2010 12:03 PM

OK, a lot of work trying to get the little details right.  Here is the correct configuration for an R2 with outboard Mk. 108 cannons:

And a photo, although this appears to be an experimental installation, Experten will notice the inner gear doors not present on the A-8.  The small hook is for the W.Gr. 21 rocket launcher, this is probably an aircraft of Ekdo. 25, a test and evaluation unit that experimented with new weapons and tactics:

The Hasegawa wings needs some work to reflect the proper configuration:

The cockpit armor applied, did this myself with plastic stock:

And finally Sprue Brothers delivered some goodies, Master Model turned brass MG 151 and Mk 108 cannons, these things are truly miniature works of art:

aka Mike, The Mikester My Website

"He has all the virtues I dislike and none of the vices I admire."   -Winston Churchill

  • Member since
    March 2006
Posted by simpilot34 on Saturday, June 19, 2010 10:28 AM

Guy what a great start to another marathon build!!!!! Looking forward to seeing your progress!!!

I myself have entered the fray and broken sprue finally on my lil Academy 1/72 A-8/6, the same kit Julez has started. Just have painted the office and upper rear bits of the fuse in RLM 66. Being there is only one decal option, will work out whether it is a -6 or-8. But here is a pic of the painting on the lint roller paint stand. What a great idea!!! Who got payed the $25 proverbial for it???!!

and a couple pics of some gems I picked up at the Model Expo. The PE stainless micro-saws ($8),

and Trumpeters scribing tool ($10).

Crushlikins, Frank no longer has to wait..... just for more WIP pics is allPropeller

Cheers, Lt. Cmdr. Richie "To be prepared for war, is one of the most effectual means of preserving the peace."-George Washington
  • Member since
    February 2007
  • From: Bournemouth UK
Posted by Luftwoller on Saturday, June 19, 2010 9:50 AM

Right heres the kit im doing for round 2,

and the profile im going to do,

and where i am so far,

i copied the map idea from his Frankengeniuslyness. Once again i used the pre-painted PE which I, personally, Love,

More soon,

...Guy

..'Your an embarrassment to the human genus, makes me ashamed to call myself Homo'.
  • Member since
    February 2007
  • From: Bournemouth UK
Posted by Luftwoller on Saturday, June 19, 2010 8:52 AM

Yey im back on the internet AT HOME!! The wonders of modern science eh?

Crush, after further research, ive concluded that the crank handle spun a large inertia type of clutch mechanism (They used similar on the tiger tanks) once the thing was at sufficient speed, the pilot pulled a clutch cable in the cockpit, that engaged the inertia wheel thingy to the engine itself. Thats the change in note. Its the actuall engine turning rather than the inertia wotsit. I can only presume that the later varients and the 190 included had an electrically driven starter motor as well as the cranking option. I know whgat id favour.

Thanks again for all the birthday wishes everyone. You too kind.

Pics later BTW,

...Guy

..'Your an embarrassment to the human genus, makes me ashamed to call myself Homo'.
  • Member since
    December 2004
  • From: Yokosuka, Japan
Posted by luftwaffle on Saturday, June 19, 2010 8:43 AM

sidure

Another question for the experten. On the antenna wire is it slack or tight on the A-8 when the canopy is open. I know ir is slack on some varients but dont have a clue on the A-8

Steve

Steve, it's more of a function of the canopy type rather than the model.  Your bird has the standard canopy which had a tensioner so it would remian tight when the canopy was open.  The blown canopy did not have a tensioner so the wire went slack when the canopy was open.  I have seen photos of Doras with standard canopiies without tensioners too, but that appears to be the exception, you know how confusing late war Luftwaffe gets.

aka Mike, The Mikester My Website

"He has all the virtues I dislike and none of the vices I admire."   -Winston Churchill

  • Member since
    July 2003
  • From: waynesboro va, via Ireland
Posted by sidure on Saturday, June 19, 2010 1:05 AM

Mike, thats a nice collection of 190's you have there. nice progress.

I am almost finished my build as of tonight. Still a lot of small details to take care of. The exhaust pipes are painted copper and then I used Tamiya finishing rust on top of that to get that dull rusted look. I will be displaying the engine and gun area fully open. I dry fitted the panels and to my surprise they fit up pretty good. The gun cover however is no where near fitting so its a good thing it will be open. If all goes well I may have pics up tomorrow.

Another question for the experten. On the antenna wire is it slack or tight on the A-8 when the canopy is open. I know ir is slack on some varients but dont have a clue on the A-8

Steve

  • Member since
    March 2006
Posted by simpilot34 on Friday, June 18, 2010 11:23 PM

Julez you are coming along very well on the lil tikes!!! Looking forward to seeing much more!!!Toast

Cheers, Lt. Cmdr. Richie "To be prepared for war, is one of the most effectual means of preserving the peace."-George Washington
  • Member since
    December 2005
  • From: back seat of your car with duct tape streched out
Posted by soulcrusher on Friday, June 18, 2010 12:49 PM

Luftwoller

Crusher, i have cracked the sound up loud on that video more than once lol and its fantastic. That whining you hear at the beginning of the start, i was led to believe, was a generator for the starter? It would be good to clarify though.

.

...Guy

Guy earlier 109's use an inertia type starter that you would have to wind up kind of like one of thoses old tin toys. I have some technical manuals on the DB engines but I am still trying to figure out how they work. When they have wound it up sufficently the pilot engages the inertia motor and you can here a different higher pitched whine. To me it sounds like the whine of an extremely high compression motor turning over but I could be wrong. It might be the sound of the inertia motor engaging. Either way it is pretty cool! Did you also notice the different exhaust tone between the DB605a engine and the DB605N in the second 109 with the electric type of starter motor?

Frank has the a copy of the DVD also. What do you think Frank?

SoulcrusherPirate


  • Member since
    July 2008
  • From: USA California
Posted by vetteman42 on Friday, June 18, 2010 11:21 AM

Sidure thats a very nice build you have going there but I cant seem to take my eye off that open nose and engine. That motor looks like one could hit the starter button and it would fire. Wish mine came out half that well. Are you planning to close it up or display it open ?

Randy So many to build.......So little time

  • Member since
    December 2004
  • From: Yokosuka, Japan
Posted by luftwaffle on Friday, June 18, 2010 9:03 AM

Steve- Really nice detail work, lovin' it!

Mike- Nice work on your projects, pilot in the Dora looks great!

Sir Guy- Freulichen Geburtstag, mein Freund! Beer

aka Mike, The Mikester My Website

"He has all the virtues I dislike and none of the vices I admire."   -Winston Churchill

  • Member since
    April 2005
Posted by Thunderbolt379 on Friday, June 18, 2010 8:49 AM

Richie -- they sure will, among many others underway at this time. I ordered a gas cylinder today, it should be there for collection Monday, and I can do some spraying during the week, hopefully moving along the big guy. If we don't get some decent weather it's going to be hard to spray in enamels, so the main schemes are going to be a bit in the balance.

Julez -- looks like four! Ambitious for me, I never finished more than two for a GB before.

Frank -- your wish is my command, skipper!

Here are the two lil guys:
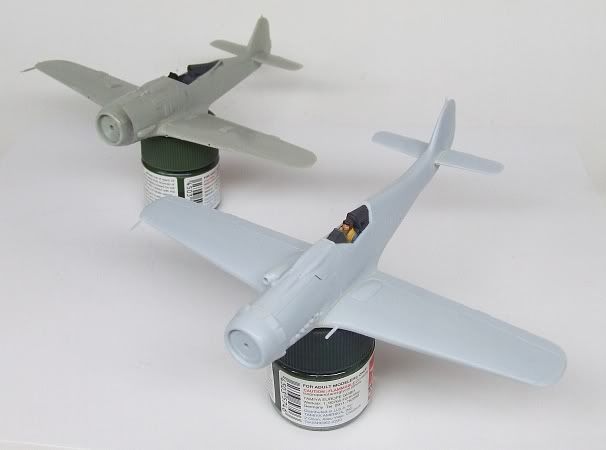
And a closeup on the Airfix Dora:


You can see how finely the gaps filled and the snug, tight, colourful cockpit.

Next, a closeup on the Academy Anton (and the slight discrepency behind the headrest...)
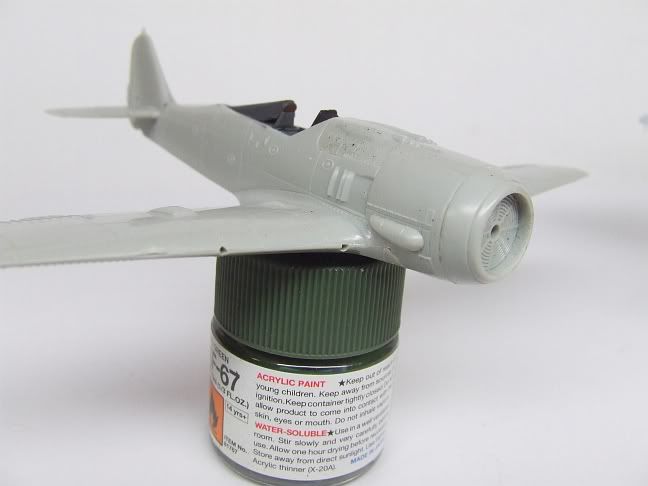
 

A tiny spot of filling and some cleanup here and there, then I can add the canopies to both and they're ready for paint. Props, landing gear and such will, as usual be painted off the model. Since it's all the same batch of paints, RLM 02, RLM 70, satin black and such, I'll probably get these items done while pre-painting on the big one. Then it's onto the wonderful world of masking and getting them into colour. I'll also try to get the big one's engine into decent shape as a major subassembly while considering how best to tackle those instruments.

Cheers, Mike/TB379

http://worldinminiature.blogspot.com/

  • Member since
    September 2003
  • From: South Central Wisconsin
Posted by Daywalker on Friday, June 18, 2010 7:50 AM

Guy- You animal, you...

Glad to see you're in for another round!  I added that Anton to the list! Propeller

Frank 


  • Member since
    September 2003
  • From: South Central Wisconsin
Posted by Daywalker on Friday, June 18, 2010 7:50 AM

Steve- Excellent work, you're really going to town on this one!  Keep those pics coming.

Frank 


  • Member since
    September 2003
  • From: South Central Wisconsin
Posted by Daywalker on Friday, June 18, 2010 7:48 AM

Mike- LOL, glad you like my reasoning!  Now, how about some pics? Wink

Frank 


  • Member since
    September 2003
  • From: South Central Wisconsin
Posted by Daywalker on Friday, June 18, 2010 7:47 AM

I'm with you Randy, sad to see any of them go down.  Hope they bring her back up to the surface soon and rebuild her.


Frank 


  • Member since
    March 2010
  • From: Brisbane
Posted by Julez72 on Friday, June 18, 2010 6:34 AM

Mike, very nice Stash....How many are you doing for this GB???

Guy, Happy 41st mateYes

Steve, Very very nice workYes following your build i was getting worried about problems building mine but after looking at your build i'm looking forward to getting stuck in.....


JOIN OUR COMMUNITY!

Our community is FREE to join. To participate you must either login or register for an account.

SEARCH FORUMS
FREE NEWSLETTER
By signing up you may also receive reader surveys and occasional special offers. We do not sell, rent or trade our email lists. View our Privacy Policy.