SEARCH FINESCALE.COM

Enter keywords or a search phrase below:

The Ostfront (eastern front) GB 2010/11

106900 views
900 replies
1 rating 2 rating 3 rating 4 rating 5 rating
  • Member since
    March 2009
  • From: East Bay, CA
Posted by Lundergaard on Monday, October 25, 2010 10:00 AM

jeff it looks great!  only your 4th build??  well i am jealous.  my 4th build is in a landfill somewhere...

cheers

andy

  • Member since
    January 2004
Posted by Captain Morgan on Monday, October 25, 2010 10:40 AM

How do I apply the Ostfront badge?

Secondly is it applied before, during or after the build is complete?

Thanks for the help!

Theirs not to make reply, Theirs not to reason why,
Theirs but to do and die: Into the valley of Death
Rode the six hundred

  • Member since
    March 2009
  • From: East Bay, CA
Posted by Lundergaard on Monday, October 25, 2010 10:45 AM

put the image on a site like flickr or whatever and then choose to view a small version of it on that site.  add the url to the image in your signature by clicking on that little icon that looks like a few frames of 70mm film with a "+" sign on it.

i have 1/2 a T-34 built and i'm sporting the badge!  Stick out tongue

andy

  • Member since
    November 2009
  • From: LaSalle, Ontario, Canada
Posted by bouttime on Monday, October 25, 2010 10:49 AM

Hey Doogs I really like that shading. Might build a Spit mk1 next and will have to remember that technique.


  • Member since
    January 2004
Posted by Captain Morgan on Monday, October 25, 2010 2:56 PM

Thanks for the help Lundergaard.

Theirs not to make reply, Theirs not to reason why,
Theirs but to do and die: Into the valley of Death
Rode the six hundred

  • Member since
    June 2010
  • From: Austin, TX
Posted by DoogsATX on Monday, October 25, 2010 6:03 PM

bouttime

Hey Doogs I really like that shading. Might build a Spit mk1 next and will have to remember that technique.


Thanks!

It's a challenge with these planes since they don't have much in the way of panel lines to break up the main elements. With something like a Spit you can play a lot more...fade some panels more than others, random streaks to break up the hotspots, etc. Worked really, really well with the Dauntless I built a few months ago, and honestly it's a technique that, combined with post-shading, I've found I much prefer to pre-shading.


On the Bench: 1/32 Trumpeter P-47 | 1/32 Hasegawa Bf 109G | 1/144 Eduard MiG-21MF x2

On Deck:  1/350 HMS Dreadnought

Blog/Completed Builds: doogsmodels.com


  • Member since
    June 2010
  • From: Austin, TX
Posted by DoogsATX on Tuesday, October 26, 2010 10:27 AM

Bit more progress last night.

Got the La-5 camo'd up in AMT Black. Did a bit of lightening, then did a final pass of thinned AMT black mixed with maybe 25% AMT-4 green. Silly putty worked way better than the play-doh, but I've still got to practice my soft mask technique. Some of the lines are soft, others harder than I'd like.

I also managed to pull off the starboard slat - no biggie - and knock off the aerial mast. What I get for putting in on so early in the game. Anybody got any tips for scratching one up? I need it tough enough to hold up to rigging. Right now I'm thinking about trying to snip one out of some PE fretting.

On the Bench: 1/32 Trumpeter P-47 | 1/32 Hasegawa Bf 109G | 1/144 Eduard MiG-21MF x2

On Deck:  1/350 HMS Dreadnought

Blog/Completed Builds: doogsmodels.com


  • Member since
    June 2010
  • From: Austin, TX
Posted by DoogsATX on Thursday, October 28, 2010 10:09 AM

Where are the updates? Feeling like it's just me in here...

The wife had mother's night out last night, so I didn't get out to the bench til late, and was already exhausted from four hours of a toddler who loves the word no and a teething infant. Still, slowly but surely moving closer to decals and then the fun stuff.
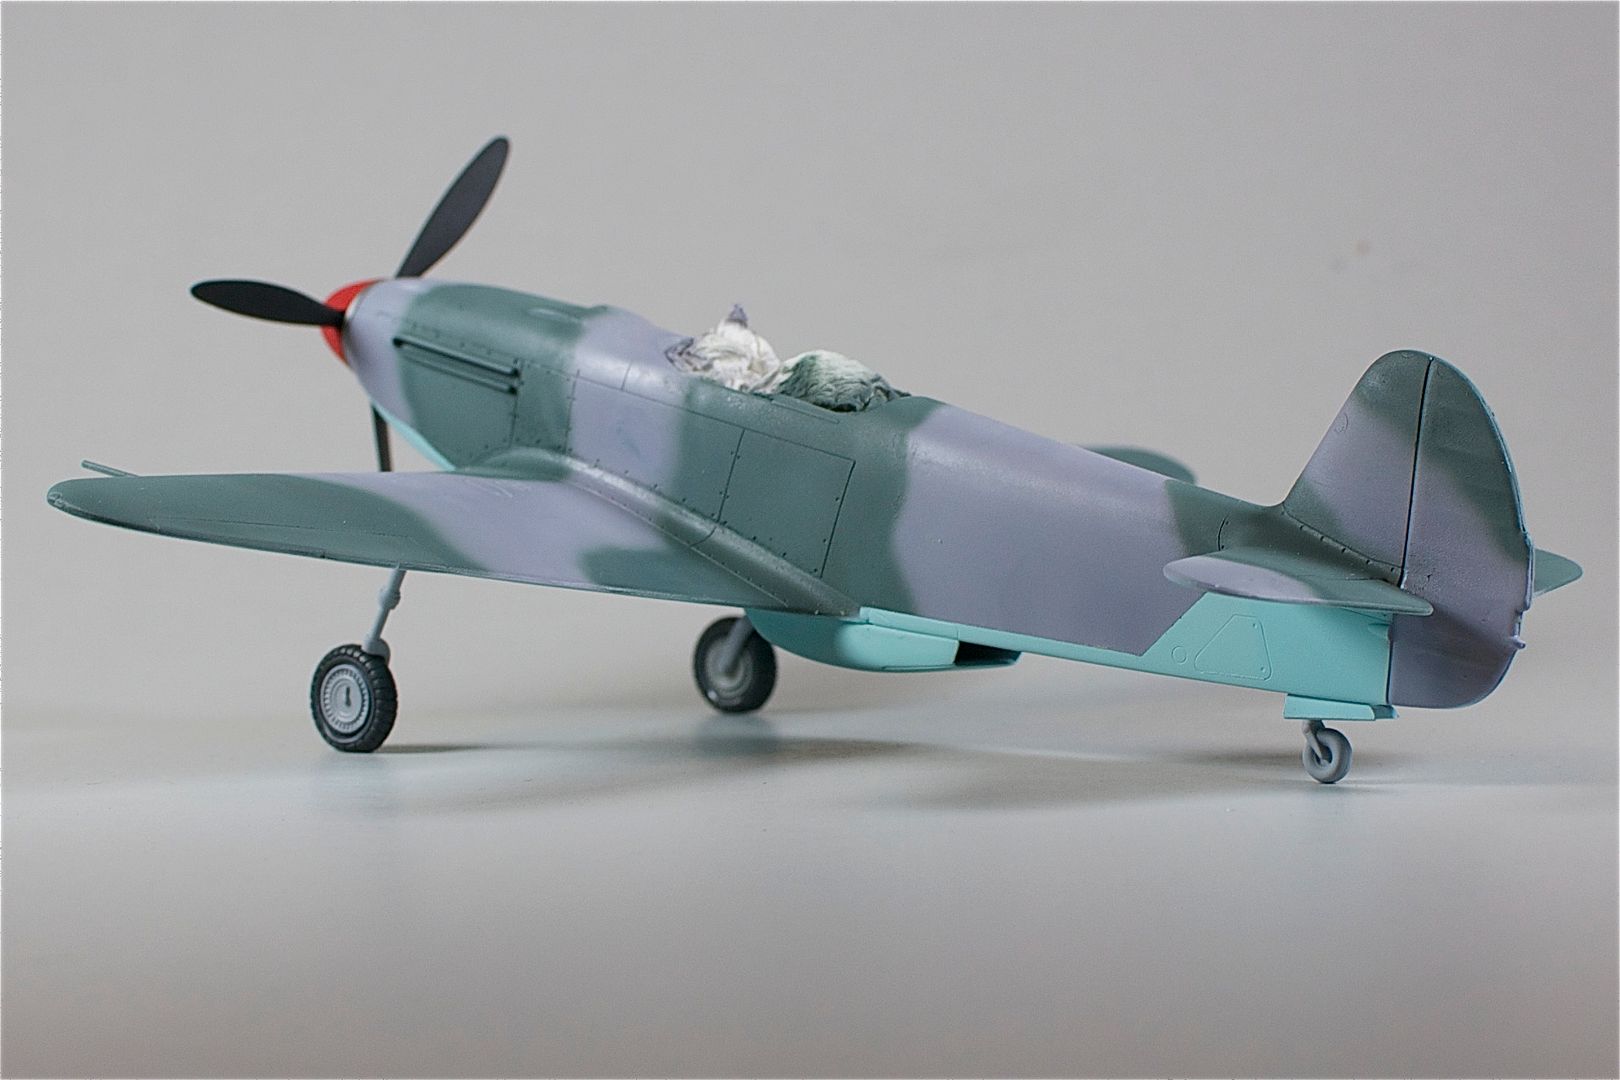
La-5

Broke off the aerial when I was masking for the black camo, so last night I scratched a new one out of some flat brass stripping. Cut it with Xuron shears, filed the edges, then cut and filed a post to mount into the fuselage. Liberal use of CA later, it's rock solid.
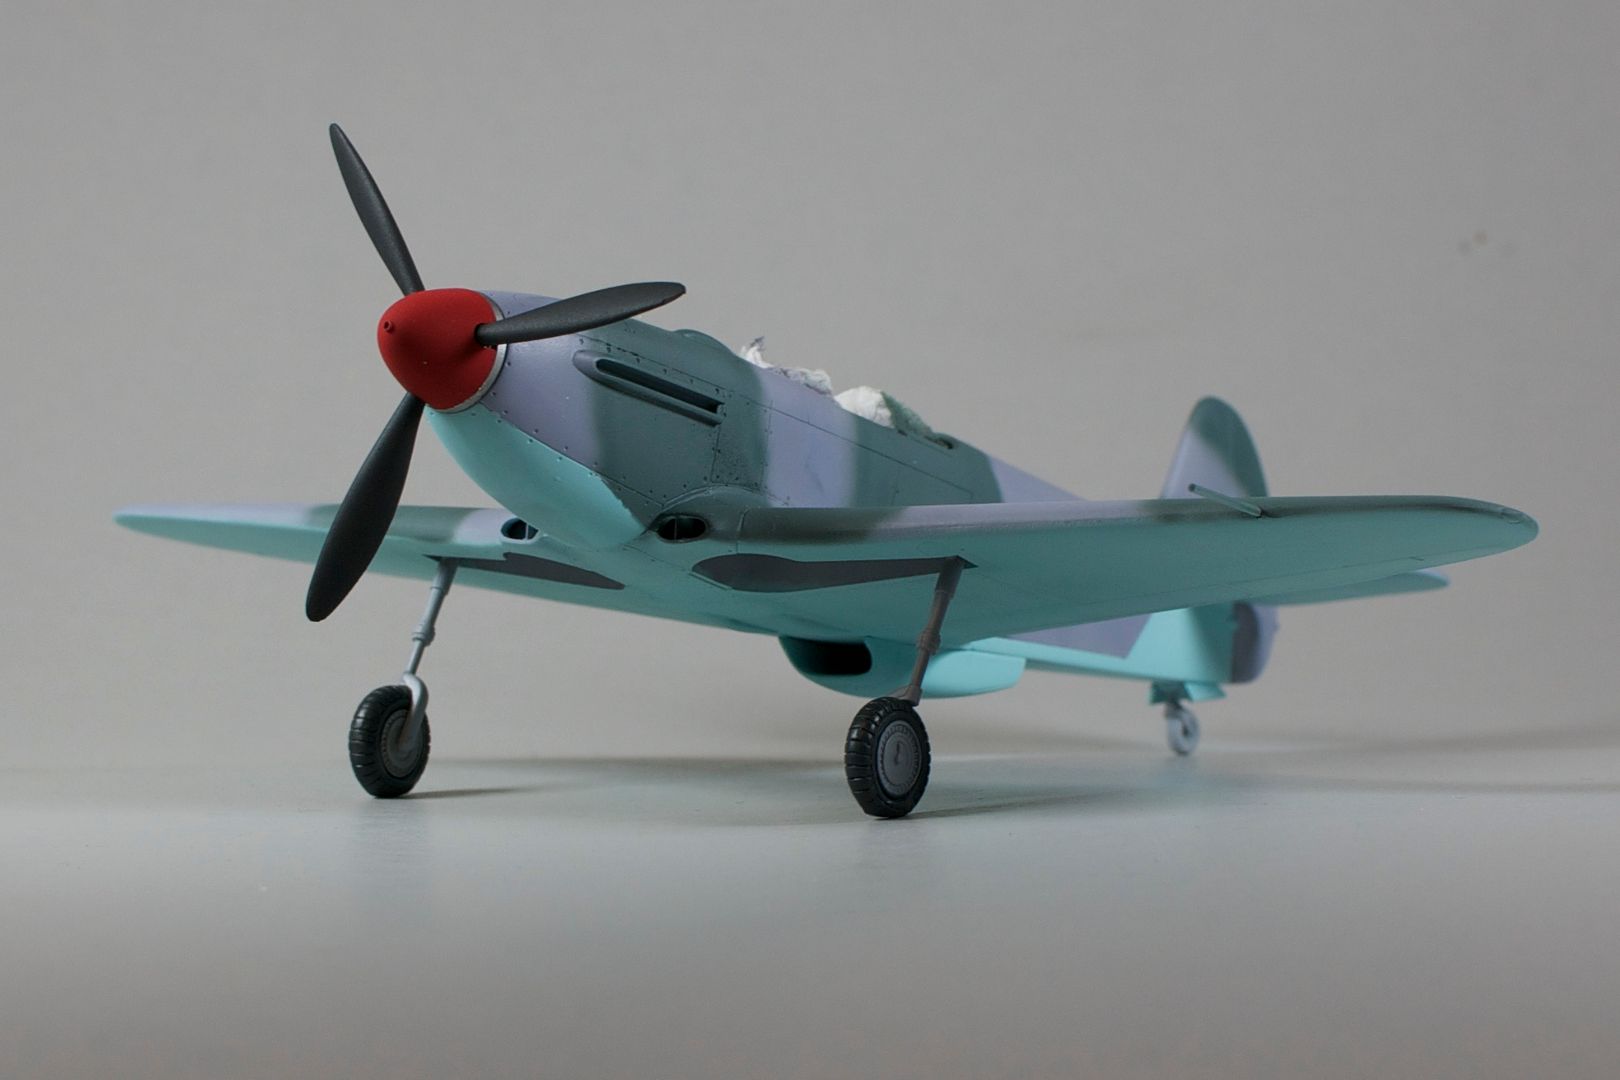
Yak-3

Got some fiddly details cleaned up, assembled the prop, and made a start on the landing gear.

Speaking of which, I HATE the landing gear on this kit. The struts don't seat anywhere in the bays. As with most of the rest of the kit, there's no positive location to guide you. I just went with CA and hoped for the best.

Next up were the wheels. More hate. Most gear struts have pretty decent sized posts for mounting the wheels. Unless the fit's really loose, you can usually get the plane to stand on its wheels without glue. This kit has nubbins. Annoying since the True Details wheels have those flat bulges that have to be aligned with the ground, but there's no way to stand it without gluing it first. Again, CA and pray. The port tire ended up several degrees off, so I pulled it off and tried again. Still not perfect, but good enough for government work, especially if you're a godless commie.


On the Bench: 1/32 Trumpeter P-47 | 1/32 Hasegawa Bf 109G | 1/144 Eduard MiG-21MF x2

On Deck:  1/350 HMS Dreadnought

Blog/Completed Builds: doogsmodels.com


  • Member since
    November 2009
  • From: LaSalle, Ontario, Canada
Posted by bouttime on Friday, October 29, 2010 5:42 AM

Doogs - love the paint work on the dauntless and those commies are coming along nicely. Keep posting your progress and I'll check back in 9-10 days when I get out of the bush. Watch out bambi.

Jeff


  • Member since
    June 2010
  • From: Austin, TX
Posted by DoogsATX on Sunday, October 31, 2010 12:51 PM

Well. The theme of the past few days seem to be "are you $*#*$%! kidding me!?!?".

La-5

I love the White Ensign enamels. With one exception. The AMT Black sprays really thin and, even though it's black, doesn't cover all that well. The coat on the La-5 came out somewhat rough, so I went to wet sand things back smooth. At which point some of the green was sanded, too. Well, the water/sanding slurry was promptly absorbed by the black and would not come out. 

So I got to repaint.

First pass I went thin so I could spray fine lines and preserve the camoflage. But it went on so thin that it looked awful.

Next coat I went thicker, and got some overspray along the camo edges, so I went back with the AMT-4 green, which covers way more evenly than the black, and that seems to have gotten everything to a good place.

Yak-3

Went to Future the Yak last night and the Paasche spat it all over the place. Seriously, I probably could have gotten a better result loading the stuff into a spray bottle. So now I have a rough coat of Future that I have to strip. Going to come back with Tamiya Clear Gloss and leave the Future for canopies and floors.


On the Bench: 1/32 Trumpeter P-47 | 1/32 Hasegawa Bf 109G | 1/144 Eduard MiG-21MF x2

On Deck:  1/350 HMS Dreadnought

Blog/Completed Builds: doogsmodels.com


  • Member since
    March 2010
  • From: Brisbane
Posted by Julez72 on Monday, November 1, 2010 9:35 AM

Doogs, sounds like your having a rough run with it lately.....IMO you build to a very high standard so in the end your going to have 2 outstanding models on the shelf, worth the effortYesYesBTW your future spitting got my attention, have you tryed thinning it with some X-20a??


  • Member since
    June 2010
  • From: Austin, TX
Posted by DoogsATX on Monday, November 1, 2010 9:53 AM

Julez72

Doogs, sounds like your having a rough run with it lately.....IMO you build to a very high standard so in the end your going to have 2 outstanding models on the shelf, worth the effortYesYesBTW your future spitting got my attention, have you tryed thinning it with some X-20a??

Yeah, I definitely hit a patch where nothing seemed to be going as planned. Got a bit more work done last night. Installed the landing gear on the La-5 and painted its tailwheel. Also stripped most of the Future off the Yak. Windex works, but it takes effort. Think I'm going to have to hit Home Depot during lunch to pick up a new bottle of elbow grease. Stick out tongue

As for the Future...I don't know what was going on. I've never had it spit like this before. I think it might have been the Paasche's fault. It's twenty years old and it's been through a hell of a lot (including my younger, much less cleaning-inclined days), so I think I may need to replace the needle/nozzle with a new set.

But it's sprayed just fine recently. Did a bang-up job with the Gunze Orange-Yellow on the Wildcats. And it was clean as a whistle before I loaded the Future.

Whatever the case, I'm planning on picking up some Tamiya Clear Gloss and playing with that. At least for these kits...

On the Bench: 1/32 Trumpeter P-47 | 1/32 Hasegawa Bf 109G | 1/144 Eduard MiG-21MF x2

On Deck:  1/350 HMS Dreadnought

Blog/Completed Builds: doogsmodels.com


  • Member since
    March 2010
  • From: Brisbane
Posted by Julez72 on Tuesday, November 2, 2010 8:13 AM

Yeah the future spitting is unusual, how humid is it in Texas this time of year.....


  • Member since
    December 2006
  • From: t.r.f. mn.
Posted by detailfreak on Tuesday, November 2, 2010 9:16 AM

hey all the builds are looking great . As it goes,I have not had that much bench time. I will tell you this much.After dry fitting and tweaking it will be a bit longer as the fighting compartment is about a 1/4 - 3/8 of an inch long and the engine compartment about that much to short. So I will have to add some here and take some there.took a few pics.


  Of course you can't see the discrepancies in the pics,my apologies for not being more educated in the area of adding arrows and such.Also added some of the interior details. As you can see in the pic of the model lying on it's side to take advantage of the natural lighting.

[View:http://s172.photobucket.com/albums/w1/g-earl828/]  http://i158.photobucket.com/albums/t104/cycledupes/1000Roadwheels4BuildBadge.jpg

  • Member since
    June 2010
  • From: Austin, TX
Posted by DoogsATX on Wednesday, November 3, 2010 11:00 AM

And...decals are on!

Yak-3

For the Yak, I used Aeromaster decals with a smidge of the kit decals for various stencils. 

La-5

The La-5 used decals from AML, depicting "Silver 69". These decals are phenomenal. Very thin, very vivid. Had some Solvaset meets Future clouding, but I've read that a top coat of Future kills that dead, so fingers crossed!

After I seal these bad boys I'm going to start attaching gear doors and such and then having happy fun weathering time. I'm thinking of adapting some armor weathering techniques, since there's just not much in the way of panel lines to play with on either plane, and post-shading efforts will probably vanish in the La-5's black camo. Anybody have any experience applying oil filters to aircraft?

On the Bench: 1/32 Trumpeter P-47 | 1/32 Hasegawa Bf 109G | 1/144 Eduard MiG-21MF x2

On Deck:  1/350 HMS Dreadnought

Blog/Completed Builds: doogsmodels.com


  • Member since
    August 2006
  • From: Amherst, MA
Posted by M1 A1 A2 Tanker on Thursday, November 4, 2010 10:20 PM

Hey

       Kermit


       Could I join up with Tamiya's 1/35 Sturmgescgutz III Ausf.B?

Markings would be for 2nd Kompanie 192nd StuGAbt, Poland June 1941. This is the one with the red skulls.


Thanks

Scott


“Computers are like Old Testament gods; lots of rules and no mercy.”  ~ Joseph Campbell


  • Member since
    September 2008
  • From: Ancaster, Ontario
Posted by maxfax on Friday, November 5, 2010 9:52 AM

Great work everyone!

Doogs: the planes look great! Love the decal work on the La 7.

Hopefully I can get an update posted soon. I have much of the Stug III G built in sections and started painting, and built the Fruil tracks. Still thinking about a colour scheme- most likely a winter whitewash.

Rob

On the bench:  Revell 1/72 HCMS Snowberry


  • Member since
    June 2010
  • From: Austin, TX
Posted by DoogsATX on Friday, November 5, 2010 10:26 AM

Well, gents, a series of unfortunate occurrences last night have relegated the La-5 to "just finish it" status.

I hate the feeling - especially with such a great kit - but if nothing else it's a good learning experience, and now I can get a bit more adventurous on some weathering techniques I've been meaning to try, since who cares if I $(%^ it up?

Besides, I've still got another in the stash...

On the Bench: 1/32 Trumpeter P-47 | 1/32 Hasegawa Bf 109G | 1/144 Eduard MiG-21MF x2

On Deck:  1/350 HMS Dreadnought

Blog/Completed Builds: doogsmodels.com


  • Member since
    June 2010
  • From: Austin, TX
Posted by DoogsATX on Saturday, November 6, 2010 11:52 AM

Okay. So here's the story on the La-5. The AML decals went on great. Beautifully. The only issue I had was with the Solvaset causing some clouding with the Future. 

After letting the decals set for a day or so, I came back and sprayed a top coat of Future to seal them in before I started on the weathering. 

When I came back the next morning, that massive decal on the port side had silvered. I tried to fix this the way I'd fixed some minor silvering on an earlier build - misting a highly thinned mix of the base color.

This was a REALLY bad time to find out that White Ensign enamels don't reduce well at all. Imagine if you put a spoonful of sand in a cup of water and stirred it up. Basically that. It falls out of suspension almost at once (conveniently clogging your airbrush!). As long as you keep it agitated it sprays okay, though. Only, when it hit the decal, instead of casually blending it back toward the base color (I tested this on the underside first and it went off without a hitch), it made it lighter. Gah!

Several misguided attempts at other things later, here's how it looks.

Fortunately, the starboard side is decent, so I'll just be displaying this guy backward, I guess...

On the Bench: 1/32 Trumpeter P-47 | 1/32 Hasegawa Bf 109G | 1/144 Eduard MiG-21MF x2

On Deck:  1/350 HMS Dreadnought

Blog/Completed Builds: doogsmodels.com


  • Member since
    June 2009
  • From: Netherlands
Posted by kermit on Saturday, November 6, 2010 1:24 PM

M1A1 tanker,

Would love to have you and will put your build on the rollcall asap. Right now i am in the USA so that might take a few days (back on the 9th). By all means start your StuG in the meantimeWink

Doogs,

So sorry to hear about your mishap. Silvering can always occure no matter how well you work. Still looks great to me and like you said, luckily the other side is unaffectedSmile Really love your work!

Richard

"Success is the ability to go from one failure to another with no loss of enthusiasm." - Sir Winston Churchill

  • Member since
    December 2006
  • From: t.r.f. mn.
Posted by detailfreak on Saturday, November 6, 2010 5:44 PM

Bouttime you're panzer III looks like it's ready to head out across the Russian steppes my friend.Wheres all the other armor thats been entered ? Any news on that Stug F?

[View:http://s172.photobucket.com/albums/w1/g-earl828/]  http://i158.photobucket.com/albums/t104/cycledupes/1000Roadwheels4BuildBadge.jpg

  • Member since
    July 2008
  • From: USA California
Posted by vetteman42 on Saturday, November 6, 2010 10:04 PM

DoogsATX both the Yak and the La-5 are looking great Yes Sorry to hear of your troubles with the silvering, but she looks just fine from here. I do really like the camo on both a job very well done.

Detailfreak I still havent ventured to the darkside yet, but hope to soon with my first tank build. I like what I am seeing of your build so far so keep the pictures coming.

Kermit you mean they let you in the USA again ??? Clown Thought you had been rather quiet the last few days.

Randy So many to build.......So little time

  • Member since
    July 2008
  • From: Vancouver, the "wet coast"
Posted by castelnuovo on Sunday, November 7, 2010 1:15 PM

What the...how did this Africa Corps guy ended up at the OstfrontConfused??? Well, Hans didn't receive much map reading training before being sent to N. Africa, took a wrong turn Embarrassed...anyway...

I signed up for this GB with sdkfz 222. Then things started to go crazy at work, boss was going bananas and it was up to me and another guy to set him straight, which we did, but that is another story. Either way, stress level went way up, there were sleapless nights...Normaly, my stress releif is working out and modeling, the later one sometimes into wee hours. And for some reason, I was thinking about N. Africa, maybe I wanted to escape to there or send the boss there, the 222 ended up in dark yellow. Then the decals were applied wrong, as you can see there are two diffeent types of crosses on it. Bang Head

Anyway, I kinda like the way it turned out, so thought to share it anyway...

Cheers,

  • Member since
    August 2008
Posted by Voidses on Sunday, November 7, 2010 1:38 PM

@DoogsATX Sorry to hear about the silvering but there might be a way to remove it. It's happened to me in the past and what I did was to use a new blade in my knife and poke holes through the gloss down to the decal and through it, lots of holes.

After that I applied strong alcohol during a few minutes (apply and then reapply when it dry). That was enough to remove the silvering on most places. Where it didn't I thinned some clear-gloss and used a small brush to force it to "seep" under the decal by brushing it over the afffected areas.

ALL silvering was eliminated with this method. When dry I just sanded down the somewhat mared finish and voila! Cool

I use enamels exclusivly(almost) and I can't say how it would work on future.

/Carl

I attack sharks when I smell them bleed

  • Member since
    June 2010
  • From: Austin, TX
Posted by DoogsATX on Monday, November 8, 2010 2:14 AM

Carl - that's a hell of a tip! Wish I'd read it before all the other crap I tried! Too bad that now I've got paint on top of the worst decals...

Played around with both Ruskies a bit this weekend. 

La-5 - Gear doors and tailwheel are finally on. Metal cowl bands were masked, sprayed with Talon Aluminum, then polished and buffed. Sadly the masking kinda sucked and I had some bleed under. I also managed to break off the pitot tube, so I drilled out the mount and replaced it with brass wire.

Yak-3 - Again, gear doors finally on, along with various gear trappings and supports. I also installed the Quickboost exhaust manifolds. Very slick. 

On the Bench: 1/32 Trumpeter P-47 | 1/32 Hasegawa Bf 109G | 1/144 Eduard MiG-21MF x2

On Deck:  1/350 HMS Dreadnought

Blog/Completed Builds: doogsmodels.com


  • Member since
    March 2010
  • From: Brisbane
Posted by Julez72 on Tuesday, November 9, 2010 4:01 AM

Doogs despite your problems both builds are looking really very niceYes

Richard, your absence has been noticed, good to see you back and posting againYesYesToast


  • Member since
    June 2010
  • From: Austin, TX
Posted by DoogsATX on Wednesday, November 10, 2010 9:54 AM

I put the finishing touches on the Commies last night. 

Overall, I don't think they're my best. Plenty of human error and some nasty surprises with the way the paint and some other elements behaved. 

La-5

Zvezda's kit is amazing. Highly recommended to anyone who wants a fun, different build. The decal silvering killed the port side, and using Goo Gone to remove the BMF residue from the canopy resulted in some nasty fogging that I just couldn't get out. Weird that it did nothing to the windscreen or fuselage windows. I'm just going to go with the story that the La-5 is depicted on a particularly humid morning.

Weathering was done with heavily thinned oil washes of raw umber, payne's gray, and (on the upper wing surfaces) transparent white. Drybrushed MM Aluminum for the heavy chipping on the prop, spinner, and metal elements. Pigments on the wheels and gear doors. Tamiya smoke and blue and black pastels for the exhaust stains.

Yak-3

Eduard's Yak-3 is a strange kit. Low parts count, solid fit among the major pieces, but very little positive location elements for the smaller bits. The landing gear and gear doors are particularly frustrating. The kit wheels are the worst I've ever seen, and I highly recommend replacing them with the True Details set. Detail is rather good around the forward fuselage and cowl, but I think the detail on the wings is a bit sloppy. Kit decals were awful. Overall it builds up into a nice looking aircraft, but I have to say - I'd really love to see what Eduard could do with a new tooling of this kit.

Thanks for watching - I'm looking forward to all the other builds and will be back at some point with the other Zvezda kits!

On the Bench: 1/32 Trumpeter P-47 | 1/32 Hasegawa Bf 109G | 1/144 Eduard MiG-21MF x2

On Deck:  1/350 HMS Dreadnought

Blog/Completed Builds: doogsmodels.com


  • Member since
    December 2002
  • From: Bury St Edmunds, Suffolk, England
Posted by Bish on Wednesday, November 10, 2010 12:12 PM

DoogsATX wow, those are awsome  Yes Now i hope you realise i will be expecting some of the same for the Mighty 8th.

I am a Norfolk man and i glory in being so


On the bench: Airfix 1/72nd Harrier GR.3/Fujimi 1/72nd Ju 87D-3

  • Member since
    June 2009
  • From: Netherlands
Posted by kermit on Thursday, November 11, 2010 2:09 PM

Castelnuovo,

Sorry to hear about your daily life's mishaps. Hope you will find the piece and quiet again you need to fully enjoy your hobby once more. Your little panzer looks great to me and the difference in decals does not look disturbing or "off" to me in any way. It's a bit of a bummer you did not shar much WIP pics but that doesn't affect the quality of your build in any way. Congrats and looking forward to the planned BT7Big Smile

Doogs,

You know how they always say that you are your own worst critic and every build you did yourself makes you look at the yucky spots first and foremost.

However, i noticed that alot of the times when you think a build is just mediocre in your own eyes, people around you seem eager to declare them the best you've done sofarWink It is all relative and if you ask me, both of these builds are Gallery material. My best wishes and congrats on the completing of these two superb builds sir!

All,

Both Tanker's and Doogs builds are reflected on the main page. By all means give me a heads up if i left out anything or anybody. Coming back from the USA i have to get up to speed again and i am not sure if i forgot something. My sincere apologies to all of you if any such thing happened and i will sort any problem out after a PMWink Feels good to be back.

As for my own plans for the group:

A few days ago i scored big on a dutch internet hobby shop. Everything they had left in stock was 50% off and amongst the items i purchased was Dragon's T34/76 with "captured" german markings. I expect to get it in somewhere next week. Most probably this kit will be my next build, either as a standard russian tank or as the boxart german one with added commanders cupola. Not sure yet...

Richard

"Success is the ability to go from one failure to another with no loss of enthusiasm." - Sir Winston Churchill

  • Member since
    July 2008
  • From: USA California
Posted by vetteman42 on Thursday, November 11, 2010 5:43 PM

DoogsATX I cant say it any better than what Kermit said, they are both stunners my man. Love the camo on them and all the little extras like antenna wires and such very very well done. YesYesBow Down

I just might hafta find me one of those La-5 kits.

Randy So many to build.......So little time

JOIN OUR COMMUNITY!

Our community is FREE to join. To participate you must either login or register for an account.

SEARCH FORUMS
FREE NEWSLETTER
By signing up you may also receive reader surveys and occasional special offers. We do not sell, rent or trade our email lists. View our Privacy Policy.