SEARCH FINESCALE.COM

Enter keywords or a search phrase below:

The Ostfront (eastern front) GB 2010/11

106899 views
900 replies
1 rating 2 rating 3 rating 4 rating 5 rating
  • Member since
    June 2010
  • From: Austin, TX
Posted by DoogsATX on Friday, October 1, 2010 4:30 PM

I guess I can see the utility of having more than one build going on, especially as in the case of the Wildcats where I've had to wait for parts or decals, or for things to dry. It's nice to be able to jump over to something else. 

But...I'm typically very much a unitasker, and like to drive through until something's done. Juggling multiple builds is outside my comfort zone.

On the Bench: 1/32 Trumpeter P-47 | 1/32 Hasegawa Bf 109G | 1/144 Eduard MiG-21MF x2

On Deck:  1/350 HMS Dreadnought

Blog/Completed Builds: doogsmodels.com


  • Member since
    March 2010
  • From: Brisbane
Posted by Julez72 on Friday, October 1, 2010 11:32 PM

I have 2 or 3 on the go at any one time, a prime one and a couple that i tinker with when i'm waiting for paint to dry or parts to arrive......

WIP pic....I did get the preshade on, not really sure how effective it will be on armour but i figured that i'd paint and finish it it pretty much the same way i'd do an aircraft...


  • Member since
    June 2009
  • From: Netherlands
Posted by kermit on Friday, October 1, 2010 11:35 PM

Thank you all for your comments. I am having a real blast with this one!Wink Yes, in it's current state it is too shiny as the paint i used was semi gloss. I am very confident i can eventually get that right by using matte varnish by the end of this build.

Had a bit of a mishap yesterday night applying the first dark wash on the tank....knocked over the cup with (waterbased) paint on the edge of my keyboardZip it!Super Angry DOH... Now my laptop's keyboard is out of comission. Luckily i got it to work again using a USB keyboard attached to it.... Will have to sort that out later...

And i have to say i agree with what aaronw said. I simply cannot work on one model at the same time due to moodswings/ attentionspan problems. I usually have two/ three builds going on with the occasional 4....

Richard

"Success is the ability to go from one failure to another with no loss of enthusiasm." - Sir Winston Churchill

  • Member since
    June 2010
  • From: Austin, TX
Posted by DoogsATX on Saturday, October 2, 2010 8:50 AM

kermit

Had a bit of a mishap yesterday night applying the first dark wash on the tank....knocked over the cup with (waterbased) paint on the edge of my keyboardZip it!Super Angry DOH... Now my laptop's keyboard is out of comission. Luckily i got it to work again using a USB keyboard attached to it.... Will have to sort that out later...

Eesh! Seems to be a rash of liquid-related computer issues of late. My tip - if you're using a laptop, keep and liquid toward the back corners. This way if you knock it chances are it'll be back and away from the computer. 

Anyway, glad you got it at least limping along again. My dad spilled a glass of wine into his Mac yesterday and, well, let's just say it has a low tolerance.

Cranked on the Yak-3 last night. Drybrushing, sludge wash, seatbelts, and major cockpit assembly. I'm finding that the cockpit pieces rely on a lot of rather vague fits. That is, they fit well, but there's no "snick" of pieces clicking exactly into place the way I've been experiencing with the Zvezda La-5. Got around this by busting out my Loctite outdoor adhesive. It strings really bad, but it's got probably five minutes of working time before it firms up, and an hour before it cures. Love this stuff, because it lets me get stuff in place, then slide the fuselage down and make any adjustments (instrument panel, etc).

Belts are modified Eduard early RAF belts.


On the Bench: 1/32 Trumpeter P-47 | 1/32 Hasegawa Bf 109G | 1/144 Eduard MiG-21MF x2

On Deck:  1/350 HMS Dreadnought

Blog/Completed Builds: doogsmodels.com


  • Member since
    June 2009
  • From: Netherlands
Posted by kermit on Saturday, October 2, 2010 12:00 PM

Julez,

Interesting that you have chosen the preshade. I did not do that to my own tank as i accentuated the outlines with drybrushing and washes but it is very interesting to watch your approach to the matter. Love the work sofar buddy!Wink

Doogs,

That is simply a flawless pit you have there. The IP really stands out and i do love the way you treated that flooring. Did you accomplish that rusty/ dirty effect by wash or paint?

As for me i have two builds going on, not just the KVSmile. I sprayed the tan this morning, applied a coat of future once cured and just now i have used putty to outline the medium green camo. A first time using this method. Hope it turns out ok...:

And like i said, the KV has received a black waterbased wash to get it dirtier:

Sooo,..... lots to do this weekendBig Smile. Keep u guys posted ofcourse

Richard

"Success is the ability to go from one failure to another with no loss of enthusiasm." - Sir Winston Churchill

  • Member since
    June 2010
  • From: Austin, TX
Posted by DoogsATX on Saturday, October 2, 2010 1:36 PM

kermit

Doogs,

That is simply a flawless pit you have there. The IP really stands out and i do love the way you treated that flooring. Did you accomplish that rusty/ dirty effect by wash or paint?

Thanks man! I'm not entirely happy with the way the seat padding came out - there contours make it a bear to get the paint right, and the MM Leather seems a bit too shiny. Need to hit it with some flat before I close everything up. Might try some drybrushing and another wash before I do. Also not really happy with the lack of detail on the radio deck, but I haven't been able to track down any pics to see what it should look like, so I'm leaving it spartan.

The flooring was painted with Vallejo Light Gray, then drybrushed with MM Aluminum, then MM Rust, then sludged in Promodeller's Dark Dirt wash. I'm still not sold on the stuff for big external work, but I love what it does in cockpits and gear bays.

Eager to see how the Sturmovik camo goes. I'll be trying the same approach with my VVS birds. Also have me a nice set of White Ensign VVS colors to try out when the time comes.

On the Bench: 1/32 Trumpeter P-47 | 1/32 Hasegawa Bf 109G | 1/144 Eduard MiG-21MF x2

On Deck:  1/350 HMS Dreadnought

Blog/Completed Builds: doogsmodels.com


  • Member since
    June 2009
  • From: Netherlands
Posted by kermit on Sunday, October 3, 2010 3:35 AM

Well... camo has been applied and the entire lot received a coat of future prior to the decals. I have to say that, even though i need to get some more experience using this method, the "sausage" technique works like a charm!Big Smile. I used to always use tape to mask camouflage but ofcourse this always gives hard edge jobs. This softer way looks very cool.

Not having the convenience of specific VVS colors i mixed them up myself utilizing fs numbers and color samples. I really liked the mid green and anthracite over tan version. Hope you guys like it!Wink

Richard


"Success is the ability to go from one failure to another with no loss of enthusiasm." - Sir Winston Churchill

  • Member since
    March 2010
  • From: Brisbane
Posted by Julez72 on Sunday, October 3, 2010 3:49 AM

Richard, Doogs...

Very cool guys, keep the wip pics comingYes


  • Member since
    June 2010
  • From: Austin, TX
Posted by DoogsATX on Sunday, October 3, 2010 8:21 AM

Very cool, Richard! Glad to see the sausage method worked so well! 

Does the Revell paint dry that glossy or are things glossed up ahead of decals?

On the Bench: 1/32 Trumpeter P-47 | 1/32 Hasegawa Bf 109G | 1/144 Eduard MiG-21MF x2

On Deck:  1/350 HMS Dreadnought

Blog/Completed Builds: doogsmodels.com


  • Member since
    June 2010
  • From: Austin, TX
Posted by DoogsATX on Sunday, October 3, 2010 8:55 AM

Decided to spend some time on the La-5 last night. Got the cockpit knocked out, masked and glued the windows behind the cockpit, and mounted the interior "doors" for the exhausts. The more time I spend with this kit, the more I love it. It reminds me of an Accurate Miniatures kit in the way you can't really test fit everything to make sure it all fits together, but once you roll the dice, it somehow all lines up just right. The fit is so good that the fuselage, engine, and wings will stay together with just a single piece of tape to keep the fuselage snug out back.

Looking forward to busting out the touch-n-flow tonight and sealing up this and the Yak. At some point I'm going to have to do some painting around the exhaust ports and the steel plates just aft. I might also hit the backside of the engine with a little something, since there's more visible through the exhaust ports than I thought.


On the Bench: 1/32 Trumpeter P-47 | 1/32 Hasegawa Bf 109G | 1/144 Eduard MiG-21MF x2

On Deck:  1/350 HMS Dreadnought

Blog/Completed Builds: doogsmodels.com


  • Member since
    March 2010
  • From: Brisbane
Posted by Julez72 on Sunday, October 3, 2010 9:18 AM

Doogs, sounds like your enjoying the Zveda kit....I've just finished the Hasegawa 109 G2 trop and i'm eying off the Zveda 109F at the LHS, i like the option of showing the engine but i've resisted so far, that is till i saw your latest pics, if the quality is a high as it looks i think i should add it to the to do list....


  • Member since
    June 2010
  • From: Austin, TX
Posted by DoogsATX on Sunday, October 3, 2010 11:50 AM

Julez72

Doogs, sounds like your enjoying the Zveda kit....I've just finished the Hasegawa 109 G2 trop and i'm eying off the Zveda 109F at the LHS, i like the option of showing the engine but i've resisted so far, that is till i saw your latest pics, if the quality is a high as it looks i think i should add it to the to do list....

Julez - Go for it! The La-5 has been a great kit so far (I might even go so far as to say it's my favorite of the kits I've built since getting back into modeling), and everything I've read says the 109 is better. And considering you can pick it up for about the price of Tamiya's E Trop, it's a no-brainer IMO. 

Got one in my stash and it looks fantastic. I'm trying to hold off and get a few more kits under my belt before I take it on...but after this La-5 that might be tough!

On the Bench: 1/32 Trumpeter P-47 | 1/32 Hasegawa Bf 109G | 1/144 Eduard MiG-21MF x2

On Deck:  1/350 HMS Dreadnought

Blog/Completed Builds: doogsmodels.com


  • Member since
    March 2009
  • From: East Bay, CA
Posted by Lundergaard on Monday, October 4, 2010 11:07 AM

You guys are literally flying thru this GB!  I'm a bit behind as i'm moving house mid month and have infant twin girls to contend with as well.  But... i did manage to get started at least and get a little bit done.

This is my first GB and only my 3rd tank (airplane guy) so i'm going slow and being thorough.  So far theDML kit and the Friuls are excellent, esp the Friuls!  Some pics... more to follow as i progress.


  • Member since
    June 2010
  • From: Austin, TX
Posted by DoogsATX on Monday, October 4, 2010 11:26 AM

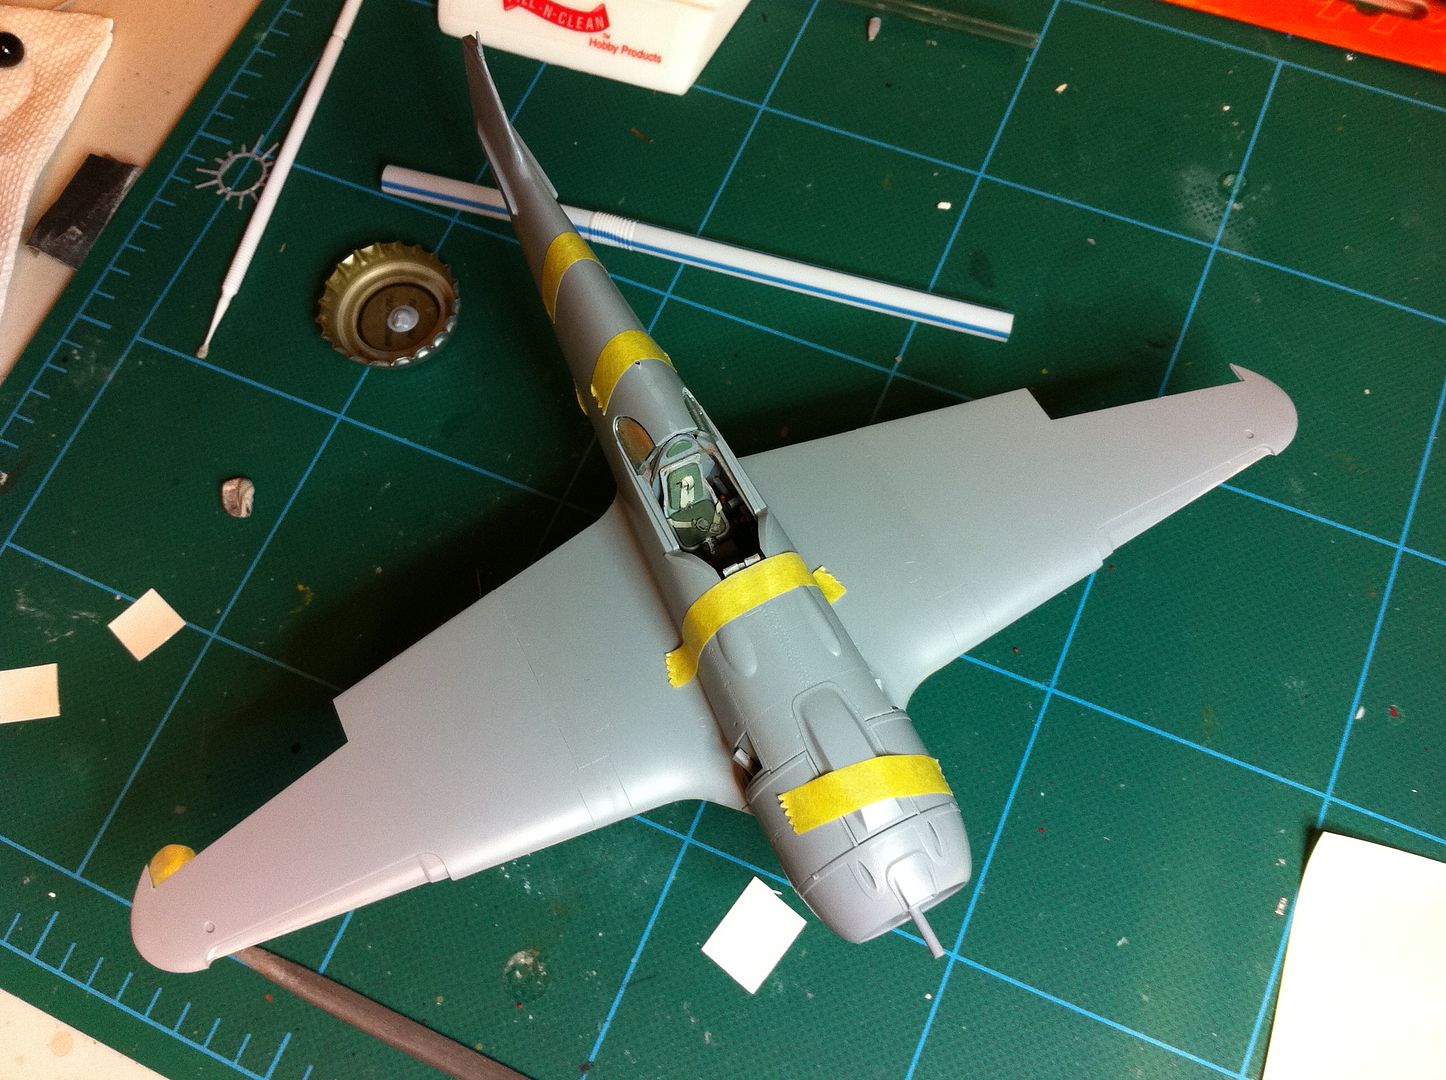
Closed up the fuselages on the Yak and La-5 last night. Overall things went swimmingly, and putty use should be pretty minimal.

I didn't really notice until last night, but the Yak's plastic is surprisingly hard. It was also a bit resistant to Tenax's charms, but finally melted in the end. 

One curious thing, the kit includes a little mounting pin for the prop spinner that you're supposed to install from the inside of the fuselage before you glue the gun deck/upper cowl in place. The instructions state very specifically DO NOT GLUE, but it's basically just a pin that sticks through a hole with nothing to keep it from falling out and getting lost in the fuselage. I ended up just gluing it down, but the ridiculousness of it had me chuckling for a few moments.

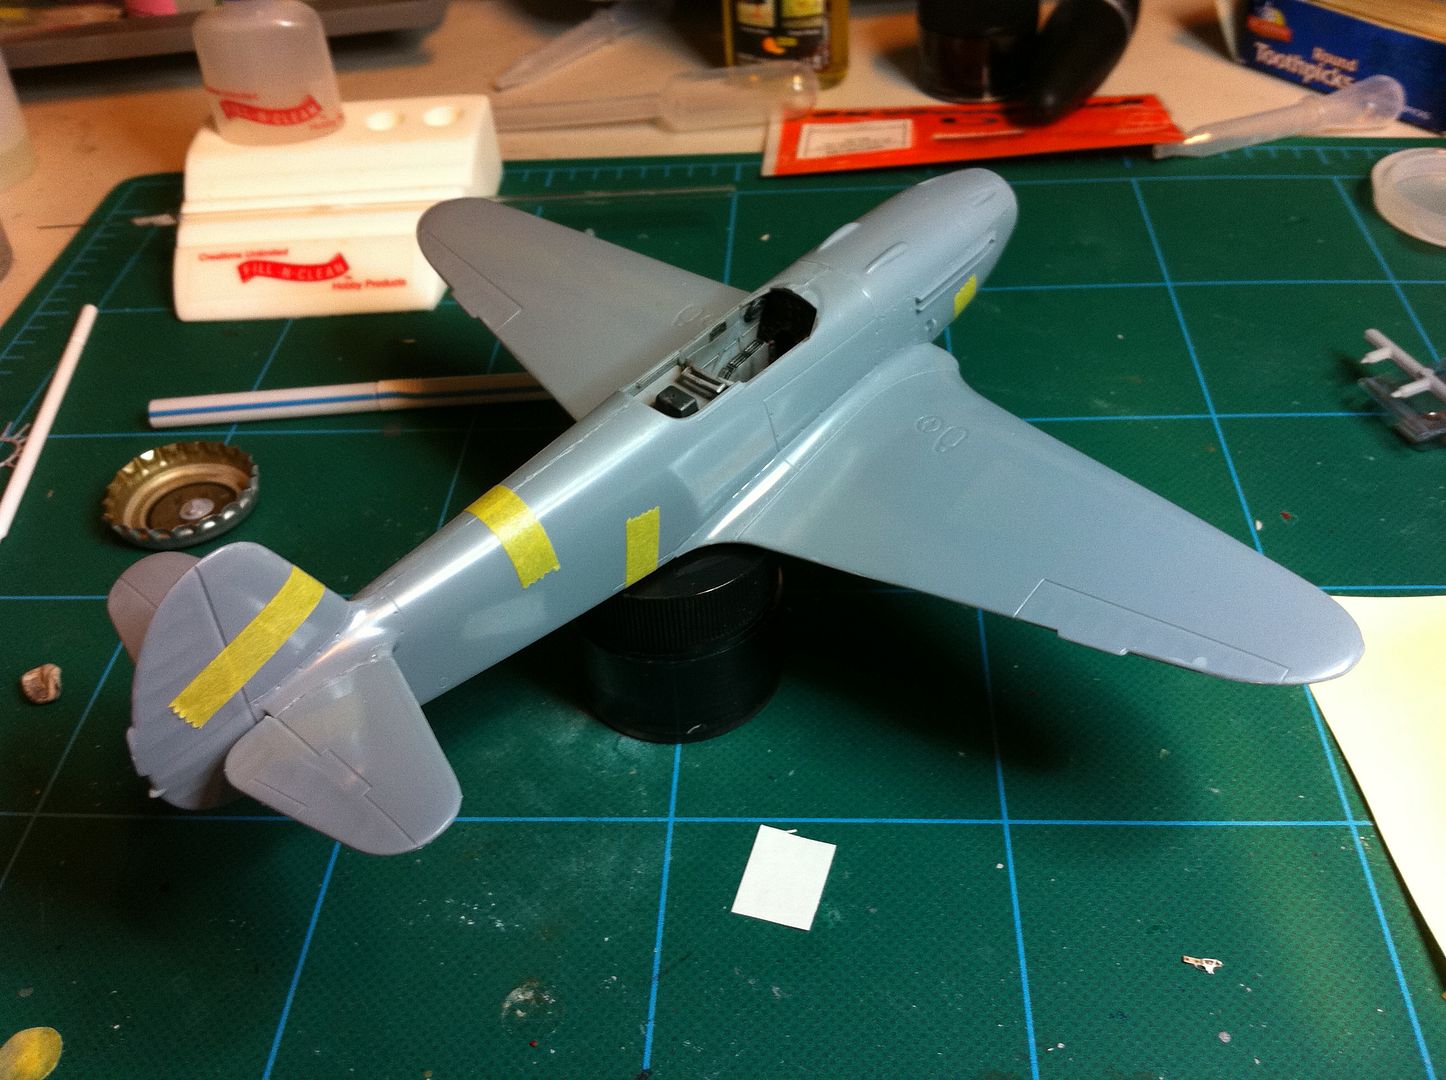
The Zvezda La-5 went together with very few problems, but for anyone who's considering building this kit, I highly recommend starting with the mission critical seams first. I started by tacking the very forward strips of the fuselage ahead of the exhaust ports to the wing root from the inside. A lot of stuff has to mount up there so that alignment is probably the most critical. Next I did the fuselage/wing seam aft of the exhaust plates. The fit was good enough that I left the seam alone between the wing root and the steel exhaust plates so I wouldn't lose any of the detail there. 

From there it was on to the upper fuselage haves and so on. There are a few areas that are going to need putty, but nothing bad and most of it far away from any fragile surface detail.

Once everything had a bit of time to firm up, I finally got to test fit the forward bodywork. This all kind of comes in place around the engine (and various bits can be left off if you want to show off the engine and guns) in four pieces - the upper gun access panels, left and right cowl panels, and the forward cowl circle. Even with the great fit so far, these had me worried. 

Fortunately, they all lined up pretty well. There's a protrusion coming forward from the lower wing that supports the engine and ends up butting up into the forward cowl ring. This is cocked up a millimeter or two too high and sort of throws things off, but it and the upper gun panel piece both join up with the cowl ring, so it should be easy enough to weld things into proper position and then mount the engine access panels from the side.

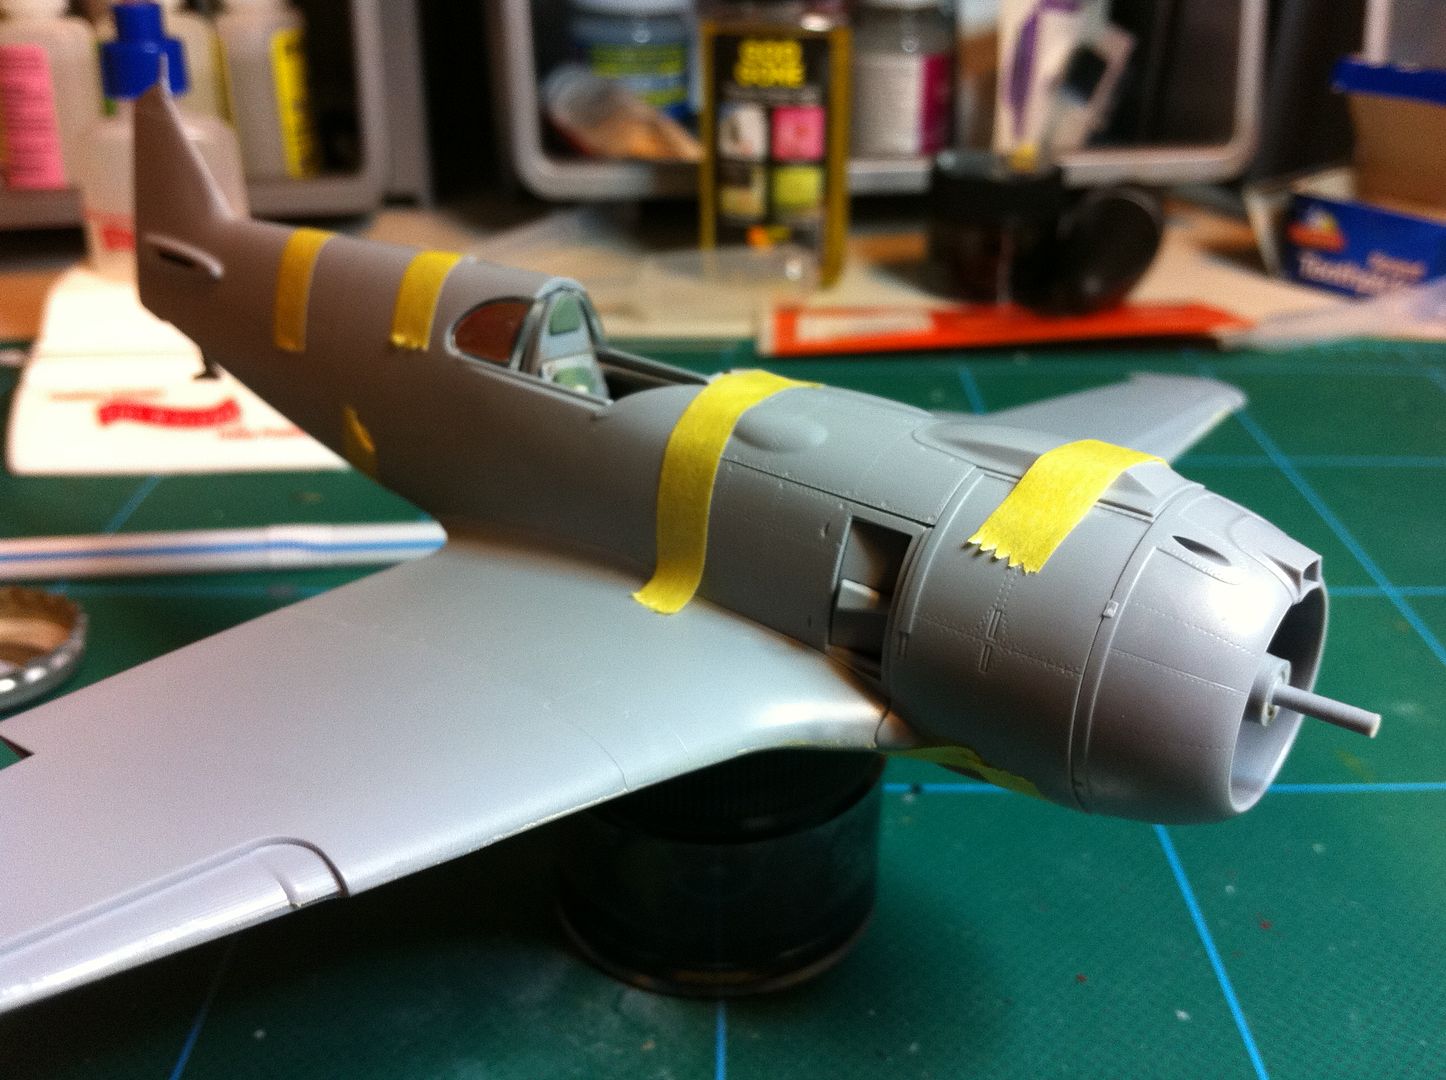
Something else I noticed...as this plane goes together it's becoming VERY obvious that it's basically an older, smaller airframe with a big honkin' engine shoved onto the front. Kinda makes me want to find some scale duct tape to finish it off with!

On the Bench: 1/32 Trumpeter P-47 | 1/32 Hasegawa Bf 109G | 1/144 Eduard MiG-21MF x2

On Deck:  1/350 HMS Dreadnought

Blog/Completed Builds: doogsmodels.com


  • Member since
    June 2010
  • From: Austin, TX
Posted by DoogsATX on Monday, October 4, 2010 11:32 AM

Lundergaard - loving the T-34/76 so far! I'm an aircraft guy myself, and I'm planning to dip my toe into the armor pool sometime soon (with a T-34/85...), so I'll be following your build with interest.

Those Friuls look pretty, by the way! I'm so tempted, but I don't know if I can justify them on a $15 Zvezda kit...

On the Bench: 1/32 Trumpeter P-47 | 1/32 Hasegawa Bf 109G | 1/144 Eduard MiG-21MF x2

On Deck:  1/350 HMS Dreadnought

Blog/Completed Builds: doogsmodels.com


  • Member since
    March 2009
  • From: East Bay, CA
Posted by Lundergaard on Monday, October 4, 2010 11:58 AM

Doogs... the Friuls are really impressive.  I was kind of weirded out spending that much money on AM but i think they will really take the model up a notch (if i don't bugger them up!)  Tongue Tied  I really only have time for about 2-4 kits a year anyway so it was worth the extra $$$ to do it up big.

The "magic tracks" seemed more daunting to me and i was worried about proper assembly, curing, painting and weathering on them.  With the friuls they are workable so i can assemble them and do what i need to do off the tank and put them on right when i'm finished and ready to attach road wheels and final weathering.  just made more sense to me in the order of things.

I'll post more pics as i progress but it might be a while as i have to set up a new work area when i move.  Soon i hope!

cheers

andy

  • Member since
    October 2009
  • From: Fort Collins, Colorado, USA
Posted by Njal Thorgeirsson on Monday, October 4, 2010 6:58 PM

WOW!

 I haven't been following this GB closely enough, but it looks like we need to get some more armor progress pics!!! Here's some of the progress I've made on my Nebelkraftwagen. Construction is about 8 hours from completion, I think. Going well- I'll post more pics and details when she's ready for paint.

Photobucket

Photobucket

Photobucket

Photobucket

Photobucket

FACEBOOK: Ryan Olson Thorgeirsson for pics of all my builds.

"There are two kinds of people in this world; those who put fries/chips on their sandwiches, and those who don't enjoy life."

PhotobucketPhotobucket

  • Member since
    April 2005
Posted by Thunderbolt379 on Monday, October 4, 2010 11:27 PM

Yo, Kermit, thou Exalted Green One!

I expressed an interest in this GB when you first mooted it but have been waaay too busy with other stuff to even realise it had started (I just finished my (first) Fw 190 for RD III yesterday). I was reading through some early pages and there was some dispute as to the actual theme of the build, "Russian Front" and whether that covered Barbarossa... What was the verdict on that?

I ask as I was interested in an early Barbarossa Bf 109 as my entry -- would that be covered by the fine-tuned theme of the event?

Cheers, Mike

http://worldinminiature.blogspot.com/

  • Member since
    March 2010
  • From: Brisbane
Posted by Julez72 on Tuesday, October 5, 2010 4:13 AM

Wow there's all sorts of kits being built in here....Very cool builds guysYes

Doogs, So you talked me into it, i picked up the Zvezda BF 109F today and it's an impressive looking kit, lots of detail in the box with an awesome looking engine...Looking at it's layout it's obvious that it's going to be the base of later MK's to come so i'm expecting to see G's and K's in the future...I do have two small gripes, no panel lines on the wing uppersurface which need to be scribed in but it's only 2 lines, the prop also, one of the blades is a short shot....Hope it goes together as well as your kits areYes


  • Member since
    June 2010
  • From: Austin, TX
Posted by DoogsATX on Tuesday, October 5, 2010 11:27 AM

Julez - I'm very far from a 109 expert, but was reading a thread on another forum when I was contemplating this kit, and apparently the F-2 didn't have panel lines on the upper wings (think the F-4 did though...):

Agreed about the prop. Ultracast I think makes an aftermarket spinner/prop combo that I might take a look at when the time comes to build this puppy.

Still amazed they managed to fit so many pieces into so small an aircraft...

On the Bench: 1/32 Trumpeter P-47 | 1/32 Hasegawa Bf 109G | 1/144 Eduard MiG-21MF x2

On Deck:  1/350 HMS Dreadnought

Blog/Completed Builds: doogsmodels.com


  • Member since
    November 2009
  • From: LaSalle, Ontario, Canada
Posted by bouttime on Wednesday, October 6, 2010 7:45 PM

Evening Gents

Made quite a bit of progress the last two nights. Thought I'd be further but was getting some water out of the airbrush so I had to work in the maintenance department. Not good having the regulator / water separator mounted right to the compressor so I ran about a 5' coil of copper tubing from the compressor then to the regulator. Theory is good we'll see in practice. Anyway here are some updated pics.

And this is the way we sand the wheels, sand the wheels, sand the wheels, this is the way we sand the wheels so early in the morning...........


Comments and suggestions always welcome


  • Member since
    September 2015
  • From: The Redwood Empire
Posted by Aaronw on Thursday, October 7, 2010 10:31 PM

Wow, I'm away a few days and the place is filling up with armor. Smile 

Doogs, the LA-5 is coming along really well. I think you are right as far as cramming a huge engine into an older plane, I believe the La-5 is basically a radial engine version of the LaGG-3.

Mike it's not my GB but I can't imagine how an Eastern Front GB would exclude Barbarosa, without it, there would not have been an eastern front.


The MiG-3 has been done for awhile now, but thought I better get a photo of the completed model up.

  • Member since
    April 2005
Posted by Thunderbolt379 on Thursday, October 7, 2010 11:03 PM

Aaron -- hi man! Nice MiG!

Well, I've had a look through and it looks like the thematic doubt was resolved way back, there are certainly Barbarossa-era types happening, so I feel confident to field a Bf 109 F-2. I'll wait for Kermit's formal okay before posting anything.

Cheers, Mike/TB379

http://worldinminiature.blogspot.com/

  • Member since
    June 2009
  • From: Netherlands
Posted by kermit on Thursday, October 7, 2010 11:17 PM

Thunderbolt,

Yes it applies. Operation barbarossa enttailed the initial german attack on russia and lasted till the end of 41. It started the war on the eastern front as a whole.

I called my own GB the eastern front gb at the time to be able to include all combatants of the time as well as have room to include lend lease material.

Long story short: youre in and have funBig Smile. Ill update the list as soon as i can buddy.

Richard

"Success is the ability to go from one failure to another with no loss of enthusiasm." - Sir Winston Churchill

  • Member since
    April 2005
Posted by Thunderbolt379 on Friday, October 8, 2010 12:10 AM

Hi Richard,

Thanks, buddy! Okay, here we go with the details:

Hasegawa 1:48 Bf 109 F-2, kit# 09010/J10, in markings for Werner Molders, commanding JG 51 in the autumn of 1941.


It'll be an essentially OOB build, with my usual addition of radiator actuator rods from styrene, and using Eduard masks, EZ Line for the antenna, and probably a Model Master enamels paintjob. I've wanted to do this one for a long time, here's a colour profile from around 1980 that whetted my appetite for this plane long ago:


Middle of the three -- note at that time research suggested a white background and yellow surround to the JG 51 crest. Also the artist seems to have inserted a lot of green in the scheme, though it could be an interpretation of RLM 74. The kit plans indicate a standard 74/75/76 scheme, and the design gives me a chance to try my hand at heavy mottling.

I'm hoping to get some preliminary spraying done on the cockpit parts today, then cruise through building.

Many thanks -- if this one goes as well as it should, I might come back for a winter scheme too!

Glad to be aboard,

Mike/TB379

http://worldinminiature.blogspot.com/

  • Member since
    March 2010
  • From: Brisbane
Posted by Julez72 on Friday, October 8, 2010 6:21 AM

Doogs, thanks for posting that pic buddy, i would have gone and scribed them without even looking....

Mike, Nice build choice, i like that schemeYes


  • Member since
    June 2010
  • From: Austin, TX
Posted by DoogsATX on Friday, October 8, 2010 2:08 PM

Well, I've cleared the Wildcats off the bench so I should be able to focus exclusively on the Yak and La-5 now.

Except I have to fly out to San Diego most of next week for a video shoot. Doh!

On the plus side of things, the Austin SMS model contest/show is tomorrow. It'll be my first time, so I have no idea how big it'll be, but I've got my fingers crossed that I might happen upon some T-34 Friuls on a dealer table.

On the Bench: 1/32 Trumpeter P-47 | 1/32 Hasegawa Bf 109G | 1/144 Eduard MiG-21MF x2

On Deck:  1/350 HMS Dreadnought

Blog/Completed Builds: doogsmodels.com


  • Member since
    June 2010
  • From: Austin, TX
Posted by DoogsATX on Friday, October 8, 2010 2:09 PM

Julez72

Doogs, thanks for posting that pic buddy, i would have gone and scribed them without even looking....

No problem! I always love research that leads to less work!

On the Bench: 1/32 Trumpeter P-47 | 1/32 Hasegawa Bf 109G | 1/144 Eduard MiG-21MF x2

On Deck:  1/350 HMS Dreadnought

Blog/Completed Builds: doogsmodels.com


  • Member since
    April 2005
Posted by Thunderbolt379 on Friday, October 8, 2010 10:44 PM

Don't you hate it when you trust the kit plans, and only later find out they're wong?

I'm not letting the grass grow, my Bf 109 F-2 is well along in construction, and as it's my first time on the F variant I'm feeling my way. The plans mentioned carving away the corner fillets to change the circular main gear wells to more squared off, and as I had done this on the K-4 my hands naturally followed suite as my mind wondered vaguely if it was the G series in betweem that had the round openings. Then of course I discovered it was the F. Bang Head

The engine cowl is being all kinds of nuisance, Hasegawa did not do a great job of engineering it, or the cowl guns. At this point I have the port cowl on, the starboard panel will be fitted to it with much pushing and pulling, and inevitably some filling, so if there was a hinge line on the midpoint of the real thing, it won't be there on this one...

No matter, while the devil is indeed in the details, the model will still be a looker!

Cheers, Mike/Tb379

http://worldinminiature.blogspot.com/

  • Member since
    March 2010
  • From: Brisbane
Posted by Julez72 on Friday, October 8, 2010 10:47 PM

Bouttime, Nice work on the Panzer IIIYes I'm doing my first armour build at the moment, a Tamiya Panther and i keep looking at the 2000 roadwheels on it, not looking forward to painting all the rubber by hand...

Aaron, Great job on the MigYesYesYes It looks very sleek and powerful....

Doogs, whats your take on the decal sheet that came with the Zvezda 109F??? Have fun at the show and make sure you take a fat walletToast


JOIN OUR COMMUNITY!

Our community is FREE to join. To participate you must either login or register for an account.

SEARCH FORUMS
FREE NEWSLETTER
By signing up you may also receive reader surveys and occasional special offers. We do not sell, rent or trade our email lists. View our Privacy Policy.