SEARCH FINESCALE.COM

Enter keywords or a search phrase below:

Hunting After Dark, 2011-2012 Night Fighter Group Build

251634 views
1422 replies
1 rating 2 rating 3 rating 4 rating 5 rating
  • Member since
    October 2009
  • From: Texas
Posted by Gregbbear on Friday, May 4, 2012 10:55 AM

Trey, looking good!  I am always so impressed by your skill with washes and detailing.  You always give such great depth, and realism. 

For the black on the -5N, I used Floquil grimy black with a few drops of flat black, to darken it some.  I am going to try and get some weathering done on it later today.  From all the photos I've seen, they have a lot of exhaust staining down the sides, and a tremendous amount of chipping.

Cheers,

Greg

- yat yas!


  • Member since
    September 2003
  • From: Australia
Posted by Helo H-34 on Friday, May 4, 2012 11:11 PM

Greg , your -5N is looking great . I was recently reading through the Osprey Modelling book , "Modelling the F4U Corsair " by Brett Green and there is a chapter on building the High Planes 1/72 F4U-5N . I've been using the book as my main reference for my Korean War F4U-5N build , although I only used the High Planes front end and grafted it onto a Italeri F4U-5N . I'm still yet to get the fuselage halves glued together , so your way ahead of me Greg .

Here's several pic's from the book of the F4U-5N Corsair that Brett Green built ...

The exhaust stainning is excellent as with the overall build I hope mine can look half as good as Mr Greens and yours Greg .

As for my stalled Night Fighter builds , I'm finally back working on the B-57G Canberra and I'm looking to finish the painting this weekend . I had started a C-123K Provider Flare Ship . P-70 and KA-50 Soviet helicopter but nothing has progressed passed airbrushing the interior pieces .

I'm now thinking and are quite keen to start the 1/72 Testors/Italeri AC-119K Stinger Gunship kit ;

Except for the additional weapons sprue , everything else is the same as the Italeri C-119G kit ;

For the markings , I have Zoltz's Gunships Over Vietnam Decal sheet ;

Mine will be "the Pea-nut Special" .

I'll trim the fuselage halves and interior pieces from the sprue and airbrush those , with more progress pic's tomorrow .

John .

  • Member since
    September 2003
  • From: Australia
Posted by Helo H-34 on Saturday, May 5, 2012 8:03 AM

I got some airbrushing done this evening of the fuselage interior pieces

The wing halves are glued together along with the two tail booms and stabilizer piece and the main wheel well inserts are glued into the lower center wing pieces . The kit plastic has a soft feel about it and is easierly scratched . I've been working on two newer release Flying  Boxcar's , a C-119C and C-119G and the gray plastic on those builds definitly feels firmer . I bought my AC-119K from a seller on amazon.com , the kit was almost $150. which included shipping to Australia .So I'm determined to make a good effort in getting it together and looking fairly reasonable .

More progress pic's tomorrow .

John .

  • Member since
    October 2009
  • From: Texas
Posted by Gregbbear on Saturday, May 5, 2012 10:24 AM

Looking good John.  I like those Zotz decals, I am definetely going to order a set.  A pregnant Lucy, good grief!  That is funny!  And thanks for the -5N pictures.  That is an excellent build.  I might have to look around for that book.

Cheers,

Greg

- yat yas!


  • Member since
    September 2003
  • From: Australia
Posted by Helo H-34 on Saturday, May 5, 2012 8:11 PM

I thought it might be a good idea for my own reference if I took some measurements and photo's of the unique weapons that are on the Italeri AC-119K Stinger , although most of the parts would probably be difficult to scratch build , I figured I would take some pic's anyway as I would no doubt kick myself later on if I didn't . Anyway I thought I would post them here , I'm not sure if they will be of any use to anyone else , but what the heck ...

These are the main guns in the cabin of the AC-119K

Here's two pic's of  the flare launcher and illuminator pieces

Here's two pic's of the AN/APQ-133 Beacon Tracking Radar dome

Next are the jet engine pods , which would probably be difficult to scratch build

Here's a couple of pic's of the nose cone and under fuselage AN/AAD-4 Flir Turret

Finally , the left fuselage side showing the square openings for the guns

As I said , it's mainly for my reference and if anyone wants some closer pic's of any of the parts , I'm only too happy to post them .

I'll glue the small round windows into the fuselage halves next , paint the cockpit seat cushions and then start glueing the cockpit in place .

John .

  • Member since
    October 2009
  • From: Texas
Posted by Gregbbear on Saturday, May 5, 2012 8:51 PM

Thanks for the pictures John.  That will help me out quite a bit.  Luckily, all I will need to build will be the flare launcher, searchlight, and night observation sight.  The measurements will help make that easier too.  If I get lucky and find a Stinger reasonably priced, I will try and make resin copies of those pieces and add them to my G Shadow.

Cheers,

Greg

- yat yas!


  • Member since
    August 2009
  • From: Borlando Fla home of the rat
Posted by TREYZX10R on Sunday, May 6, 2012 2:46 PM

Greg thanks so much for the kind compliment,really appreciate it. The  dark colors are difficult to get the 'look' right on,you pulled it off nicely on the Corsair. Yes they did get pretty beat up some good leading edge chipping in this pic I found on line

John very cool subject ,love the old Gunships!

I've made some headway on the wing. The kit has been made like the Dragon Ju-88 so that various versions can be done off a single main mold. This does present fit issues,the main ones being gaps around the intakes and gun ports. I used some sheet to back fill the worst gun port on the port wing and green squadron for the rest as they were'nt to severe.

I also tried Fermis method for the nav lights using some clear sprue

After several dry fits I secured the wing in place and finish sanded all the seams

Then fitted up the flaps,there was not a real good fit with these and mounting them up was a tad tricky as you have to 'geuss at the proper angle. Also no solid attach point so they move around a lot while the gue sets,very aggravating indeed

Almost ready for some paint now!


  • Member since
    September 2003
  • From: Australia
Posted by Helo H-34 on Sunday, May 6, 2012 5:41 PM

Trey , awesome WIP and fix on the Hobbycraft F4U-2 Yes

I've made some more progress on my Stinger

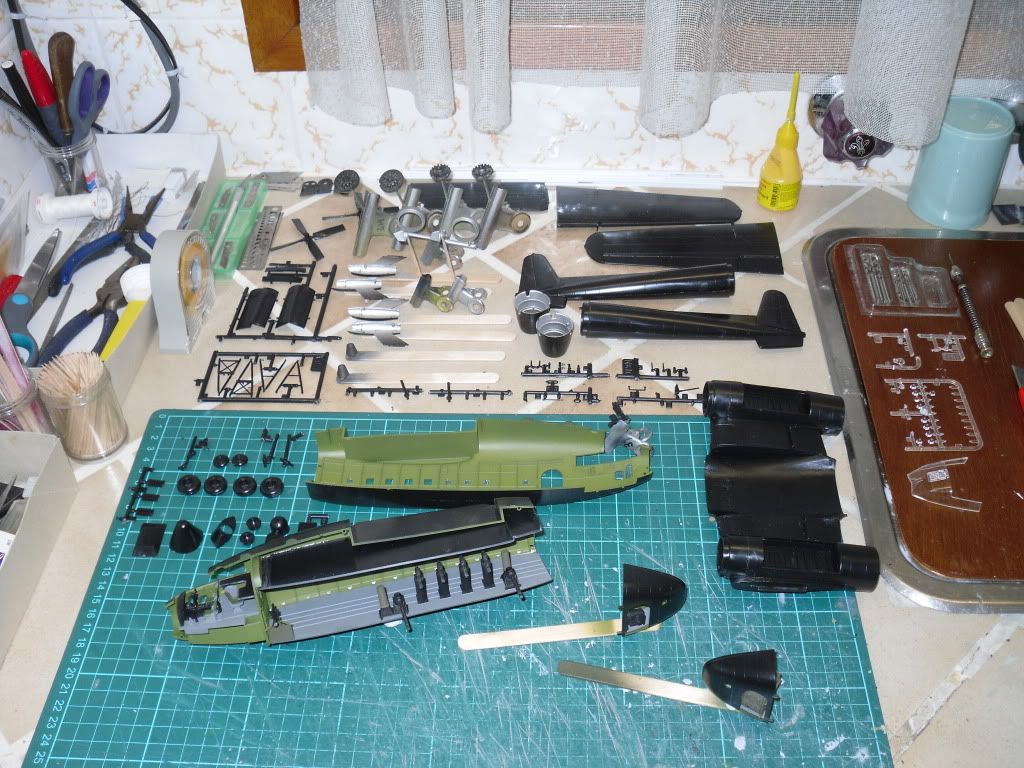
The cockpit and guns are glued in place , so the fuselage halves are ready to glue together .

There are a couple of issues with the cockpit , firstly the table at the rear of the cockpit sits too high and the edge of the table can be seen through the right side of the fuselage cockpit window . I originally discovered this while building the C-119C and G models recently and here's a pic from my files as to what i did to fix the error

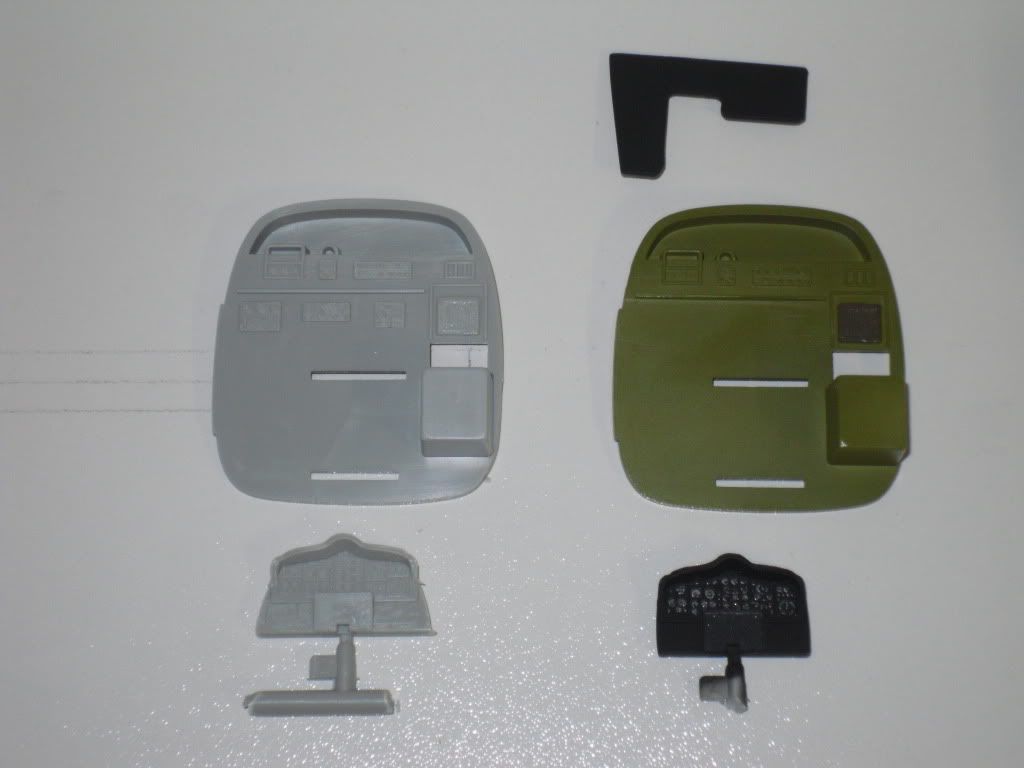
I filed down some of the raised detail on the rear cockpit wall so I could lower the table and aslo you will notice that I filed the sides of the main instrument panel . I had difficulty trying to close the nose section on my first C-119C build and the join kept opening up until I realised what the problem was and pulled the instrument panel out . So those two issue's seem to be standard fix's with the C-119 build and I did accordingly with my Stinger build

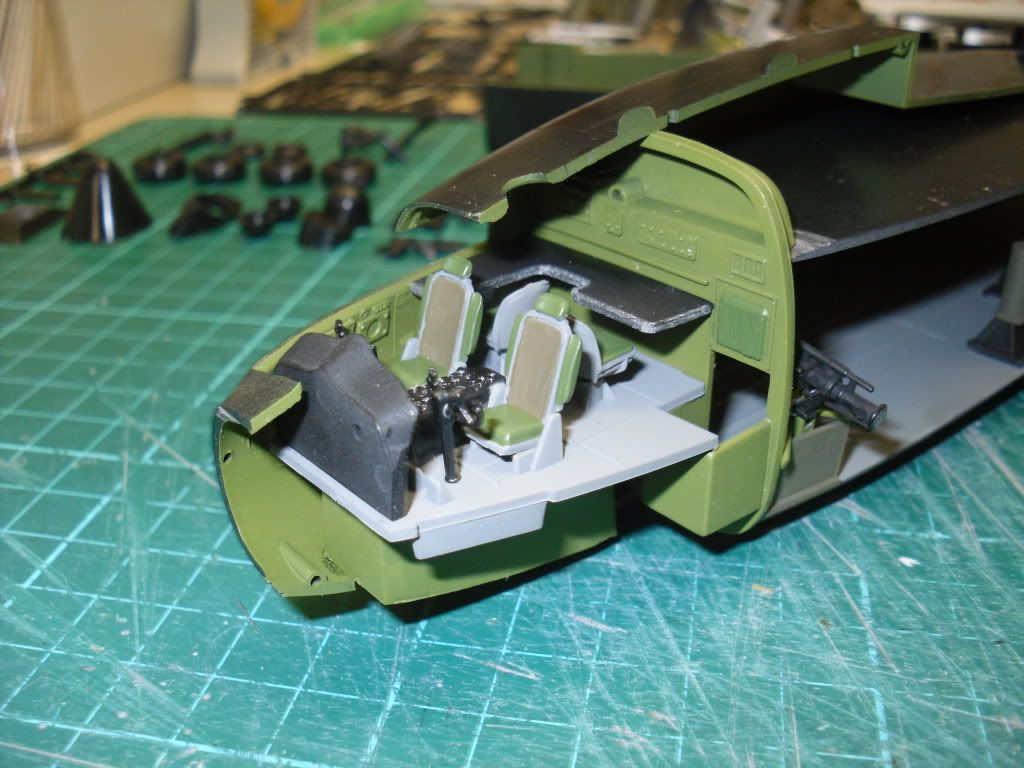
The guns look okay glued in position

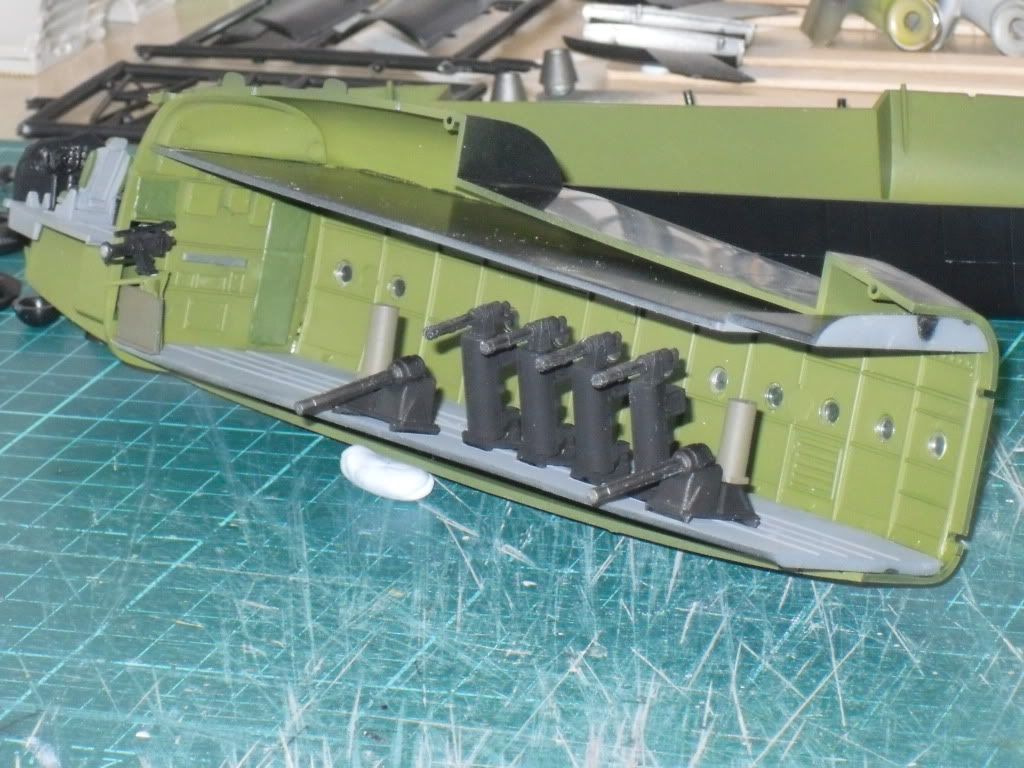
And the Flare Launcher and xenon light seem to fit in place okay

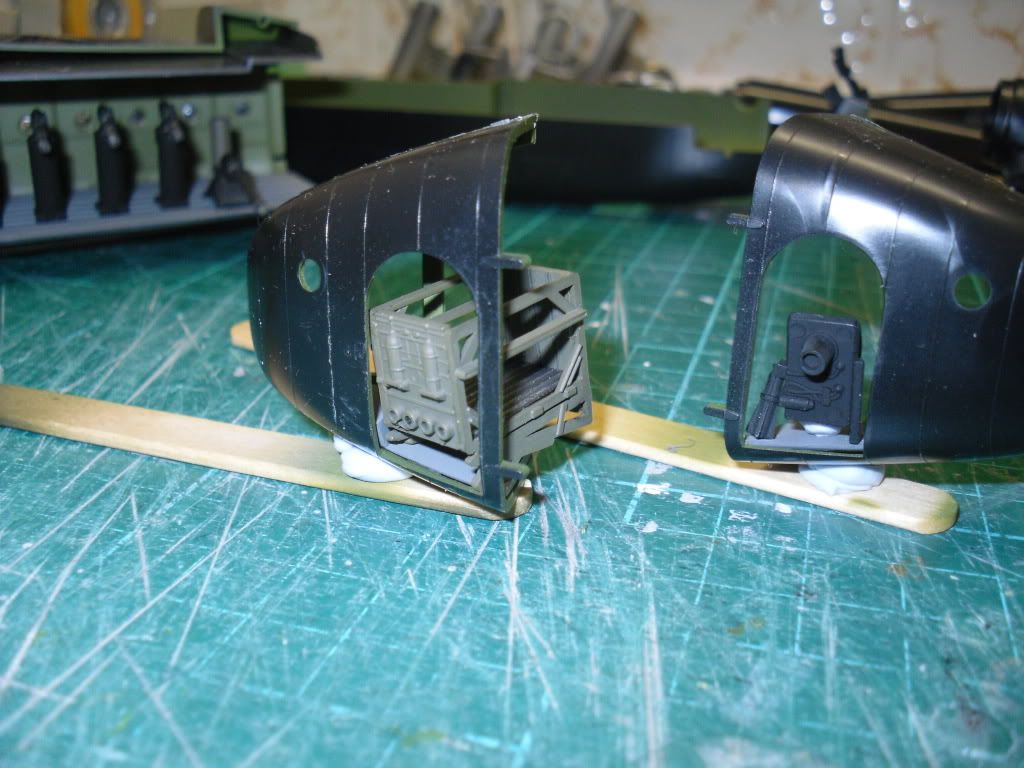
I'm not sure as to leave the rear clamshell doors off and paint them seperatly ; I will have them in the close position once finished . The Flare Launcher is a tiny bit wider than the door opening and it can't be fitted in from the outside , so painting the rear doors seperatly might be the way to go .

I'll glue the fuselage together next followed by the center wing section , tail booms and outer wings .

I was looking at the Zoltz decal sheet and have taken a liking to the AP-2H Neptune "Naplam Nellie"

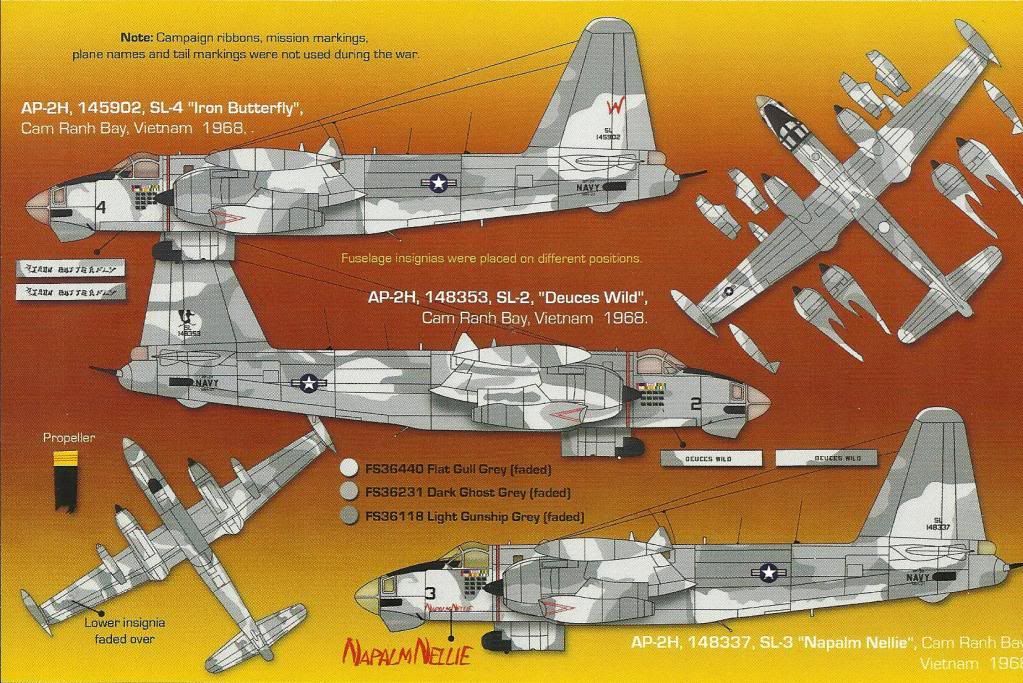
I have the Facon vacuform conversion set for the Hasegawa P2V-7 neptune kit , It looks  a fairly straight forward conversion . I'm just not sure if the AP-2H was used extensively at night ?

Anyway , I'll continue on with the Stinger .

John .

  • Member since
    September 2003
  • From: Australia
Posted by Helo H-34 on Monday, May 7, 2012 5:48 AM

A little more progress on the Stinger Gunship .

Just before I glued the fuselage halves together , I added some plastic strip to the top roof section just forward of the wings and another piece of plastic strip along the bottom of the fuselage join

This helps provide some additional strength to the fuselage join , especially given my clumsy heavy handed style of sanding and cracking open joins .

So lot's of pieces puttied and ready for sanding first thing tomorrow

John .

  • Member since
    October 2009
  • From: Texas
Posted by Gregbbear on Tuesday, May 8, 2012 7:21 AM

Trey, you are really moving along good.  The nav lights are a nice touch.  I would give that a try, but I dont think I have the dexterity to do that in 72nd scale.  Probably not even in 48th, 

John, you too are really moving along on your Stinger.  As for the Neptune, it was very much a nocturnal hunter.  It had a FLIR, LLTV, and the rear gunner had a night scope instead of a gunsight.  I'm sending you an email with some scans I think you will like.

I haven't made any progress myself.  I have been too busy with chores. 

Cheers,

Greg

- yat yas!


  • Member since
    September 2003
  • From: Australia
Posted by Helo H-34 on Tuesday, May 8, 2012 7:59 AM

Thank you kindly Greg , for taking the time to scan some info on the AP-2H Neptune and send it to me ; It is very much appreciated , thanks buddy ...Yes

I was looking at the Hasegawa Neptune kit today and the falcon vac sheet and there's not a lot of info on the coversion provided by Falcon , just a side profile drawing . There are two halves of the LLTV on the sheet although it's not marked on the drawing . In any case the build looks fairly straight forward and I'm keen to start once I finish the Stinger and the B-57G .

My Stinger build is starting to look like a Gunship now

The center wing section is a nice neat fit , although the front right corner over the fuselage kept lifting a tiny bit , so I applied some super glue with a tooth pic and clamped the fuselage and wing section with my hand while I sat at the bench drinking a cup of coffee .

I'll still need to add some putty along the fuselage center join but I'm very pleased how the Stinger has gone together so far . I've also cleaned up all the seperate pieces and have them ready for painting .

John .

  • Member since
    September 2003
  • From: Australia
Posted by Helo H-34 on Tuesday, May 8, 2012 8:21 AM

I forgot to mention , amazon.com had some of these books on the AC-119G Shadow and AC-119K stinger listed and I found a seller who ships internationally

The book was a little expensive at $40 but I saw the same one on ebay for $75 ....OUCH

Anyway I ordered a copy from amazon and it should arrive in two weeks .

John .

  • Member since
    October 2010
  • From: Hobart, Australia
Posted by Casper the Chihuahua on Tuesday, May 8, 2012 6:53 PM

Time to look at the F4-D. This is a BIG kit. As you would expect, the F-4s in 1/48 are about the size of a 1/32 BF-109 so in 1/32 it's a monster.

I'm adding the Eduard interior and exterior sets. I'll be retaining the Tamiya IP decals and using Eduard colour PE for the rest. I see no point in spoiling the effect of the decals by hand paining the other dials. Stick out tongue I'm also adding Brassin ejector seat set The amazing detail on these seats should help sell the rest of the office.

As mentioned before, this is a big kit! So here's a comparison shout of the fuselage (without the nose BTW) next to my recently completed Sea Harrier in 1/24

Apart fro the Harriers front aerial, these two will be the exact same length. The F-4 is truly a large bird.

Cheers

On the bench: A-4F 1/32 Hasegawa

Just deployed: F6F-5N Hellcat Nightfighter 1/48 Eduard

Up next: A6-E Intruder 1/48 Revell

  • Member since
    September 2003
  • From: Australia
Posted by Helo H-34 on Tuesday, May 8, 2012 8:39 PM

Looking forward to seeing your F-4D come together Casper .

I'm just blown away at the level of skill and detail you are able to accomplish with your builds Sir  ...

John .

  • Member since
    September 2003
  • From: Australia
Posted by Helo H-34 on Tuesday, May 8, 2012 8:59 PM

Greg , Thank's for the info on the AP-2H Neptune ...Yes

I didn't realise that the AP-2H had those exhaust /jet engine silencer's fitted , so that was good info to find out .

While the putty is drying on the Stinger Gunship , I'm thinking of mixing up some two part epoxy and fill in part of the molded in under fuselage radar on the Hasegawa Neptune kit .  That way by the time I start the build I can cut away the old radar dome staright away .

John

  • Member since
    October 2010
  • From: Hobart, Australia
Posted by Casper the Chihuahua on Tuesday, May 8, 2012 10:20 PM

Helo H-34

Looking forward to seeing your F-4D come together Casper .

I'm just blown away at the level of skill and detail you are able to accomplish with your builds Sir  ...

John .

Thanks John, kind words indeed, Ser. I try my best, this is a hobby I returned to after some 30 years. I am constantly trying to better my skills but still often fall short of my own goals. But practice makes perfect and words of encouragement are always good!

Cheers

On the bench: A-4F 1/32 Hasegawa

Just deployed: F6F-5N Hellcat Nightfighter 1/48 Eduard

Up next: A6-E Intruder 1/48 Revell

  • Member since
    August 2009
  • From: Borlando Fla home of the rat
Posted by TREYZX10R on Wednesday, May 9, 2012 8:54 PM

John thanks for the kind words. The Stinger is really taking shape,the interior came out awesome.

Casper I'm looking forward to the F4 build,that thing is HUGE!

Greg thanks,you could pull the nav lights off I'm sure. Maybe even in 1/72 it would be feasable me thinks;)

I got the Radom on and the gear fitted,slowly getting close to paint time

  • Member since
    September 2003
  • From: Australia
Posted by Helo H-34 on Friday, May 11, 2012 7:50 AM

The canopy is fitted in place and the Stinger is ready for masking

The nose cone is a little undersize , especially on the sides , the top and bottom were close to being flush with the front of the aircraft but I needed a couple of sessions of puttying and sanding to blend the nose cone in . I hand brushed some acrylic silver over the sanded putty to fill in any tiny little pin holes you sometimes get after wet sanding Tamiya putty . So after masking it will be a light sand with some 2000 grade wet & dry just to smooth out the silver and then onto airbrushing the first colour first thing tomorrow .

John

  • Member since
    October 2010
  • From: Hobart, Australia
Posted by Casper the Chihuahua on Friday, May 11, 2012 8:35 PM

Almost ready for some painting. Been prepping parts and cutting and glue bits of PE.

The exhausts really look nice with the Eduard details;

Some paneling for the office;

...and the lower halves of the canopy locking systems

Cheers

On the bench: A-4F 1/32 Hasegawa

Just deployed: F6F-5N Hellcat Nightfighter 1/48 Eduard

Up next: A6-E Intruder 1/48 Revell

  • Member since
    September 2003
  • From: Australia
Posted by Helo H-34 on Saturday, May 12, 2012 2:59 AM

Nice start with the cockpit and exhaust Casper ...Yes

With the Stinger , I decided to paint the gear wells , landing gear struts/doors , wheels and props first , using Tamiya's AS-12 Silver

Tomorrow , I'll airbrush the colour Tan (Gunze H-310) to the top surface's

While in-between coats of silver paint , I started looking at the Hasegawa P2V Neptune along with Falcon's AP-2H Vac AP-2H

I mixed up some two part epoxy and filled the belly radome halves

Here's a pic of the Vacuform conversion pieces

I was reading through the AP-2H article Greg kindly sent me and the under wing weapons consisted of a pair of SUU-11A Gun pods with Mk. 82 & 77 bombs .

Haseegawa's weapons sets don't have any SUU-11A gun pods but I found some in an AMT AH-1G Cobra kit from the stash

I guess they will have to do for the Neptune .

Anyway I'll continue on painting the Stinger .

John

  • Member since
    October 2010
  • From: Hobart, Australia
Posted by Casper the Chihuahua on Saturday, May 12, 2012 10:10 PM

Got the office done except for the top rear IP and the HUD assembly. The Eduard details really help with the look. I'm also adding Brassin ejector seats which should complete the busy look.

Cheers

On the bench: A-4F 1/32 Hasegawa

Just deployed: F6F-5N Hellcat Nightfighter 1/48 Eduard

Up next: A6-E Intruder 1/48 Revell

  • Member since
    October 2010
  • From: Hobart, Australia
Posted by Casper the Chihuahua on Sunday, May 13, 2012 6:33 AM

Got the upper cockpit on the fuselage painted and dry-brushed. Cockpit fits in like a dream. Screwed in instead of glued. Also got the lower wing/fuselage screwed and glued on. Never attached wings to a fuse with such little fuss (well perhaps excepting the Tamiya Spitfire)

Cheers

On the bench: A-4F 1/32 Hasegawa

Just deployed: F6F-5N Hellcat Nightfighter 1/48 Eduard

Up next: A6-E Intruder 1/48 Revell

  • Member since
    March 2010
  • From: Democratic Peoples Republic of Illinois
Posted by Hercmech on Monday, May 14, 2012 10:59 AM

Casper:

Nice work on the pit!


13151015

  • Member since
    June 2010
Posted by Night Fighter Nut on Monday, May 14, 2012 12:01 PM

Dude!  that looks awesome!  Very well done.  Hey gang, I have finally gotten settled somewhat and will now atttempt to get back into posting what I'm working on... barring any mishaps with the camera.  :)  Currently I'm trying to finish up with Fiat Cr 42 Cn  Italian night fighter and have just started a Pe-3 Bis WW2 Russian night fighter. 

  • Member since
    August 2009
  • From: Borlando Fla home of the rat
Posted by TREYZX10R on Monday, May 14, 2012 6:04 PM

John Stinger is really coming together ,nice fix on the nose cone! Looking forward to the Neptune a subject not modelled often nice choice!

Casper great looking office!

I'm trying a more agressive approach to the preshade this time and doing a little salt chipping as well,so some silver went down first

Then the shading with black ,zinc and red brown staining

Then put some white down thinned 50% and just enough applied to not bury the preshade


  • Member since
    September 2003
  • From: Australia
Posted by Helo H-34 on Monday, May 14, 2012 7:44 PM

Nice work Trey , I'm yet to try any type of pre-shading on my builds . The Stinger is molded in black plastic , so I'm thinking of buffing with some kitchen paper towel after the painting has finished and given the kit has raised panel lines , I'm hoping I might get some type of darker effect ?

Anyway , I'm not too happy with the fuselage join on the roof , so I have had to re-sand and now touch up the Tan colour before starting the medium green and dark green colours

Oh well , only a slight set back .

John .

  • Member since
    September 2003
  • From: Australia
Posted by Helo H-34 on Monday, May 14, 2012 11:52 PM

There is a seller on ebay called prettyplanes.com , who has hundreds of military aircraft photo's available in different sizes and I have bought quite a few photo's from them including these three gunship pic's ...

The images are on high quality photo paper and I think they are all excellent

The photo's should look good next to my finished builds .

John

  • Member since
    March 2010
  • From: Democratic Peoples Republic of Illinois
Posted by Hercmech on Tuesday, May 15, 2012 6:32 AM

Trey...I am anxious to see how she turns out over that preshade you have going on!


13151015

  • Member since
    February 2003
  • From: Rothesay, NB Canada
Posted by VanceCrozier on Tuesday, May 15, 2012 7:18 AM

TREYZX10R

...

http://img.photobucket.com/albums/v710/treyzx10r/Aircraft%20kits%20part2/Corsairpreshade005.jpg

http://img.photobucket.com/albums/v710/treyzx10r/Aircraft%20kits%20part2/Corsairpreshade003.jpg

...

Stop right there, I like it that way!!!!

On the bench: Airfix 1/72 Wildcat; Airfix 1/72 Vampire T11; Airfix 1/72 Fouga Magister

  • Member since
    October 2009
  • From: Texas
Posted by Gregbbear on Tuesday, May 15, 2012 5:49 PM

Good looking stuff going on!  That is one great looking cockpit Caspar.  Lots of detail in there!  I really liked the size comparison earlier too.  What a monster it will be when finished!

John, the stinger is looking good.  It is quite impressive.  Your photos you bought look great too.  That stinger shot while firing is especially cool.

I swear that I think some joints mysteriously suck in any type of filler. I have used different putties, super glue, Mr Surfacer, etc, and sometimes, despite my best efforts, and even after a primer coat, a seam shows up on the color coat. 

Trey, that is really cool what you are doing with the Corsair.

I haven't done anything myself.  We moved over the weekend, and I haven't unpacked my stuff yet, or set up a work area.  I have too many orders from the wife I must complete first!

Cheers,

Greg

- yat yas!


JOIN OUR COMMUNITY!

Our community is FREE to join. To participate you must either login or register for an account.

SEARCH FORUMS
FREE NEWSLETTER
By signing up you may also receive reader surveys and occasional special offers. We do not sell, rent or trade our email lists. View our Privacy Policy.