SEARCH FINESCALE.COM

Enter keywords or a search phrase below:

Hunting After Dark, 2011-2012 Night Fighter Group Build

252239 views
1422 replies
1 rating 2 rating 3 rating 4 rating 5 rating
  • Member since
    June 2010
Posted by Night Fighter Nut on Thursday, November 8, 2012 7:35 AM

Very well done...  :)  the detail is great.  

  • Member since
    October 2010
  • From: Hobart, Australia
Posted by Casper the Chihuahua on Wednesday, November 7, 2012 7:21 PM

Completed office without the HUD or ejector seat

Cheers

On the bench: A-4F 1/32 Hasegawa

Just deployed: F6F-5N Hellcat Nightfighter 1/48 Eduard

Up next: A6-E Intruder 1/48 Revell

  • Member since
    October 2010
  • From: Hobart, Australia
Posted by Casper the Chihuahua on Wednesday, November 7, 2012 6:03 PM

Some work on the control surfaces. I masked off and sprayed Tamiya X-18 semi-gloss black.

I then used the Flory white wash and slopped that over pretty heavy handed;

Once that was dry then with a cue tip I removed most of the excess;

This will be then cleaned with a 000 brush and then detailed. Once finished it hopefully gives the illusion of some wear and grime and also a slight suggestion of lettering and labels above the controls as you normally get in a cockpit.

Cheers

On the bench: A-4F 1/32 Hasegawa

Just deployed: F6F-5N Hellcat Nightfighter 1/48 Eduard

Up next: A6-E Intruder 1/48 Revell

  • Member since
    October 2010
  • From: Hobart, Australia
Posted by Casper the Chihuahua on Tuesday, November 6, 2012 8:51 PM

Ok, some slow progress on the Nighthawk. Slow work as i want to get this monster just right.

IP and rear cockpit wall;

Cheers

On the bench: A-4F 1/32 Hasegawa

Just deployed: F6F-5N Hellcat Nightfighter 1/48 Eduard

Up next: A6-E Intruder 1/48 Revell

  • Member since
    June 2010
Posted by Night Fighter Nut on Monday, November 5, 2012 9:10 PM

Forgot to mention, black widows were notorious for chipped paint along the leading edges of the wings and even on the window's window frames.  The OD green widows didn't chip as much, better paint, but they did wear a bit.  Majority of the chipping would be within the span of the propellers, not so much beyond them.

  • Member since
    June 2010
Posted by Night Fighter Nut on Monday, November 5, 2012 9:03 PM

That's a really nice job with the painting Trey.  I see that you are going to put weight just behind the engines.  Don't miss out on putting weight behind the gunners chair since you have the turret location open.  The weight just needs to be in front of the rear wheels, as far as possible, to be effective.  A lot of weight will fit behind the gunners chair and since you have the wings already attached, you don't have to worry about interference with them later.  :)  Just be carefull you don't over load the legs.  :)  How are you going to weather your wheels?  I used oil pastels for mine but everyone is different.

  • Member since
    August 2009
  • From: Borlando Fla home of the rat
Posted by TREYZX10R on Sunday, November 4, 2012 8:18 PM

Wheels are ready

Booms for ship 2 need some weight before attaching to the Pod

  • Member since
    August 2009
  • From: Borlando Fla home of the rat
Posted by TREYZX10R on Saturday, November 3, 2012 4:20 PM

Casper thats going to be a Monster,looking forward to seeing it build out!

I had a long airbrush session and got quite a bit painted today.

Started with a green zinc coat over the canopies

I applied some OD green on ship 2 as a gude coat and it still needs some sanding around the seams and canopy join areas.

Finally some black goes down on ship 1. First glance looks pretty clean and no seams or blems showing!

This calls for a tall frosty pint me thinks!

  • Member since
    October 2010
  • From: Hobart, Australia
Posted by Casper the Chihuahua on Friday, November 2, 2012 10:32 PM

Ok, I've officially started on the Nighthawk. A lot of plastic and she's a big plane and at the moment I seriously have nowhere to display her when she's done Huh?

Cheers

On the bench: A-4F 1/32 Hasegawa

Just deployed: F6F-5N Hellcat Nightfighter 1/48 Eduard

Up next: A6-E Intruder 1/48 Revell

  • Member since
    August 2009
  • From: Borlando Fla home of the rat
Posted by TREYZX10R on Thursday, November 1, 2012 7:29 PM

Ship 2 booms needed new firewalls and the port boom will require an extension to make up for the nacelle area that was donated to ship 1.

Test fit shows the same ugly gaps ,as if I was expecting something different!

Finish sanded ship 1 and its real close to being 'paint' ready


  • Member since
    August 2009
  • From: Borlando Fla home of the rat
Posted by TREYZX10R on Tuesday, October 30, 2012 8:12 PM

Thanks NFN the fit on these booms is down right aweful to say the least.

After much test fitting I went for it and they ligned up ok after some tweaking as the glue set. There is still an ugly gap on all sides that needs a lot of filler. Good thing I bought 2 tubes of green putty last time at the LHS!

After a lot of tedious sanding I've got a join I can at least live with

Ship one is ready for some fine finish sanding.


  • Member since
    June 2010
Posted by Night Fighter Nut on Monday, October 29, 2012 4:39 PM

Check the fit on your booms.  Sometimes they can be kattywampus on you.  One side higher or lower than the other.

  • Member since
    August 2009
  • From: Borlando Fla home of the rat
Posted by TREYZX10R on Sunday, October 28, 2012 9:09 PM

NFN thanks I got it off evil bay from a Railroad hobby supplier. I remember you building the A frame for yours and it came out great. I had already gone as far as I was going to go scratching interior bits and have sealed the cones on already.

Wings are on

Obvious gaps need to be filled

Filler sanded ready for some primer

Booms up next

  • Member since
    June 2010
Posted by Night Fighter Nut on Sunday, October 28, 2012 7:32 PM

That ground set up looks great.  Where did you find it?  

Before you glue on the back cone, remember there is a plexiglass "A" frame inside it to prevent it from imploding during dives.  The Maam website has a great picture of it.  It can be made with stretched clear sprue and its pretty easy.  I had this photo handy to show you what I'm talking about.

P-61A 123

  • Member since
    August 2009
  • From: Borlando Fla home of the rat
Posted by TREYZX10R on Saturday, October 27, 2012 10:17 PM

NFN thanks thats a great link,I suppose you're right about the mold being used so much did'nt take that into consideration!

Enrico appreciate the kind words!

Wing s for ship one have the flaps up and ready to mount onto the pod.

Canopy masked

Starting to gather up some equipment for the Dio

  • Member since
    April 2011
  • From: Caput Mundi (Rome,Italy)
Posted by Italian Starfighter on Thursday, October 25, 2012 8:14 AM

Treyzx10r:......good work on both models.....!!Enrico.

http://img.photobucket.com/albums/v381/tigerman12/ThatsAmoreGBBadge.jpg


  • Member since
    June 2010
Posted by Night Fighter Nut on Thursday, October 25, 2012 5:30 AM

As for the canopies, it usually has to do with the molding of the aircraft halves.  This is an old mold and were talking several thousand casts made from these molds.

  • Member since
    June 2010
Posted by Night Fighter Nut on Thursday, October 25, 2012 5:26 AM

www.warbirdsandairshows.com/.../reading-2011.htm

This site will help a little. Also this

Northrop P-61 Black Widow night fighter cutaway

  • Member since
    August 2009
  • From: Borlando Fla home of the rat
Posted by TREYZX10R on Wednesday, October 24, 2012 7:07 PM

Thanks NFN that would be a big help! The pics on the MAM site just do'nt show enough detail at this point for an engine instal.


Ship 2 canopy time,same as the first set with the exception of the open hatcehs. Surprisingly this seems to fit a bit better than the other one . I'm geussing not having the canopies closed leaves enough free surface area for the assembly to flex more?


Decided to start working on the Eduard resin wheels,must say these things are nicely cast.


Next up the dreaded canopy mask session!

  • Member since
    June 2010
Posted by Night Fighter Nut on Wednesday, October 24, 2012 5:43 AM

Great work Trey!  :)  I have a couple of pics on the engine itself.  I know the Mid Atlantic Air Museum has a shot of the engine outside the widow.  It was in the process of being renovated.  All other pics I have show the nose cone off and being worked on.  I may have one in a book but I need to get back to you on that one.

  • Member since
    August 2009
  • From: Borlando Fla home of the rat
Posted by TREYZX10R on Monday, October 22, 2012 9:39 PM

Next up prepping the cowls and engines . The kit supplied engines were too small in diameter for the new cowls causing them to sit too far forward. I remedied this with a strip of tamiya tape around the engine base then ca glued it in place once I was sastified it was square.

While that cured I started adding the resin bits to the other engines. Required some minor surgery but a straight forward modification. Cut away the area to be replaced and sanded to fit.

Engines ready to mount on ship 1 booms,the other engines need more work yet.

Ca glued in place ,there are a few small gaps to fill and some sanding yet to be done


  • Member since
    August 2009
  • From: Borlando Fla home of the rat
Posted by TREYZX10R on Sunday, October 21, 2012 9:07 PM

I'm on to tackling the engines ,first the gear up booms. I ordered some a/m resin nacelles and thought they came with the end adjustable cooling cowls as pictured in the ad(not!) be forwarned ordering stuff ask questions!
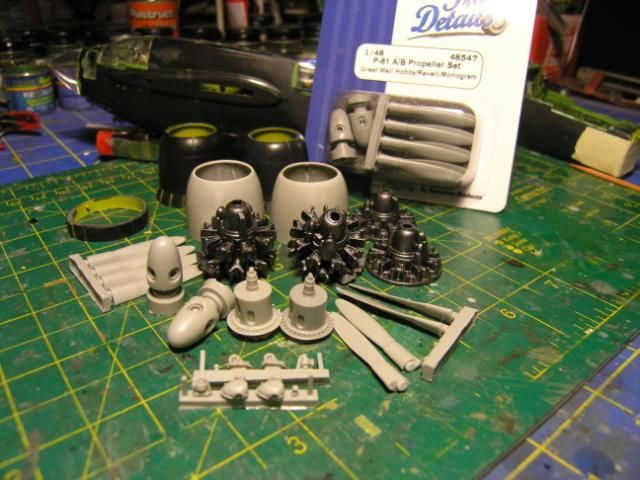
 

they also need lots of sanding and trimming,even had to remove a blob of resin that dribbled down each side,hey at least it was the same on both parts!

Next I had to do some surgery as the kit supplies an open and closed cooling cowl on each boom,WHY!?

Card stock added over the lower cowl area,later I'll add some mesh back in

Closed cowl from the gear down boom needs a plug to get the correct length back and a strong glueing point

The cowl ring side needs the same

Trimmed and sanded

Glued in place with the better looking side turned out.the blems will be sanded out later. I left the nasty ones inboard so they wo'nt stick out as bad.

I'm starting to get a grip on ship 1,now I need to research the engine mounting detail and figure out how much ship 2 cowls will be opened up, if at all! I really want to have an engine in mid removal for the finished build but wondering how authentic i can make it look. Any pics of an engine removal would be great not having much luck finding any on line.


  • Member since
    August 2009
  • From: Borlando Fla home of the rat
Posted by TREYZX10R on Friday, October 19, 2012 4:02 PM

Vance thanks space is running a bit sparse now,going to have to expand my shelf space for sure.

NFN thanks it has been a fight getting this canopy in place ,think I've got it whipped(almost)

I've gotten the canopy in place and filled the gap at the front with green putty

Next I masked off the canopy and added more green putty to cure the step on the starboard side

after sanding,then masked again and applied some testors flat black enamel to the area

this filled in the minor defects and its on its way to being ready for some added sub assemblies now

  • Member since
    June 2010
Posted by Night Fighter Nut on Wednesday, October 17, 2012 1:42 PM

I just thought...  you probably mean the gap between the front and back of this cover.  The best way I did this was biasing the cover toward the rear and filling in the front part with stretched clear sprue.  I seem to remember that there was a small window in that area.  The extra stretched sprue would act as a frame edge to the rounded glass part.  Still it's tricky.  Looks like you're doing just fine.

  • Member since
    February 2003
  • From: Rothesay, NB Canada
Posted by VanceCrozier on Wednesday, October 17, 2012 1:28 PM

(hmmm, I've kinda lost track of this one!) Trey - building a pair of Black Widows at the same time?!?! Where do you put all these things when you're done?!?! Looking good, nice workaround on the the framing.

On the bench: Airfix 1/72 Wildcat; Airfix 1/72 Vampire T11; Airfix 1/72 Fouga Magister

  • Member since
    June 2010
Posted by Night Fighter Nut on Wednesday, October 17, 2012 1:14 PM

The glass over the pilot was hindged on one side with something like a piano hindge.  That's why they made it the way they did.  I've tried to use stretched sprue to make something like the piano hinge to take up that gap on one side.  I'll try to check some other references.  You're still doing very well Trey.

  • Member since
    August 2009
  • From: Borlando Fla home of the rat
Posted by TREYZX10R on Tuesday, October 16, 2012 8:31 PM

Greg thanks I did see a replacement canopy on evil bay but it was in Russia and costs $27 + the same for shipping!!! I decided to just deal with the Demon I know.

NFN Thank you as well,and ca'nt wait to see you work your magic on the Great wall offering!

I continue to battle the ill fitting canopy. I've made it worse by having one in flight as the pilots upper section has a gap all around. The part literally just falls through the opening,not even close to being a fit!

I've used foam safe ca to glue some styrene strips around the edges

The front strip wound up not being needed

The crew is now in place

Some serious tedious cleaning up is going to be needed,I need a break for a pint(or 2)

Ship 2 canopy is up next and as it will have the hatches in the open position it should go quicker(I hope)

  • Member since
    June 2010
Posted by Night Fighter Nut on Tuesday, October 16, 2012 8:17 AM

It has finally arrived.  The P-61A from Great Wall, 1/48th scale.   :)  Looking it over it looks very nice.  I did note some incorrect or incomplete parts but over all it looks very nice.  :)  Decals feature either Lady Gen or Sweaten Wally.  Hmmmm which do I want to do next.?  I know, first finish the Russian plane.  I should have a lot of time this weekend to work on the Pe3 Bis.  :)

  • Member since
    October 2009
  • From: Texas
Posted by Gregbbear on Monday, October 15, 2012 7:07 PM

Looks good Trey.  I've always wondered why nobody in the after market has designed a fix for some of the P-61's problems??? 

I would like a P-61 (or two) in my collection, but I just don't have the room to display 48th scale beasts.  One would look nice next to my P-70....

Cheers,

Greg

- yat yas!


  • Member since
    June 2010
Posted by Night Fighter Nut on Monday, October 15, 2012 9:29 AM

Very good.  I'm thinking of adding a crew to one at some point as well.  check out Zotz decals for some other P-61 decals.  I know they did have a release some time ago.  I believe other companies have started releasing more decals as well.  I still have a few sets in my stash but some didn't have turrets.

JOIN OUR COMMUNITY!

Our community is FREE to join. To participate you must either login or register for an account.

SEARCH FORUMS
FREE NEWSLETTER
By signing up you may also receive reader surveys and occasional special offers. We do not sell, rent or trade our email lists. View our Privacy Policy.