SEARCH FINESCALE.COM

Enter keywords or a search phrase below:

Weathering GB - 2/1/2011 - 1/31/2012

24487363 views
861 replies
1 rating 2 rating 3 rating 4 rating 5 rating
  • Member since
    July 2010
Posted by jbrady on Wednesday, February 2, 2011 6:58 PM

Terry: You have to write an article about how you get those effects. That is truely amazing work.


  • Member since
    May 2003
  • From: fort mill SC
Posted by Robert92562 on Wednesday, February 2, 2011 7:09 PM

Doogs, I know that its to late for the F-150 to get in on this build. Please add Tamiya's 1/48 BF109E-4/7 TROP and  Eduard FW 109 D-9 to the build list.

About the F-150, It was inspired by the other Doog, Some one posted a build he did of a old abandoned race car. I don't recall the name he gave the build but it was pretty cool. So I see this truck abandoned on a back road not sure if its a ford but close enough for the Revell F-150 in the stash. So I cut open the driver door, rusted out  the fenders a quarter panels, and the did some weathering.

I will be starting the BF 109 tonight.

Bob


  • Member since
    June 2009
  • From: Netherlands
Posted by kermit on Wednesday, February 2, 2011 7:16 PM

Terry,

I have to agree with jbrady here and want to say that these pictures are mouthwatering!Bow Down I had my lady take a look at them and she totally agrees that somebody would absolutely swear that you are showing a piece of rusted metal and not a model. This is gallery material!!

Would you be willing to explain more in detail how you work with the lifecolors? How you mix it, apply it and adapt it...stuff like that? Maybe even (if i may be so bold) a little pic tutorial?

Best stuff i have seen in awhile now.Yes

Richard

"Success is the ability to go from one failure to another with no loss of enthusiasm." - Sir Winston Churchill

  • Member since
    June 2003
  • From: Garland, TX
Posted by pepper kay on Wednesday, February 2, 2011 7:34 PM

kermit

Would you be willing to explain more in detail how you work with the lifecolors? How you mix it, apply it and adapt it...stuff like that? Maybe even (if i may be so bold) a little pic tutorial?

I've not seen lifecolors in my area ... where do you buy from ? ...

And I agree with Richard ... a photo tutorial would be absolutely great !! ...

pepper

  • Member since
    July 2008
  • From: USA California
Posted by vetteman42 on Thursday, February 3, 2011 12:40 AM

pepper kay

 kermit:

Would you be willing to explain more in detail how you work with the lifecolors? How you mix it, apply it and adapt it...stuff like that? Maybe even (if i may be so bold) a little pic tutorial?


I've not seen lifecolors in my area ... where do you buy from ? ...

And I agree with Richard ... a photo tutorial would be absolutely great !! ...

pepper

Ditto above..................... please YesYes

Randy So many to build.......So little time

  • Member since
    March 2010
  • From: Brisbane
Posted by Julez72 on Thursday, February 3, 2011 1:17 AM

Dittoabove...............againToast


  • Member since
    February 2006
  • From: Smithers, BC, Canada
Posted by ruddratt on Thursday, February 3, 2011 2:30 AM

DoogsATX

 ruddratt:

I've yet to try any of Eduard's WWII subjects, but their WWI stuff over the past ten years or so doesn't seem to have a lot of the issues you fellas are talking about.

Doogs, the Sherman is looking awesome! What is this filtering technique you mentioned?


Thanks ruddratt!

The filtering I'm talking about is basically a filter wash. About a pencil eraser-size amount of Winton & Newton raw umber artist diluted with Mona Lisa odorless thinner. Mixed it in one of those artist palettes with the shallow plastic bowl indentions, then brushed it on with a wide brush. The ratio's probably about twice as strong as the one I used on my P-47, but I'm liking the effect on the Sherman so far.

Which Eduard WWI subjects would you recommend as particularly good? Always see them at the LHS but have never bought for fear of rigging!

Thanks for that info Doogs, but I still have a few more questions about it (I've never tried it, but love the effect especially after seeing that Sherman, so bear with me buddy). So now, when you apply this mixture, how heavy are you going, and are there particular filter colors one would use depending on the base color?

Regarding Eduard's WWI stuff, one of my favorite kits of theirs is the 1/48 Fokker D.VII series - great detail, fit, color optons, separate control surfaces, and hardly any rigging (a real plus for those who don't like a lot of it). Their series of Sopwith Camels are also great kits, but require a fair amount of rigging. Here's a pic of each...

Mike

 "We have our own ammunition. It's filled with paint. When we fire it, it makes pretty pictures....scares the hell outta people."


  • Member since
    July 2010
Posted by jbrady on Thursday, February 3, 2011 6:51 AM

ruddratt: Hats off to you. I would love to build either one of those but have neither the skill or the patience. I love the fuselage paint on the Foker. Both builds are beautiful.


  • Member since
    January 2011
  • From: Springfield, MA
Posted by TigerEP1 on Thursday, February 3, 2011 7:10 AM

All the updates are amazing!

ruddratt,

those are fantastic, your lozenge paintwork (and or decal) is stunning. both fine examples!

Terry,

My god man you have rust in your veins! Simply stunning!

Doogs,

Looking great man as usuall, the serman is really taking shape!

jbrady,

awesome as always, looking forward to more!

Bob,

Can't wait to see what you bring to the GB!

pepper,

I got your e-mail but my client is being funky, Ty much and i will let you know when it arrives!


I'll have a update this afternoon,  work was brutal the last 3 days and yesterday was spent beating Dead Space 2 and digging my dads crown vic out of the driveway...lol

On the bench:

1/35th Tamiya Willi's MB


  • Member since
    July 2010
Posted by jbrady on Thursday, February 3, 2011 10:15 AM

Looks like I will be lurking for a while. I lost the tip to my airbrush. Three projects ready for paint and the airbrush is out of action. Can't figure where that little bugger went. I dropped it and heard it hit the edge of the bench. I have a ceramic tile floor in the paint room so I should have heard it hit the floor but I didn't. Tore the room apart, vacuumed with a new bag, tore the room apart again... guess it's in a black hole somewhere.


  • Member since
    June 2010
  • From: Austin, TX
Posted by DoogsATX on Thursday, February 3, 2011 4:18 PM

Terry - WOW! Honestly, IMO, you should hit FSM up about writing a weathering article...that's some fantastic work right there. I didn't even know Lifecolor made weathering sets. I've used their paints...hate them through the airbrush, but they brush pretty well.

Bob - thanks for the info on the F150 - I need to find a good rustbucket project at some point - that one looks fantastic!

jbrady - sorry to hear about the airbrush tip...what kind are you using? 

Sad to say, but I got shut out last night. It was around 40 degrees in the garage and I just couldn't do it. Figured I'd go to sleep early for once, and ended up getting the worst night of sleep I've had in ages, and with an 8 month old daughter that's saying a lot. Just rams home how great modeling is at helping me decompress and clear my head.

Planning to shoot RLM 02 over the canopy and putty one last time tonight, then spend the rest of the evening playing with the Sherman.

Also...anybody have any experience with Mig or AK Interactive's stuff? I was thinking about the pigment clumping last night, and how my pigments (Doc O'Brien pigment set from Micro Mark) tend to "rub in" far better than pastels. Was curious if the same was true for Mig, since the Doc O'Brien set is nice, but the colors are somewhat limiting.

On the Bench: 1/32 Trumpeter P-47 | 1/32 Hasegawa Bf 109G | 1/144 Eduard MiG-21MF x2

On Deck:  1/350 HMS Dreadnought

Blog/Completed Builds: doogsmodels.com


  • Member since
    July 2010
Posted by jbrady on Thursday, February 3, 2011 7:00 PM

Doogs: It's a badger 200 NH. I have to get more organized about this modeling thing. I was assembling the landing gear on the Hellcat (very very fiddly) got the left gear done and realized I had not put the gear bay in the right wing. The only thing to do was take the right wing off and pry the wing apart. Sitting here waiting for the glue to dry enough to reattach the wing. Simply a stupid mistake.


  • Member since
    February 2006
  • From: Smithers, BC, Canada
Posted by ruddratt on Thursday, February 3, 2011 7:33 PM

jbrady, bummer about the 'cat. Don't be too hard on yourself though. I'm sure most of us have been there/done that at one point or another in our modeling careers (I know I have! ). Glad you got a handle on her now.

Regarding your airbrush, I replaced the medium tip in my Badger 150 with a fine tip a while back. I still have the old medium tip however, and the needle that goes with it. If you think they will work in your airbrush, say the word and they're yours. Yes

Mike

 "We have our own ammunition. It's filled with paint. When we fire it, it makes pretty pictures....scares the hell outta people."


  • Member since
    July 2010
Posted by jbrady on Thursday, February 3, 2011 8:05 PM

ruddratt: Thanks for the offer, but I ordered another tip expedited shipping should be here monday or tuesday. Again thanks.


  • Member since
    June 2010
  • From: Austin, TX
Posted by DoogsATX on Friday, February 4, 2011 1:18 AM

Got some weathering work done on the Sherman tonight. Everything was done with artist oils in raw umber, black, payne's gray, and transparent white (for rain streaks). I found this pack of brushes at Hobby Lobby the other day that are almost like rakes...their ends are segmented into a few "fingers" and turns out they're awesome for this kind of streaking work.

Most of this was done by placing small dots of oils with the tip of a busted old airbrush needle, drawing them down with a brush damp with thinner, then using the rake brushes.

I'd say the top's nearing completion...still have a ways to go on the tracks, bogies, and overall dust weathering though!

On the Bench: 1/32 Trumpeter P-47 | 1/32 Hasegawa Bf 109G | 1/144 Eduard MiG-21MF x2

On Deck:  1/350 HMS Dreadnought

Blog/Completed Builds: doogsmodels.com


  • Member since
    January 2011
  • From: Springfield, MA
Posted by TigerEP1 on Friday, February 4, 2011 3:45 AM

Looking fantastic Doogs!

So heres my minor update, finally got that damn wheel on..lol and started rusting the sides back etc. Lots more to do but wanted to show something.


The jeep will be getting some work today as well, i miss working on it..lol

On the bench:

1/35th Tamiya Willi's MB


  • Member since
    July 2010
Posted by jbrady on Friday, February 4, 2011 8:04 PM

Looking good Tiger.

Here's where the 5-N is.

The landing gear is the fiddliest I've ever worked with. There are seven microscopic parts in that little area. I would have left some off but it is a good representation of the unique gear on the hell cat. Got to decide if I want to add the even smaller PE parts.

Kind of freaked out by the paint scheme. I may be able to do all of the assembly before I start the painting. There is only one color for the entire aircraft including landing gear and bays.

I like this kit a lot. The resin parts are beautifully molded and so much better than the plastic. The cannon barrels are incredible. I should ahve my airbrush back in action tomorrow. Hopefully the base coat will go on tomorrow evening.


  • Member since
    June 2010
  • From: Austin, TX
Posted by DoogsATX on Saturday, February 5, 2011 1:06 AM

Woot! Finally got to bust out the airbrush for real tonight!

The E-7 is primed (Mr Surfacer 1200) and just about ready for paint. Want to wet sand it baby-butt smooth tomorrow, since nothing sands smooth like Mr. Surfacer.

Also moved on to weathering the lower hull, suspension and tracks on the Sherman. Dusted the flanks, bogies, and front and back with Tamiya Buff thinned about 75%. Hit the tracks while I was at it, then went back and brushed MM Burnt Umber over the rubber chevrons with a wide, flat brush, since the Helo Drab recommended by the FSM article seemed too green. Moving on to pigments next, with the end very much in sight!

Here's a before and after:

and the tracks:

On the Bench: 1/32 Trumpeter P-47 | 1/32 Hasegawa Bf 109G | 1/144 Eduard MiG-21MF x2

On Deck:  1/350 HMS Dreadnought

Blog/Completed Builds: doogsmodels.com


  • Member since
    March 2010
  • From: Brisbane
Posted by Julez72 on Saturday, February 5, 2011 2:32 AM

Great work everbody, lovin all these picsYesYesYes

More from me

I did the preshade in RLM66 and painted on the undersurface RLM 76...I'm moving quickly on this one because i'm off work with an ear infection and i've found plenty of bench time.....anyways a pic...


edit::stupid laptop touchpad....


  • Member since
    December 2003
  • From: Charleston, SC
Posted by sanderson_91 on Saturday, February 5, 2011 9:01 AM

Ditto - great work from all!

TigerEP1 - I'm really liking your tank

jbrady - very nice Hellcat - I have the F6F-3 in he stash but not the F6F-5N - might have to pick one of them up! 

doogs - your 109 looks really good.  I've never primed with Mr Surfacer before - I'll have to give that a try.  Your Sherman looks awesome - I have some armor in the stash but haven't built any yet - gonna have to move a Sherman to the top of the pile

julez72  - you 190 is looking good too!  Can't wait to see the finished product!


  • Member since
    October 2008
  • From: New Jersey
Posted by oddmanrush on Saturday, February 5, 2011 10:14 AM

Hi all, a lot of good progress being made here! Good work from every one so far.

As for me, I decided to try something new. Since the 190 will have been sitting around for a long time I wanted to have most of its bare metal exposed, paint faded, etc, so I put some aluminum foil on the upper surfaces on the plane. The places that would be most exposed to the sun and elements. It looks really shiny now, but this is only the beginning. I will tone it down as I progress. Either way, I'm super happy with it as it is the first time I've tried foil for a NMF.

What do you think?

Jon

My Blog: The Combat Workshop 

  • Member since
    July 2010
Posted by jbrady on Saturday, February 5, 2011 10:30 AM

Jon: It looks good. I can't get my head around foiling. Do you use a piece for each panel, one large piece to cover, say, a wing? how do you deal with areas that pieces of foil butt against one another? Just something else to learn.


  • Member since
    June 2010
  • From: Austin, TX
Posted by DoogsATX on Saturday, February 5, 2011 12:03 PM

Great progress, everyone! Loving all the different types of builds we've got going on here!

Tiger - the Stug is looking great! What are you using for the rust? May have to build myself something in Panzer Grey soon...love the color!

jbrady - I haven't even tried test-fitting the 109's gear yet, but I'm worried. Eduard's Yak-3 has very annoying landing gear, and if the Hellcat's in that same boat...yikes!

Julez - progress! I'm trying to decide if I want to to preshade the 109 or not...I tend to accidentally cover it all up!

oddmanrush - that 190 is looking pretty great already. Congrats on the foiling...that's one bit of modeling I know I don't have the patience for!

I'm currently trying to figure out how I want to proceed with painting the 109. To preshade or not? I'm also thinking about going against the "light to dark" tradition, since it seems like it'll be a lot easier to mask the RLM 79 sandgelb than the RLM 78. Got awhile to make up my mind, though, since I have to paint the white fuselage band first...

On the Bench: 1/32 Trumpeter P-47 | 1/32 Hasegawa Bf 109G | 1/144 Eduard MiG-21MF x2

On Deck:  1/350 HMS Dreadnought

Blog/Completed Builds: doogsmodels.com


  • Member since
    July 2010
Posted by jbrady on Saturday, February 5, 2011 2:35 PM

Doogs: Had the same quandry with the Hellcat to pre-shade or not. The dark sea blue will certainly cover it with even light coats... went with it anyway. Actually the landing gear on the Hellcat is surprisiingly straightforward. Just very fiddly. Eduard did a very good job of representing the mechanism that twists 90 degrees while retracting. It's just that in 1/48 the parts are incredibly tiny. What I did was pllace the parts for the oleo struts and let them sit for a couple of hours. Then I set the gear in the wing and attached the parts to the main struts that also attach to the gear bay. After that set, I had a complete gear assembly that could be removed for safekeeping.


  • Member since
    January 2011
  • From: Springfield, MA
Posted by TigerEP1 on Saturday, February 5, 2011 2:55 PM

Doog's thanks!

The rust for me is very simple combo of literally 3 paints. I start by mixing bestial brown and  pueblo red so it end up being a reddish brown (bestial brown is a medium /light brown. Pueblo red is a touch on the maroon side. Once its dry i dab a citidel flesh wash over it which give it that varied look. Then i do a bit of streaking with the same wash. it works out nicely as the wash isn't thinned and streaks well. Simulates the rust stains nicely. =)

I'll get pics of the paint later today so you can see the colors.


On the bench:

1/35th Tamiya Willi's MB


  • Member since
    May 2005
  • From: Dublin Rep Of Ireland
Posted by terry35 on Saturday, February 5, 2011 5:26 PM

JBrady, I like the speed at which you have recovered from disaster and got back up to speed, looking forward to seeing you progress.

Doogs that Sherman is really coming along well, looks great with the weathering so far.

Bob your pic's are coming up as moved or removed.

Ruddratt those planes are beautiful, wish I had the patience to try WWI planes.

Doogs, JBrady, Richard,Pepper Vetteman, Julez and everybody else thanks for the kind compliments, it means a lot since its so long since I have been on the bench.

I did a small piece on chipping about 2-3 years ago, since I saved it I will post it here.


Anyhoo.....

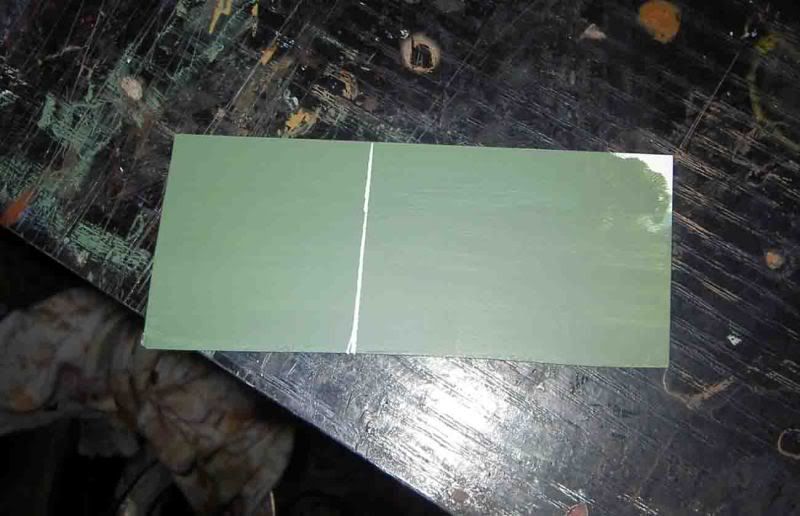
1. I just painted a piece of card green.

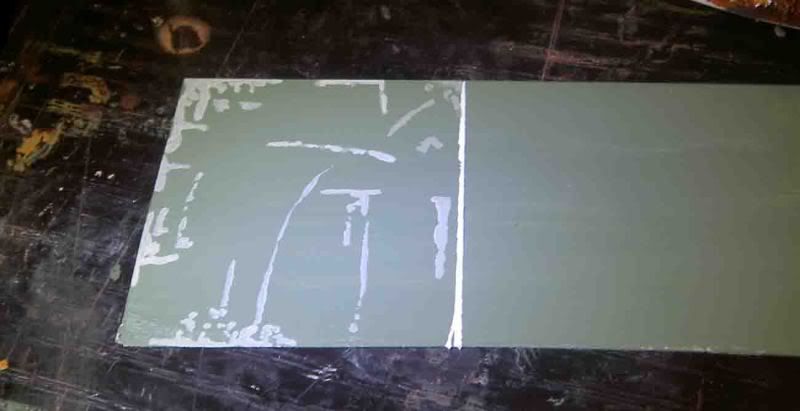
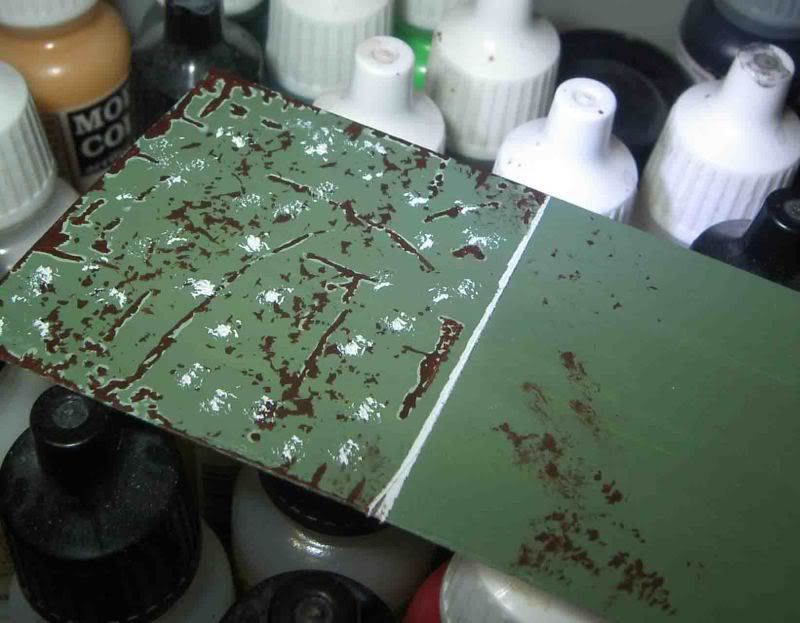
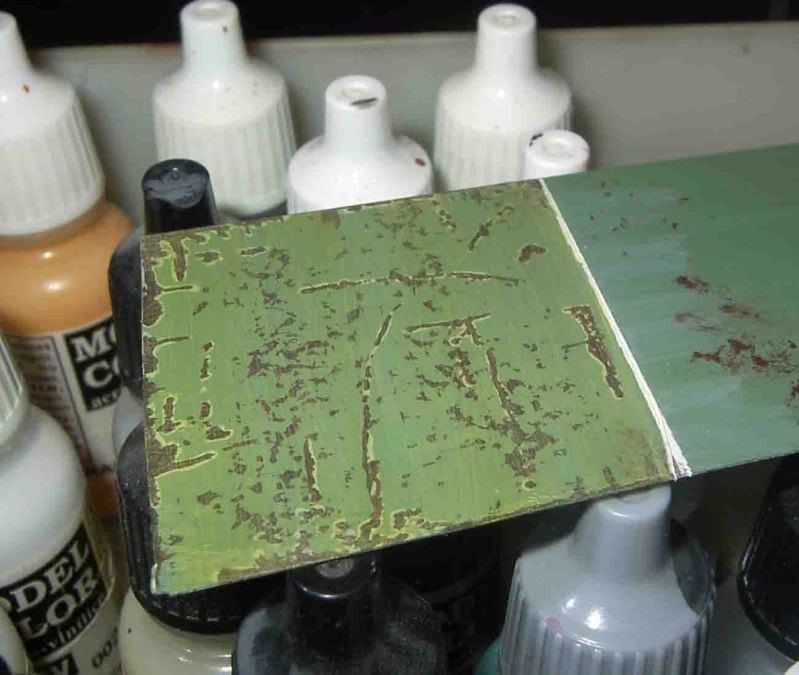
2. By lightening the green with white I can start to paint in the base of the scratches.

3. I painted in the exposed and surface corroded steel in brown.

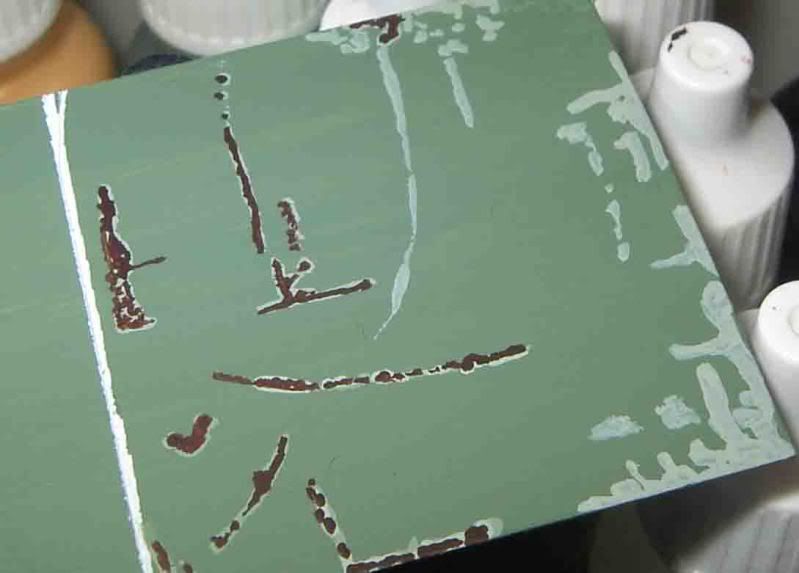
Smaller chips and scrapes can be added with a sponge or an old brush, I have to thank Karl for the old  brush technique from his Nashorn build which was ann eye opener for me.

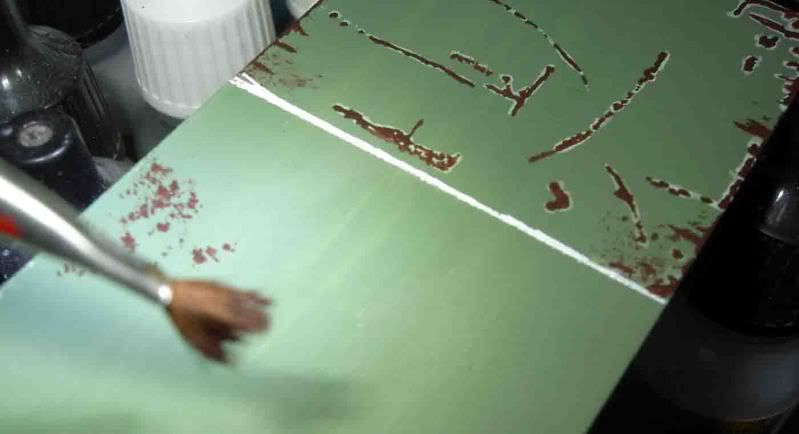
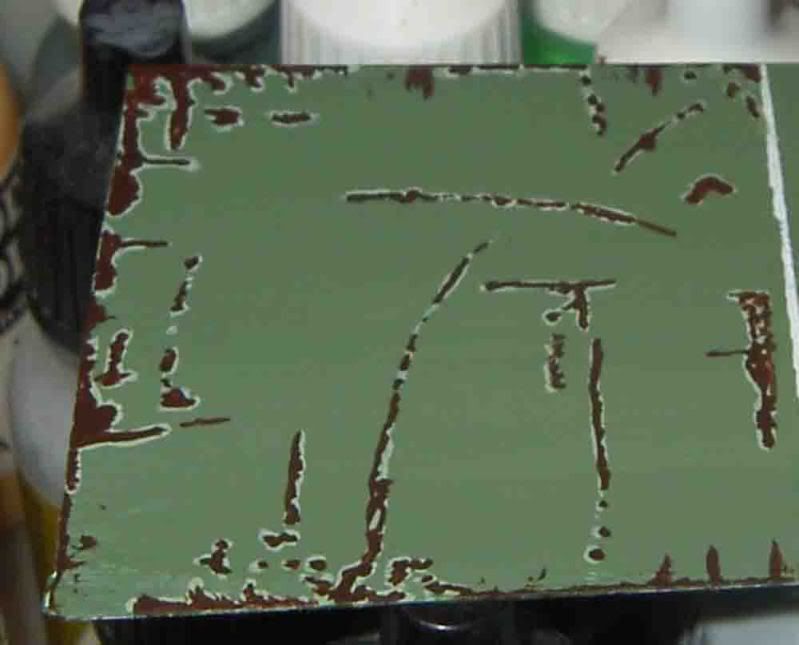
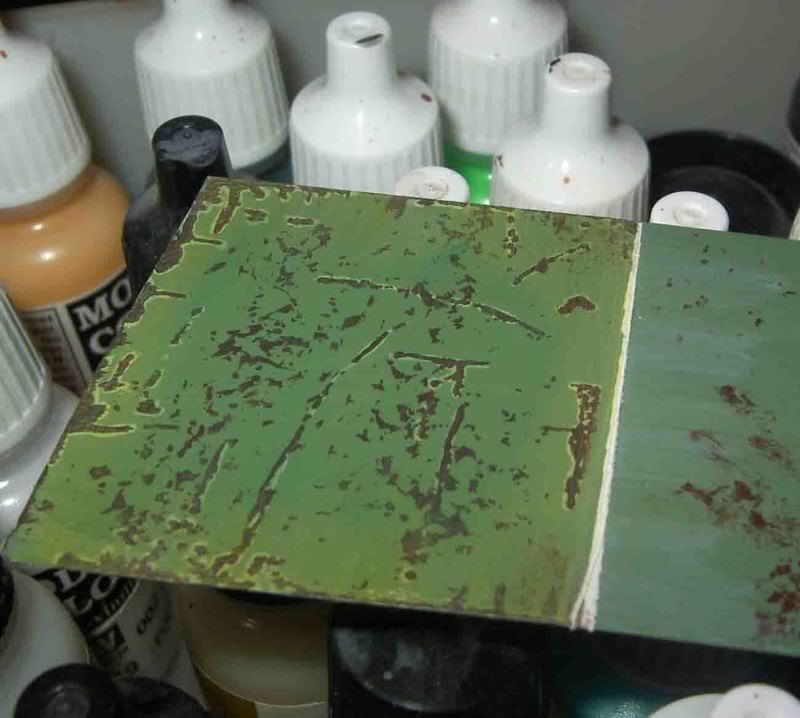
4. Small amounts of white oil paint added and blended.

You can also see the brush chip and the sponge chip here.

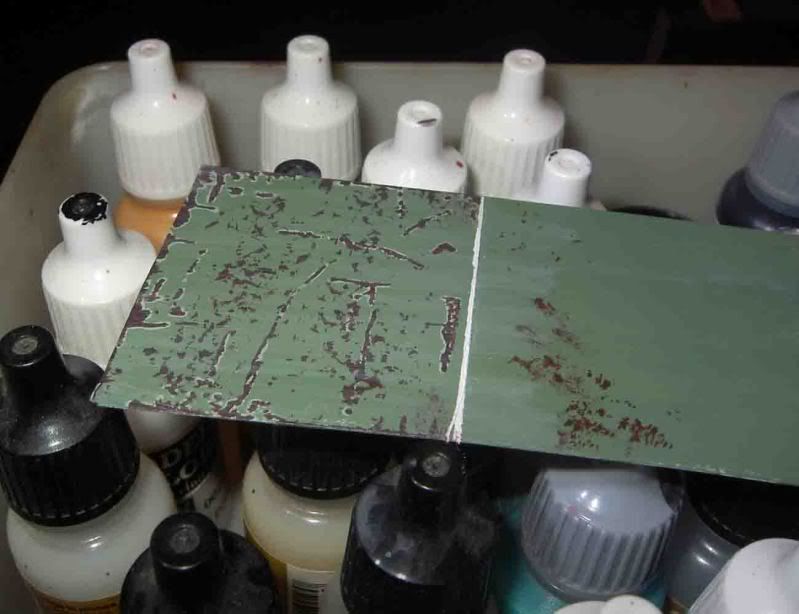
Next Yellow added and blended.

5. now blue added to the central areas and blended.

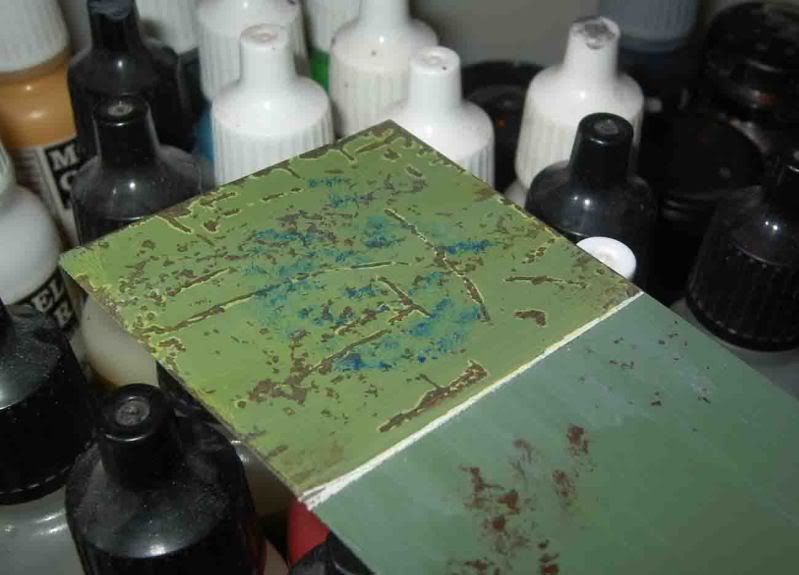
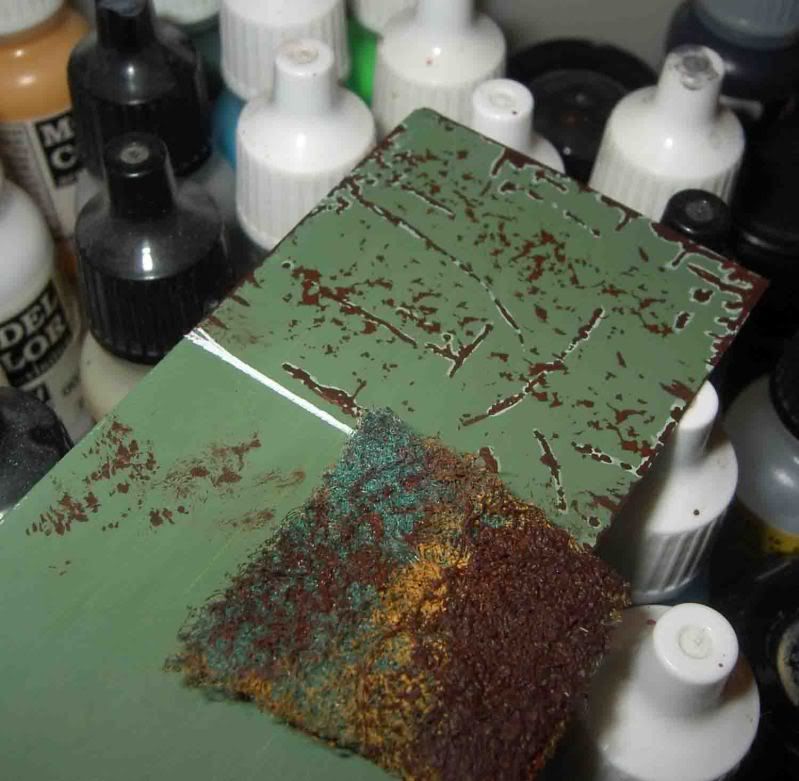
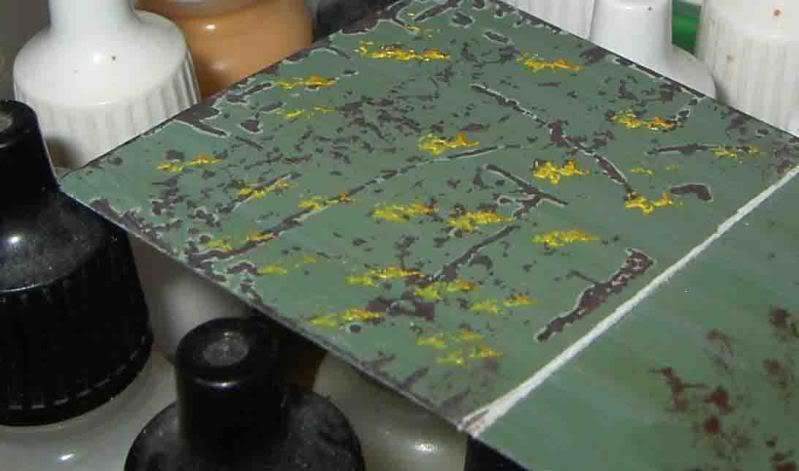
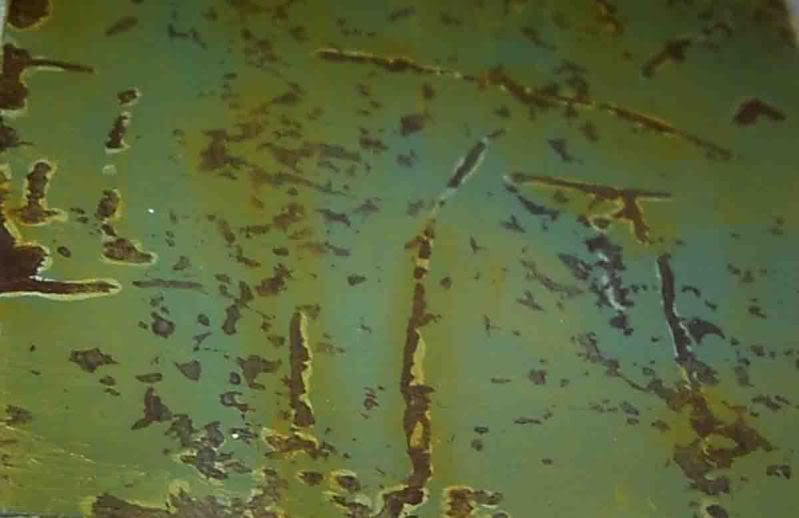
Finishing off, surface rust added, this tends to seep into the surrounding paint work.

You could be much more subtle here, but I was in a hurry.

And the finished article. You could tweek your finish to suit your own tastes from here.

Everybody has their own favourite finish, and who am I to tell anybody different.

What I really want to do is try and take real world weathering photos and try replicate them.

On the way to work in the mornings I normally pass a beer lorry in temple bar and even though the vehicle in only a couple of years it is amazing to see theh condition of the flatbed.

Thanks for looking and goodluck to everybody with their progress in this GB.


Terry

  • Member since
    May 2005
  • From: Dublin Rep Of Ireland
Posted by terry35 on Saturday, February 5, 2011 5:33 PM

Julez  I really like the preshading on the 190. thet yellow looks great, its one of the few colours that frightens me.

Jon the work on your 190 is great. I get the idea of what your aiming for,cool.

Tiger, |I like your rusting on thet stug, if you dont mind me saying some of the photos seem a little dark. I hold a LED torch over the model before I take the shot. Still you are making good progress on a fantastic subject.

Terry.

  • Member since
    March 2010
  • From: Brisbane
Posted by Julez72 on Saturday, February 5, 2011 5:53 PM

Terry, awesomeCoolthanks for posting that techniqueToast

Thanks for the comments on the 190 guysYes I normally only preshade luftwaffe birds with the soft demarcation lines between colours, anything with hard line like a spitfire i'd rather postshade...

So i'm moving quickly with this one, all the camo is on and i've moved on to the exaust area, a decal is supplied for this but i'm not good with large decals at all so i'm just going to paint it on....


  • Member since
    May 2005
  • From: Dublin Rep Of Ireland
Posted by terry35 on Saturday, February 5, 2011 7:36 PM

Julez, good point about preshading for luftwaffe birds and not for the likes of something with a hard edge, never thought of anything in that manner and it makes perfect sense now.

Terry.

  • Member since
    October 2008
  • From: New Jersey
Posted by oddmanrush on Saturday, February 5, 2011 8:17 PM

Man, I can't keep up with you guys! Terry, that is one awesome little tutorial for chipping paint...I will have to book mark that for a while!

Jbrady thanks for the comment. Don't worry, I can't get my head around foiling either! I won't attempt it for a factory fresh, show piece model any time in the near future. I figured it would work here since I don't need it to be perfect since the 190 is suppose to be a weathered wreck. The wrinkles and imperfections in my technique seem to make it look more like stressed and dented aluminum so haste and inexperience worked in my favor this time.

In this case, for the wings I just foiled the entire wing with one large piece. First, I put some liquid glue along the outer edges of the wing, all the way around. Then laid down a large section of foil. I burnished it down with the back side of a paint brush to make it as smooth as possible and to show the detail beneath. Once the glue dried and it was set in place I trimmed the excess with my blade. For the cowling I covered several panels worth with one section of foil. Using the same method, I just glued around the panels and laid the section of foil over it. Trimmed as necessary.

Again, it works here because it doesn't have to be perfect. If I was doing a P-51, I certainly wouldn't be brave enough to employ this method.

Thanks again guys, keep up the good work, I'm loving this build!

Jon

My Blog: The Combat Workshop 

JOIN OUR COMMUNITY!

Our community is FREE to join. To participate you must either login or register for an account.

SEARCH FORUMS
FREE NEWSLETTER
By signing up you may also receive reader surveys and occasional special offers. We do not sell, rent or trade our email lists. View our Privacy Policy.