SEARCH FINESCALE.COM

Enter keywords or a search phrase below:

Weathering GB - 2/1/2011 - 1/31/2012

24487363 views
861 replies
1 rating 2 rating 3 rating 4 rating 5 rating
  • Member since
    June 2010
  • From: Austin, TX
Posted by DoogsATX on Thursday, February 17, 2011 7:50 AM

Bob - gotta agree with everyone else, stunning work! I'm not the biggest motorcycle guy (my wrenching tastes fall more toward the CJ, early Bronco, FJ40, old Land Rover types), but I've got a friend with two Ducatis and yeah...one of them looks pretty similar. Those rashes are downright realisitic...from the right angle, I would confuse this for the real thing! I'll get it up on the front page soon!

More progress on the 109. At this rate, I'll be wrapping it up this weekend!

Flat coat on, canopy unmasked, tailwheel installed. Also, a note to anyone using Eduard's Brassin wheel set on the 109...REPLACE THE KIT'S TAILWHEEL MOUNT WITH THE RESIN ONE! The resin strut is too thick for the kit's mounting hole. Mr. Dremel and I had a little something to say about that, and I had to cut a few millimeters of the strut, but it's in.

On the Bench: 1/32 Trumpeter P-47 | 1/32 Hasegawa Bf 109G | 1/144 Eduard MiG-21MF x2

On Deck:  1/350 HMS Dreadnought

Blog/Completed Builds: doogsmodels.com


  • Member since
    February 2006
  • From: Smithers, BC, Canada
Posted by ruddratt on Thursday, February 17, 2011 11:31 AM

Very nice work fellas!! Yes Lots of fine examples of weathering. What's really neat is the different extremes each piece shows. Cool stuff!

jbrady, you did a stunning job on the Hellcat! I know you had your struggles with it, but the result is a piece I'd be proud to display in my collection. Your other 'cat is coming along real nice too - can't wait to see 'er finished!

Tiger, great pastel work on the stug. I love using those for weathering!

Doogs, you are a machine! That emil is just amazing! I know what you mean about eduard's decals - I've build a fair amount of their WWI stuff, and the decals were always a treat to apply!

Jon, that Fw of yours is just begging to be placed in a dio! Excellent work!

Robert, that bike is just way too cool! Your weathering/paint skills are at a level I sure hope to acheive someday. The way you replicated the scuffed paint on the panels is genius! Looks like the real thing!

Casper, I'm definitely looking forward to your next project here. Given your skill level, that 109 will be a treat for the eyes for sure!


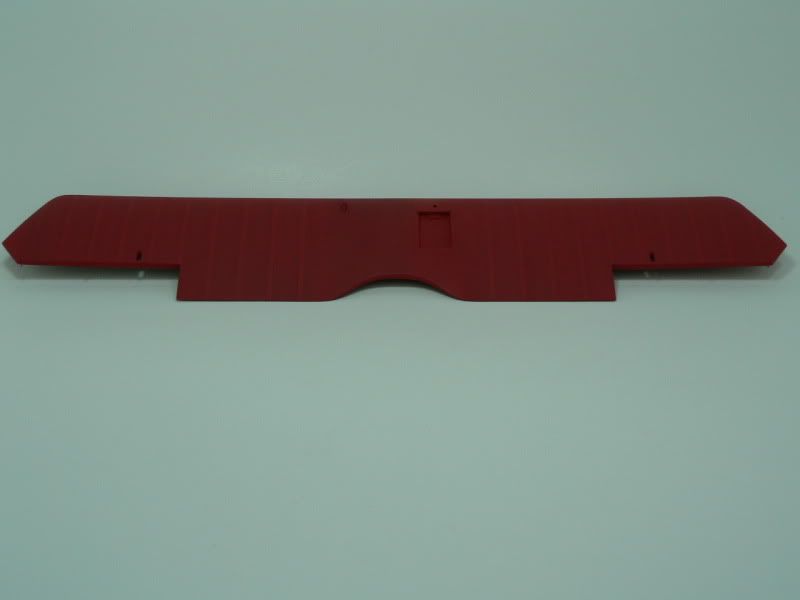
I'm happy to say that I've been able to make a good deal of headway on the Pfalz. Most of the paint is on and the weathering process is underway, although I'm leaning towards the subtle end of the spectrum, using it to break up and give some depth to what is really a simple 2-color paint scheme. To break up the solid red on the wings, I applied a base coat of tamiya flat red, masked all the ribs, and then lightly sprayed a well-thinned mix of tamiya smoke & flat black over just the ribs, moving front to back. The red under the masks was way too bright after the masks were removed, so a second light coat of red, this time MM Acryl insignia red was misted on over each rib and in between until I got the result I was looking for. Very light random shots of the smoke/flat black mix were then applied to the white and red areas on the fuselage to dirty them up a bit, and the ribs on the horizontal tailplane were free-handed using the same mix.

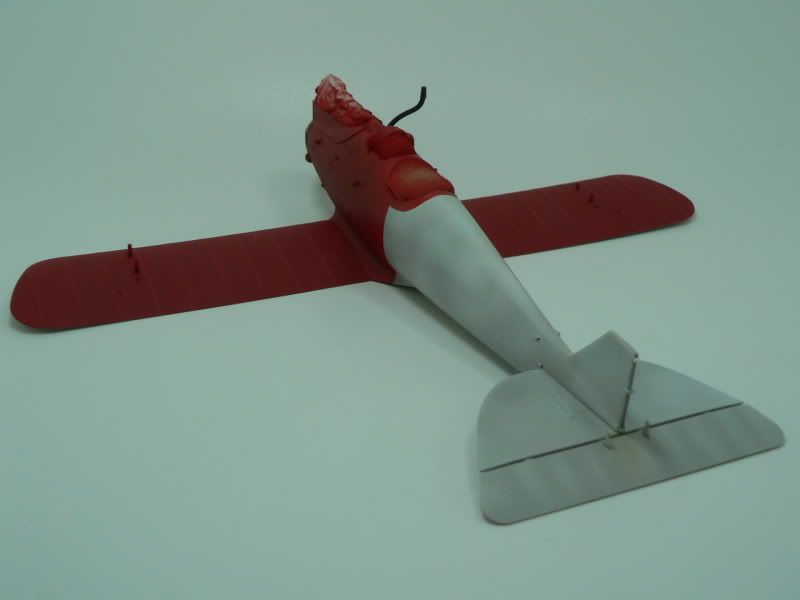
Today I am off from work, and plan on making some major headway on 'er. All the struts including the main gear have paint, and after a coat of Future on the undersurfaces of the wings, the lozenge decals will start to go on.

Keep the pics coming fellas. This is an awesome GB!!

Mike

 "We have our own ammunition. It's filled with paint. When we fire it, it makes pretty pictures....scares the hell outta people."


  • Member since
    May 2003
  • From: fort mill SC
Posted by Robert92562 on Thursday, February 17, 2011 3:15 PM

Thanks guys for all the nice comments. To answer a few questions. The weathering on the frame and motor is a thick wash of brown and black artist oils mixed with a thick paint thinner. I brushed the motor and then the frame trying to get it to stay more in some spots and less in others.

As far as the road rash. After sealing the decals with a coat of clear gloss I used a heavy gage nail file and just tried to scuff through the decals untill i hit the yellow and primer below. addind the dirty wash helped the scuffs realy show.

The weld are the way the kit comes, I think the wash really showed them off.

I have to credit the doogsATX web page for posting his lighting set up. I think it has help me post some much improved photos.

Thank again and looking forward to seeing more of the great post in this GB.

Bob


  • Member since
    July 2010
Posted by jbrady on Friday, February 18, 2011 1:31 PM

ruddratt: I love the color... did these guys think of this as camoflage?

Robert: Lighting or no that is one slick build. From some angles it really does look like the real deal.

There's going to be a delay in the Wildcat... I'm going to work on the F6F 3 for a while. Should be great weathering excercise.


  • Member since
    June 2010
  • From: Austin, TX
Posted by DoogsATX on Friday, February 18, 2011 1:45 PM

ruddratt - that thing's looking great! I love how the ribbing almost makes weathering biplanes the inverse of later steel-skinned aircraft. Only hope I can do so well with my Pup!

Bob - glad my lighting tips helped! 

jbrady - can't  wait to see that Hellcat! That gun and ejection port staining is just ridiculous! Also really like the overpainted national insignia - almost looks like it was flying the older star-and-circle markings, but I didn't think Hellcats were in service before that got phased out?

The 109 is racing toward the finish line. I'm hoping to probably be done with it tomorrow. Last night I got the gear on (ugh...why is Eduard's landing gear so poorly designed...especially sitting at this precarious angle...I want more than faith in CA to hold the plane up), got a start on the chipping, toned down the prop chipping with Model Master RLM 70 (close enough to the Gunze, much better for drybrushing), and painted RLM 02 on the surfaces exposed by the extended slats. Also test-fit the canopy. I've been sweating bullets about how to attach this thing and the little PE bit that's supposed to hold it to the rear canopy. Good news is that the canopy is such a snug fit that it'll hold itself in place, so I don't have to rig any sort of ridiculous jig for it!

Here's a little teaser. Hopefully the next pics will be of the finished product.

On the Bench: 1/32 Trumpeter P-47 | 1/32 Hasegawa Bf 109G | 1/144 Eduard MiG-21MF x2

On Deck:  1/350 HMS Dreadnought

Blog/Completed Builds: doogsmodels.com


  • Member since
    July 2010
Posted by jbrady on Friday, February 18, 2011 2:24 PM

Doogs: Good to see that the 109 is on schedule.

The F6F 3 is a repaint. That aircraft was originally intermediate blue over gull grey. If you look at the underside of the wing you can see a border of the grey along the leading edge. As for the National insignia I'll have to check my references. I know that some F6F's carried the red border but that was only for about a month and I don't know if any Yorktown planes had the red borders.


  • Member since
    October 2008
  • From: New Jersey
Posted by oddmanrush on Friday, February 18, 2011 2:38 PM

Haven't been real vocal here lately, sorry gents. Course I haven't been real productive either Embarrassed but I hope to have some work time tonight and over the weekend. In the mean time I owe some kudos to some really awesome builds! Bob that bike looks fantastic. I love the paint scrapes. Looks very much like its taken a few spills in its day. Doogs I see you are doing fine work as usual, its refreshing to see a Trop 109 around, haven't seen a lot of them lately...very eye catching work.

Can't wait to get off work, put the kids to bed and then tear at the Fw 190.

Oh, I'm thinking guys....not sure if I like the look of my Fw 190 after all. I wanted to use the salt masking but its made the paint looked more chipped than faded. I'm not really sure if that is the appropriate look for it. I also think I'm not really pleased with the bit of green I added. If you have opinions let me know. If I don't change any thing I'm hoping that some washes and dry brushing will add a little more of the what ever it is that is missing....

Jon

My Blog: The Combat Workshop 

  • Member since
    October 2010
  • From: Hobart, Australia
Posted by Casper the Chihuahua on Friday, February 18, 2011 6:18 PM

Doogs, the Bf bird really looks great. Can't wait to see the dirt ad weathering detail for this Trop version. I am now literally drooling to start my Bf 109. Hopefully next week!

Cheers

On the bench: A-4F 1/32 Hasegawa

Just deployed: F6F-5N Hellcat Nightfighter 1/48 Eduard

Up next: A6-E Intruder 1/48 Revell

  • Member since
    June 2003
  • From: Garland, TX
Posted by pepper kay on Friday, February 18, 2011 6:55 PM

Hey Guys:

Has anyone used 'FAST FRAMES' for their canopies ?? ...

Thanks,

pepper

  • Member since
    June 2010
  • From: Austin, TX
Posted by DoogsATX on Friday, February 18, 2011 10:43 PM

pepper kay

Hey Guys:

Has anyone used 'FAST FRAMES' for their canopies ?? ...

Thanks,

pepper

I haven't. Had a set come with my now-ruined Academy P-38 and was seriously considering them considering how much a PITA masking the P-38 canopy seems to be (especially on that Academy kit), but when I asked around the prevailing opinion was that they were crap and best avoided.

On the Bench: 1/32 Trumpeter P-47 | 1/32 Hasegawa Bf 109G | 1/144 Eduard MiG-21MF x2

On Deck:  1/350 HMS Dreadnought

Blog/Completed Builds: doogsmodels.com


  • Member since
    June 2010
  • From: Austin, TX
Posted by DoogsATX on Saturday, February 19, 2011 1:47 AM

And the 109 is done!

Final touches include stretched sprue antenna, mig pigments for color (Beach Sand and Gulf War Sand), chipping with both drybrushed MM Aluminum and a silver prismacolor pencil, and wingtip lights done in MM Chrome Silver overpainted with Tamiya clears.

Overall, I think this kit can stand for some improvements (gear struts!), but it's extremely solid and builds up well. 

Okay, enough blathering.

Thanks for following along and making this such a great GB, everyone! Don't think my Mossie qualifies, and if my next armor build ends up being what I think it will, I'll be doing a standalone WIP for it, but I'll still be around here and back with the PBJ before long!

On the Bench: 1/32 Trumpeter P-47 | 1/32 Hasegawa Bf 109G | 1/144 Eduard MiG-21MF x2

On Deck:  1/350 HMS Dreadnought

Blog/Completed Builds: doogsmodels.com


  • Member since
    July 2010
Posted by jbrady on Saturday, February 19, 2011 9:07 AM

Another beautiful build well done Doogs.


  • Member since
    February 2006
  • From: Smithers, BC, Canada
Posted by ruddratt on Saturday, February 19, 2011 10:40 AM

Outstanding work as usual, Doogs! One of the finest 109's I've seen on these forums! Yes

Mike

 "We have our own ammunition. It's filled with paint. When we fire it, it makes pretty pictures....scares the hell outta people."


  • Member since
    May 2005
  • From: Dublin Rep Of Ireland
Posted by terry35 on Saturday, February 19, 2011 6:21 PM

Doogs, congratulations on finishing your build she looks killer.

Bob excellent  work there ,hope nobody was hurt falling off that bike, the damage is ultra convincing.


Terry.

  • Member since
    December 2003
  • From: Charleston, SC
Posted by sanderson_91 on Saturday, February 19, 2011 6:35 PM

jbrady

Doogs: Good to see that the 109 is on schedule.

The F6F 3 is a repaint. That aircraft was originally intermediate blue over gull grey. If you look at the underside of the wing you can see a border of the grey along the leading edge. As for the National insignia I'll have to check my references. I know that some F6F's carried the red border but that was only for about a month and I don't know if any Yorktown planes had the red borders.

Doogs - your 109 looks awesome!  I've been toying with the idea of builiding a few 1/32 aircraft - everything I've got is 1/48.  Might have to pick one of these up.

jbrady - I'm looking forward to seeing your F6F-3.  I haven't worked on mine in a few weeks but might break out the AB tonight.  The fading I did with the oils is OK, but not what I'm looking for.  I'm going to bit the bullet and hope that I don't fade it too much.  Here's where it stands now:

Thanks!

Steve


  • Member since
    July 2010
Posted by jbrady on Saturday, February 19, 2011 10:00 PM

Steve: It looks pretty good to me. Can't wait to see the finished product.


  • Member since
    October 2010
  • From: Hobart, Australia
Posted by Casper the Chihuahua on Saturday, February 19, 2011 10:29 PM

Doogs looks like I've got my work cut out for me! Nice 109! I took note of what you said about the landing struts and ordered the SAC metal struts.

Just awaiting the Brassin wheels and the Aires radio equipment. Got all the stuff for the diorama and will probably have to think about its design and layout soonish.

Cheers

On the bench: A-4F 1/32 Hasegawa

Just deployed: F6F-5N Hellcat Nightfighter 1/48 Eduard

Up next: A6-E Intruder 1/48 Revell

  • Member since
    December 2002
  • From: Bury St Edmunds, Suffolk, England
Posted by Bish on Sunday, February 20, 2011 5:40 AM

There is some amazing work going on here, and you all making me very jealous as i am 8,000 mils away from my workbench.

Doogs, the 109 looks just top rate and up to your usual impressive standard. I really must get me a 32nd 109 when i get back, but deffinatly going to look at the Dragon rather than Eduard E kit. Saying that, i should really just get round to building a 109 at any scale. So whats next for the Doogs touch.

Bod, that bike looks like its had the odd knock or tow. Great work you have done there. And i am sure theres some tips all of us could use whatever type of kits we build.

I am a Norfolk man and i glory in being so


On the bench: Airfix 1/72nd Harrier GR.3/Fujimi 1/72nd Ju 87D-3

  • Member since
    March 2010
  • From: Brisbane
Posted by Julez72 on Monday, February 21, 2011 9:10 AM

Doogs, lovely 109 you have thereYes it puts my old to one shame.....Tongue TiedGuess i'll have to do another one now i'm better with the AB, i was planning on doing the Zveda 109F in a trop scheme, the one with green stripes rather than spots.....

Bod, very cool work on the bikeYes it looks convincingly real.....


  • Member since
    July 2010
Posted by jbrady on Monday, February 21, 2011 10:21 AM

Really pused on this one for the last 36 hours. Just a little context.

It's late August or early September 1942 and VMF 223 has been on Guadalcanal for 2 or 3 weeks. Their aircraft are sitting outside in the mud and dust of Fighter One. Even the old school Marine crew chiefs can't keep up with cosmetic maintenance given the brutal operational pace, the daily bombings, and nightly shellings. White 2 is starting to show the conditions.

May just do another one of these to show what it looked liked at the end of October. By that time the upper camo would have looked like chalk instead of paint.

This one is just for a size comparison


  • Member since
    March 2010
  • From: Brisbane
Posted by Julez72 on Monday, February 21, 2011 10:33 AM

Jbrady, great work on both of them, well doneYes i like the 2 tone scheme on the Wildcat very muchToast


  • Member since
    July 2010
Posted by jbrady on Monday, February 21, 2011 2:28 PM

Also got some work in on the F6F 3 lst night. Fuselage buttoned up. Had to scratch lap belts out of pinstriping tape... hardly visible anyway. I can't find reference photos that show a diagonal brace in the windows behind the cockpit so I left them out. Despite what some experts on other sites will tell you about the drop tank, flangless tanks were in use as early as mid 1943. Got the seams taken care of and the rescribing done. I'm not crazy about the fit of the turbo wastegate (it was the same on the F6F 5 so probably a kit issue) but with the tank in place it's hardly visible anyway.


  • Member since
    February 2006
  • From: Smithers, BC, Canada
Posted by ruddratt on Monday, February 21, 2011 7:59 PM

jbrady, that Wildcat is a work of art! Your weathering is very effective - really shows the results of the harsh conditions those birds operated in. Yes

...and now you're at work on a third 'cat?! Man, I need to get crackin'!

Mike

 "We have our own ammunition. It's filled with paint. When we fire it, it makes pretty pictures....scares the hell outta people."


  • Member since
    March 2010
  • From: Brisbane
Posted by Julez72 on Monday, February 21, 2011 8:51 PM

ruddratt

...and now you're at work on a third 'cat?! Man, I need to get crackin'!

Ya Ditto


  • Member since
    June 2010
  • From: Austin, TX
Posted by DoogsATX on Monday, February 21, 2011 8:56 PM

Great job on the Guadalcanal bird, jbrady! I've added it to the build roster...and I'd love to see you follow it up with another from late October!


On the Bench: 1/32 Trumpeter P-47 | 1/32 Hasegawa Bf 109G | 1/144 Eduard MiG-21MF x2

On Deck:  1/350 HMS Dreadnought

Blog/Completed Builds: doogsmodels.com


  • Member since
    October 2010
  • From: Hobart, Australia
Posted by Casper the Chihuahua on Tuesday, February 22, 2011 7:17 PM

As the increasing list of AM grows for my Bf 109 it is going to be a few weeks until I get it all in the post. I've added the external bomb pack from Eduard, the Eduard PE exterior/interior set, the metal wheels, Aires radio set, Brassin wheels. I now have the Master gun barrels, Verlinden maps and the resin ammunition case.

So in the meantime I thought I would build a couple of the smaller diorama elements while I wait for the postman.

I got this last year, a Luftwaffe bomb trolley;

Really nice quality and fine detail. This should paint up nicely and can't wait to give it bumps and scratches etc.

Cheers


On the bench: A-4F 1/32 Hasegawa

Just deployed: F6F-5N Hellcat Nightfighter 1/48 Eduard

Up next: A6-E Intruder 1/48 Revell

  • Member since
    October 2010
  • From: Hobart, Australia
Posted by Casper the Chihuahua on Wednesday, February 23, 2011 5:02 PM

Fits together quite nicely, a couple of problems re the fit but generally good. The resin in this kit is extremely brittle so there have been a few tears and snaps. One thing I have noticed by looking at ref photos is that weld joins can look like CA glue painted over or the other way around.

My plan is to prime this with a mix of steel and RLM66, then using a foam brush I am going to fleck on RLM02 in patches where the device has been handled the least. I am hoping it has the look of a once RLM02 paint scheme that has almost flaked off with excess use.

Cheers

On the bench: A-4F 1/32 Hasegawa

Just deployed: F6F-5N Hellcat Nightfighter 1/48 Eduard

Up next: A6-E Intruder 1/48 Revell

  • Member since
    July 2010
Posted by jbrady on Wednesday, February 23, 2011 9:34 PM

It looks like a Hellcat. Wings and empenage are on. the engine is done. I thought about the resin engine... even worked on it for a while. I just don't have that skill set yet. Maybe the next build... maybe build one of the Verlinden Cyclones I have as a separate project. Food for thought.

I think it's time for a beer and maybe break out the airbrush or maybe not.


  • Member since
    May 2003
  • From: fort mill SC
Posted by Robert92562 on Thursday, February 24, 2011 7:36 PM

Can I get a little help from some of the fine aircraft builders in this GB. I have zero experence with building aircrafts. I started a 1/48 scale Tamiya A10A Thunderbolt.

My question, in step one and two it calls out for a 45-50g weight. Please tell me what you guys use for the nose weight. How are they installed.

Any help would be great.

Thanks

Bob

  • Member since
    June 2010
  • From: Austin, TX
Posted by DoogsATX on Thursday, February 24, 2011 7:43 PM

Lead. Any kind you can manage. 50g is actually quite a bit of weight and you're going to need it everywhere you can get it forward of the main gear struts. I'd look at fishing weights (large, small, they even have cone-shaped ones you can more-or-less cram into the nose). 

Also, I believe it's called plumbers tape, but it's a malleable metal strip with holes drilled throughout. I don't think it's lead, but it's extremely dense and heavy. You could use it to line fuselage walls, fold it over on itself, whatever works.

Also...DO NOT secure weights with putty! It'll eat the plastic. I usually secure bits with CA, then hit it with larger amounts of white glue. Takes awhile to cure, but it holds fine.

Good luck...I'm about to head back to the weighting game when I start the PBJ in April...

On the Bench: 1/32 Trumpeter P-47 | 1/32 Hasegawa Bf 109G | 1/144 Eduard MiG-21MF x2

On Deck:  1/350 HMS Dreadnought

Blog/Completed Builds: doogsmodels.com


JOIN OUR COMMUNITY!

Our community is FREE to join. To participate you must either login or register for an account.

SEARCH FORUMS
FREE NEWSLETTER
By signing up you may also receive reader surveys and occasional special offers. We do not sell, rent or trade our email lists. View our Privacy Policy.