SEARCH FINESCALE.COM

Enter keywords or a search phrase below:

Weathering GB - 2/1/2011 - 1/31/2012

24487363 views
861 replies
1 rating 2 rating 3 rating 4 rating 5 rating
  • Member since
    June 2009
  • From: Netherlands
Posted by kermit on Thursday, February 24, 2011 11:22 PM

Doogs,

As i said i wanted to do another large scale Uboat but as i am searching for it i couldn't help myself and plan in a smaller one: the RoG type XXI "Wilhelm Bauer" in 1/144 scale. Could i join the group with that one?

Also your suggestion of the new Arado from RoG was very tempting....maybe in the future. It does look stunning!Smile

Richard

"Success is the ability to go from one failure to another with no loss of enthusiasm." - Sir Winston Churchill

  • Member since
    June 2003
  • From: Garland, TX
Posted by pepper kay on Friday, February 25, 2011 12:28 PM

Robert92562

. Please tell me what you guys use for the nose weight.

Hey Bob:

You've gotten some good suggestions from the group ... I also use BB's - get 'em at WalMart or a sporting good store ... pour them in all around the nose of the fuselage, add a dab or two of Super Glue (CA) and a lot of white glue to seal them in ... ...

To answer one of your questions, you add weight up front so that the model will sit on all its' wheels and not have the tail drag on the ground ...

pepper

  • Member since
    May 2003
  • From: fort mill SC
Posted by Robert92562 on Friday, February 25, 2011 12:56 PM

Thanks doogs and pepper, I picked up some lead tape from a plumber on my job and i have some BB's. Never thought of the BB's, This is why I love this fourm. Nothing to show on this build yet but I'm working on it.

Bob

  • Member since
    October 2010
  • From: Hobart, Australia
Posted by Casper the Chihuahua on Friday, February 25, 2011 8:43 PM

Finished painitng the bomb tolley;

Think it turned out pretty well. The paint faking techniques worked really well. A good prime of RLM66 + steel and then daubed on the RLM02 with a small sponge brush. A bit of silver dry-brush highlighting on the heavy use areas and the lugs and then a very generous wash of a rusty brown oil with a touch of black to help pick out the details.

Next up is the Luftwaffe Oil cart, a little more complicated this kit. I read somewhere the 109s often leaked a lot of oil and these carts were used all the time to keep them topped up.

Cheers

On the bench: A-4F 1/32 Hasegawa

Just deployed: F6F-5N Hellcat Nightfighter 1/48 Eduard

Up next: A6-E Intruder 1/48 Revell

  • Member since
    June 2010
  • From: Austin, TX
Posted by DoogsATX on Friday, February 25, 2011 9:49 PM

kermit - gotcha added! Sad it won't be the Arado, but looking forward to a sub nonetheless!

Casper  - that bomb cart's looking slick!

Anybody see this month's FSM? Some really great tips for weathering older raised-line kits!

On the Bench: 1/32 Trumpeter P-47 | 1/32 Hasegawa Bf 109G | 1/144 Eduard MiG-21MF x2

On Deck:  1/350 HMS Dreadnought

Blog/Completed Builds: doogsmodels.com


  • Member since
    March 2010
  • From: Brisbane
Posted by Julez72 on Friday, February 25, 2011 10:32 PM

Richard, looking forward to seeing that sub come together, i'll be starting my verlinden biber soon, thinking about a little display with that oneToast

Casper, i agree with Doogs, very nice looking bomb cartYes

Progress report..... I've put the wash on and have the first coat of flat clear on, after the kids go to bed i'll add the staining around the exausts and guns with pastels and hopefully have finished pics up by tomorrow...


  • Member since
    October 2010
  • From: Hobart, Australia
Posted by Casper the Chihuahua on Friday, February 25, 2011 10:41 PM

Julez72

Casper, i agree with Doogs, very nice looking bomb cartYes

Thanks! As in nice and dirty! Just wait for the Oil cart, that's going to have leaks an'all! Smile

Cheers

On the bench: A-4F 1/32 Hasegawa

Just deployed: F6F-5N Hellcat Nightfighter 1/48 Eduard

Up next: A6-E Intruder 1/48 Revell

  • Member since
    March 2010
  • From: Brisbane
Posted by Julez72 on Friday, February 25, 2011 10:59 PM

Yeah i like the oil cart it would look good on a base with a figure or two...i have a fair amount of 1/48 tamiya airfeid accesories that i will oneday turn into little displays for my builds...


  • Member since
    July 2010
Posted by jbrady on Saturday, February 26, 2011 9:07 AM

Got all the little bits on last night... suddenly I'm at the point where I have to decide how to paint this thing.

This aircraft was a field repaint so I'm thinking I should paint the thing in intermediate blue over gull grey with the national markings then paint the three-tone scheme over that. Never done a three-tone scheme before so it should be a challenge.


  • Member since
    June 2003
  • From: Garland, TX
Posted by pepper kay on Saturday, February 26, 2011 9:43 AM

jbrady

This aircraft was a field repaint so I'm thinking I should paint the thing in intermediate blue over gull grey with the national markings then paint the three-tone scheme over that. Never done a three-tone scheme before so it should be a challenge.

Why not do the three-tone scheme from the beginning with each of the color coats lightened up considerably ... then, add even more white to the 3 colors and go back over, spraying each of the large panels with the lighter - lightened colors and then shoot the thing with a very thin white 'haze', maybe 10% paint - 90% thinner ...

Just a thought ...

pepper

  • Member since
    July 2010
Posted by jbrady on Saturday, February 26, 2011 9:52 AM

Pepper: That's one way to go. If you look at the picture on the deck you'll notice that the underside of the wing shows the gull grey on the leading edge. It'll be easier if I just paint the underside grey to begin with. I'm going to have trouble with insignia white and the grey will act as a primer. It almost looks like the side national markings were oversprayed with a very light blue before the stars with a bar were put on. Thing that amazes me is how beat up this airplane is considering it's the commander's personal airplane.


  • Member since
    June 2010
  • From: Austin, TX
Posted by DoogsATX on Saturday, February 26, 2011 10:27 AM

jbrady - I like your plan. I agree it looks like the fuselage insignia was overpainted, and it'd be cool to represent that in the build.

Also, instead of straight Insignia White, you may want to consider a VERY light gray (something like Model Master Camoflage Gray), or put a few drops of gray into the white. Should help with coverage, but also keep the white from looking too clean.

On the Bench: 1/32 Trumpeter P-47 | 1/32 Hasegawa Bf 109G | 1/144 Eduard MiG-21MF x2

On Deck:  1/350 HMS Dreadnought

Blog/Completed Builds: doogsmodels.com


  • Member since
    June 2003
  • From: Garland, TX
Posted by pepper kay on Saturday, February 26, 2011 10:36 AM

jbrady

http://i1228.photobucket.com/albums/ee442/jbrady29/F6Fs_on_USS_Yorktown_Aug_1943.jpg

More puzzlers here ... what carrier was this photo shot on ? ... if an Atlantic fleet airplane, the color scheme would be gray and white ... and their paint was beaten up even more than the Pacific aircraft ...

The star/bar looks to be an overpaint of a RNAF roundel ... look at the circular 'lines' underneath and over the top of the star/bar ... the Brits used Hellcats as well in the Atlantic and p'haps this was some sort of exchange-program bird ? ...

'Tis a head-scratcher for sure though ...

pepper

  • Member since
    July 2010
Posted by jbrady on Saturday, February 26, 2011 10:42 AM

Pepper: It's VF 5 on the Yorktown August 1943. Check out the green prop spinner. The great thing about this photo is the documentation that goes with it.


  • Member since
    June 2003
  • From: Garland, TX
Posted by pepper kay on Saturday, February 26, 2011 11:04 AM

jbrady

Pepper: It's VF 5 on the Yorktown August 1943. Check out the green prop spinner. The great thing about this photo is the documentation that goes with it.

OK, I've found this photo ... check this link:  http://www.markstyling.com/F6F.01.htm

On the first page, there are several VF-5, Yorktown 1943 Hellcats - on the 2nd page, I believe there's one more ...

Take a look because each carries a different paint scheme :-) ...

pepper

  • Member since
    July 2010
Posted by jbrady on Saturday, February 26, 2011 11:25 AM

Thanks pepper, I've seen those plates. i'll be workign form the May 1943 image for the original paint. I know, though, that the August 1943 image is wrong in that Flatley's plane carried the blue rectangle and star not the red surround. The proof is the photo that we're discussing. Also VF 5 had the prop bosses painted green not intermediate blue. I love working from actual photo's of the planes I'm modeling.


  • Member since
    June 2003
  • From: Garland, TX
Posted by pepper kay on Saturday, February 26, 2011 11:40 AM

jbrady

 i'll be workign form the May 1943 image for the original paint. I know, though, that the August 1943 image is wrong in that Flatley's plane carried the blue rectangle and star not the red surround. The proof is the photo that we're discussing.

I always thought the red surround was on all the a/c early in the war, then taken off ... if that be the case, then perhaps the captions on the photos (showing the dates) are incorrect  ? ...

pepper


  • Member since
    July 2010
Posted by jbrady on Saturday, February 26, 2011 11:55 AM

The red and white stripes and the red ball in the center of the star were early war and removed in May 1942. The red surround was mandated in early 1943 and removed a month later. Some groups never had time to put them on at all. Some groups carried them for a month or two. Must have driven ground crews crazy keeping up with all the marking changes.


  • Member since
    June 2003
  • From: Garland, TX
Posted by pepper kay on Saturday, February 26, 2011 11:57 AM

Now I've gone and screwed up again ?? ... confusion reigns today ...

I just checked Wikipedia and here's their write-up on Flatley:

After Coral Sea, he returned to the states to form VF-10, flying F4F Wildcats. Named the Grim Reapers, as Commanding Officer (CO), Flatley became "Reaper Leader." There were successes at Guadalcanal, but several losses which left him frustrated. Following his tour as Commander Air Group Five (CAG-5) on board USS Yorktown (CV 10), during which he helped introduce Grumman’s F6F Hellcat to combat in August 1943, Flatley at the age of 36 never flew combat again.[1]

Lt. Commander Flatley as Commander Air Group 5 (CAG-5) in his F6F-3 Hellcat on the flight deck off USS Yorktown before takeoff during the Marcus Island raid on 31 August 1943. This raid was featured in 1944 film The Fighting Lady.

So the caption for this picture - same as your picture - would indicate the color scheme as being August 1943 ...

pepper


  • Member since
    July 2010
Posted by jbrady on Saturday, February 26, 2011 1:52 PM

Pepper: That's the same photo. I just used photo shop to crop and enhance so that I could use it for reference.


  • Member since
    July 2010
Posted by jbrady on Saturday, February 26, 2011 2:36 PM

Okay so now I've had a serious senior moment... I forgot to get decals for this particular build. I have the national markings but no lettering that's appropriate. Does anyone know if there are decals sheets with generic US Navy marking from WWII?


  • Member since
    December 2003
  • From: Charleston, SC
Posted by sanderson_91 on Saturday, February 26, 2011 3:38 PM

There's some really great work going on here!

jbrady - your Wildcat looks really nice - your weathering job is excellent!  I can't wait to see your paint work on the Hellcat. 

I've done a bit of work on my Hellcat during the week.  Instead of breaking out the AB, I drybrushed a few lighter shades of the Sea Blue and Intermediate Blue trying to replicate the fading seen in the Pacific.  After the lightening drybrush, I used a filter of burnt umber to tone down the lightening and give a bit of a dirty look.  Here are some pics:

Before:

After:

I'm happy with the overall look - it's very close to what I was trying to achieve.  I stil have to finish up the landing gear and apply a filter to the undersides.  Let me know what you guys think.  Thanks!

Steve


  • Member since
    December 2003
  • From: Charleston, SC
Posted by sanderson_91 on Saturday, February 26, 2011 3:41 PM

I've gotta say that I'm not thrilled with my pics!  I'll have to see if I can get some better shots.


  • Member since
    July 2010
Posted by jbrady on Saturday, February 26, 2011 4:13 PM

Steve thats looking great. From what I understand drybrushing was all the rage in an earlier age of modeling. Seeing what you've done with the Hellcat I can see why. Shows that there is more than one way to do things right. Great work.


  • Member since
    May 2005
  • From: Dublin Rep Of Ireland
Posted by terry35 on Saturday, February 26, 2011 5:41 PM

Steve, the Hellcat is both beautiful and stunning, as I look at the aircraft in this GB I feel jealous of all the talent.

J.Brady where on this earth do you get all the time to produce all this wonderful work.

Doogs, the bomb trolley is  a little beauty, the trailer looks like it has potential.

Personally I have got more work done but l am not happy with my own results to date and I am re-examining my efforts to date and trying to see if I can get the results I desired from the outset of the build.

I hope to get posting again soon.

Terry.

  • Member since
    July 2010
Posted by jbrady on Saturday, February 26, 2011 6:27 PM

terry35

J.Brady where on this earth do you get all the time to produce all this wonderful work.

Personally I have got more work done but l am not happy with my own results to date and I am re-examining my efforts to date and trying to see if I can get the results I desired from the outset of the build.

I hope to get posting again soon.

Terry.

Sleep is over rated... coffee and cigarettes.


  • Member since
    February 2006
  • From: Smithers, BC, Canada
Posted by ruddratt on Sunday, February 27, 2011 3:51 PM

Looking good, fellas! Nice to see this GB moving right along! This has been an awesome place to hang out!

Rich, welcome aboard!! Looking forward to seeing that sub!

Casper, that bomb cart is aces! I'm sure the oil cart will be just as awesome-looking!

Jules, can't wait to see more pics of your 190. Sounds like you're making excellent progress!

jb, your 'cat is progressing nicely. Sure to be another stunner!

Steve, that 'cat of yours is simply superb! I love all of different weathering techniques you incorporated into the build. Really top-notch work!


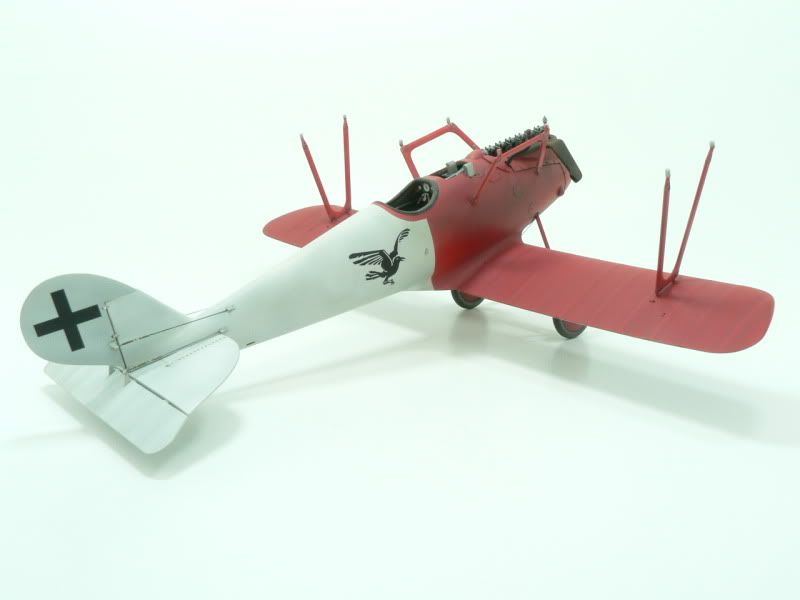
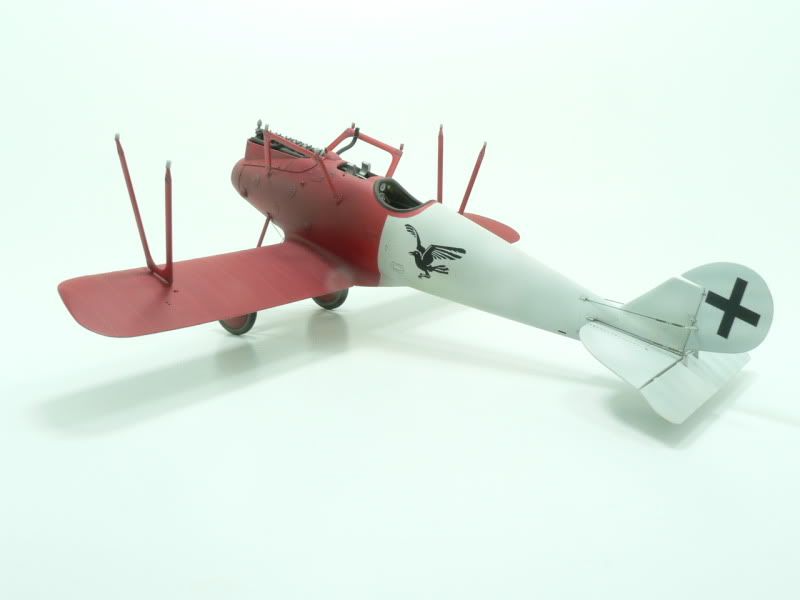
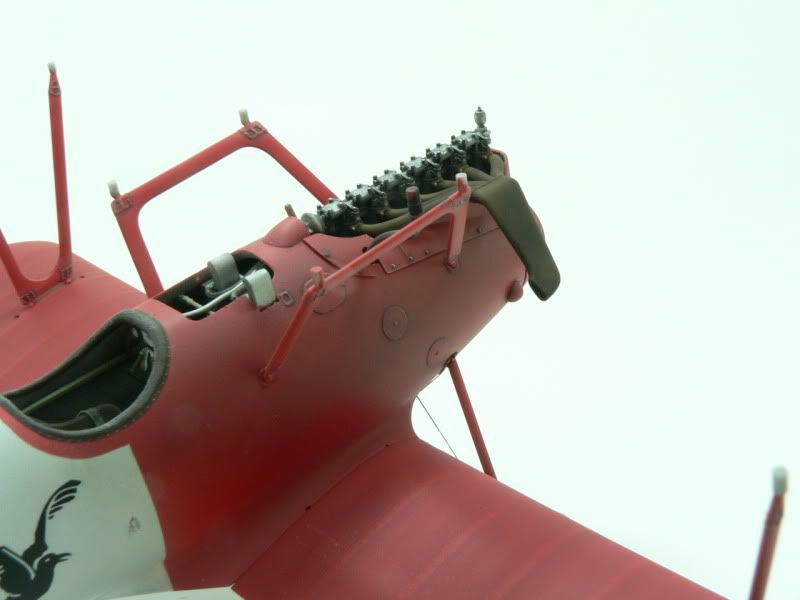
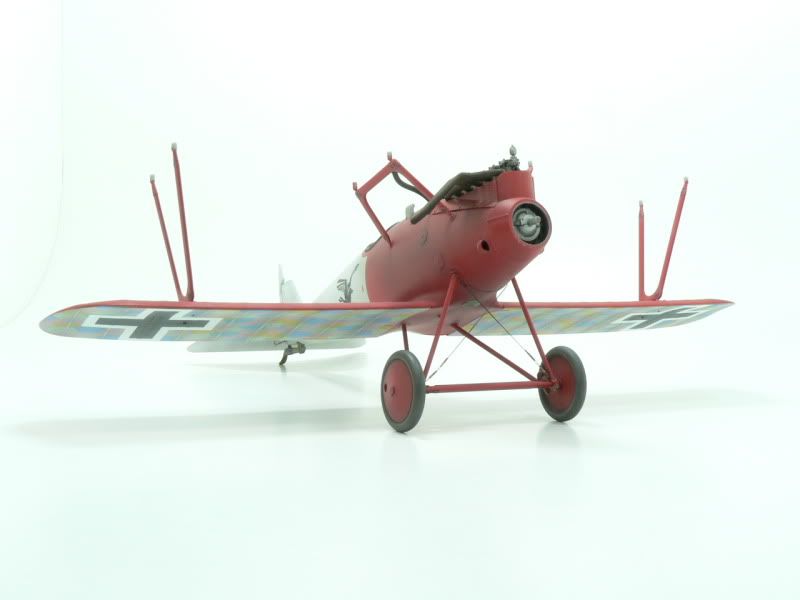
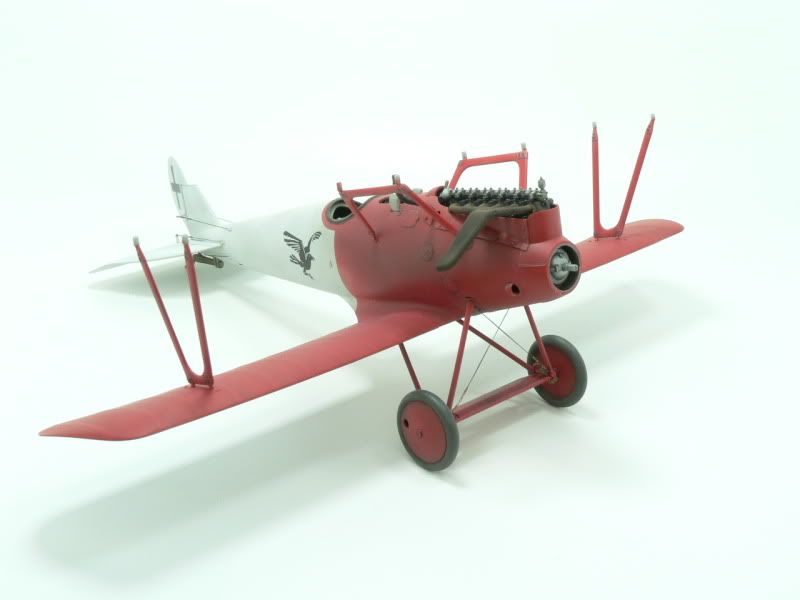
I'm happy to report major progress on the Pfalz. All that remains is the prop/spinner, the windscreen, the guns, the upper wing decaling, and of course the rigging and all those turnbuckles. The method I used for weathering the lozenge worked out fine - I'm quite pleased with the result. Anyway, this is where she stands so far, but there's still a ways to go.


Mike

 "We have our own ammunition. It's filled with paint. When we fire it, it makes pretty pictures....scares the hell outta people."


  • Member since
    March 2010
  • From: Brisbane
Posted by Julez72 on Sunday, February 27, 2011 7:19 PM

Ruddrat, wow thats awesome man, i like the way the rib tape just shows through the red paint...very niceYes I'll be watching very closely how you guys work the turnbuckles for future reference, i'm doing an Eduard 1/48 Dr1 shortly as an introduction into WW1 aircraft because of it's lack of rigging...I'm hopeing Wingnut Wings will eventually release a 1/32 Sopwith Camel as i'd like to do R A Little's mount from 201sqd, provided i can find a photo or something....ANYTHING to give me a clue what it looked like, there are plenty of references for his Triplane but nothing on the Camel yet............

I Should have some finished 190 pics up within the next 24 or soYes


  • Member since
    June 2003
  • From: Garland, TX
Posted by pepper kay on Sunday, February 27, 2011 8:07 PM

jbrady

. Does anyone know if there are decals sheets with generic US Navy marking from WWII?

Yes, there are and at my LHS  besides ... I've got to run by there tomorrow and will look to see that  they still have them ... you're interested in the letters and numbers ? ... and your scale is 1/48 ? ...

If I see them and they're  not been sold, which I doubt - I'll grab 'em and mail them off right away ...

The stripes and triangles/diamonds/etc. can all be cut from a white decal sheet ... Microsoft makes that too ...

pepper

  • Member since
    June 2010
  • From: Austin, TX
Posted by DoogsATX on Sunday, February 27, 2011 8:28 PM

ruddratt - WOW! I need to go back and re-read your weathering plan for the ribs, that looks fantastic! 

I cannot wait to get cracking on my Sopwith Pup...I'm intimidated by it, but think it'll be a great challenge/learning experience! Now if they'd just make a Camel and a Spad XIII. I'd love to do the latter up in Rickenbacker's markings:


On the Bench: 1/32 Trumpeter P-47 | 1/32 Hasegawa Bf 109G | 1/144 Eduard MiG-21MF x2

On Deck:  1/350 HMS Dreadnought

Blog/Completed Builds: doogsmodels.com


JOIN OUR COMMUNITY!

Our community is FREE to join. To participate you must either login or register for an account.

SEARCH FORUMS
FREE NEWSLETTER
By signing up you may also receive reader surveys and occasional special offers. We do not sell, rent or trade our email lists. View our Privacy Policy.