SEARCH FINESCALE.COM

Enter keywords or a search phrase below:

The Official F-4 Phantom II Group Build 2011

619214 views
2992 replies
1 rating 2 rating 3 rating 4 rating 5 rating
  • Member since
    June 2009
Posted by jimbot58 on Sunday, July 3, 2011 12:48 PM

Thunderbolt379

Jimbot -- page 1 updated, congrats on pulling off a terrific build! The -G looks top stuff and hold its own with much younger kits. CONGRATS!

Mike/TB379

Gosh! Golly! I want to shed a tear... It's almost like seeing your child graduate from medical school or something....

Alright, not really!

Thanks for all your kind comments everybody. Considering how long ago this kit was actually started, restoration woes, re-finishing, missing and damaged parts, it was a battle. As I putter around with the "F" (wish i could get motivated on it) it almost seems a bit boring to do a fresh kit out of the box!

*******

On my workbench now:

It's all about classic cars now!

Why can't I find the "Any" key on my keyboard?


  • Member since
    February 2010
  • From: New Jersey
Posted by 68GT on Sunday, July 3, 2011 3:21 PM

Needed a brake from that old 1/72 RF-4E by Revell and started on one of their 1/48 F-4Js.  I picked up a bagged package of two and had plans to build them as VX-30 & VF-121 F-4Js on the SuperScale sheet 48-984.  Been seeing the anniversary builds and started thinking.

Had a Sheet of (48-1043) corsair decals and thought about building one of the F-4s in a Tri-Color schem from WWII.  I'm up to color two on the fuselage already.

On Ed's bench, ???


  • Member since
    November 2003
  • From: State of Mississippi. State motto: Virtute et armis (By valor and arms)
Posted by mississippivol on Sunday, July 3, 2011 7:59 PM

68GT: I like that idea! Can't wait to see how it turns out.

Glenn

  • Member since
    February 2010
  • From: New Jersey
Posted by 68GT on Sunday, July 3, 2011 8:34 PM

Kind of figure that it also works as a what if we had F-4Js instead of F4Us back in 1943-44.

On Ed's bench, ???


  • Member since
    November 2010
  • From: Lafayette, Indiana
Posted by Son Of Medicine Man on Monday, July 4, 2011 2:43 PM

jimbot58

Finally got to those photos. Can't believe how much it costs these days to develop a roll of film! Plus I only got a few photos I deem as 'acceptable'. Many were overexposed as the background was all white and messed with the exposure meter. Good thing I had some knowledge of photography and knew to bracket photos a few steps up and down! TB, can you use the first one put up on the honor wall? It's about the best I ended up with.

http://img842.imageshack.us/img842/7760/r1062970005.jpg

http://img836.imageshack.us/img836/1315/r1062970006.jpg

http://img11.imageshack.us/img11/1183/r1062970003.jpg

Plus I made a few of my earlier builds. The FB-111A fully loaded with fuel tanks for a long mission to drop a nuke on Ivan:

http://img685.imageshack.us/img685/6479/r1062970016.jpg

The Italeri A-6:

http://img7.imageshack.us/img7/2482/r1062970011.jpg

F-15C from Hasegawa:

http://img94.imageshack.us/img94/8477/r1062970014.jpg

And a little German tank I did, but can't remember the maker of the kit. Might be either a Hasegawa or a Dragon. It's 1/72nd scale:

http://img641.imageshack.us/img641/1439/r1062970017.jpg


Hi Jim!

Nice work!  Great job on the Geasel and the pictures!  Yes  Yes

Ken

  • Member since
    November 2010
  • From: Lafayette, Indiana
Posted by Son Of Medicine Man on Monday, July 4, 2011 2:48 PM

Happy Birthday USA!

  • Member since
    June 2009
Posted by jimbot58 on Monday, July 4, 2011 3:18 PM

Son Of Medicine Man

Happy Birthday USA!

Indeed! If you enjoy freedom, thank a vet!

Thanks to all you vets out there!

*******

On my workbench now:

It's all about classic cars now!

Why can't I find the "Any" key on my keyboard?


  • Member since
    November 2010
  • From: Lafayette, Indiana
Posted by Son Of Medicine Man on Monday, July 4, 2011 3:25 PM

jimbot58

 Son Of Medicine Man:

Happy Birthday USA!


Indeed! If you enjoy freedom, thank a vet!

Thanks to all you vets out there!

I totally agree with you Jim!  I give a big thank you to all veterens of the USA and our allies!

Ken

  • Member since
    February 2010
  • From: Ontario, Canada
Posted by Bockscar on Monday, July 4, 2011 4:39 PM

Son Of Medicine Man


 jimbot58:


 Son Of Medicine Man:

Happy Birthday USA!


Indeed! If you enjoy freedom, thank a vet!

Thanks to all you vets out there!


I totally agree with you Jim!  I give a big thank you to all veterens of the USA and our allies!

Ken

Dittos from Canada!

  • Member since
    April 2005
Posted by Thunderbolt379 on Wednesday, July 6, 2011 9:01 AM

And a belated HB to the US of A from Down Under too...

A smidgeon of progress, the cockpit of Fujimi's F-4K has finally almost come together. I painted the seats today, brushing detail over a sprayed satin black base. The ejection loops are a bit overscale, but that's okay. I did the black stripping with a fine point pen, and for 1:72, it'll do:

Some shadowing in the cockpit right wall, then I can put this lot together. From that point it should be more or less downhill to the finish. I hear the fit of this retooled kit (1990s?) is markedly better than the first round of 'new-tool' Fujimi Phantoms in the late 80s. I shall see...

M/TB379

http://worldinminiature.blogspot.com/

  • Member since
    February 2003
  • From: Panama City, Florida, Hurricane Alley
Posted by berny13 on Wednesday, July 6, 2011 12:18 PM

Nice collection of aircraft Jim.  The A-6E TRAM looks very good.  Also good job on the Geasel. 

Berny

 Phormer Phantom Phixer

On the bench

TF-102A Delta Dagger, 32nd FIS, 54-1370, 1/48 scale. Monogram Pro Modeler with C&H conversion.  

Revell F-4E Phantom II 33rd TFW, 58th TFS, 69-260, 1/32 scale. 

Tamiya F-4D Phantom II, 13th TFS, 66-8711, 1/32 scale.  F-4 Phantom Group Build. 


  • Member since
    November 2010
  • From: Lafayette, Indiana
Posted by Son Of Medicine Man on Wednesday, July 6, 2011 6:59 PM

Thunderbolt379

And a belated HB to the US of A from Down Under too...

A smidgeon of progress, the cockpit of Fujimi's F-4K has finally almost come together. I painted the seats today, brushing detail over a sprayed satin black base. The ejection loops are a bit overscale, but that's okay. I did the black stripping with a fine point pen, and for 1:72, it'll do:

http://i301.photobucket.com/albums/nn48/MikeTheModeller/Fujimi%20F-4K/DSCF0673.jpg

Some shadowing in the cockpit right wall, then I can put this lot together. From that point it should be more or less downhill to the finish. I hear the fit of this retooled kit (1990s?) is markedly better than the first round of 'new-tool' Fujimi Phantoms in the late 80s. I shall see...

M/TB379

Hi Mike,

Nice job, it is looking very nice!  Yes

Ken

  • Member since
    November 2003
  • From: State of Mississippi. State motto: Virtute et armis (By valor and arms)
Posted by mississippivol on Wednesday, July 6, 2011 10:03 PM

Mike: YesYes

  • Member since
    June 2009
Posted by jimbot58 on Thursday, July 7, 2011 12:02 AM

Thunderbolt379

And a belated HB to the US of A from Down Under too...

A smidgeon of progress, the cockpit of Fujimi's F-4K has finally almost come together. I painted the seats today, brushing detail over a sprayed satin black base. The ejection loops are a bit overscale, but that's okay. I did the black stripping with a fine point pen, and for 1:72, it'll do:

http://i301.photobucket.com/albums/nn48/MikeTheModeller/Fujimi%20F-4K/DSCF0673.jpg

Some shadowing in the cockpit right wall, then I can put this lot together. From that point it should be more or less downhill to the finish. I hear the fit of this retooled kit (1990s?) is markedly better than the first round of 'new-tool' Fujimi Phantoms in the late 80s. I shall see...

M/TB379

Using a pen for the black striping? That's a great idea! Can't believe I didn't think of it!

*******

On my workbench now:

It's all about classic cars now!

Why can't I find the "Any" key on my keyboard?


  • Member since
    April 2005
Posted by Thunderbolt379 on Thursday, July 7, 2011 8:37 AM

Today's progress:

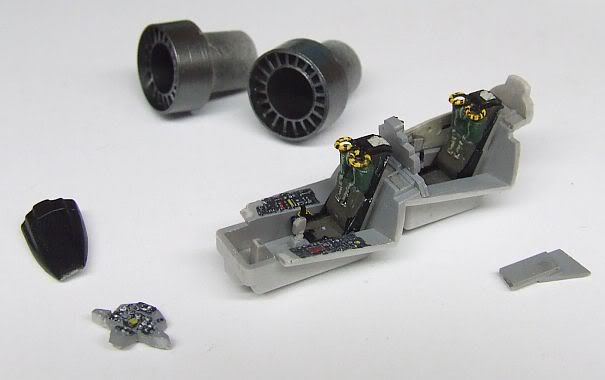
Completed the cockpit -- the instruments don't look the way panels do in larger scale planes when I drybrush them, more's the pity, but the lid will be closed and there won't be more than an impression to be seen. First, the pit with seats installed anf the pesky front stick repaired:
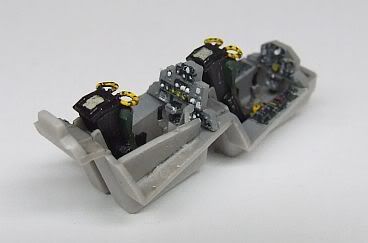
Pit with forward panel installed:
And cockpit installed in the fuiselage:
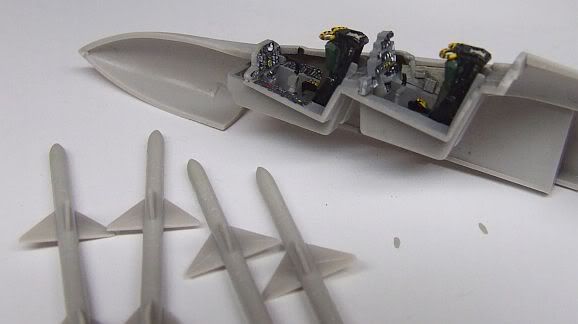
I sprayed the seekers of all dozen Sparrows in progress at this point, tomorrow I'll mask them and do a round with white, taking in the Sidewinders and landing gear parts. Then I'll production line all the missiles at some point in the near future, satin coat, decals, accent panel lines, more satin, paint the drilled-out exhausts and the seekers of the AIM-9s black...

In photos at this scale the pit looks blobby and blotchy to me, but that's the best I can do with my eyesight and vision aids, not to mention dexterity. The good news is, photos like these are rather larger than real life.

Cheers, gonna try to seal up the fuselage before I hit the hay...

Mike/TB379

http://worldinminiature.blogspot.com/

  • Member since
    February 2011
  • From: Mobile, AL
Posted by RotorHead10 on Thursday, July 7, 2011 9:23 AM

And where may I find this honor wall?

http://i301.photobucket.com/albums/nn48/MikeTheModeller/GB_Badges/Phantom2011_1.jpg

  • Member since
    April 2005
Posted by Thunderbolt379 on Thursday, July 7, 2011 9:35 AM

Page 1 -- foot of the lead post, right under the badges.

M/TB379

http://worldinminiature.blogspot.com/

  • Member since
    November 2010
  • From: Lafayette, Indiana
Posted by Son Of Medicine Man on Thursday, July 7, 2011 4:39 PM

Thunderbolt379

Today's progress:

Completed the cockpit -- the instruments don't look the way panels do in larger scale planes when I drybrush them, more's the pity, but the lid will be closed and there won't be more than an impression to be seen. First, the pit with seats installed anf the pesky front stick repaired:

http://i301.photobucket.com/albums/nn48/MikeTheModeller/Fujimi%20F-4K/DSCF0674.jpg

Pit with forward panel installed:

http://i301.photobucket.com/albums/nn48/MikeTheModeller/Fujimi%20F-4K/DSCF0675.jpg

And cockpit installed in the fuiselage:

http://i301.photobucket.com/albums/nn48/MikeTheModeller/Fujimi%20F-4K/DSCF0676.jpg

I sprayed the seekers of all dozen Sparrows in progress at this point, tomorrow I'll mask them and do a round with white, taking in the Sidewinders and landing gear parts. Then I'll production line all the missiles at some point in the near future, satin coat, decals, accent panel lines, more satin, paint the drilled-out exhausts and the seekers of the AIM-9s black...

In photos at this scale the pit looks blobby and blotchy to me, but that's the best I can do with my eyesight and vision aids, not to mention dexterity. The good news is, photos like these are rather larger than real life.

Cheers, gonna try to seal up the fuselage before I hit the hay...

Mike/TB379

Mike,

Looks like you are coming along nicely.  Very good!  Yes

Ken

  • Member since
    April 2005
Posted by Thunderbolt379 on Friday, July 8, 2011 7:42 AM

Today's progress:

I got a start on glueing the fuselage last night. It was actually quite warped, so I worked in three sections. The nose I did with gel CA and used a rubber band, something I rarely do, and the tail I did with liquid cement. The root between the engines was standing wide by nearly an eighth of an inch, and was pegged with a clamp overnight, in fact I left the band and clamp in place until the whole spine was done. I finished it today, ran liquid cement in from the inside and held it by hand, two applications did the trick. Even then I was taking no chances, and used gel CA to reinforce the joints with strip styrene, something I have done with Phantoms for many years, before releasing the band and clamp.

Note that the spreader built into the kit is reinforced too, and there's a .010" shim glued to the back of the lower forward fuselage part. The fuselage was more warped than I had thought, the lower edges were bowed in far enough for the lower forward part to not want to fit, and it was eased in with liquid cement and held until it set up, thus pushing the fuselage essentially back out where it belonged. Now the wingroot gaps are only very minor, well within the range of a lick of putty to handle, but I'll assess whether to use an extra spreader too. The only significant gap would have been between the lower forward part and the main wing undersurface, thus the shim.

The nose has been adzed and wet-polished to eliminate the joints, the spine has been treated that way too and needs only some panel lines rescribed. The tail and one or two other places have received a dab of putty which I may attend to tomorrow. The lower of the two tail antennae has bitten the dust in handling, and will demand something clever, but at least one side of the fuel dump is still there (and I can reglue the other side to it...)

Next job: satin coat the insides of the intakes, which were sprayed white a way back, then the intakes can be built up and installed. I'm thinking it makes sense to install the wing, tidy the joints, then add the gear bay doors and possibly the inner pylons before applying the underside white. I'll see how other jobs shake down as I go. Canopy masks will feature before long too (this kit has a one-piece canopy option.)

Here's the obligatory boxtop shot (which I should have taken first, of course...)

It's really a very good kit, the warpage was the only problem. I look forward to working up more of these birds...

Cheers, Mike/TB379

http://worldinminiature.blogspot.com/

  • Member since
    April 2005
Posted by Thunderbolt379 on Saturday, July 9, 2011 9:53 AM

Today's progress:

The intakes were given a coat of Microscale Satin so there would be a visible lustre in the trunks. Note the edges of the ramps and casings are adzed clean to receive liquid cement (no, I don't suffer from AMS badly enough to doctor ejector pin marks inside the trunk):

Then the assembled wing was attached. The fit was noticeably better than on the two other Fujimi F-4s I have underway, this tooling corrected some of the alignment issues of the previous molds. Note the top piece of the rear ejection seat has come loose at this point:

The next step was to build up the intakes, note the premasking, which will stay in place until the paintjob is on:

The intakes were mounted with liquid cement. I had hoped to get away without a filling job, but the kit isn't quite that good! In fact there is no F-4 I know of that doesn't call for filler on the intake joints. The speckling is overspray from doing the back of the duct. Rear seat is complete again:

The wing roots are very close in this kit but there remained a hairline gap that was not going to close up with liquid cement and flexing, so I thinned Squadron White putty with liquid cement and applied it with a small, soft brush:

There are some small parts to go on, then doubtless more filler, and when this lot is rubbed down there'll be a few bits to redo. The largest gaps were on the underside and will likely need a second go round. Some panel line rescribing will be in order, but nothing more dramatic than clean-up and re-establishing in a few places.

The only elements in the cockpit to go are the coaming and HUD, then I can get the canopy on, hopefully to dry overnight. I have a mask set on hand too.

I'm closing in on this one!

Cheers, Mike/TB379

http://worldinminiature.blogspot.com/

  • Member since
    June 2009
Posted by jimbot58 on Saturday, July 9, 2011 5:21 PM

Looking good so far, Mike. I assume from what you've said here that some Fujimi kits suffer from a few fit issues? Just wondered as there is an "E" in my stash that's been there a long time.

*******

On my workbench now:

It's all about classic cars now!

Why can't I find the "Any" key on my keyboard?


  • Member since
    November 2003
  • From: State of Mississippi. State motto: Virtute et armis (By valor and arms)
Posted by mississippivol on Saturday, July 9, 2011 5:32 PM

Good progress, Mike! It's shaping up really well.

Glenn

  • Member since
    April 2005
Posted by Thunderbolt379 on Saturday, July 9, 2011 8:21 PM

Thanks, guys! Jimbot, the fit of the Fujimi birds is generally good, but here and there it was like they lost the plot. The standard tooling has issues with the wingroot, intake seams and where it all comes together on the underside between the ducts. This tooling was more accurate but there is still a mismatch in that area, thus the ten-thou shim. The mismatch extended to the ducts too, and was slightly larger, I would have shimmed them too but had already painted the lips (white, same colour as the plasticard that would have shimmed them!) that show up in the bottom of the ducts (so filler was used instead). Next time I build these molds I'll add a shim to the corners of the lower wing part that end up in the bottom of the ducts.

The RF-4E I have at an advanced state, waiting for a Norm '72 Luft scheme, really fought me in this area, the mismatch extended to the height of the cockpit, the GIB had no eyeline over the sills and when I adjusted that it changed the spread of the fusleage, so I adjusted that and it changed the fit at the wingroots... Fujimi Phantoms look good finished but there's always a certain amount of fiddling to get them there.

Cheers, Mike/TB379

http://worldinminiature.blogspot.com/

  • Member since
    July 2011
  • From: Land of Oz
Posted by MilitaryAircraft101 on Sunday, July 10, 2011 2:28 AM

If it's ok, I'd like to enter for the GB.

1:72 Hasegawa F-4E Phantom II.

Thanks,

MA101

  • Member since
    April 2005
Posted by Thunderbolt379 on Sunday, July 10, 2011 2:33 AM

By all means, welcome aboard MA101 -- updating the lead post...

Mike/TB379

http://worldinminiature.blogspot.com/

  • Member since
    July 2011
  • From: Land of Oz
Posted by MilitaryAircraft101 on Sunday, July 10, 2011 2:41 AM

Just picking on someone random, but what is the deal with the group build badges? Tongue Tied Do you get them when you enter or when you finish! Thanks,

Noob (AKA ME) Whistling

  • Member since
    April 2005
Posted by Thunderbolt379 on Sunday, July 10, 2011 3:43 AM

Grab a badge when she's done...

M/TB379

http://worldinminiature.blogspot.com/

  • Member since
    June 2009
Posted by jimbot58 on Sunday, July 10, 2011 4:32 AM

Thunderbolt379

Thanks, guys! Jimbot, the fit of the Fujimi birds is generally good, but here and there it was like they lost the plot. The standard tooling has issues with the wingroot, intake seams and where it all comes together on the underside between the ducts. This tooling was more accurate but there is still a mismatch in that area, thus the ten-thou shim. The mismatch extended to the ducts too, and was slightly larger, I would have shimmed them too but had already painted the lips (white, same colour as the plasticard that would have shimmed them!) that show up in the bottom of the ducts (so filler was used instead). Next time I build these molds I'll add a shim to the corners of the lower wing part that end up in the bottom of the ducts.

The RF-4E I have at an advanced state, waiting for a Norm '72 Luft scheme, really fought me in this area, the mismatch extended to the height of the cockpit, the GIB had no eyeline over the sills and when I adjusted that it changed the spread of the fusleage, so I adjusted that and it changed the fit at the wingroots... Fujimi Phantoms look good finished but there's always a certain amount of fiddling to get them there.

Cheers, Mike/TB379

I guess it's not unusual for any kit to have some fit issues. The Hasegawa with the fuselage made up of four sections took a bit of fiddling to get them just right and i did a bit fiddling with the fuselage as well to eliminate a gap at the wing root. Now I am having to work a bit on the intakes as they seem to be a bit too wide where they meet the fuselage, and leaves a step. I didn't realize this until I cemented it in place, but made some adjustments before cementing the other. Now I'm having to try to fix the first one without destroying too much surrounding detail.

Hey, I know we discussed what color to paint the bottom of the Norm 75 Luft "F", but did we actually come to a conclusion? I don't remember. I have read that factory painted on a silver (Painted, not bare metal) but this usually faded to a gray. I'll have to look back through our discussion here, but it seems we have filled 158 pages with our dribble....Wink

Jim

*******

On my workbench now:

It's all about classic cars now!

Why can't I find the "Any" key on my keyboard?


  • Member since
    December 2009
  • From: Endicott, Va.
Posted by Bomber Boy on Sunday, July 10, 2011 9:03 AM

Hey Thunberbolt and other Phantom lovers,

I would very much like to get in on this build if ya'll think it possible. I am already underway with two. One is an Italeri f-4J, that I'm marking as a Marine 333 Sq, from the movie The Great Santini for a Reels category in the  virginia Shootout in Roanoke va. The other is a Revell f-4c from Seymour Johnson of the 4th tfw 335th fs in SEA camo. As a side note I intend on building one of every aircraft type that has flown from Seymour and the 4th. I tried to finish a group of 4 Revell 1/72 Thunderbirds from the 70's for the last group build but was unable to complete as they are quite the problem child, lots of flashing and misfit but i'm still working on them slowly but do not wish to submit them for this build. 

So if I can that's an Italeri 1/48 f-4j and a Revell 1/48 f-4c. 

on another side note my keypad on my Mac is doing strange things so some letters that should be capital are not and some Rs my get thRough that aRe.

Thanks James

James Herndon II __-_-_/"\_-_-__

Endicott ,Va

beandawgartworks.com

  • Member since
    April 2005
Posted by Thunderbolt379 on Sunday, July 10, 2011 9:21 AM

Welcome to the Wing, James -- I'll update p1 right away. Feel free to upload progress pics of your builds to date -- the more the merrier!

Cheers, Mike/TB379

http://worldinminiature.blogspot.com/

JOIN OUR COMMUNITY!

Our community is FREE to join. To participate you must either login or register for an account.

SEARCH FORUMS
FREE NEWSLETTER
By signing up you may also receive reader surveys and occasional special offers. We do not sell, rent or trade our email lists. View our Privacy Policy.