SEARCH FINESCALE.COM

Enter keywords or a search phrase below:

The Official F-4 Phantom II Group Build 2011

619174 views
2992 replies
1 rating 2 rating 3 rating 4 rating 5 rating
  • Member since
    February 2010
  • From: Ontario, Canada
Posted by Bockscar on Sunday, June 5, 2011 6:09 PM

Still have open canopies Rich,,,,not trying to load you down with more work...lol....how do you paint those tiny dials so nice!.....lol.....

  • Member since
    August 2009
  • From: Toledo Area OH
Posted by Sparrowhyperion on Sunday, June 5, 2011 6:48 PM

If you mean the detail on the instrument panels, that's the photo Etch.  I suppose somewhere in the world there is a modeler who could probably paiint that small, but I'm definitely not him.  If you mean the seats and side panels, I just use a very very fine brush and paint it on one tiny dot at a time.  Things like the hydraulic lines and control cables in the cockpit and on the ejection seats I let my Wife do since her hands don't shake like mine do.  I normally build in a pre-takeoff configuration.  Gear down, cockpit closed, and maybe with flaps extended.  But this one will probably be a hangar queen like it's real life counterpart.  I couldn't find any AM flap kits for it.


Bockscar

Still have open canopies Rich,,,,not trying to load you down with more work...lol....how do you paint those tiny dials so nice!.....lol.....

In the Hangar: 1/48 Hobby Boss F/A-18D RAAF Hornet,

On the Tarmac:  F4U-1D RNZAF Corsair 1/48 Scale.

  • Member since
    February 2010
  • From: Ontario, Canada
Posted by Bockscar on Sunday, June 5, 2011 7:10 PM

Just messsin, Rich, not criticizing.......the seats, and dashes, looked great.

When I was working in sculpture and dioramas I ran into the age old problem, "What is Realism?"

Here's a good one, I actually found a course in artistic realism, that had nothing to do with micro-dial painting, it was all about the conditions and situation the artist was painting about...not a word about paint, colour, technique, accuracy, or composition.....

I like both, I like the PE dials and hand-painted seats....... Real airplanes have scratches and dents. Real airplanes have circuits and worn cockpits.....that's reality.....

I remember shaving and sanding all of the little shrink bumps off a kit, then found out the real airplane had its share of bumps and little warps.

I saw a photo of  the original paint job for an old WWII airplane, not so pretty......


  • Member since
    August 2009
  • From: Toledo Area OH
Posted by Sparrowhyperion on Sunday, June 5, 2011 7:16 PM

I know what you mean.  I try to leave them a little less than perfect.  A smudge here, a scratch or dent there.  It makes the kit a lot more realistic.  I have seen quite a few veteran combat planes in my day, and not one of them was even close to cosmetically perfect.  So that's how I build them.  Now if I can keep from passing out because my air conditioner just died, I should have the cockpit ready to be installed tomorrow night or so.  The seats are what take a while.

Rich


Bockscar

Just messsin, Rich, not criticizing.......the seats, and dashes, looked great.

When I was working in sculpture and dioramas I ran into the age old problem, "What is Realism?"

Here's a good one, I actually found a course in artistic realism, that had nothing to do with micro-dial painting, it was all about the conditions and situation the artist was painting about...not a word about paint, colour, technique, accuracy, or composition.....

I like both, I like the PE dials and hand-painted seats....... Real airplanes have scratches and dents. Real airplanes have circuits and worn cockpits.....that's reality.....

I remember shaving and sanding all of the little shrink bumps off a kit, then found out the real airplane had its share of bumps and little warps.

I saw a photo of  the original paint job for an old WWII airplane, not so pretty......


In the Hangar: 1/48 Hobby Boss F/A-18D RAAF Hornet,

On the Tarmac:  F4U-1D RNZAF Corsair 1/48 Scale.

  • Member since
    February 2010
  • From: Ontario, Canada
Posted by Bockscar on Sunday, June 5, 2011 7:52 PM

So here's teh belaboured result of cutting a laterla bulkhead for the intakes:

So the little tan bit, first column 3rd row, that is what I taped to the paper tube, second column, second row, to try and get the right internal shape.

First column, 4th row, next attempt. Second column, second row, next, second column, fifth row, still stuck that the the tube was the answer, but no, third column, third row, realized I needed to conect the bulkhead in a 'normal' orientation too the keel....the next two column items were evolutions on that until i got it 'Right.'

Black piece of plastic at the second column top row is the target intake duct. The third column, second row tube is the final pattern to apply to that black plastic.

Working for a mortgage company helps, lots of left over cards......


  • Member since
    August 2009
  • From: Toledo Area OH
Posted by Sparrowhyperion on Sunday, June 5, 2011 8:10 PM

Looks good.  One question.  Why did you need to saw off the outer fuselage piece? 


Lol Mortgage company.  I wish you were in the US.  I could use a good mortgage agent about now. lmao.


Bockscar

So here's teh belaboured result of cutting a laterla bulkhead for the intakes:

http://www.cyberspaceage.com/images/549_IMG_6671.JPG

So the little tan bit, first column 3rd row, that is what I taped to the paper tube, second column, second row, to try and get the right internal shape.

First column, 4th row, next attempt. Second column, second row, next, second column, fifth row, still stuck that the the tube was the answer, but no, third column, third row, realized I needed to conect the bulkhead in a 'normal' orientation too the keel....the next two column items were evolutions on that until i got it 'Right.'

Black piece of plastic at the second column top row is the target intake duct. The third column, second row tube is the final pattern to apply to that black plastic.

Working for a mortgage company helps, lots of left over cards......


In the Hangar: 1/48 Hobby Boss F/A-18D RAAF Hornet,

On the Tarmac:  F4U-1D RNZAF Corsair 1/48 Scale.

  • Member since
    June 2009
Posted by jimbot58 on Sunday, June 5, 2011 8:13 PM

Ok, I think I'm rounding the corner here on the Geasel! I've been touching up all the little things and I'm putting the gear together. I still need to mount the canopies and I want to add some masking tape belts to the seats, even though this was an OOB build. I guess I put in a bit more than the what is considered OOB, but the fact that there are no AM parts added....

Let's see...

Add belts and place seats in cockpit...

install canopies...

Finish and install landing gear and doors...

Mount external fuel tanks...

Mount weapons pylons....

Finish decals on weapons stores and ECM pod...

Mount all of the above...

Install stabs....

Then this guy might actually be done!

I have yet to decide on whether to  move on to the "F". It seems that the Trumpeter F-105G "Wild Weasel" found it's way onto my work bench after all. (Cockpit started, some sub assemblies done) I guess, however, with this GB going on all year, there's plenty of time to do both.

I'll add a WIP photo later and go for a better camera when I get it done.

*******

On my workbench now:

It's all about classic cars now!

Why can't I find the "Any" key on my keyboard?


  • Member since
    November 2010
  • From: Lafayette, Indiana
Posted by Son Of Medicine Man on Sunday, June 5, 2011 8:28 PM

Bockscar

So here's teh belaboured result of cutting a laterla bulkhead for the intakes:

http://www.cyberspaceage.com/images/549_IMG_6671.JPG

So the little tan bit, first column 3rd row, that is what I taped to the paper tube, second column, second row, to try and get the right internal shape.

First column, 4th row, next attempt. Second column, second row, next, second column, fifth row, still stuck that the the tube was the answer, but no, third column, third row, realized I needed to conect the bulkhead in a 'normal' orientation too the keel....the next two column items were evolutions on that until i got it 'Right.'

Black piece of plastic at the second column top row is the target intake duct. The third column, second row tube is the final pattern to apply to that black plastic.

Working for a mortgage company helps, lots of left over cards......


Cool Dom!  Engineering at it's finest!  It is great to watch an artist at work.  Geeked

Ken

  • Member since
    November 2010
  • From: Lafayette, Indiana
Posted by Son Of Medicine Man on Sunday, June 5, 2011 8:40 PM

Hi Everyone,

I just could not stand it anymore.  All the clutter on my workbench had to go!  So I spent the weekend working on puting up another shelf along with some hangers for my tools.  Here is the result:


Not all of my weekend was spent on that.  I did get some work done on my cockpit.  Here is what it looks like now:


And notice in this next picture the rudder pedals in the front cockpit.  It took several hours to get them there.  I will paint them tomorrow.  I tried to get the pedals installed in the rear cockpit but I ran into a problem trying get them at the proper angle.  the wall separating the cockpits was in the way.  So I had to re-work the hinges on the pedals and will let them dry overnight.  I will try to instal them tomorrow night.


Ken

  • Member since
    August 2009
  • From: Toledo Area OH
Posted by Sparrowhyperion on Sunday, June 5, 2011 8:52 PM

Ken.  You have the most organized workshop I have seen in a long time.  And you actually have modeling suppplies and tools that AREN'T out of their wrappers...

In the Hangar: 1/48 Hobby Boss F/A-18D RAAF Hornet,

On the Tarmac:  F4U-1D RNZAF Corsair 1/48 Scale.

  • Member since
    November 2010
  • From: Lafayette, Indiana
Posted by Son Of Medicine Man on Sunday, June 5, 2011 9:03 PM

Sparrowhyperion

Ken.  You have the most organized workshop I have seen in a long time.  And you actually have modeling suppplies and tools that AREN'T out of their wrappers...

Thanks Rich.  Actually it is an illusion on the tools.  I keep the packages to store the tools in.  The Xuron tools are really nice precision instruments and I don't want them to get damaged while I am not using them.

Ken

  • Member since
    February 2010
  • From: Ontario, Canada
Posted by Bockscar on Sunday, June 5, 2011 9:07 PM

Yeah, what's with the unopened suff:

Order # 0000000000001:

1 Xuron clipper

1 pot of Testor's U239-38765908765 Plutonium grey

3 aluminum tubes 0.25 ID 0.30 OD

5 plbs of cFive putty, er, maybe not.....

Yeah, who needs Ebay Rich......


  • Member since
    February 2010
  • From: Ontario, Canada
Posted by Bockscar on Sunday, June 5, 2011 9:09 PM

Oh yeah,

A 'tool illusion,'

yeah,

It's all in the shiney packaging......

now they tell me.....Wink


  • Member since
    August 2009
  • From: Toledo Area OH
Posted by Sparrowhyperion on Sunday, June 5, 2011 9:10 PM

LOL.  My tools consist of one set of fairly sharp Xuron sprue cutters, a bunch of cheap paint brushes, a razor knife of indeterminate origin, 2 xacto handles and some blades, and a bunch of plastic clamps and clothes pins.  Oh yeh, some elastics, one vise and my old dremel.  The good tools are just too expensive for me right now.  But I usually get by with what I have.

In the Hangar: 1/48 Hobby Boss F/A-18D RAAF Hornet,

On the Tarmac:  F4U-1D RNZAF Corsair 1/48 Scale.

  • Member since
    February 2010
  • From: Ontario, Canada
Posted by Bockscar on Sunday, June 5, 2011 9:16 PM

Very Nice Ken;

http://i1143.photobucket.com/albums/n625/Fooser_Ken/100_4489.jpg

The seats are really shaping up;

http://i1143.photobucket.com/albums/n625/Fooser_Ken/100_4492.jpg

That little parachute launcher on the upper left of the seats, don't knock that around...lol...

  • Member since
    November 2010
  • From: Lafayette, Indiana
Posted by Son Of Medicine Man on Sunday, June 5, 2011 9:19 PM

Bockscar

Oh yeah,

A 'tool illusion,'

yeah,

It's all in the shiney packaging......

now they tell me.....Wink


Dom, you still crack me up!

Ken

  • Member since
    February 2010
  • From: Ontario, Canada
Posted by Bockscar on Sunday, June 5, 2011 10:10 PM

Not to be a traitor here, but this guy's having fun:

http://www.britmodeller.com/forums/index.php?showtopic=25944

not bad.....

  • Member since
    August 2009
  • From: Toledo Area OH
Posted by Sparrowhyperion on Monday, June 6, 2011 3:18 PM

OK, coupl;e of questions for ya Berny.

 First off, is this the ALQ101 you used?
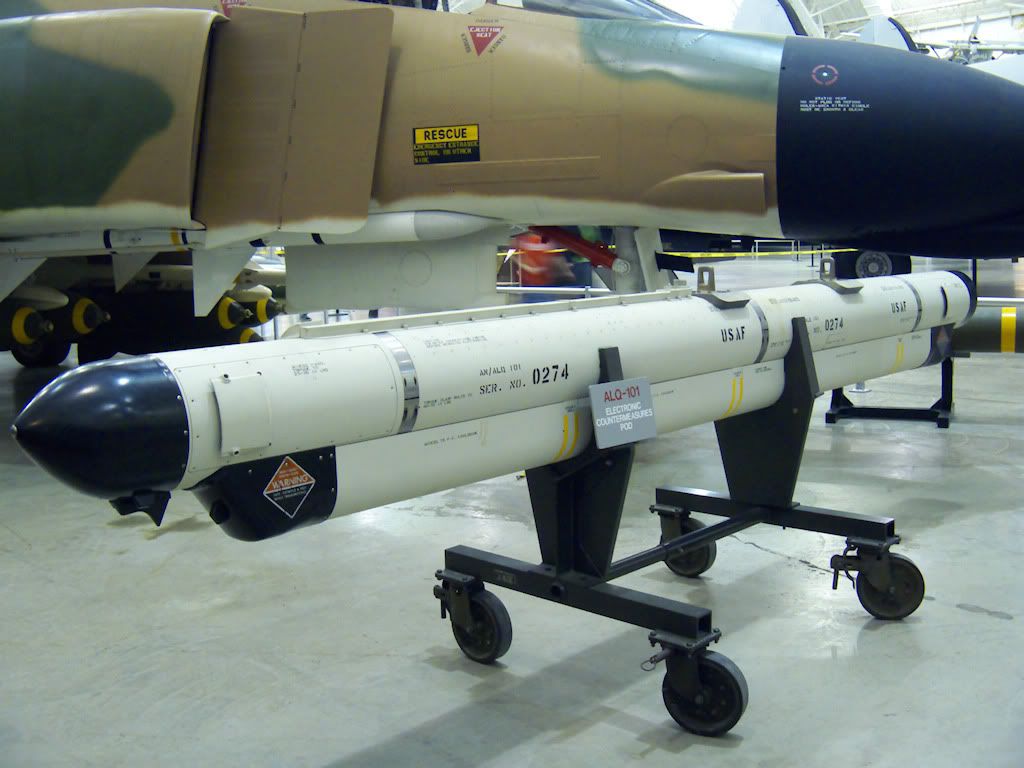
If so, are the colors shown for it correct or should they be different?

I found a couple of ALQ119 pods in one of my kits and I was wondering if they can be modified back down to an ALQ101 by removing the extra stuff under the gondola.  They seem to look pretty similar other than that.

I am thingking of this loadout.

inboard bays AIM9J Sparrowsx4

Inboard Pylons either 2 ALQ101 or 2 ALQ87 ECM Pods

Outer Pylons full of AIM7F sidewinders.

Centerline 600gal. drop tank.

If that wouldn't be a typically accurate load, let me know.  I also have a number of GBUs, and a bunch of Bullpups (B and C).

I hope to have the cockpit done tonight.  I'm just waiting for the paint to dry on the Pilot Harness straps and buckles, then I can mount them on the seats and install the seats in the cockpit.

In the Hangar: 1/48 Hobby Boss F/A-18D RAAF Hornet,

On the Tarmac:  F4U-1D RNZAF Corsair 1/48 Scale.

  • Member since
    February 2003
  • From: Panama City, Florida, Hurricane Alley
Posted by berny13 on Monday, June 6, 2011 4:36 PM

Sparrowhyperion

OK, coupl;e of questions for ya Berny.

 First off, is this the ALQ101 you used?

http://i77.photobucket.com/albums/j75/sparrownightmare/Berny%2069260%20build/ALQ101EECMPode1024x768.jpg

If so, are the colors shown for it correct or should they be different?

I found a couple of ALQ119 pods in one of my kits and I was wondering if they can be modified back down to an ALQ101 by removing the extra stuff under the gondola.  They seem to look pretty similar other than that.

I am thingking of this loadout.

inboard bays AIM9J Sparrowsx4

Inboard Pylons either 2 ALQ101 or 2 ALQ87 ECM Pods

Outer Pylons full of AIM7F sidewinders.

Centerline 600gal. drop tank.

If that wouldn't be a typically accurate load, let me know.  I also have a number of GBUs, and a bunch of Bullpups (B and C).

I hope to have the cockpit done tonight.  I'm just waiting for the paint to dry on the Pilot Harness straps and buckles, then I can mount them on the seats and install the seats in the cockpit.

No, that was not the type we used.  The one shown was a later ECM pod.  The type carried by our jets were AN/ALQ-101(V)1.  That is the correct paint, gloss white body with gloss black for and aft radomes.  There was a small gondola which was all gloss black. 

For load out the fuselage missile wells carried AIM-7F Sparrow and the inboard pylon would be loaded with AIM-9J Sidewinders.  We used the type of AIM-9 launchers found in the Hasagawa F-4 kits, not the older type found in the Monogram F-4C/D kits.

For ECM pods we carried one AN/ALQ-87, or one AN/ALQ-101 pod.  If we carried two pods we would have only one of each loaded. 

The missions we were tasked with was air to air only.  We did not carry any air to ground weapons at all. 

I'll have an AN/ALQ-101 ECM pod in the mail to you this week.  I have two in my spare parts box and I will send you one.  They are the type carried by our jets. 

Outboard stations, 370 tanks.  Inboard stations, ECM pods, AIM-9J Sidewinders.  Centerline station 600 Gal tank.  Fuselage missile stations, AIM-7E or F times four.  Full gun with 50-50 mix of APHE/HEI.

Berny

 Phormer Phantom Phixer

On the bench

TF-102A Delta Dagger, 32nd FIS, 54-1370, 1/48 scale. Monogram Pro Modeler with C&H conversion.  

Revell F-4E Phantom II 33rd TFW, 58th TFS, 69-260, 1/32 scale. 

Tamiya F-4D Phantom II, 13th TFS, 66-8711, 1/32 scale.  F-4 Phantom Group Build. 


  • Member since
    August 2009
  • From: Toledo Area OH
Posted by Sparrowhyperion on Monday, June 6, 2011 4:47 PM

Thanks for the clarifgication.  I don't know why but I always mix up the AIM7 and AIM9s. lol.  Thanks for the pods.  We picked up the Hasegawa B and C weapons paks, and I snagged an ESCI weapons set for a few bucks last night.  I think that right now I have enough regular ordinance to outfit a fleet of F14s. lol.


I found this image of the pod I thnk you are talking about on Google.  They guy shows how he made it scratch from a couple of nosecones off of AL119 pods and an A7 Harm main tube..  Does it look fairly accurate?

In the Hangar: 1/48 Hobby Boss F/A-18D RAAF Hornet,

On the Tarmac:  F4U-1D RNZAF Corsair 1/48 Scale.

  • Member since
    August 2009
  • From: Toledo Area OH
Posted by Sparrowhyperion on Monday, June 6, 2011 4:50 PM

And is this the AN/ALQ87 pod you used? 

In the Hangar: 1/48 Hobby Boss F/A-18D RAAF Hornet,

On the Tarmac:  F4U-1D RNZAF Corsair 1/48 Scale.

  • Member since
    November 2010
  • From: Lafayette, Indiana
Posted by Son Of Medicine Man on Monday, June 6, 2011 4:58 PM

Hi Everyone,

I just thought that maybe some of you would be interested in this.  It is a DVD that is going to be released July 12th.  The name of the DVD is Air War:  Vietnam 1964-1972 (2011).  I saw posted that it is going to contain previously unseen material.  Here is a link:

 http://www.amazon.com/gp/product/B004X60QME 

Ken

  • Member since
    February 2003
  • From: Panama City, Florida, Hurricane Alley
Posted by berny13 on Monday, June 6, 2011 6:17 PM

Sparrowhyperion

Thanks for the clarifgication.  I don't know why but I always mix up the AIM7 and AIM9s. lol.  Thanks for the pods.  We picked up the Hasegawa B and C weapons paks, and I snagged an ESCI weapons set for a few bucks last night.  I think that right now I have enough regular ordinance to outfit a fleet of F14s. lol.


I found this image of the pod I thnk you are talking about on Google.  They guy shows how he made it scratch from a couple of nosecones off of AL119 pods and an A7 Harm main tube..  Does it look fairly accurate?

http://i77.photobucket.com/albums/j75/sparrownightmare/Berny%2069260%20build/alq101finalpainted1.jpg

That is very close.  The (V)1 had only one gondola.  I have one from the Monogram F-4C/D kit I am going to send you.  For the AN/ALQ-87 pod the antennas under the pod were longer and the same size.  If you need one of them, I can also send you one.  I am sure the Hasagawa weapons set contains the correct ALQ-87 pod.  I know I have several in my spare parts box so it wouldn't be any trouble to include that one when I mail it off.  Just let me know. 

Berny

 Phormer Phantom Phixer

On the bench

TF-102A Delta Dagger, 32nd FIS, 54-1370, 1/48 scale. Monogram Pro Modeler with C&H conversion.  

Revell F-4E Phantom II 33rd TFW, 58th TFS, 69-260, 1/32 scale. 

Tamiya F-4D Phantom II, 13th TFS, 66-8711, 1/32 scale.  F-4 Phantom Group Build. 


  • Member since
    August 2009
  • From: Toledo Area OH
Posted by Sparrowhyperion on Monday, June 6, 2011 7:03 PM

Well.  The seats are done.  I think they came out rather well.  Here's some images.

Still waiting for some detail painting to dry on the cockpit tub then these babies get installed in it.

Rich

In the Hangar: 1/48 Hobby Boss F/A-18D RAAF Hornet,

On the Tarmac:  F4U-1D RNZAF Corsair 1/48 Scale.

  • Member since
    August 2009
  • From: Toledo Area OH
Posted by Sparrowhyperion on Monday, June 6, 2011 7:08 PM

That might be a good idea, just in case.  Thanks

Rich


berny13


That is very close.  The (V)1 had only one gondola.  I have one from the Monogram F-4C/D kit I am going to send you.  For the AN/ALQ-87 pod the antennas under the pod were longer and the same size.  If you need one of them, I can also send you one.  I am sure the Hasagawa weapons set contains the correct ALQ-87 pod.  I know I have several in my spare parts box so it wouldn't be any trouble to include that one when I mail it off.  Just let me know. 

In the Hangar: 1/48 Hobby Boss F/A-18D RAAF Hornet,

On the Tarmac:  F4U-1D RNZAF Corsair 1/48 Scale.

  • Member since
    February 2010
  • From: Ontario, Canada
Posted by Bockscar on Monday, June 6, 2011 7:50 PM

Nice Work Deb, Marissa, and Rich!YesSmile


  • Member since
    November 2010
  • From: Lafayette, Indiana
Posted by Son Of Medicine Man on Monday, June 6, 2011 8:29 PM

Hi Everyone,

Tonight I did battle with the rudder pedals (again).  While battling with the rear cockpit pedals I knocked one of the front ones loose, which in a way was good because obviously it wasn't secured enough.  The pedals won again tonight, but I have a new plan of attack for tomorrow.  I have the second set that came with the new cockpit so I am going to start over with them.  I attached a smaller gauge wire to two of the pedals for the front.  I will keep working on the two for the rear so they will be dry enough to work with tomorrow night.  I am going to attach the wire at the very bottom of the pedals and flatten the wire at the end where I need them to attach.  I might even try mixing some epoxy so that it will be thicker thereby giving a little more substance to adhere to.  Very delicate work and a real pain, but it will be very cool when I win.

Ken

  • Member since
    February 2010
  • From: Ontario, Canada
Posted by Bockscar on Monday, June 6, 2011 8:57 PM

Son Of Medicine Man

Hi Everyone,

Tonight I did battle with the rudder pedals (again).  While battling with the rear cockpit pedals I knocked one of the front ones loose, which in a way was good because obviously it wasn't secured enough.  The pedals won again tonight, but I have a new plan of attack for tomorrow.  I have the second set that came with the new cockpit so I am going to start over with them.  I attached a smaller gauge wire to two of the pedals for the front.  I will keep working on the two for the rear so they will be dry enough to work with tomorrow night.  I am going to attach the wire at the very bottom of the pedals and flatten the wire at the end where I need them to attach.  I might even try mixing some epoxy so that it will be thicker thereby giving a little more substance to adhere to.  Very delicate work and a real pain, but it will be very cool when I win.

Ken

Uhhhh....wire? Tiny little wire?????

Uhhhh....Row!....Row ya Swabs!.....Row!!!!!!!!

Gosh, never knew you were so cruel, Ken.....lol.....

Hey, I checked out the Gator grippper glue, and it smells like acrylic, but looks and acts like Elmer's.....

Uhhhmmm so what, I've been bonding stuff with thickened Future Past, Forever!


  • Member since
    November 2010
  • From: Lafayette, Indiana
Posted by Son Of Medicine Man on Monday, June 6, 2011 9:02 PM

Bockscar


Uhhhh....wire? Tiny little wire?????

Uhhhh....Row!....Row ya Swabs!.....Row!!!!!!!!

Gosh, never knew you were so cruel, Ken.....lol.....

Hey, I checked out the Gator grippper glue, and it smells like acrylic, but looks and acts like Elmer's.....

Uhhhmmm so what, I've been bonding stuff with thickened Future Past, Forever!


Hi Dom,

Yes, I am totally cruel!  To these rudders!  They will bend to my will!!  Super Angry

So, have you tried that Gator gripper glue yet?  If so, what do you think of it?

Ken

  • Member since
    February 2010
  • From: Ontario, Canada
Posted by Bockscar on Monday, June 6, 2011 9:43 PM

LOL...hmmmmm.....kinda looks like mayo....mmmmm.......yeah, yeah,,,kinda tastes like Emer's....mmmmmmWink,not bad.....on cheap hotdogs!!!!!

JOIN OUR COMMUNITY!

Our community is FREE to join. To participate you must either login or register for an account.

SEARCH FORUMS
FREE NEWSLETTER
By signing up you may also receive reader surveys and occasional special offers. We do not sell, rent or trade our email lists. View our Privacy Policy.