SEARCH FINESCALE.COM

Enter keywords or a search phrase below:

The Official F-4 Phantom II Group Build 2011

618420 views
2992 replies
1 rating 2 rating 3 rating 4 rating 5 rating
  • Member since
    February 2003
  • From: Panama City, Florida, Hurricane Alley
Posted by berny13 on Saturday, January 15, 2011 8:05 PM

Son Of Medicine Man

Hi Berny,

I sent you a PM with a picture out of the Osprey MiG Killers 1972-73 book.  I did not want to violate any copyrighted material here.  I agree with you that the Bullpups would not have been used for a typical raid on the Ho Chi Minh trails, so I recant that choice for a target but still want to load the Bullpups.  I can't escape the "coolness" of how they look!

Ken

That is definately AGM-12's loaded on the inboard.  The outboard is loaded with SUU-30's.  That is a very strange loadout.  The AGM's would be for large hard targets and the SUU-30's for anti-personnel.  That is the type of load used against train depots.  At that time no targets in North Vietnam were being attacked.  LBJ stopped all bombing in NV in December 1968. 

Berny

 Phormer Phantom Phixer

On the bench

TF-102A Delta Dagger, 32nd FIS, 54-1370, 1/48 scale. Monogram Pro Modeler with C&H conversion.  

Revell F-4E Phantom II 33rd TFW, 58th TFS, 69-260, 1/32 scale. 

Tamiya F-4D Phantom II, 13th TFS, 66-8711, 1/32 scale.  F-4 Phantom Group Build. 


  • Member since
    February 2003
  • From: Panama City, Florida, Hurricane Alley
Posted by berny13 on Saturday, January 15, 2011 9:13 PM

I have posted these before for those that want to detail the seats.

The color of the Phantom exhaust.

Berny

 Phormer Phantom Phixer

On the bench

TF-102A Delta Dagger, 32nd FIS, 54-1370, 1/48 scale. Monogram Pro Modeler with C&H conversion.  

Revell F-4E Phantom II 33rd TFW, 58th TFS, 69-260, 1/32 scale. 

Tamiya F-4D Phantom II, 13th TFS, 66-8711, 1/32 scale.  F-4 Phantom Group Build. 


  • Member since
    December 2010
  • From: New Zealand
Posted by Rough as guts on Saturday, January 15, 2011 9:31 PM

Hello Phellow Phantom builders,

Congratulations to Mobius 118, for knocking out a striking build  in less than 3.3 % of allowed build time, and a challenging scheme at that.

I'm not surprised to announce that I haven't even taken one part off the sprue yet.Good things take time?

I guess I have a fair bit on my plate, that's before I get a chance to look at the hobby bench although I have been teaching my 7 y.o son to build kitsets (blind leading the blind) and together we've built a Hurricane, a P51-D and a P40-M which is all good practice for me getting into the 1/72 aviation thing and the other day  I embarrassed myself terribly when my wife caught me "strafing" the cat down the hallway, making silly airplane noisesPropellerEmbarrassed From now on I'll only "play" with my planes when she's out.

I'm enjoying watching the discussions from the sideline and have learn t a hell of a lot already.

I have an amateurs  question for the panel today :

Thinning paint?  I only brush paint and I use Tamiya and Humbrol enamels.( Some of these cans are 30 years old, hand me downs from my father and my father in-law. I opened a tin of Zinc Chromate and it ran beautifully)What I was wondering was, is my current habit of using mineral turpentine as a thinner recommended or should I be looking for a more appropriate alternative? It seems to work fine but occasionally the paint goes a bit powdery if I thin to far.

Cheers for now, RAG


www.kiwimodeller.com

  • Member since
    April 2005
Posted by Thunderbolt379 on Saturday, January 15, 2011 9:46 PM

Hi RAG -- I think we've all strafed parts of the house at some point, at a wide variety of ages! Smile

Re the turpentine point, I would certainly go with a proprietory thinner instead. Turpentine is a very harsh alternative, I have only ever used it as brush cleaner, and even that is not a great thing to do as the fumes are pretty toxic. Humbrol and Model Master both have excellent thinners that are much purer, and both are complimentary with eachother's ranges of enamels. (They still stink and give off toxic fumes, though, so a respirator or painting outdoors is highly recommended.) Thinning paint to just the right consistency certainly helps it level out on the surface, and with some acrylics it's absolutely necessary if you're going to brush rather than airbrush, so the same should apply to enamels.

Cheers, hope you make a start in the not too distant future,

Mike/TB379

http://worldinminiature.blogspot.com/

  • Member since
    February 2010
  • From: Ontario, Canada
Posted by Bockscar on Saturday, January 15, 2011 9:47 PM

Berny13:

Did you grind down all of those other reinforcement plates on the Tamilya 1/32 fuselage?

I thought I read something earlier in the thread but can't find it. Just wondering.


  • Member since
    February 2003
  • From: Panama City, Florida, Hurricane Alley
Posted by berny13 on Saturday, January 15, 2011 9:54 PM

Bockscar

Berny13:

Did you grind down all of those other reinforcement plates on the Tamilya 1/32 fuselage?

I thought I read something earlier in the thread but can't find it. Just wondering.


I started on them but haven't finished.  Arthur Ridas is still visiting.  I can't get him to go away.

Berny

 Phormer Phantom Phixer

On the bench

TF-102A Delta Dagger, 32nd FIS, 54-1370, 1/48 scale. Monogram Pro Modeler with C&H conversion.  

Revell F-4E Phantom II 33rd TFW, 58th TFS, 69-260, 1/32 scale. 

Tamiya F-4D Phantom II, 13th TFS, 66-8711, 1/32 scale.  F-4 Phantom Group Build. 


  • Member since
    November 2003
  • From: State of Mississippi. State motto: Virtute et armis (By valor and arms)
Posted by mississippivol on Saturday, January 15, 2011 10:07 PM

"the other day  I embarrassed myself terribly when my wife caught me "strafing" the cat down the hallway, making silly airplane noisesPropellerEmbarrassed From now on I'll only "play" with my planes when she's out."

Hey Rag,

That's better than my story. Last time I strafed the cat, he "Night Check Charlie'd" me later on. Evil felineDevil

Glenn

  • Member since
    February 2010
  • From: Ontario, Canada
Posted by Bockscar on Saturday, January 15, 2011 10:19 PM

 The other day I torqued my right thumb 90 degrees trying to get a frozen car door open.

When I was tearing up some cardboard, for the funning recycle bin, I tore the first metacarpel in my right index finger as well. No problem when I was a kid, but yeah, now he doesn't go away. I'm do for another round of Diclophenac I think.

How many of these funning Arthurs are there?

  • Member since
    November 2003
  • From: State of Mississippi. State motto: Virtute et armis (By valor and arms)
Posted by mississippivol on Saturday, January 15, 2011 10:19 PM

Finally got my putty (for the Rhino-plasty, [that's a good name for it, thanks!])in the mail along with 6 books for $10 from Squadron in less than a week! I've been meddling with the Rhino, still working on the wings. After looking at the pictures I posted earlier, I decided to fill in the flap lines on the underside as they are inconsistent looking when you compare them. I'm going with white for the intake trunks, every Phantom I've seen has had them. I'll probably cut it with some gray to keep it from being too stark.

Glenn

  • Member since
    November 2003
  • From: State of Mississippi. State motto: Virtute et armis (By valor and arms)
Posted by mississippivol on Saturday, January 15, 2011 10:27 PM

Bockscar

 The other day I torqued my right thumb 90 degrees trying to get a frozen car door open.

When I was tearing up some cardboard, for the funning recycle bin, I tore the first metacarpel in my right index finger as well. No problem when I was a kid, but yeah, now he doesn't go away. I'm do for another round of Diclophenac I think.

How many of these funning Arthurs are there?

Too many than I can mention! I'm sorry to hear about that. Hope it gets feeling better soon!

Glenn

  • Member since
    December 2003
  • From: Indiana
Posted by hkshooter on Saturday, January 15, 2011 10:30 PM

I havent started either but don't intend to until I complete the current project. Won't be to much longer though.

  • Member since
    November 2010
  • From: Lafayette, Indiana
Posted by Son Of Medicine Man on Saturday, January 15, 2011 10:56 PM

berny13

 Son Of Medicine Man:

Hi Berny,

I sent you a PM with a picture out of the Osprey MiG Killers 1972-73 book.  I did not want to violate any copyrighted material here.  I agree with you that the Bullpups would not have been used for a typical raid on the Ho Chi Minh trails, so I recant that choice for a target but still want to load the Bullpups.  I can't escape the "coolness" of how they look!

Ken


That is definately AGM-12's loaded on the inboard.  The outboard is loaded with SUU-30's.  That is a very strange loadout.  The AGM's would be for large hard targets and the SUU-30's for anti-personnel.  That is the type of load used against train depots.  At that time no targets in North Vietnam were being attacked.  LBJ stopped all bombing in NV in December 1968. 

Hi Berny,

There was the Cambodian Campaign in 1970, which did involve US fighter bombers on tactical missions.

Ken

  • Member since
    April 2005
Posted by Thunderbolt379 on Sunday, January 16, 2011 7:11 AM

Made some progress today, though mostly a day of fiddling to get around the shortcomings of Fujimi's engineering...

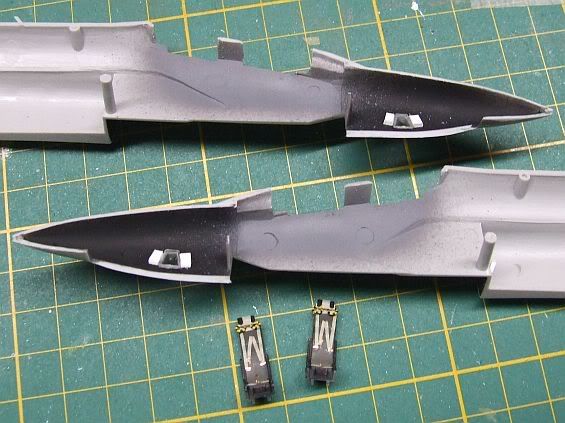
After painting the inside of the nose yesterday, I got the cockpit walls done, and added the recon camera lateral windows. They seat from behind and the clear plastic had large dimples... Nothing to be done about the latter and the fomer had me imagining the windows falling out into the interior during masking. I had attached them with Clear Parts Cement, which is never super strong, so I scraped away some paint and superglued in some styrene stock to support the windows. They seem to be stronger now...

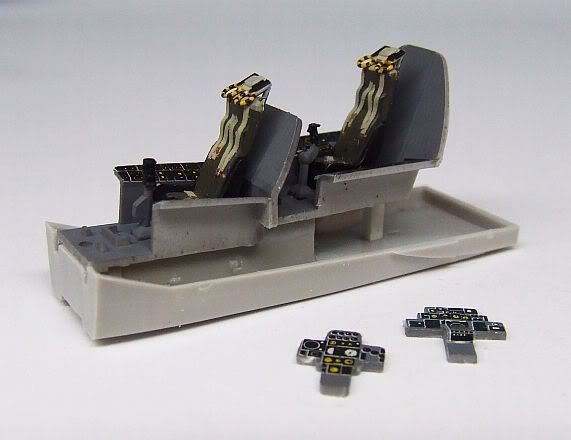
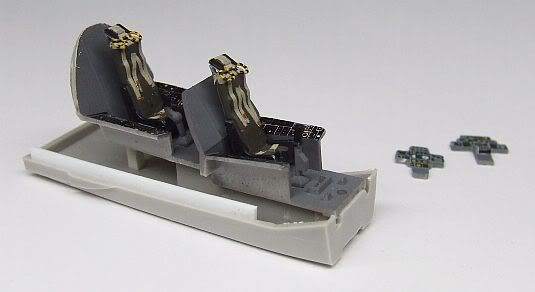
The seats got their metallic paint buckles and were added to the cockpit along with the sticks. However I noticed at once that the tub seemed to be warped, with a big depression at the back that meant the GIB would have been without any lateral vision at all, his helmet would not have cleared the sil. I know the rear cockpit was very tight, but that couldn't be right, so I installed a 6mm styrene prop under the back of the cockpit to flex it upward so that he had at least an eyeline over the sils:

I made a call on the intakes: these trunks are XF-24 corresponding to RAL 7012, topside camo gray:

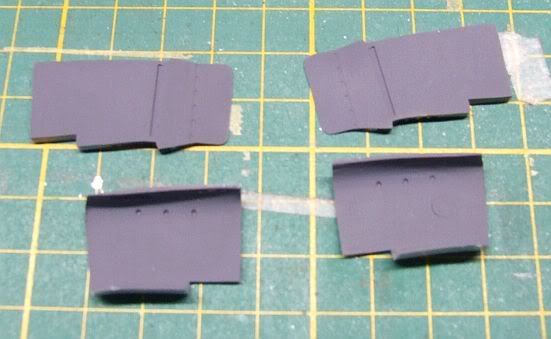
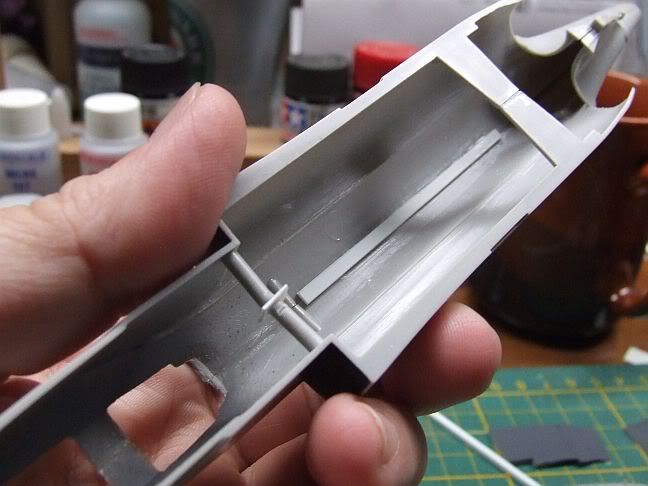
As you can see, the fuselage halves were just the tiniest bit warped... I glued them from the tail forward, applying liquid cement from the inside and anchoring them with tape:

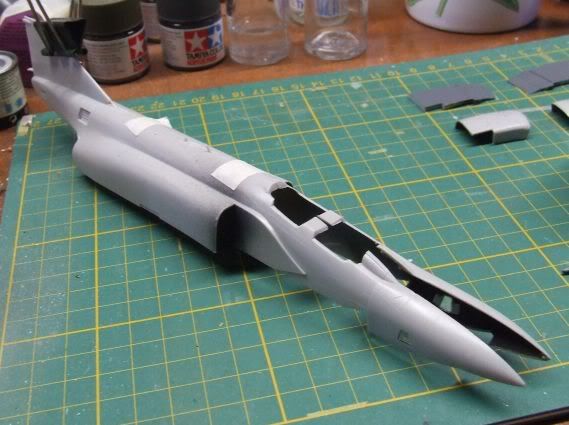
The interior was braced with plastic strip. Also, with the fuselage together a few fit issues began to appear, such as the fact the fuselage was a good millimeter too wide for the spacing of the wing top surfaces on the already-assembled wing. I filed the wing roots a touch before tracing the problem to the two tubular spacers which meet just behind the cockpit -- they're too long, pushing the forward fuselage out too wide for the lower piece carrying the cockpit to fit. I sawed a piece out of the braces, fiound I'd taken too much, and put in a .020" shim between them to take up the slack:

Then it was time to test fit the cockpit. Width-wise was not too bad, though the fit was sloppy. I added some styrene guides inside the lower fuselage part onto which I could flex the sidewalls for a better fit. The problem now was the vertical aspect. Having raised the rear cockpit so the GIB could see out even the smallest bit, the rear wall didn't fit under the top of the fuselage... I filed back both until they met acceptably (though introduced a gap...), and that's where I am right now:

Adding the instrument panels comes next, then get the assembly into the fuselage, add the wing and start working on the joints. The wingroots will use some putty, and the junction under the front of the wing will too, though I can probably get that fairly close. Then I can build up the intakes and get them into place, they look like they'll fit pretty close at this point. Slotted stabilators finish the main hull, the burner cans are painted, there's a clear part for the bottom of the recon module to mask and fit, then I'll be onto the canopies and masking...

Cheers, Mike/TB379

http://worldinminiature.blogspot.com/

  • Member since
    December 2003
  • From: Indiana
Posted by hkshooter on Sunday, January 16, 2011 7:18 AM

Looking good Mike. Weird that the cockpit don't fit.

  • Member since
    November 2009
  • From: The NYC.
Posted by Ish47guy on Sunday, January 16, 2011 9:07 AM

Berny, any recommendations for getting the interior of the afterburner that green color?  The first time I saw that on an actual J-79, it sent me for a loop.  I thought it was a severe case of corrosion.

  • Member since
    November 2010
  • From: Lafayette, Indiana
Posted by Son Of Medicine Man on Sunday, January 16, 2011 9:14 AM

berny13

 Son Of Medicine Man:

Hi Berny,

I sent you a PM with a picture out of the Osprey MiG Killers 1972-73 book.  I did not want to violate any copyrighted material here.  I agree with you that the Bullpups would not have been used for a typical raid on the Ho Chi Minh trails, so I recant that choice for a target but still want to load the Bullpups.  I can't escape the "coolness" of how they look!

Ken


That is definately AGM-12's loaded on the inboard.  The outboard is loaded with SUU-30's.  That is a very strange loadout.  The AGM's would be for large hard targets and the SUU-30's for anti-personnel.  That is the type of load used against train depots.  At that time no targets in North Vietnam were being attacked.  LBJ stopped all bombing in NV in December 1968. 

Hi Berny,

I have been doing a lot of research, and found that the USAF ordered a variant of the Bullpup-B designated "AGM-12E", with an antipersonnel warhead for attacking missile sites.  So that would have fit with the SUU-30s also for anti-personnel.

Ken

  • Member since
    February 2003
  • From: Panama City, Florida, Hurricane Alley
Posted by berny13 on Sunday, January 16, 2011 9:22 AM

Ish47guy

Berny, any recommendations for getting the interior of the afterburner that green color?  The first time I saw that on an actual J-79, it sent me for a loop.  I thought it was a severe case of corrosion.

I mix my own green to get the shade I need.  I have three bottles, J-79 new, J-79 used and J-79 old.  I started with Olive green and used a mixture of yellow and black to get the colors.  The color you see in the picture is J-79 new.  I can't give you an exact ratio as I go by TLAR (That Looks About Right).

Berny

 Phormer Phantom Phixer

On the bench

TF-102A Delta Dagger, 32nd FIS, 54-1370, 1/48 scale. Monogram Pro Modeler with C&H conversion.  

Revell F-4E Phantom II 33rd TFW, 58th TFS, 69-260, 1/32 scale. 

Tamiya F-4D Phantom II, 13th TFS, 66-8711, 1/32 scale.  F-4 Phantom Group Build. 


  • Member since
    February 2003
  • From: Panama City, Florida, Hurricane Alley
Posted by berny13 on Sunday, January 16, 2011 9:42 AM

Son Of Medicine Man

 berny13:

 Son Of Medicine Man:

Hi Berny,

I sent you a PM with a picture out of the Osprey MiG Killers 1972-73 book.  I did not want to violate any copyrighted material here.  I agree with you that the Bullpups would not have been used for a typical raid on the Ho Chi Minh trails, so I recant that choice for a target but still want to load the Bullpups.  I can't escape the "coolness" of how they look!

Ken


That is definately AGM-12's loaded on the inboard.  The outboard is loaded with SUU-30's.  That is a very strange loadout.  The AGM's would be for large hard targets and the SUU-30's for anti-personnel.  That is the type of load used against train depots.  At that time no targets in North Vietnam were being attacked.  LBJ stopped all bombing in NV in December 1968. 


Hi Berny,

I have been doing a lot of research, and found that the USAF ordered a variant of the Bullpup-B designated "AGM-12E", with an antipersonnel warhead for attacking missile sites.  So that would have fit with the SUU-30s also for anti-personnel.

Ken

It is possible.  During part of that time period I was assigned to Hill AFB working on the F-4 RAM team (Rapid Area Maintenance), TDY, to Clark AB, Udorn, and TSN for six months at a time.  My job was going all over SEA repairing or taking apart battle or crash damaged F-4's.  My knowledge of combat missions flown was limited as I wasn't in a combat outfit after July 1970. 

I was assigned to Hill AFB in August 1970 leaving Thailand in July of that year.  I was a RAM Team Chief for a year and a half before being assigned to Eglin AFB getting there just in time to deploy to Thailand for Linebacker l.

Berny

 Phormer Phantom Phixer

On the bench

TF-102A Delta Dagger, 32nd FIS, 54-1370, 1/48 scale. Monogram Pro Modeler with C&H conversion.  

Revell F-4E Phantom II 33rd TFW, 58th TFS, 69-260, 1/32 scale. 

Tamiya F-4D Phantom II, 13th TFS, 66-8711, 1/32 scale.  F-4 Phantom Group Build. 


  • Member since
    November 2010
  • From: Lafayette, Indiana
Posted by Son Of Medicine Man on Sunday, January 16, 2011 10:34 AM

berny13

 Son Of Medicine Man:

 berny13:

 Son Of Medicine Man:

Hi Berny,

I sent you a PM with a picture out of the Osprey MiG Killers 1972-73 book.  I did not want to violate any copyrighted material here.  I agree with you that the Bullpups would not have been used for a typical raid on the Ho Chi Minh trails, so I recant that choice for a target but still want to load the Bullpups.  I can't escape the "coolness" of how they look!

Ken


That is definately AGM-12's loaded on the inboard.  The outboard is loaded with SUU-30's.  That is a very strange loadout.  The AGM's would be for large hard targets and the SUU-30's for anti-personnel.  That is the type of load used against train depots.  At that time no targets in North Vietnam were being attacked.  LBJ stopped all bombing in NV in December 1968. 


Hi Berny,

I have been doing a lot of research, and found that the USAF ordered a variant of the Bullpup-B designated "AGM-12E", with an antipersonnel warhead for attacking missile sites.  So that would have fit with the SUU-30s also for anti-personnel.

Ken


It is possible.  During that time period I was assigned to Hill AFB working on the F-4 RAM team (Rapid Area Maintenance), TDY, to Clark AB, Udorn, and TSN for six months at a time.  My job was going all over SEA repairing or taking apart battle or crash damaged F-4's.  My knowledge of combat missions flown was limited as I wasn't in a combat outfit. 

Hi Berny,

Very cool!  So that will be the load out I will use.  I cannot find if there was an external pod for controlling these missiles.  Do you happen to know?

Ken

  • Member since
    February 2003
  • From: Panama City, Florida, Hurricane Alley
Posted by berny13 on Sunday, January 16, 2011 10:43 AM

They didn't use an external pod.  It was controlled by the "HOBO Knob", a small joy stick located on the right console in the rear cockpit.   

Berny

 Phormer Phantom Phixer

On the bench

TF-102A Delta Dagger, 32nd FIS, 54-1370, 1/48 scale. Monogram Pro Modeler with C&H conversion.  

Revell F-4E Phantom II 33rd TFW, 58th TFS, 69-260, 1/32 scale. 

Tamiya F-4D Phantom II, 13th TFS, 66-8711, 1/32 scale.  F-4 Phantom Group Build. 


  • Member since
    November 2010
  • From: Lafayette, Indiana
Posted by Son Of Medicine Man on Sunday, January 16, 2011 10:46 AM

Thank you again Berny.  Now I just have to wait for the kit to arrive.

Ken

  • Member since
    November 2009
  • From: The NYC.
Posted by Ish47guy on Sunday, January 16, 2011 12:29 PM

Berny, in relation to J-79 new, how would you describe the used & old colors?  My build is a S model close to the ned of its service life, 2 years before the unit transitioned to the F-14, so I'm thinking old would be the way to go.

  • Member since
    February 2010
  • From: Ontario, Canada
Posted by Bockscar on Sunday, January 16, 2011 6:06 PM

F-4P

F-4Putty

RHINO PLASTY 101:

Doc, when I wake up, is my shnozz gonna look okay?

Well maybe, but remember...

Ugly is as ugly as it gets...

I had to put these spars, (these are the templates, I can't find the fotos of the fuselage with the spars glued  into the fuselage and wings) in just to keep the paper thin crispy warped plastic in place. If you really want to see the spars glued in place, I'm thinkin' maybe just bash it open right about now!Tongue Tied

Does it get any prettier than this?:

I still can't believe I'm going to hang pylons under all of that putty. Maybe I'm just warming up for the The Official F-4 Phantom II Group Build 2021! The arrow is a reference point kinda like a surveyor's start point for the pylons.

Sorry the photos are so wonky, but this is my first photo posting and first GB! Embarrassed

  • Member since
    April 2005
Posted by Thunderbolt379 on Sunday, January 16, 2011 7:14 PM

Bockscar -- I salute your perseverence, sir! I think I'd have binned it, but it's amazing to see a model being resurrected this way!

Cheers, M/TB379

http://worldinminiature.blogspot.com/

  • Member since
    February 2010
  • From: Ontario, Canada
Posted by Bockscar on Sunday, January 16, 2011 7:29 PM

Hey Thunderbolt:

I have an F4E 1:48 Fujimi as inspiration. It has that same super sharp nose your 1:72 build has, and the cross section isn't round, the 1:48 version is a bit like an ME-109's nose cross section, wider at the bottom than the top, if you catch my drift.

Fujimi has just about the crispiest styrene I've ever seen. Goes great with a bit of salsa!

  • Member since
    April 2005
Posted by Thunderbolt379 on Sunday, January 16, 2011 7:59 PM

GRIN -- the styrene grade they used in their 1:72 Phantoms is a buit friendlier, it's just the engineering that needs fiddling right and left...

M/TB379

http://worldinminiature.blogspot.com/

  • Member since
    November 2009
  • From: The NYC.
Posted by Ish47guy on Sunday, January 16, 2011 8:00 PM

With some sound modeling advice, I was able to fit the Aires nozzles.  They are much better than the kit nozzles.

  • Member since
    August 2009
  • From: Toledo Area OH
Posted by Sparrowhyperion on Sunday, January 16, 2011 8:06 PM

Looking really nice man.  I wish someone made some decent cans for the Spey engine on the FGR.2.  The kit cans are kind of boring. lol

Rich


Ish47guy

With some sound modeling advice, I was able to fit the Aires nozzles.  They are much better than the kit nozzles.

http://img.photobucket.com/albums/v26/ishthe47guy/Model%20Pics/VF-202%20F-4S/IMG_2119.jpg

http://img.photobucket.com/albums/v26/ishthe47guy/Model%20Pics/VF-202%20F-4S/IMG_2118.jpg

In the Hangar: 1/48 Hobby Boss F/A-18D RAAF Hornet,

On the Tarmac:  F4U-1D RNZAF Corsair 1/48 Scale.

  • Member since
    February 2010
  • From: Ontario, Canada
Posted by Bockscar on Sunday, January 16, 2011 8:11 PM

Sorry, I must have deleted all of the spar shots, I can't find them, but here's an old 1/72 B-70 shot of the spars/reinforcement bulkheads I cut:

I hate 'squishy' models.

  • Member since
    August 2009
  • From: Toledo Area OH
Posted by Sparrowhyperion on Sunday, January 16, 2011 8:15 PM

Is that the AMT kit?  I have one of those, and was planning on adding some support as well.


Bockscar

Sorry, I must have deleted all of the spar shots, I can't find them, but here's an old 1/72 B-70 shot of the spars/reinforcement bulkheads I cut:

http://www.cyberspaceage.com/images/549_100_7084.JPG

I hate 'squishy' models.

In the Hangar: 1/48 Hobby Boss F/A-18D RAAF Hornet,

On the Tarmac:  F4U-1D RNZAF Corsair 1/48 Scale.

JOIN OUR COMMUNITY!

Our community is FREE to join. To participate you must either login or register for an account.

SEARCH FORUMS
FREE NEWSLETTER
By signing up you may also receive reader surveys and occasional special offers. We do not sell, rent or trade our email lists. View our Privacy Policy.