SEARCH FINESCALE.COM

Enter keywords or a search phrase below:

Panzerjager GB (March 1st - June 30th, 2011)

62073 views
1090 replies
1 rating 2 rating 3 rating 4 rating 5 rating
  • Member since
    November 2003
  • From: Nashville, TN area
Posted by bobbaily on Wednesday, March 16, 2011 7:36 PM

Eric-great work on the Emil....very nice.

Here's a couple of progress pics-the front gun structure is not glued to the chassis yet...and I noticed that the left rear fender is a bit off....but hey, it's a tank, right?

Probably won't get anymore done until mid-next week.  However, I'm happy with my progress to date.  Maybe I'm learning to relax, but the instructions are getting a bit easier to figure out.  I did end up 'accidently' cutting off a few brackets that I'll now have to go back and put in the PE parts.  Wasn't planning on doing that, but it shouldn't be too bad. Detail on the interior is fantastic....however, I'm not planning on leaving any hatches open....maybe next time.

Anyway.....

Bob


  • Member since
    March 2003
  • From: Rain USA, Vancouver WA
Posted by tigerman on Wednesday, March 16, 2011 10:55 PM

That looks like good progress Bob. Is that a one-piece barrel? I guess I thought the kit came with a metal one, but as long as it's one-piece and not two, I'm good.

Got lazy tonight, but got the wheels cleaned up and printed out Karl's track tutorial. I'm scared. LOL

Anyone done it before? Any pointers?

   http://i7.photobucket.com/albums/y269/wing_nut_5o/PANZERJAGERGB.jpg

 Eric 

  • Member since
    November 2003
  • From: Nashville, TN area
Posted by bobbaily on Thursday, March 17, 2011 6:05 AM

Thanks Eric.  Yes, it is a one piece barrel.....very light seam...easily sanded off.

Bob


  • Member since
    September 2009
  • From: Rugby, England
Posted by Hinksy on Thursday, March 17, 2011 7:16 AM

Hey Tigerman,

I assume you are referring to the Magic tracks? I used them for the first time on my little Dragon Panzer I and they were bloomin' great!

First off I did the easy bit and did the bottom section of track. To get me started I made up a sheet of styrene with two thin straight edge strips the exact diameter of the tracks.

What I did was to use a piece of fine wire and took this piece of wire from 12o'clock on the idler wheel under the road wheels and up to 12 o'clock on the front drive wheel so I could get the length spot on. I assembled the bottom run and brushed Tamiya thin cement on the links, waited ten minutes then fitted the bottom run. The cement was holding the links perfectly but they were still very adjustable and I was able to position them around the drive and idler wheels.

I then used the same piece of wire to do the top run to get the length ok but I added a few extra links for sag. I assembled these the same way, positioned them and pushed down on the tracks were the sag would be and I packed the 'sag' parts whilst the cement dried.

Dead easy and very effective!


 I hope this helps!

ATVB

Ben Yes

On the Bench - Dragon Pz. IV Ausf. G (L.A.H.) Yes

Your image is loading...


  • Member since
    April 2005
  • From: Piscataway, NJ!
Posted by wing_nut on Thursday, March 17, 2011 8:03 AM

Nice progress Bob

Nice work on the indies Ben.  Not so scary are they?

Marc  

  • Member since
    December 2006
  • From: t.r.f. mn.
Posted by detailfreak on Thursday, March 17, 2011 9:28 AM

            Great looking builds here,Bob as far as that fender being askew it looks like a bit of damage and personally I would not worry about straightening.Any chance of an interior shot or two??Cool

             Ben,if you take your time with those indie links they will come out just fine,I have done more than twenty sets and they all look good.Stick out tongue

                                                             Greg"Detailfreak"RowleyYes

[View:http://s172.photobucket.com/albums/w1/g-earl828/]  http://i158.photobucket.com/albums/t104/cycledupes/1000Roadwheels4BuildBadge.jpg

  • Member since
    March 2003
  • From: Rain USA, Vancouver WA
Posted by tigerman on Thursday, March 17, 2011 9:43 AM

Thanks for the pointers Ben. Looks great. However, I want to paint my tracks off of the vehicle. I've never done them attached and I just don't feel confident painting them that way. I know it can be done, I guess it boils down to confidence and a steady hand.

   http://i7.photobucket.com/albums/y269/wing_nut_5o/PANZERJAGERGB.jpg

 Eric 

  • Member since
    March 2011
  • From: Ohio
Posted by Taps88 on Thursday, March 17, 2011 4:03 PM

Looking good Bob...Don't sweat the fender, I agree with battle damage...gives it character Yes


Well gang...Looks like I have to replace the Anthem. Searched high and low with no luck. I stopped by my Local Michaels and I can't believe they want $216.00 for it. Yes, you heard me right!!

Now way. I even took a walk past the model kits they have...good selection of car kits but......$27.99??? I'm talking Revell kits here...not like Tamiya Sports/Racing types. Unbelievable!!

So....I checked the local Hobbytown and they have My Anthem 155 in stock (with the hose & spare jars) for $99.00. I'll be stopping by there Saturday.


I'll then get the interior painted and start adding the hardware inside.

Eric / Formally known as Erock68

On the Bench:

Academy: 1/72 B17 Memphis Bell

Tamiya: 1/35 Panther G

Dragon: 1/35 Platformwagen SSy


  • Member since
    May 2005
  • From: Dublin Rep Of Ireland
Posted by terry35 on Thursday, March 17, 2011 5:43 PM

My God there is some progress being made here, Nate, Taps, Bob,  Ben everybody flying along.

Got a bit done during the week but did not photograph anything yet. Hope to post soon.

Terry.

  • Member since
    March 2003
  • From: Rain USA, Vancouver WA
Posted by tigerman on Thursday, March 17, 2011 7:43 PM

Taps88

Looking good Bob...Don't sweat the fender, I agree with battle damage...gives it character Yes


Well gang...Looks like I have to replace the Anthem. Searched high and low with no luck. I stopped by my Local Michaels and I can't believe they want $216.00 for it. Yes, you heard me right!!

Now way. I even took a walk past the model kits they have...good selection of car kits but......$27.99??? I'm talking Revell kits here...not like Tamiya Sports/Racing types. Unbelievable!!

So....I checked the local Hobbytown and they have My Anthem 155 in stock (with the hose & spare jars) for $99.00. I'll be stopping by there Saturday.


I'll then get the interior painted and start adding the hardware inside.

Wow, what a stroke. Even with the handy 40% off coupon, it still would cost much more. I was going to suggest ebay, but it sounds tough to top that Hobbytown price.

I've owned 3 Badgers and am like a loyal dog.

   http://i7.photobucket.com/albums/y269/wing_nut_5o/PANZERJAGERGB.jpg

 Eric 

  • Member since
    April 2009
  • From: Carmel, IN
Posted by deafpanzer on Thursday, March 17, 2011 8:44 PM

Guys, I have been lurking but not anymore because I wanted to say great job everybody in this GB. Yes I will be one of your big fans.  Wish I can sign up but I have committed to two GBs and they end in June too.  So I will just be one of your cheerleaders... Indifferent 

Andy

  • Member since
    July 2006
  • From: San Francisco Bay Area
Posted by bufflehead on Thursday, March 17, 2011 9:50 PM

ARRRGGHHH!!!!!  Angry Two weeks into March and I haven't been able to participate in the GB yet! Bang Head.  That Dragon Hetzer is languishing in my closet....Boo Hoo  My fault really; I need to stop working two jobs. Sad

Still its great to see the fine work being done!  Hopefully I'll be able to finish up all my work projects and get back to the bench soon.

Bob - man, I'm jealous that you've got that Dragon Jagdpanzer IV and building it!  Looks like a SWEEEET kit and you're obviously doing a fine job with it!  I was going to ask what camo pattern you plan on doing, but I think I'll just wait until you get some paint on her!

Taps88 - your Sturer Emil is looking fantastic!  What a great looking gun assembly and breech!  I've never been interested in open top vehicles, but that is one monster of a tank!  You're doing that Trump kit proud!

Nacthflieger - Beautifully assembled Tamiya Marder III!  Those Friul tracks look really nice as well as those figures!

PANZERWAFFE - the interior of your Panzerjager I is stunning, especially the instrument panel!!   Awesome work dude!

Hinsky - Another nice Marder that's coming along great!  Those "workable" tool clamps can be a bear to assemble.  If you still need some assistance here's a link that might be useful, http://www.militarymodelling.com/forums/postings.asp?th=39017  Most of the workable clamps are pretty similar and assemble the same way.  I use a different method but don't have any photos to post, sorry.

Sorry, if I missed earlier posts, I was only able to go back 3-4 pages. 

Eric - Look for an update from me in 2-3 weeks.  I'm hoping by then my weekends will be free again!

Ernest

Last Armor Build - 1/35 Dragon M-26A1, 1/35 Emhar Mk.IV Female


Last Aircraft Builds - Hobby Boss 1/72 F4F Wildcat & FW-190A8


  • Member since
    March 2003
  • From: Rain USA, Vancouver WA
Posted by tigerman on Friday, March 18, 2011 1:14 AM

Sorry you can't join the party Andy, but if you find time, please drop in.

Ernest, hurry on up, the bus is all warmed up.

No progress tonight. I was watching March Madness. One of my wild-card picks went down tonight. Argh.

Hoping to get a base down Sunday, but unsure right now. I'll have to double-check and see if I missed anything. Sadly I glued the fenders together as one piece when I should have probably did them seperate. I now have a bit of a gap between the front fenders. I think puttying it would look silly, so I'm exploring my options.

   http://i7.photobucket.com/albums/y269/wing_nut_5o/PANZERJAGERGB.jpg

 Eric 

  • Member since
    September 2009
  • From: Rugby, England
Posted by Hinksy on Friday, March 18, 2011 3:11 AM

tigerman

Thanks for the pointers Ben. Looks great. However, I want to paint my tracks off of the vehicle. I've never done them attached and I just don't feel confident painting them that way. I know it can be done, I guess it boils down to confidence and a steady hand.

Hey TM,

I agree totally! I have only ever painted indy tracks on a tank once and that was with that Panzer I but it was pretty simple!

When I built my big JS-152 I assembled the links in a similar way using the supplied jig etc but was carefull with the glue and didn't allow it to stick to the wheels and I didn't glue the ends together so once TOTALLY set I could remove the tracks and paint them 'off build'.

If I were you, in this case I'd still assemble the two upper and lower halves on each side as per my last post but let them set in place but don't glue the ends together. Paint them off the tank and then put them back on. You'll be able to bend them about a bit to pop them on and off so you shouldn't have any troubles.


Honestly TM, if I can do this (newbie) I certainly know that you can buddy! 

Have confidence! Yes Wink

ATVB

Ben Toast

On the Bench - Dragon Pz. IV Ausf. G (L.A.H.) Yes

Your image is loading...


  • Member since
    August 2003
  • From: Connecticut, USA
Posted by Nachtflieger on Friday, March 18, 2011 9:01 AM

Bob: Nice progress on your Jagdpanzer! Looking real good!

Ben: Some good tips on indy track assembly methods, thanks!

I've had no further progress on my Marder as I've been using my time to touch up a couple of builds I plan on entering in an up-coming contest. I'll probably start painting around the first of April. In the mean time, I'll be watching everyone else's progress with interest. Keep up the good work guys!Big Smile


  • Member since
    March 2003
  • From: Rain USA, Vancouver WA
Posted by tigerman on Friday, March 18, 2011 9:19 AM

Thanks for the vote of confidence Eric. Cool

The Dragon kit has sponsons molded to the hull, so there will be less room to work. your method is worth a look though. I used to paint them on the sprue or tape and then glue to the wheels. Not very efficient. The latest I read is to glue one long run and wait an hour and then lay across the wheels and sprockets, remove, then paint when fully cured.

   http://i7.photobucket.com/albums/y269/wing_nut_5o/PANZERJAGERGB.jpg

 Eric 

  • Member since
    November 2003
  • From: Nashville, TN area
Posted by bobbaily on Saturday, March 19, 2011 10:36 AM

Thanks all.  I'm happy with the kit and it's helping me conquer my feel of Dragon kits....now to tackle that Sherman Premium kit in the stash...

Greg-I'm out of town at the moment....gotta love travel youth soccer...but interior detail is limited to the radio and great detail on the cannon.  I guess Dragon wants to support the aftermarket folks.  I know that the Gerorg Bose Stug Cyberhobby kit has much more interior detail.

I will post some interior pics early in the week though.

Cheers and how about everybody taking the weekend off from building so I don't get too far behind?  Just a thought..Angel

Enjoy the weekend guys.

Bob


  • Member since
    October 2009
Posted by PANZERWAFFE on Saturday, March 19, 2011 11:46 AM

Hey guys, nice work to everyone.

TAPS88 - Nice work and progress and fast.  Sorry about the airbrush but look forward to you getting your new one.

BOB - Great progress also.  As the others said, would not worry with the fender and pass it by calling it battle damage.  When you get to painting this would provide a perfect place to put in some heavy scratches, rust or just some heavier weathering. Yes  It looks in one of the pics like there is good cast texture on the armor arond the fighting compartment.  Barrel looks good, nice not to have to worry about a heavy seam.

TIGERMAN - Ben gave some great advice with the magic tracks, I do them the same way with no problems.  When you do have a molded on fender or something in the way it doesnt matter.  What I do then is make the track into two sections so on final assembly there would be two glue joins.  You would have a top section and bottom section of track that way after they are painted and weathered OFF the vehicle you can work the top section back onto the vehicle then glue the bottom on.  This is what I will be doing with my Pazerjager I.

NICE (I think) we have Andy as a cheerleader. Indifferent

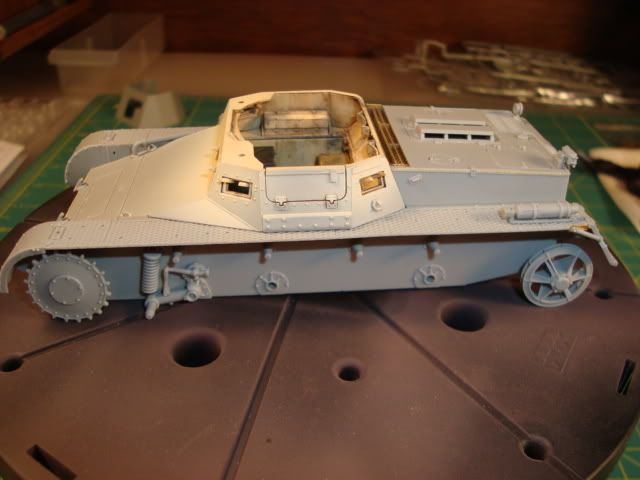
Back at the bench for the weekend and hope to devote the rest of the day to getting some stuff done.  A few small things were accomplished through the week.  Here are some pics (Not much to show but think pics are better than words)

Starting to look like its part, glued the top assemblies in place.

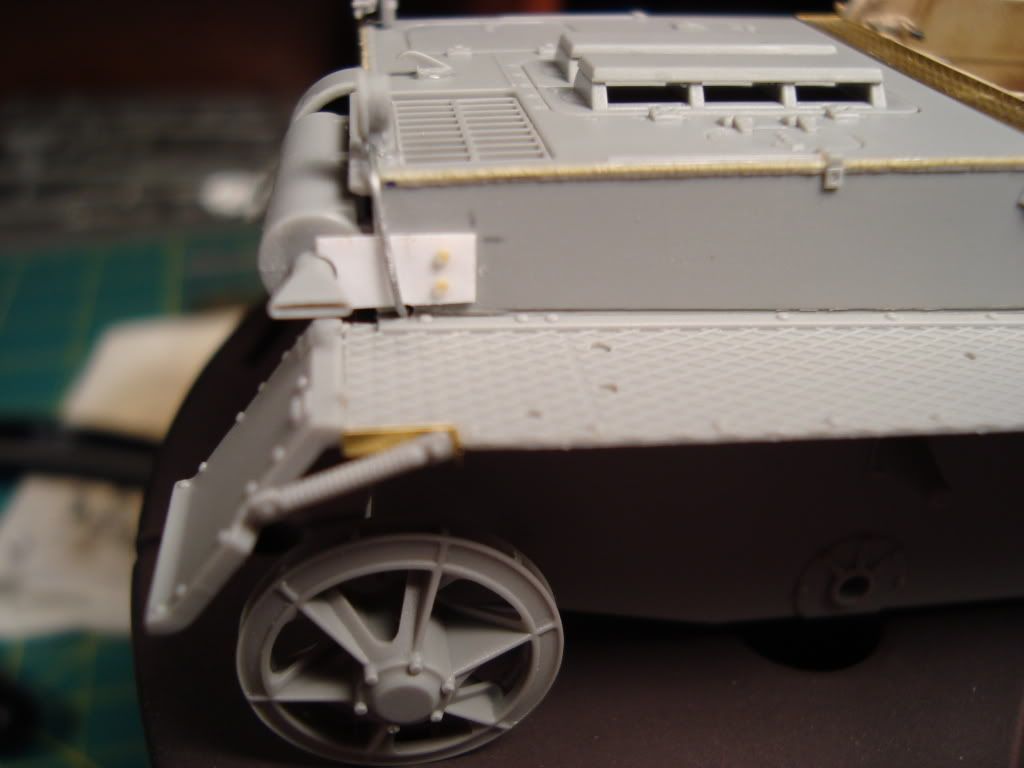
Some more stretched sprue for weld beads on the front.

Exhaust bracket, weld beads and wiring for the tail light was added.

Wiring and weld bead on the other side

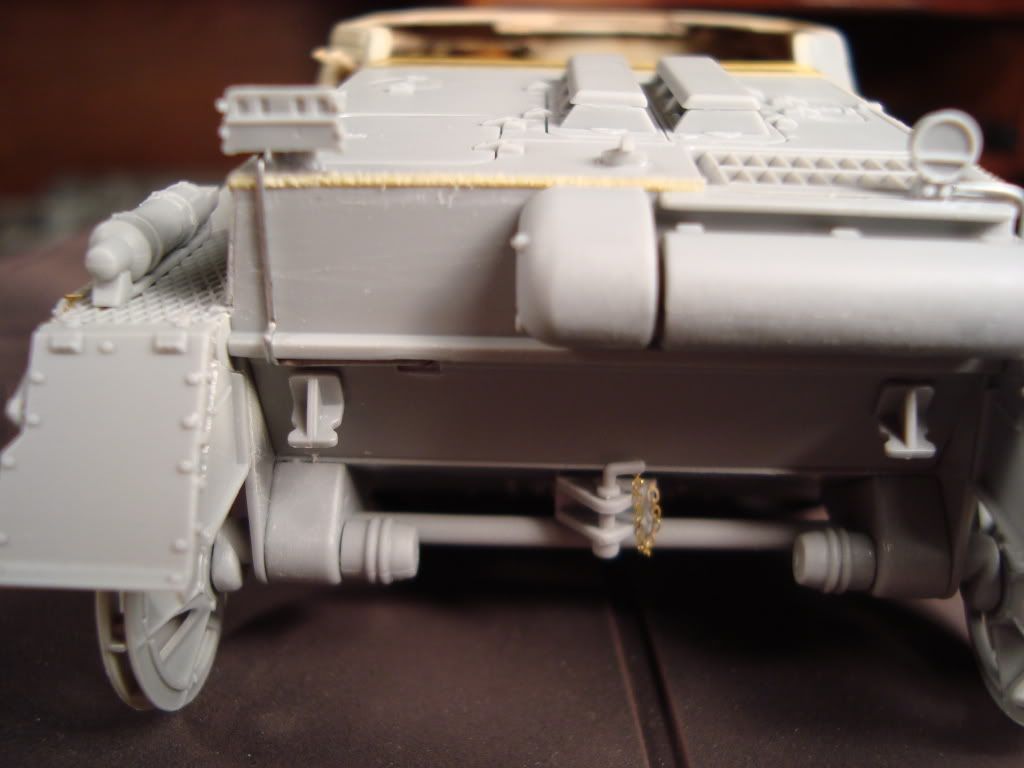
Found the wiring and exhaust bracket looking on the internet, came across (the forums friend) Tony's (aka: Pvt Mutt) build of the Panzerjager and borrowed his ideas.  Hope you dont mind.  Well will see what I can get done today..so until then.

Rob

  • Member since
    September 2009
  • From: Rugby, England
Posted by Hinksy on Saturday, March 19, 2011 12:01 PM

Hey guys,

"Take a weekend off from building" Bob? Yeah ok - when hell freezes over! Wink

Actually I've had to take today off from building as it my parents are having the loft extension done and it's impossible to sit down anywhere in this house quietly at present and build so today:

  • I went and bought my new Tamiya StuG III B (the one that the dog chewed up). That's my next WIP following completion of the Marder.
  • I then decided to aid my diet (I'm not fat whatsoever but having a badly injured knee, working full time in an office and having model building as my main hobby isn't conducive to a trim waistline) so I bought a cracking new mountain bike which I can use for all the little local journeys that I'd normally do in my car. I'll save a lot of fuel and get fit and shed pounds - FAST! I can also take a ride round my local farmland where I do Fox & Rabbit control with my rifles (my other main hobby) just to check things out - the bonus being there are loads of great tracks that are perfect for mountain bikes.

Tomorrow:

  • I'll start assembly of the Pak 40 which is a model in itself! After that I'll get the fighting compartment wall interiors built up with the parts that don't need to be left out for painting and wiring like the radio etc.

Monday (Days Holiday):

  • I'll get the fighting compartment assembled and make a start on hand painting the radios and getting the wiring done.
  • I'd like to be at a point come the end of Monday where I can lay a coat of my Vallejo rattlecan Primer so I'm ready for busting out the air brush next weekend.
  • Sorted! Cool

WIP update tomorrow guys!

ATVB

Ben Toast   

On the Bench - Dragon Pz. IV Ausf. G (L.A.H.) Yes

Your image is loading...


  • Member since
    March 2003
  • From: Rain USA, Vancouver WA
Posted by tigerman on Saturday, March 19, 2011 1:53 PM

Hey Rob, how do you do the weld beads? I know you take stretched sprue, but how long do you soak it with glue before shaping it?

   http://i7.photobucket.com/albums/y269/wing_nut_5o/PANZERJAGERGB.jpg

 Eric 

  • Member since
    October 2009
Posted by PANZERWAFFE on Saturday, March 19, 2011 2:33 PM

TM - I'm using Testors liquid plastic cement (the pink label).  First, holding the sprue, brush on a coat of glue and let dry about 15 seceonds or so then brush on another coat of glue.  Right after that glue in place on the model and let dry on there for about 5 - 10 minutes, just long enough so that when you work on it, it does not fall off.  then carefully brush two more coats of glue and after about 15 - 20 seconds (really about the time it takes to put the glue up and get my chisel blade out and model in hand) start stippling with the chisel blade.  When the glue looks dry and the effect of the stippling is not working any longer, I just brush another coat of glue on and then continue the process.  I just keep repeating that until I am happy with the result. 

It does not take that much because on this PZ I the welds are tiny.  On a bigger vehicle with bigger welds use the same process but apply several more coats on before stippling the sprue to ensure it is soft.  In short I just apply glue and poke at it until I can get the plastic to start shapping.  Dont like to let it soak (many people do) because if it soaks to long I think it turns to mushy.  Hope that helps.

Rob

  • Member since
    March 2003
  • From: Rain USA, Vancouver WA
Posted by tigerman on Saturday, March 19, 2011 3:33 PM

Thank you Rob. There is one piece on the mantlet  that needs a bead.

Here's a few belated update photos:


The wheels are not glued down.


Not sure how much if any will get done today. Kind of lazy.

It doesn't look like a lot is done, but 46 wheels and lots of little parts like the hooks and track hangers do add up.

   http://i7.photobucket.com/albums/y269/wing_nut_5o/PANZERJAGERGB.jpg

 Eric 

  • Member since
    August 2003
  • From: Connecticut, USA
Posted by Nachtflieger on Saturday, March 19, 2011 3:49 PM

Good progress guys. I like the welds Rob. All those little parts will add up to a great looking Jagdtiger Eric!

Nate


  • Member since
    March 2011
  • From: Ohio
Posted by Taps88 on Saturday, March 19, 2011 3:50 PM

Looking pretty darn good there, both Eric & Rob.

Roadwheels do take up a lot of the build, don't they? We're armor guys...we love 'em!

I've done the welds a few times and I really like the way yours are turning out, Rob!

Eric / Formally known as Erock68

On the Bench:

Academy: 1/72 B17 Memphis Bell

Tamiya: 1/35 Panther G

Dragon: 1/35 Platformwagen SSy


  • Member since
    April 2005
  • From: Piscataway, NJ!
Posted by wing_nut on Sunday, March 20, 2011 2:25 PM

Everyone's work is outstanding.

I finally have a enough done to show some progress. There is a huge glaring error that i have to fix.  I admit my concentration has not been the best but these CH instructions are really starting to frustrate me.  The latest for me was the hatch.  It done not fit in the ring.  so I figured taking parts from different kits they just didn't match up right.  So I added some strip to fill the gap.  Looks terrific except now I realize that the hatch sit down inside the ring so it is raised above the hatch in a circle.  Won't be hard to fix but a clear picture would have been nice. Yeah, yeah... I know I should have checked some refs but it's easier to put as much blame on them as I can.Whistling

Anyway, here is where I am.

Marc  

  • Member since
    March 2003
  • From: Rain USA, Vancouver WA
Posted by tigerman on Sunday, March 20, 2011 5:19 PM

Nice progress Marc. Did you have an option for a fired smoke grenade?

   http://i7.photobucket.com/albums/y269/wing_nut_5o/PANZERJAGERGB.jpg

 Eric 

  • Member since
    August 2003
  • From: Connecticut, USA
Posted by Nachtflieger on Sunday, March 20, 2011 5:23 PM

Nice job Marc. Aside from the hatch issue, it looks like a good, clean build so far.

Nate


  • Member since
    October 2009
Posted by PANZERWAFFE on Sunday, March 20, 2011 10:10 PM

ERIC - Thats some nice clean work!  The wheels look great and yes they are time consuming and not much fun but no floaters and the position of them look good too me Yes  Nice job with the putty above the sprocket.  Must also comend you on the spare track hangers, I often find those to be fustrating trying too get them straight and in the proper place, yours are Yes

NATE, TAPS88 - Thanks guys Big Smile

MARC - You really put some work in this guy this weekend, shes almost ready for paint.  Looks great and I to like the one discharged smoke Yes  From my research, one of the biggest complaints from the crew was how much these vehicles leaked.  Maybe one of the crewmen decided too fix the leak in the hatch Whistling

BOB - Hope the game was good.

Here is the up date.  Decided too finish out the hull completly before moving on to the gun.  So started with the road wheels, I too had to do a little work on these.  They came with a brass ring that had to be glued in place for both sides and on all wheels.  After glueing I then sanded and smoothed them out.


Went ahead and did some painting and decided on this for my base color or colors.  All the wheel boggies are dry fit for know.

Much left too do here but this should give me a good start.  I think the color on this one does look better in person.  next steps, will paint the front / rear lights, vent hose on the glacis, some of the wiring for the lights (also wired the front black out light just cant see it in the pic above), paint the exhaust and then get it's screen on and in place then paint it.  After that will do some weathering only on the lower hull were the tracks go, will save the top for when the whole model is completed and weather all at one time.  When the susspension is done will then put on the magic tracks.  Finally paint the tools and then move to the gun.  So still much to do.  The rest of the running gear parts are almost ready to put on, not a very good pic but here they are.

Hope to post threw the week but it will depend on how work goes.


Rob

  • Member since
    February 2004
  • From: Connecticut, East of the River
Posted by tlivancso on Monday, March 21, 2011 3:54 AM

Awesome work by everyone.

Nate: Nice build as always sir, will enjoy seeing you put some color on it and the figures as well Big Smile.

Ben: Great looking build, and the tip on the tracks very useful too thanks Beer.

Rob: Awesome looking interior and the instrument panel is really sharp, what size brush did you use to pick the details out.

Taps88: Great looking build super clean and fast Big Smile.

TM: Really good looking build so far, very clean and the rear grills look sharp. I did find a Calibre set that has the waffle pattern zimm for a StuG IV so there must have been a version with it on it but I have also seen pics in one of my refs that shows the early without any zimm at all so time will tell if I do any or not.

Marc: Nice clean build and I know you will get the hatch settled out.

Well no progress for me at the moment except doing reaserch and looking in the box now and then, trying to finish up a few items for the upcoming show as Nate and dupes are doing as well. Hope to start on the kit after next weekend before traveling for work for the following two weeks, glad this thing does not end till June.. Stick out tongue

Cheers, Thom


IPMS Member #42958 /  AMPS Member #2091

IPMS Central Connecticut (President)

IPMS Northeast Military Modelers Association (Web Master)

Like Alice "I try to believe in three impossible things before breakfast"

  • Member since
    April 2005
  • From: Piscataway, NJ!
Posted by wing_nut on Monday, March 21, 2011 7:28 AM

Thanks guys. 

Eric, the kits comes with 6 each used and unused smoke grenades.  The hatch turned to be a very easy fix The glue bond was strong enough to hold but it popped out with a little pressure. A Dremel sanding drum and some fine sandpaper and it was done in a few minutes.  I wash all my F-ups were that easy to fix.

Marc  

JOIN OUR COMMUNITY!

Our community is FREE to join. To participate you must either login or register for an account.

SEARCH FORUMS
FREE NEWSLETTER
By signing up you may also receive reader surveys and occasional special offers. We do not sell, rent or trade our email lists. View our Privacy Policy.