SEARCH FINESCALE.COM

Enter keywords or a search phrase below:

The Offical Natural Metal Finish Group Build III

135895 views
774 replies
1 rating 2 rating 3 rating 4 rating 5 rating
  • Member since
    August 2010
  • From: New Zealand
Posted by Furyan on Tuesday, January 31, 2012 3:09 AM

Lol yeah thanks Vett, quick shot of the packard biult Merlin, bit shiney but I like to think the mechanics gave it extra TLC hahaha..

The cockpit area is very detailed, took me ages even just getting this far.. a bit more to do still, like both walls etc.. 

(Hey if anyone can plse confrim if the all 51D tangs had their radio wire strung or not would be very much appreciated ... maybe Doogys hasnt caught my post yet... Tongue Tied )  Would love to know. I thght they all were.. maybe wrong. 


Thanks.


Loving these ultra deatiled dials _b

Last build: Tamiya's P-51D Mustang in big 1/32 - Lt Col J C Meyer and his blue nosed bastards. Never forgotten.


  • Member since
    June 2010
  • From: Austin, TX
Posted by DoogsATX on Tuesday, January 31, 2012 7:45 AM

Furyan


 DoogsATX:


 Not did 8th AAF fighters sport aerial wires, so no need to string those. 

I did Petie 2nd in 1/48 last summer in prep for the 1/32, but it kind of went and satisfied my 'Stang urges for the time! 


Thanks for that info Doogs, very interesting. Hey so the 8th didnt carry the aerial wire!? Youre 100% sure of that, again thanks for the heads up. I guess the top pic I posted of P2 showing the wire strung is wrong!? I was in the thinking it was something every 51D carried... O_o

(Cats that B17 is looking awesome _b )

It's an extremely common misconception, and you'll see aerials added to all kinds of P-51s, P-47s and yes, even Spitfires that don't call for them. I don't know why 8th AAF fighters didn't run aerial wires, but they didn't.

On the Bench: 1/32 Trumpeter P-47 | 1/32 Hasegawa Bf 109G | 1/144 Eduard MiG-21MF x2

On Deck:  1/350 HMS Dreadnought

Blog/Completed Builds: doogsmodels.com


  • Member since
    October 2010
  • From: Hobart, Australia
Posted by Casper the Chihuahua on Tuesday, January 31, 2012 6:51 PM

Painting all done, next decal times.

Cheers

On the bench: A-4F 1/32 Hasegawa

Just deployed: F6F-5N Hellcat Nightfighter 1/48 Eduard

Up next: A6-E Intruder 1/48 Revell

  • Member since
    February 2011
  • From: Launceston, Australia
Posted by the real red baron on Tuesday, January 31, 2012 11:10 PM

looks nice casper, cant wait for more!


  • Member since
    November 2009
  • From: SW Virginia
Posted by Gamera on Wednesday, February 1, 2012 8:21 AM

Furyan: Very nice work on the cockpit and the merlin looks terrific! I assume this kit has the removable cowling parts to show the engine off?

Casper: Very colourful B-17! Love the patchwork aircraft you're building. I looked at the instructions for it figured I'd go with a simpler scheme.  

"I dream in fire but work in clay." -Arthur Machen


  • Member since
    August 2010
  • From: New Zealand
Posted by Furyan on Wednesday, February 1, 2012 1:02 PM

Gam: Thanks... yes indeed it does have removable panels, held on with small magnets Smile


Doogs: Wow, again your info is outstanding, thanks for clearing that up. I was always under the impression that the radio wire helped with  radio reception, I guess that wasnt always so. Looks like the mast did just that same job. Thanks again on the wonderful photos. You wouldnt have any more would you!??

Casper the Forts looks primo dude, nice! Yes

Last build: Tamiya's P-51D Mustang in big 1/32 - Lt Col J C Meyer and his blue nosed bastards. Never forgotten.


  • Member since
    June 2010
  • From: Austin, TX
Posted by DoogsATX on Wednesday, February 1, 2012 2:22 PM

Furyan

Doogs: Wow, again your info is outstanding, thanks for clearing that up. I was always under the impression that the radio wire helped with  radio reception, I guess that wasnt always so. Looks like the mast did just that same job. Thanks again on the wonderful photos. You wouldnt have any more would you!??

Casper the Forts looks primo dude, nice! Yes

I did some digging and found what seems like a reasonable answer:

The simple answer is that NO fighters in the ETO were fitted with the wire antenna. The reason for this is that the AAF Stateside were using HF radios and the RAF were using VHF. The AAF had to change in order to communicate with the British radio stations. The pole antenna alone was found to be suitable for this. You may find the odd photo of very early P-47s with the wire but this of course was very short-lived - a matter of a week or so before they were fitted with VHF sets. The problem seems to have arisen by profile artists (and decal manufacturers) using factory drawings etc to prepare their work without a knowledge of the circumstances. I cannot speak for other theatres of operations as the need to communicate with RAF stations did not apply. However, I can state categorically that the wire antenna was redundant for 8th and 9th AF machines. If you look carefully at photographs of early issue P-51D's of the 8th AF you will be able to find a perspex blanking plate fitted over the slot in the canopy where the wire would normally have gone through. Also of course, just look at P-47s and P-51B/Cs that have been fitted with Malcolm hoods - only a whip antenna is fitted.

Don't have any more pics per se, but I found most of those through the Google. A few I've already got tucked in Photobucket for reference.

On the Bench: 1/32 Trumpeter P-47 | 1/32 Hasegawa Bf 109G | 1/144 Eduard MiG-21MF x2

On Deck:  1/350 HMS Dreadnought

Blog/Completed Builds: doogsmodels.com


  • Member since
    August 2010
  • From: New Zealand
Posted by Furyan on Wednesday, February 1, 2012 2:42 PM

DoogsATX

-Q-


Awesome doogs.. indeed the B and C wore only the whip wire even in the anatomy information books I have. Ive learnt something very useful in model making. Thanks.


Last build: Tamiya's P-51D Mustang in big 1/32 - Lt Col J C Meyer and his blue nosed bastards. Never forgotten.


  • Member since
    December 2006
  • From: Kennewick, WA
Posted by kbuzz01 on Wednesday, February 1, 2012 8:52 PM

Furyan and Casper - great stuff!!  YesYes

Have made a little progress on the F-86.  A little slow - I've got 3 builds goin'.  (I usually have only one on the bench!)

Magical Ballast (?)  It was junk I had in the drawer about the right weight.  Confused  Since I don't intend to fly it, I left the engine out.

DSC01653.jpg build1

DSC01654.jpg build2

Hope to do some painting soon.

Ken


animation6.gif image by kbuzz_photos
  • Member since
    April 2010
Posted by Theuns on Thursday, February 2, 2012 6:39 AM

Here is my little 1/72 Academy B.I will do a few pannels in darker allu to break up the plastic look to it.

Hoping to do the yellow tail and wingtips tomorrow.
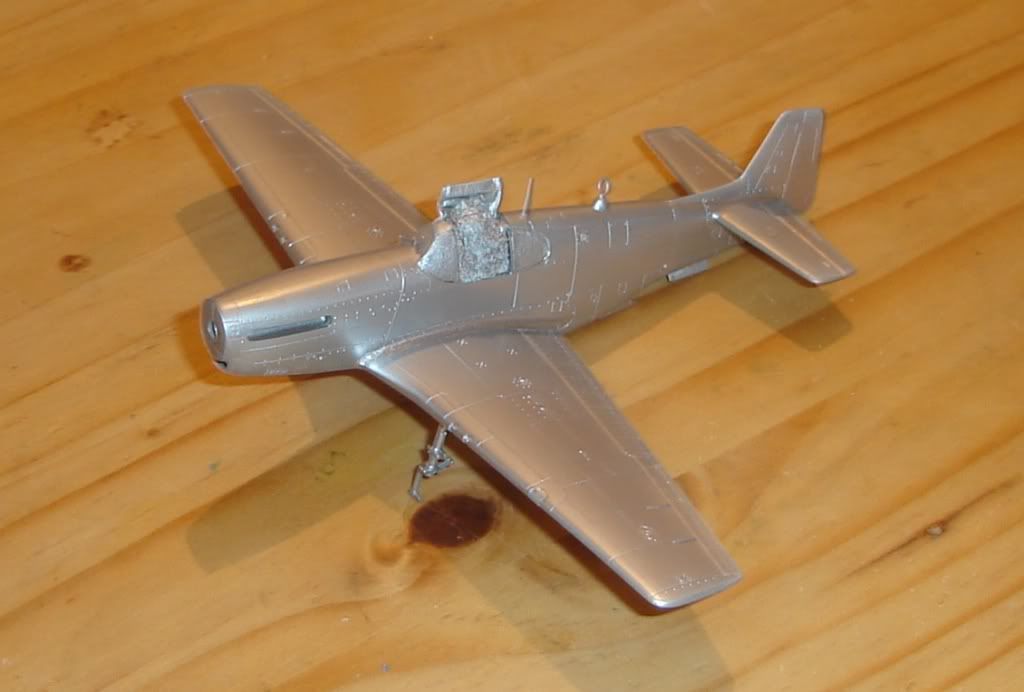
1/72 Academy P-51B

Theuns

PS. I have seen pix of P-51's with green or silver wheel wells and UC doors, would this have been standard during different times in the plane's carrier as parts were replaced/repaired.

I have also read that a silver lacure was painted inside some US planes. maybe it's this???

  • Member since
    June 2010
  • From: Austin, TX
Posted by DoogsATX on Thursday, February 2, 2012 8:24 AM

Theuns

Here is my little 1/72 Academy B.I will do a few pannels in darker allu to break up the plastic look to it.

Hoping to do the yellow tail and wingtips tomorrow.

http://i803.photobucket.com/albums/yy315/lmc001/models003-3.jpg?t=1328185265

Theuns

PS. I have seen pix of P-51's with green or silver wheel wells and UC doors, would this have been standard during different times in the plane's carrier as parts were replaced/repaired.

I have also read that a silver lacure was painted inside some US planes. maybe it's this???

P-51 gear bays are all over the place. I wouldn't be surprised to one day see a pic of one painted with rainbows. But the most common seems to have been green zinc chromate in the gear bays themselves, with the doors left metal (or painted with aluminum lacquer).

I believe silver lacquer was more heavily used pre-war? And the internals of some aircraft in non-crewed areas. See: F4F gear bay. I know aluminum lacquers were used on the P-51's wing surface to cover over the filled-in panel lines and generally elsewhere was probably employed the way it was employed by pre-war yellow wings aircraft - corrosion protection. 

On the Bench: 1/32 Trumpeter P-47 | 1/32 Hasegawa Bf 109G | 1/144 Eduard MiG-21MF x2

On Deck:  1/350 HMS Dreadnought

Blog/Completed Builds: doogsmodels.com


  • Member since
    June 2010
  • From: Austin, TX
Posted by DoogsATX on Thursday, February 2, 2012 8:27 AM

"Magic Carpet" is primed at last! The Mr. Surfacer 1200 went down very well. Probably the best application I've ever gotten out of the stuff. Next up...a light polishing sand, then some Tamiya X-1 for  nice, black base.

On the Bench: 1/32 Trumpeter P-47 | 1/32 Hasegawa Bf 109G | 1/144 Eduard MiG-21MF x2

On Deck:  1/350 HMS Dreadnought

Blog/Completed Builds: doogsmodels.com


  • Member since
    October 2010
  • From: Hobart, Australia
Posted by Casper the Chihuahua on Thursday, February 2, 2012 11:15 PM

Ok, got the fortress done. This kit was a joy to build. One of the bet offerings I've seen from Revell.

Cheers

On the bench: A-4F 1/32 Hasegawa

Just deployed: F6F-5N Hellcat Nightfighter 1/48 Eduard

Up next: A6-E Intruder 1/48 Revell

  • Member since
    July 2008
  • From: USA California
Posted by vetteman42 on Thursday, February 2, 2012 11:58 PM

Furyan hope you are able to show off that Merlin it sure does look the part. Are you going to have an open panel for it ? The pit is really lookin sweet too, cant wait to see more of it, seems to be a bunch of detail for you to play with in there.

Doogs thanks for sharing that little tidbit about the areal wires on the mustangs, thats one I didnt know either and will remember. Glad to see you have the jug back on the bench too Eats

Casper gotta tell ya I REALLY like the finish on your B-17 !! Just cant wait to see it all decaled up.

Lookin good Kbuzz YesYes Are you planning to build the engine and show it off next to the Sabre ? The fits on that kit look pretty good I may have to look for one as I want to build one soon. Like your weights too BTW.

Theuns I have to say you nailed that finish on so small a scale, a hard thing to do. A lot of them I have seen done in NMF have a grainy look to them which yours lacks. YesYes


Randy So many to build.......So little time

  • Member since
    November 2009
  • From: SW Virginia
Posted by Gamera on Friday, February 3, 2012 8:58 AM

Ken: Very nice stuff there! Funny I've never built a F-86 but I keep looking at the ones done by the guys over on Stikpusher's Korean War GB and I'm more and more tempted.

Theuns: Really nice work there! I'm not sure about the landing gear bays on the Mustang. Being a lazy modeler I usually just paint them NM, that is I don't mask them at all and just spray them NM with the rest of the aircraft.

Casper: Great job there! I really respect you for the radio wires which I've have knocked off each one about five times apiece and gotten glue splattered all over the aircraft attaching them. When I first saw how they'd molded the front cockpit area in one big piece of clear plastic I was a little skeptical on how it would work out but I can't tell any difference in your model Yes

Cliff

"I dream in fire but work in clay." -Arthur Machen


  • Member since
    April 2010
Posted by Theuns on Friday, February 3, 2012 9:32 AM

Thanx for the compliments guys, I actually thought the silver was to "shiny" but if you guys say it looks OK then I'm one happy dude!

I will just do the gunbay covers and the exhaust pannel in a slightly different tone of allu. The yellow for the tail and wingtips has been sprayed on and now just need to wait for the gloss to cure.

As for the "fine textured" paint , it was Tamiya Chrome silver thinned down about 30% with Turps and sprayed at a relative hight pressure (about 25 PSI). It was purely accedental I assure you!


Theuns

  • Member since
    July 2008
  • From: USA California
Posted by vetteman42 on Friday, February 3, 2012 11:47 AM

Casper we must have been posting at the same time an you hit the go button first Stick out tongue Your B-17 is a beauty for sure, like I said I REALLY like the color scheme and markings you have chosen. Love the closeups you took, the crystals are so clear I can see the detail inside and that work really paid off for you. Right down to the papers on the bench in the radio compartment. Very very well done sir Bow Down Your build is posted on the front page.

Guys I was checking the front page and found a bunch of mistakes that have been corrected. If you will kindly check and let me know of others that I have missed that would be great.

Randy So many to build.......So little time

  • Member since
    December 2006
  • From: Kennewick, WA
Posted by kbuzz01 on Friday, February 3, 2012 11:57 AM

Great work, everybody.  Beautiful B-17, Casper!!

The Academy F-86 is a nice build.  Very minimal fit problems so far.  Not too sure how those large decals will work, but we'll see soon.  No plans to do anything with the engine - not into dioramas.

Ken

animation6.gif image by kbuzz_photos
  • Member since
    October 2010
  • From: Hobart, Australia
Posted by Casper the Chihuahua on Friday, February 3, 2012 3:48 PM

Gamera


Casper: Great job there! I really respect you for the radio wires which I've have knocked off each one about five times apiece and gotten glue splattered all over the aircraft attaching them. When I first saw how they'd molded the front cockpit area in one big piece of clear plastic I was a little skeptical on how it would work out but I can't tell any difference in your model Yes

Hey Gamera, the radio wires turned out better than I'd hoped. I used small bit of PE to tether the wires to the fuselage. It's a technique I'll try again soon. As for the cockpit canopy, I first tried to build the Academy B-17F a couple of years back and it is a terrible kit. The canopy slid in under 2 halves of fuselage ceiling which were warped and one half caved into the pit. This Revell kit is awesome. so nicely engineered. The ONLY thing they could fix is the placement of the connectors to the sprues. Tamiya and Dragon are the only manufacturers that get this right. They often make connectors that sit under the part so when removed and lightly cleaned there is no hint on a mark. Connecting to curved surfaces is always difficult to successfully clean up.

Cheers

On the bench: A-4F 1/32 Hasegawa

Just deployed: F6F-5N Hellcat Nightfighter 1/48 Eduard

Up next: A6-E Intruder 1/48 Revell

  • Member since
    November 2009
  • From: SW Virginia
Posted by Gamera on Friday, February 3, 2012 11:18 PM

Casper the Chihuahua


 Gamera:


Casper: Great job there! I really respect you for the radio wires which I've have knocked off each one about five times apiece and gotten glue splattered all over the aircraft attaching them. When I first saw how they'd molded the front cockpit area in one big piece of clear plastic I was a little skeptical on how it would work out but I can't tell any difference in your model Yes


Hey Gamera, the radio wires turned out better than I'd hoped. I used small bit of PE to tether the wires to the fuselage. It's a technique I'll try again soon. As for the cockpit canopy, I first tried to build the Academy B-17F a couple of years back and it is a terrible kit. The canopy slid in under 2 halves of fuselage ceiling which were warped and one half caved into the pit. This Revell kit is awesome. so nicely engineered. The ONLY thing they could fix is the placement of the connectors to the sprues. Tamiya and Dragon are the only manufacturers that get this right. They often make connectors that sit under the part so when removed and lightly cleaned there is no hint on a mark. Connecting to curved surfaces is always difficult to successfully clean up.

Cheers

Ahh, good idea, I never thought of using PE to anchor them in place. I'm looking forward to giving this kit a go, I've heard nothing but good about it.I have a partly completed Academy B-17G, I don't think it's that bad a kit but no where near as nice as the Revell one.

Cliff

"I dream in fire but work in clay." -Arthur Machen


  • Member since
    October 2010
  • From: Hobart, Australia
Posted by Casper the Chihuahua on Friday, February 3, 2012 11:44 PM

As you can see the cockpit on this kit is pretty sparse.

There are two not-very-fitting-at-well plastic bits for the side wall that I just threw away.

I cut off the window sills and replaced them with the FP brass offerings. As you can see on the port side, just a plastic ridge.

So while the Flightpath set spices up the IP and some of the side consoles considerably, it completely fails to add anything else to the cockpit. So scratch time. As always with my approach to scratch, I like to simulate not replicate. I tried to do something that looked good to the eye and not worry too much about what was really inside this pit for real.

It's amazing how much of this will be seen on the final kit. Airfix could have done a little more perhaps. But it's amazing what can be done with some left over PE, resin, styrene cockpit shapes and wire.

Cheers

On the bench: A-4F 1/32 Hasegawa

Just deployed: F6F-5N Hellcat Nightfighter 1/48 Eduard

Up next: A6-E Intruder 1/48 Revell

  • Member since
    April 2010
Posted by Theuns on Saturday, February 4, 2012 12:42 AM

As for the Academy 1/48 F-86 "band decals" I had hassles with mine, so I just masked and painted the yellow bands and used thin strips of black decals to finnish it off.

Maybe with some setting/softning solution you'll have better luck.

Theuns


  • Member since
    August 2010
  • From: New Zealand
Posted by Furyan on Sunday, February 5, 2012 3:28 AM

"I looked up as the air raid sirens started to roar,  some went about their usual business as the threat didnt seem large, I saw one lone US aircraft in silver, glinting against the blue sky in the bright morning sun yet it also seemed semi transparent... 5 minutes later I had no friends left, no home and no city, I weep for them still"


Nagasaki survivor - August 1945 


Sad


Last build: Tamiya's P-51D Mustang in big 1/32 - Lt Col J C Meyer and his blue nosed bastards. Never forgotten.


  • Member since
    June 2010
  • From: Austin, TX
Posted by DoogsATX on Sunday, February 5, 2012 8:30 AM

Casper - lovely Fort! What's that new thing on the bench? Don't recognize it.

Been a frustrating few days at Casa Doogs. We need the rain real bad, but of course it waits until I'm ready to start painting to show up and settle in...

Finally got a break yesterday, so I got the wings blacked up in prep for the Alclad. Been hoping to have this one knocked out by the 18th, but all this rain is making that really difficult!

On the Bench: 1/32 Trumpeter P-47 | 1/32 Hasegawa Bf 109G | 1/144 Eduard MiG-21MF x2

On Deck:  1/350 HMS Dreadnought

Blog/Completed Builds: doogsmodels.com


  • Member since
    July 2008
  • From: USA California
Posted by vetteman42 on Monday, February 6, 2012 12:31 AM

Casper wow just finished the B-17, a sweet build BTW, and now you have gone and done a bunch of work on the Sabre. Great start you have goin Yes

Doogs Eats

Strange weather we are having here in SoCal too. My sister was in Richardson last week couldn't believe the rain that was coming down. She told me I was right, Californians don't know what a rain storm is LOL

Randy So many to build.......So little time

  • Member since
    October 2010
  • From: Hobart, Australia
Posted by Casper the Chihuahua on Monday, February 6, 2012 12:37 AM

Sorry V-man, I've bumped the Sabre for the 1/24 Harrier Stick out tongue I'll do the Sabre next, I promise!!

Cheers

On the bench: A-4F 1/32 Hasegawa

Just deployed: F6F-5N Hellcat Nightfighter 1/48 Eduard

Up next: A6-E Intruder 1/48 Revell

  • Member since
    June 2010
  • From: Austin, TX
Posted by DoogsATX on Monday, February 6, 2012 2:24 AM

Got the NMF on the wings and cowl tonight...

On the Bench: 1/32 Trumpeter P-47 | 1/32 Hasegawa Bf 109G | 1/144 Eduard MiG-21MF x2

On Deck:  1/350 HMS Dreadnought

Blog/Completed Builds: doogsmodels.com


  • Member since
    October 2010
Posted by ColGray on Monday, February 6, 2012 10:09 PM

Is it too late to join again with another build?

I just picked up Monograms F-80 in 1/48th so it should be a nice relaxing NMF build

let me know


http://i712.photobucket.com/albums/ww122/randysmodels/NMF%20Group%20Build%20III/Group%20Badge/NMFIIIP-51Badge.jpg

  • Member since
    July 2008
  • From: USA California
Posted by vetteman42 on Monday, February 6, 2012 10:18 PM

Casper no worries buddy but I did haffta yank your chain a bit ya know

Doogs now thats what I have been waiting to see, sweet. You can really lay that alclad down man Bow Down

Col Gray your build is in sir and looking forward to seeing it. I have one of those in the statch maybe one day I will be able to actually build it.

Randy So many to build.......So little time

  • Member since
    April 2010
Posted by Theuns on Tuesday, February 7, 2012 1:39 AM

Dang that Alclad gives good results! Wish I gould get hold of some here :-(

I am in the final stages of completing my 51 and will post pix soon.

In the kit they give an ADF loop on the rear top fuse that I installed and painted. Last night I looked at all my 51B pix and not one had the loop ,so I had to cut the thing off and now need torepair the area.

Theuns

JOIN OUR COMMUNITY!

Our community is FREE to join. To participate you must either login or register for an account.

SEARCH FORUMS
FREE NEWSLETTER
By signing up you may also receive reader surveys and occasional special offers. We do not sell, rent or trade our email lists. View our Privacy Policy.