SEARCH FINESCALE.COM

Enter keywords or a search phrase below:

Blitzkrieg in the West (France 1940) Sept. 18 2011 - March 1 2012

144765 views
2290 replies
1 rating 2 rating 3 rating 4 rating 5 rating
  • Member since
    September 2005
  • From: beacon falls , Ct.
Posted by treadwell on Friday, September 23, 2011 7:49 PM

Eric :  )

The main thing that is important is to be able to hold the tiny part down while you cut it's shape...

it is that simple... I have tried with tape and tried with crazy glue... for me the cement takes longer, but had good results.. I'm telling you man, you can do this... take of couple of tries maybe but it will be so worth it :  )   .....finish the turret cap and turret and add the little hooks LAST... LOL

treadCool

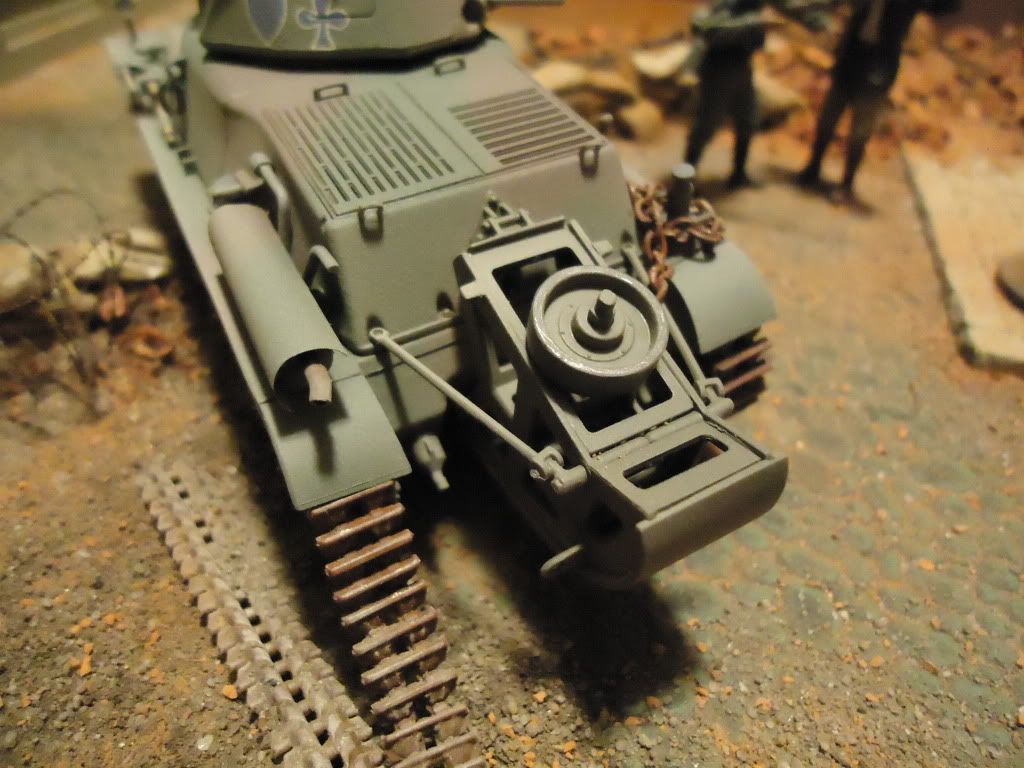
P.s. I forgot to add that the pics of the hull and running gear look excellent...I love the overall looks of the Hotchkiss...very small ... very coolCool


  • Member since
    March 2003
  • From: Rain USA, Vancouver WA
Posted by tigerman on Friday, September 23, 2011 8:07 PM

The thing is so small. I barely was able to grab it between my fingernails, and i was surprised at that. I don't know.

   http://i7.photobucket.com/albums/y269/wing_nut_5o/PANZERJAGERGB.jpg

 Eric 

  • Member since
    March 2006
  • From: Right Side of a Left State
Posted by Shellback on Friday, September 23, 2011 8:31 PM

I'm finally done working for the day . Putting the finishing touches on my wall / deck project .

Tread , cool idea for makinf the hook .Yes

Eric  , you can fix it so dont sand away the details .Yes

Casteinuovo, chasis looks good .

WBill , yes , wheels n sprockets .

  • Member since
    September 2005
  • From: beacon falls , Ct.
Posted by treadwell on Friday, September 23, 2011 8:36 PM


you just need some confidence,Eric.... As of now I am sending you all my best KarmaSmile...


  • Member since
    March 2003
  • From: Rain USA, Vancouver WA
Posted by tigerman on Friday, September 23, 2011 9:06 PM

treadwell

Eric :  )

The main thing that is important is to be able to hold the tiny part down while you cut it's shape...

it is that simple... I have tried with tape and tried with crazy glue... for me the cement takes longer, but had good results.. I'm telling you man, you can do this... take of couple of tries maybe but it will be so worth it :  )   .....finish the turret cap and turret and add the little hooks LAST... LOL

treadCool

P.s. I forgot to add that the pics of the hull and running gear look excellent...I love the overall looks of the Hotchkiss...very small ... very coolCool


In hindsight, I sure wish I had done that. Dunce

   http://i7.photobucket.com/albums/y269/wing_nut_5o/PANZERJAGERGB.jpg

 Eric 

  • Member since
    October 2009
Posted by PANZERWAFFE on Friday, September 23, 2011 9:28 PM

Hey everyone.  It's been a busy work week so finally checking in here.  Great work to everyone!  Will be going back to read and catch up.

JC - Thanks for that last link on the Somua Yes

ERIC - Thats some bad news about your hooks!  You defiantly need to try to make some hooks those details, as small as they are, need to be on there.  If you prefer, I checked my spare parts box and found

Thats right, spare hooks and cupola!  If you want them just PM me and I'll drop them in the mail tomorrow.

What seam are you trying to figure out?  Not sure what you want me to take picture of but here are a few pictures and no picking on my H39, it was only my second build.

If those are not the right shots let me know and will post more.

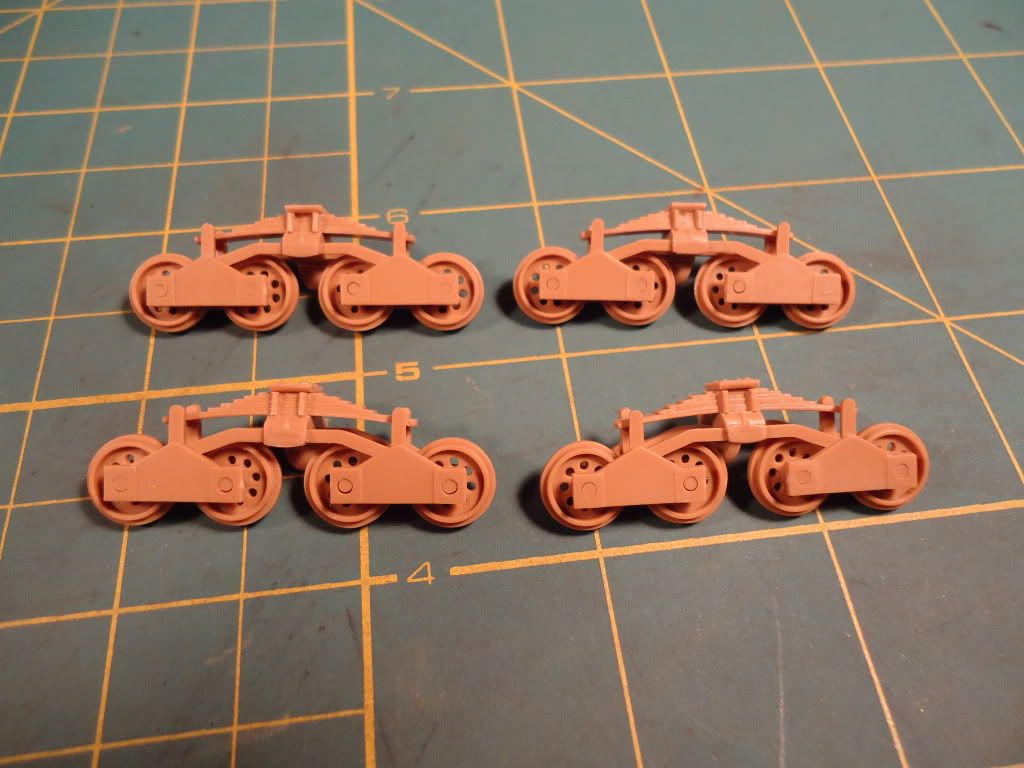
My update on the Somua.  Not much to show but finally broke sprue last night.  Thought about detailing the bogie's but decided not to since they will be completely covered with skirts.
Then work to work on the hull.  The hull was made up of 5 pieces and they fit together very badly.  Glued them together and let dry overnight.  Here you can see the poor fit
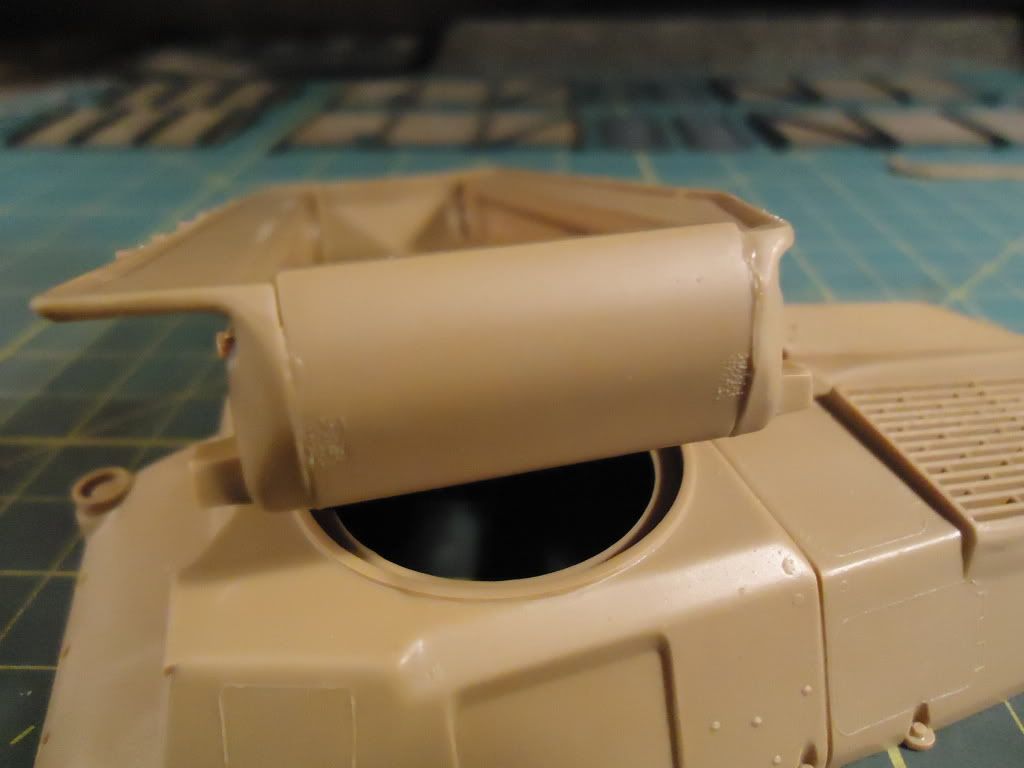
Have puttied all seams today and will be working on sanding and shaping the hull tonight.  Have found that have to be very careful sanding and cutting / cleaning parts.  The plastic is the softest I've ever worked with and is very easy to over cut, sand, or even tear.  Hope to have more to show over the weekend.


Rob

  • Member since
    July 2008
  • From: South of france
Posted by Vit13 on Saturday, September 24, 2011 1:35 AM

hello Guys ,


this morning i can't modelling. Stick out tongue

I wait to watch on tv the rugby game France / All blacks Stick out tongue

@Tread :  check your mail.

i found this page with all modifications to the Tamiya B1.

http://www.chars-francais.net/new/index.php?option=com_content&task=view&id=1231&Itemid=36


jc


  • Member since
    March 2003
  • From: Rain USA, Vancouver WA
Posted by tigerman on Saturday, September 24, 2011 1:44 AM

Rob, you da man. Bow Down I'll gladly take those hooks. Sorry guys, I'm a busy beaver and making those itsy bitsy hooks looks too compelling to me.

That was the scheme I was thinking of, but now that you've done it, perhaps I'll get more creative. LOL

I wanted to see if you puttied the joins between the two upper halves on the front of the vehicle where the hatch is. It looks as though you didn't. Some of the photos in BW are hard to tell. I think from another photo I found the seam under the rear deck is also supposed to be there.

Bummer about the hull on that Somua, but I imagine you knew what you were getting into.

   http://i7.photobucket.com/albums/y269/wing_nut_5o/PANZERJAGERGB.jpg

 Eric 

  • Member since
    July 2004
  • From: Texas
Posted by wbill76 on Saturday, September 24, 2011 10:45 AM

Thanks tread! 1000+ parts = lots of detail / (clean-up X part), so some steps are very time-intensive for what "seems" to be not much result but the devil is ALWAYS in the details! Wink The "Super Kits" were meant to include every possible conceivable detail option for the builder or dioramist (right down to including details and parts normally not seen unless in a repair setting). It was an idea that at the time sounded great I'm sure as the "next big thing" as it came on the heels of their resoundingly successful Tiger 3-in-1 kits...but ultimately proved too much of a good thing and they then reverted to the "Smart Kit" approach instead. Big Smile  

Eric, glad you were able to find a solution for your lifting hooks going AWOL!

  • Member since
    May 2011
Posted by panzerbob01 on Saturday, September 24, 2011 12:04 PM

Eric;

Sounds like a good save on the hooks!  Still, it is pretty simple and fast - so just in case one or another new guys go AWOLSurprise, AND you are, like me, ess willing to leave things a few days while stuff posts around...

There is another still easier DIY route for these (I've done this similarly on several WIP where I rashly donated bitty hook bits to the floor, the cats, and the suck-broom...Big Smile):  cut a little squarish piece larger than the planned-for hook out of the 0.03 styrene or similar, and cement that nubbin into the hook hole - creating a over-sized "flange" or prong. You now have all the material needed to make the new hook right in place on your cupola. Once DRY, use your new X-acto # 11 blade tip and carve out underside for the hook-over, and gently scrape off the top side for the curve. To get a smooth "cast bit finish", you can apply a small amount of thicker cement to the carved hook. This will create the smooth finish AND get the "welded-in" look.  This is EASY!  The piece is already in place, so if you suffer stiff and clumsy fingers as do I, you are spared placing a bitty part (hey - that's why I had to replace it....), and it is held firmly for the sculpting, and you don't end up having to transfer the bit afterward.  Maybe the best part, though, is that IF you bolo the first attempt (yeah - I needed practice Embarrassed), you can simply snick the offender off and start over!

However you go, you will get a GREAT look!

BobToast

  • Member since
    July 2004
  • From: Sonora Desert
Posted by stikpusher on Saturday, September 24, 2011 12:51 PM

PANZERWAFFE

Then work to work on the hull.  The hull was made up of 5 pieces and they fit together very badly.  Glued them together and let dry overnight.  Here you can see the poor fit

http://i951.photobucket.com/albums/ad352/PANZERI/SOMUA%20S35/DSC00285.jpg

http://i951.photobucket.com/albums/ad352/PANZERI/SOMUA%20S35/DSC00286.jpg

Have puttied all seams today and will be working on sanding and shaping the hull tonight.  Have found that have to be very careful sanding and cutting / cleaning parts.  The plastic is the softest I've ever worked with and is very easy to over cut, sand, or even tear.  Hope to have more to show over the weekend.


Nice job on the Somua! I started one a couple years ago and sidelined it after this point because of the poor fit of the lower hull. It looks like you made it over that hurdle much better than I did.Yes


F is for FIRE, That burns down the whole town!

U is for URANIUM... BOMBS!

N is for NO SURVIVORS...

       - Plankton

LSM


  • Member since
    March 2006
  • From: Right Side of a Left State
Posted by Shellback on Saturday, September 24, 2011 1:15 PM

WARPAGE !!!!

This will set me bac k until i figure out a way to correct it .Angry

  • Member since
    March 2003
  • From: Rain USA, Vancouver WA
Posted by tigerman on Saturday, September 24, 2011 1:54 PM

Ouch Carl!

That is indeed a problem I don't see a fix for. Heat in war water and try to re-bend it?

   http://i7.photobucket.com/albums/y269/wing_nut_5o/PANZERJAGERGB.jpg

 Eric 

  • Member since
    March 2003
  • From: Rain USA, Vancouver WA
Posted by tigerman on Saturday, September 24, 2011 2:01 PM

Oh, any volunteers to trim and sand over 214 links? Anyone? (cricket, cricket)

   http://i7.photobucket.com/albums/y269/wing_nut_5o/PANZERJAGERGB.jpg

 Eric 

  • Member since
    March 2011
  • From: Ottawa,Ontario,Canada
Posted by modeler#1 on Saturday, September 24, 2011 2:57 PM

Hi guys

got my kit It's pretty old as you can see however it does have some quality.

hope you enjoy!

here's the tank all be doing (courtesy Vit13)

On the Bench: Nothing atm

  • Member since
    May 2011
Posted by panzerbob01 on Saturday, September 24, 2011 3:35 PM

Shellback

WARPAGE !!!!

This will set me bac k until i figure out a way to correct it .Angry

http://i176.photobucket.com/albums/w164/Shellback-01/Blitzgieg%20France/S6300017.jpg

http://i176.photobucket.com/albums/w164/Shellback-01/Blitzgieg%20France/S63000153.jpg


Carl:

Yikes!  But maybe not as hard to address as thought: 

This is a Pz.1B or some such (Italeri kit maybe???) - you can get the hull tub straight by starting either at the bow or the stern and fitting in and cementing the appropriate plate and clamping (or holding firmly, if using Tenax or some FAST hot cement) until stuff sets up well and snug. Then do the other end. IF you carefully align and squeeze joins together, this will shape the ends of the hull and get plates squarely aligned. When you add on and well-cement and clamp the upper hull units, these will pull things even more in line. Ultimately, IF you align all the cemented plate seams and joins and get them set in place properly, the warpage between the seam/join points will be pulled straight. 

IF you have less confidence then I do in relying just on the kit parts, add in a mid-hull brace cut very "square" from a thicker piece of styrene sheet (0.040 or thicker). Make it snug to fit across the hull- and glue it in.  Make sure that this is well-cemented along the hull bottom AND the sides.  This can do a better job if it is put in at a slight diagonal across the hull (so make it a little longer than the hull is wide). The higher up the hull-sides it reaches, the better. This will be a "bulkhead" in the hull. I don't recall whether the kit you have has a "firewall" piece, but if so, this will do the trick as I'm describing.   You will come out ALL RIGHT!Big Smile

I just assembled the Italeri "Semovente L/40 da 47/32 hull - built from multiple plates. The bottom and both sides were warped - not as badly as your hull, but bad enoughSad. And a while back I built a MasterBox befehlspanzer 1A - little boxy thing - EVERY panel and the casement, too, were all seriously warped. Dry-fitting made for tears. But after fussing with each join in turn as described above, both things came out GREAT. I'd post a pic here, if I knew how - but the Semo's over on Armorama in the "under different flag" campaign, if you want to see.  Point being, it WILL work out, even if it looks pretty bad right now!.  DON't boil the darned thing!

BobToast

  • Member since
    October 2009
Posted by PANZERWAFFE on Saturday, September 24, 2011 4:11 PM

ERIC - The two joins between the two upper half's on the front and the one in the rear should show the seam.  The seam was actually very  visible on the real one I saw.  This is due to the hull pieces being cast and then all bolted together.  Nice work so far with the hull and turret!

MODELER#1 - That looks to be an interesting kit.  It is one I have always wanted but have not yet acquired.  Looks like your off to a good start.  Will be watching to see how your Heller kit fairs and hope that it has better fits than mine.

WBILL - Thats a lot of parts!  Even though I have not built my super kit, the high detail and part count is what lured me to get it.  Really look forward to see you tackle this build!

STICK - Thanks for the confidence with the Somua.  Presently doing a lot of sanding and shaping of the hull, think it may come out alright.

Your UE is looking great!  Love these LITTLE guys!  What are the tracks: rubber band, length and link, indies?  Believe you have the smallest build with this one.

ANDYT - Nice choice!  Wasn't the Gladiator the last Allied purpose built fighter Bi-plane?

Have used the Testor's decal kit Gamera had talked of.  I am very selective of what I use these decals for ex specially the clear paper.  Printing on the either the white or clear sheet they look really good but when taken off their paper and applied onto the build they are very light in color.  The white sheet works ok at best, the clear sheet is almost useless.  The lighter color you try to print on the sheet the higher chance it will not show once on the model Sad  Unless doing one on a heavily weathered or something I want really light colored decals, I paint what would be the decals when one is not provided.  Have not tried any other type of decals besides these and kit offered ones.

CARL - That's some tough luck with your hull.  I agree with PANZERBOB01.  Have done the method he has described a few times and all has always worked out well.  Just takes a bit more time.

Rob

  • Member since
    March 2003
  • From: Rain USA, Vancouver WA
Posted by tigerman on Saturday, September 24, 2011 4:45 PM

Modeler, good start. Hooks very similar to my H-39. Have fun with the tiny pieces. LOL

I assume this comes with belt tracks?

Bill, uh, nice kit, but no thanks. Wink

   http://i7.photobucket.com/albums/y269/wing_nut_5o/PANZERJAGERGB.jpg

 Eric 

  • Member since
    July 2004
  • From: Sonora Desert
Posted by stikpusher on Saturday, September 24, 2011 5:10 PM

PANZERWAFFE


STICK - Thanks for the confidence with the Somua.  Presently doing a lot of sanding and shaping of the hull, think it may come out alright.

Your UE is looking great!  Love these LITTLE guys!  What are the tracks: rubber band, length and link, indies?  Believe you have the smallest build with this one.


It has link and length thank goodness. And I am really digging the way Tamiya molded them. I have done the links on the sprocket and upper run so far following their directions to the letter. Quite a concept I know... LOL! I think by the end of my days off Monday thru Wednesday, I may have some serious progress madeHmm I am glad I chose little and Tamiya. It seems to be working to get the modeling mojo flowing again.

Maybe I will dig out my Somua after seeing yours and get it back in the batting order again. This French armor stuff is pretty cool. Great paint schemes and lots of nifty shapes!Stick out tongue


F is for FIRE, That burns down the whole town!

U is for URANIUM... BOMBS!

N is for NO SURVIVORS...

       - Plankton

LSM


  • Member since
    May 2005
  • From: Dublin Rep Of Ireland
Posted by terry35 on Saturday, September 24, 2011 5:11 PM

Well just poping into check how everybody is doing, castlenuevo the chassis looks great so far it's probably the one kit by Tamiya I never owned but always thought looked so cool. 

Bill just looking at your start on the super kit of tHe Mk.IV as I was reading through your post and seen where you stated about the temporary fit of the tyres over the wheels I had a flash back to when I had the same problem myself, glad you knew about the possibility of snapping the tyres.

Eric, great start to the hotchkiss pity about the loss of the hooks but I glad the problem is solved.

Stick pusher the UE is small indeed but it is a superb kit, good luck with the rest of your build and be careful with those tiny tracks.....

Carl, ouch on the problem with the pz1 hull all I can think of is to square off a piece of plastic to the exact width necessary and try use it as a gauge while you try square off the hulL sides.

Bill Carls well if you don't mind I 'm just gonna take your lead on this one, while the kit is of a quality that can easily warrant the odd bit of expense , well I'm finished throwing cash at it. I will get any numbers etc. From sprues or wherever. I have spent the week going over the French site and trying to get a plan of attack for the kit, so as I said if you don't mind I'll follow you.

Sorry if I missed anybody but I promise that I check in daily for a read through but on the iPhone so replying with my chunky fingers is nota an option.


Terry.

  • Member since
    May 2005
  • From: Dublin Rep Of Ireland
Posted by terry35 on Saturday, September 24, 2011 5:18 PM

Forgot Rob, I never seen what the suspension of a somua thanks for the pic, another one of life's little curiosities solved. 


Terry.

  • Member since
    March 2006
  • From: Right Side of a Left State
Posted by Shellback on Saturday, September 24, 2011 5:57 PM

Panzerbobo1 ...................many thanks for your help and advice . I'll give it a try tonight . Finding a thick gauge of plastic will the challenge . I'll come up with something along the lines of your suggestions and post some pics of the results .........good or bad .Yes

  • Member since
    March 2006
  • From: Right Side of a Left State
Posted by Shellback on Sunday, September 25, 2011 12:08 AM

Ok , here was the warp .

And here's how i fixed it .

I cut out the bottom of the hull so i could bend either side independently .

I cut this metal for a brace from  the cover off the back of an old dryer . I dont throw things away .

I clamped the metal brace in place and flowed C.A. between the plastic and metal .

This is the results

Straight !

Glued the cut out section back in place . I'll clean it up tomorrow .


  • Member since
    March 2003
  • From: Rain USA, Vancouver WA
Posted by tigerman on Sunday, September 25, 2011 1:39 AM

Great save Carl! Now that's innovation.

   http://i7.photobucket.com/albums/y269/wing_nut_5o/PANZERJAGERGB.jpg

 Eric 

  • Member since
    July 2004
  • From: Texas
Posted by wbill76 on Sunday, September 25, 2011 10:14 AM

Carl,

Your Pz-I has a real "backbone" now! Nice work removing the warpage. Beer

  • Member since
    May 2005
  • From: Dublin Rep Of Ireland
Posted by terry35 on Sunday, September 25, 2011 10:48 AM

Wow Carl great save there, you really are a master of tackling classic kits.


Terry

  • Member since
    June 2006
  • From: Michigan
Posted by ps1scw on Sunday, September 25, 2011 11:27 AM
  • Member since
    March 2006
  • From: Right Side of a Left State
Posted by Shellback on Sunday, September 25, 2011 12:13 PM

Thanks guys . It turned out pretty well actually . Now i can move on and get the running gear together on this "heavy metal " little Pz.1 .

  • Member since
    April 2003
  • From: 41 Degrees 52.4 minutes North; 72 Degrees 7.3 minutes West
Posted by bbrowniii on Sunday, September 25, 2011 4:27 PM

Hey guys,

With AMPSEast in the rearview mirror, I'll be jumping into my 222 in the next couple of days. I picked up a few figure sets at the show that I hope will help me to enliven the scene a little bit. I'll try to post a pic or two in the upcoming days.

First priority, however, is to clean and organize my bench:

'All that is necessary for the triumph of evil is for good men to do nothing' - Edmund Burke (1770 ??)


  • Member since
    March 2006
  • From: Right Side of a Left State
Posted by Shellback on Sunday, September 25, 2011 4:59 PM

How many models could be under all of that ? Wink

JOIN OUR COMMUNITY!

Our community is FREE to join. To participate you must either login or register for an account.

SEARCH FORUMS
FREE NEWSLETTER
By signing up you may also receive reader surveys and occasional special offers. We do not sell, rent or trade our email lists. View our Privacy Policy.