SEARCH FINESCALE.COM

Enter keywords or a search phrase below:

Blitzkrieg in the West (France 1940) Sept. 18 2011 - March 1 2012

144765 views
2290 replies
1 rating 2 rating 3 rating 4 rating 5 rating
  • Member since
    April 2003
  • From: 41 Degrees 52.4 minutes North; 72 Degrees 7.3 minutes West
Posted by bbrowniii on Sunday, September 25, 2011 6:13 PM

Shellback

How many models could be under all of that ? Wink

The world wonders....Whistling

And so do I!!!!

'All that is necessary for the triumph of evil is for good men to do nothing' - Edmund Burke (1770 ??)


  • Member since
    March 2006
  • From: Right Side of a Left State
Posted by Shellback on Sunday, September 25, 2011 6:50 PM

bbrowniii

 Shellback:

How many models could be under all of that ? Wink


The world wonders....Whistling

And so do I!!!!

Thats funny !

  • Member since
    October 2009
Posted by PANZERWAFFE on Sunday, September 25, 2011 10:10 PM

STIK - Good to hear the MOJO is returning!  The Tamiya fit sure looks better than the old Mirage kits.  Look forward to the next update.  OH, if you do decide to pull your Somua back out, make sure you have all of your MOJO ready for a frustrating build.

CARL - Great ingenuity, nice and straight Yes


What a frustrating kit this is.  Many poor assembly fits through out.  Put all the assemblies together then a few parts later find out everything is wrong Bang Head  Dry fitting is kind-of difficult on this one due to their being no real alignment holes or guides.  Does not look like much was done but it was none stop all weekend on the lower hull and suspension.  Believe the worst is behind me now Smile

Suspension without skirts

Skirts with some additional details.  Have also begun assembly of both tracks.

Spent a day sanding and reshaping the front and rear of the hull.  The molded on fenders were also removed.  In place will be the Eduard PE fenders.  Have made only one so far.

Skirt attached to hull.  Entire suspension being built should prove to make putting on the tracks and painting difficult.

Hope all of your builds are going well.

Rob

  • Member since
    March 2003
  • From: Rain USA, Vancouver WA
Posted by tigerman on Sunday, September 25, 2011 11:18 PM

bbrowniii

Hey guys,

With AMPSEast in the rearview mirror, I'll be jumping into my 222 in the next couple of days. I picked up a few figure sets at the show that I hope will help me to enliven the scene a little bit. I'll try to post a pic or two in the upcoming days.

First priority, however, is to clean and organize my bench:

http://i37.photobucket.com/albums/e76/bbrowniii/Modeling/100_3606.jpg

That looks like my daughter's room.

   http://i7.photobucket.com/albums/y269/wing_nut_5o/PANZERJAGERGB.jpg

 Eric 

  • Member since
    November 2009
  • From: SW Virginia
Posted by Gamera on Monday, September 26, 2011 9:06 AM

Great work all around guys, esp kudos to Shellback quick thinking on that really warped lower hull.

The Char B1 is together- added some Mr Surfacer to the turret for the cast texture and think I got it too rough so I'm sanding it down. The Pak 39 is almost complete as well, hopefully photos soonish.

"I dream in fire but work in clay." -Arthur Machen


  • Member since
    March 2006
  • From: Right Side of a Left State
Posted by Shellback on Monday, September 26, 2011 11:28 AM

Gamera , i'm pleased with the results . When i first saw the warp i was ready to toss it and order a Dragon Pz.1 . This fix was actually a challenge and fun .

Rob , sure is a load of detail going into that build ! Those tracks look cool . Lots of P.E. is going to fun .

  • Member since
    September 2011
  • From: Vancouver, WA
Posted by AndyT on Monday, September 26, 2011 11:35 AM

I am not worthy!!!!!!

Awesome save.

BTW my home internet will be down until tomorrow afternoon. I'll post my progress tomorrow evening.

Andy
Imagination is Froever.

  • Member since
    January 2011
  • From: The Great North Woods, Maine
Posted by Chazzer on Monday, September 26, 2011 12:27 PM

  Hey guys, I went to APMS this past weekend. What a great time!! I bought a few kits (8). Still not sure just what to build. Not in the picture is the Stug "A". I picked up the Tamaya Matilda and the Bren carrier from Boyd, who gave me some great deals. I think he sold me the KV II. Anyway  I got some great stuff. Some posted in the Panzer III GB. I've never built anything from the Brits. Any suggestions? I want to do some AM stuff. A bit out of my comfort zone.

Thanks

IAFScott


ChazzerBlack Eye

  • Member since
    July 2008
  • From: South of france
Posted by Vit13 on Monday, September 26, 2011 12:39 PM

Very good Scott ,

Yes

Jc


  • Member since
    April 2003
  • From: 41 Degrees 52.4 minutes North; 72 Degrees 7.3 minutes West
Posted by bbrowniii on Monday, September 26, 2011 12:42 PM

Hey Scott

It was great to get to meet you at the show! Sorry that we didn't get a chance to talk more - I hope I didn't come across as rude when I walked away.

Now that you've got all those great kits, it's time to build 'em up to enter in next year's show!!

'All that is necessary for the triumph of evil is for good men to do nothing' - Edmund Burke (1770 ??)


  • Member since
    March 2003
  • From: Rain USA, Vancouver WA
Posted by tigerman on Monday, September 26, 2011 2:16 PM

Chazzer

  Hey guys, I went to APMS this past weekend. What a great time!! I bought a few kits (8). Still not sure just what to build. Not in the picture is the Stug "A". I picked up the Tamaya Matilda and the Bren carrier from Boyd, who gave me some great deals. I think he sold me the KV II. Anyway  I got some great stuff. Some posted in the Panzer III GB. I've never built anything from the Brits. Any suggestions? I want to do some AM stuff. A bit out of my comfort zone.

http://i1204.photobucket.com/albums/bb404/SChazzer/012-3.jpg

Thanks

http://smileys.smileycentral.com/cat/3/3_12_21.gifScott


http://www.smileycentral.com/sig.jsp?pc=ZSzeb114&pp=ZSman000

You have two in your pile: Matilda and the Universal Carrier. That's the older Matilda, so it would qualify for lots of upgrades. Feel free to refer to the build log on the first page for more ideas.

   http://i7.photobucket.com/albums/y269/wing_nut_5o/PANZERJAGERGB.jpg

 Eric 

  • Member since
    November 2009
  • From: SW Virginia
Posted by Gamera on Monday, September 26, 2011 2:43 PM

Stikpusher & Chazzer: Stopped by Armorama and blundered across this:

Sleeping Universal Carrier Crew

Dunno if you guys have seen it before or not but I thought that it's different and interesting. 


"I dream in fire but work in clay." -Arthur Machen


  • Member since
    March 2003
  • From: Rain USA, Vancouver WA
Posted by tigerman on Monday, September 26, 2011 4:06 PM

Special shout out to Rob (Panzerwaffe) I received my turret hooks and a bonus baggie of trimmed tracks! I'm shivering just looking at them. I might have to bump up my visor powers for them. Dang their small. If ever there were a time for DS tracks, this is it. Heck I'd be done by the end of the week!

   http://i7.photobucket.com/albums/y269/wing_nut_5o/PANZERJAGERGB.jpg

 Eric 

  • Member since
    February 2003
  • From: Allentown, PA
Posted by BaBill212 on Monday, September 26, 2011 4:21 PM

Some excellent stuff going on in here guys...   I feel like I am sliding a bit. I'll get some pics up as soon as I can (even on my limited progress).

Gamera,,,,  I really like those snoozin figs,,,  thanks for the heads-up


Bill

Enjoy the ride!


  • Member since
    March 2011
  • From: Ottawa,Ontario,Canada
Posted by modeler#1 on Monday, September 26, 2011 5:32 PM

more progress ...

this pic here is the wire bundle on the front of the tank. on the top is the kit peice on the botom isscrachbuilt wire


wheel assemby....completed

body almost completed awaiting primer


I am consitering pre-shading this one what do you guy's think?

On the Bench: Nothing atm

  • Member since
    March 2003
  • From: Rain USA, Vancouver WA
Posted by tigerman on Monday, September 26, 2011 6:30 PM

Good work on the wire Modeler. I can't say a preshade would help or not. I've never done it myself on a tank before. What color is the basecoat?

   http://i7.photobucket.com/albums/y269/wing_nut_5o/PANZERJAGERGB.jpg

 Eric 

  • Member since
    March 2006
  • From: Right Side of a Left State
Posted by Shellback on Monday, September 26, 2011 8:40 PM

Chazzer

  Hey guys, I went to APMS this past weekend. What a great time!! I bought a few kits (8). Still not sure just what to build. Not in the picture is the Stug "A". I picked up the Tamaya Matilda and the Bren carrier from Boyd, who gave me some great deals. I think he sold me the KV II. Anyway  I got some great stuff. Some posted in the Panzer III GB. I've never built anything from the Brits. Any suggestions? I want to do some AM stuff. A bit out of my comfort zone.

http://i1204.photobucket.com/albums/bb404/SChazzer/012-3.jpg

Thanks

http://smileys.smileycentral.com/cat/3/3_12_21.gifScott


http://www.smileycentral.com/sig.jsp?pc=ZSzeb114&pp=ZSman000

Good haul . Those Tamiya kits have been out for a while and they are good solid kits . Some A.M.  P.E. will relly dress them up .

  • Member since
    March 2006
  • From: Right Side of a Left State
Posted by Shellback on Monday, September 26, 2011 8:44 PM

Modeler , if you havent tried pre shading before then i wold say go for it and decide for yourself how you like/dislike the results .

  • Member since
    July 2004
  • From: Sonora Desert
Posted by stikpusher on Monday, September 26, 2011 8:57 PM

Gamera

Stikpusher & Chazzer: Stopped by Armorama and blundered across this:

Sleeping Universal Carrier Crew

Dunno if you guys have seen it before or not but I thought that it's different and interesting. 


Oh I do like those figures! Classic! I will have to see if the LHS can order them. I still a couple Universal Carriers in the stash. 

Well this afternoon I completed building the UE Carrier. I still need to build the figures, trailer, and accesories though... Here are some pics of its current state. The hatches in front of the open cupolas are only tacked in place for painting.

I spent more time sanding away ejector pin marks in the cargo shelf than I did working on the link and length tracks. Kudos to Tamiya for some superb L&L tracks!Toast The only modification I made to the kit was to drill out the exhaust pipe. What a sweet little kit.Yes


F is for FIRE, That burns down the whole town!

U is for URANIUM... BOMBS!

N is for NO SURVIVORS...

       - Plankton

LSM


  • Member since
    March 2006
  • From: Right Side of a Left State
Posted by Shellback on Monday, September 26, 2011 9:30 PM

Good looking little kit Stik . Did the track sag come molded or did you bend it ? Looks like the track color is different over the rollers from being bent .

  • Member since
    May 2011
Posted by panzerbob01 on Monday, September 26, 2011 10:19 PM

Stik;

Cool little beastie!  So that's the Tamiya kit? It does indeed appear to build up pretty nicely and looks very crisp and mostly quite realistic! 

But is that muffler heat-shield the real Tamiya kit part?  Wow. That's a let-down (no reflection on you at all - it's the part you have)Ick!  My carp and grumble is that the real thing is a piece of rather flimsy sheet-metal. SOMETIMES it had a sort of asbestos blanket or batting inside - there was a sheet metal "plate" or wall on the hull side of the exhaust to serve as an inside heat-shield to isolate that pipe from the passenger-sidewall.  When viewed from either end, the sheet metal construction is pretty evident.  I guess I am way surprised to see it molded so resolutely stout! The more so as Tamiya appears to have captured the rather thin nature of those hatch domes pretty nicely! 

I've built a few of the RPM/Mirage kits of this type - somewhat cruder in many ways but about the same in terms of that heat-shield.  I found it an easy to-do improvement to thin the ends out a bit - maybe you can do this with the X-acto here in-place...?

Otherwise, looks a cool and nice build. I look forward to seeing how you paint it up!Big Smile

Bob

  • Member since
    March 2006
  • From: Right Side of a Left State
Posted by Shellback on Monday, September 26, 2011 10:28 PM

Italeri Pz.1 update .

I glued the upper hull to the lower . The fit wasnt to bad actually concidering all of the warpage that the lower hull had .There are a few small seams to fill . I'll flow C.A. into them .

The rear hull plate for the  engine compartment  was a bad fit . i had it glued in place , then broke it off because the fit was not good . Some major putty work here .

  • Member since
    October 2009
Posted by PANZERWAFFE on Monday, September 26, 2011 10:35 PM

ERIC - Happy you received your parts, hope they will work and is what you needed.

MODLER#1 - Nice progress.  When I pre-shade, if the base color is a darker color pre-shade with flat black, if the base is a lighter color I use chestnut.  Pre shading can give great results, try it.

CHAZZ - Those are some good kits and will build nicely.  What about doing the Matilda, that would be nice to see in this GB.

Does anyone know where AM tracks for the Bren Carrier can be purchased?

STIK - She is a sharp looking UE.  Very clean and well done.

TREAD - Was looking at your turret, what are the small holes in the top of the vision cupola and turret.  Guess you drilled these holes if so what size and what are they for?  Looking through pics of the Somua did not or could not see these details.  The B1 turret was the same as the Somua except for the turret ring and bore, I think.  Do you know if those holes should be on the Somua?

Somua

Was back and forth on which turret to use and finally decided the Tamiya B1 turret was the best choice.  Using the Tamiya turret presented a few fixes that needed to be addressed.  First weather if the Tamiya or kit provided turret was used, from looking at photos, the molded on ring on the hull had to go.

The mounting ring on the Tamiya turret was way to small for the turret bore in the hull and if the turret was just set in the hole you could see a large gap between the turret and hull.  You can see the size difference in this shot.  Left side - kit provided turret, right side - Tamiya turret. 
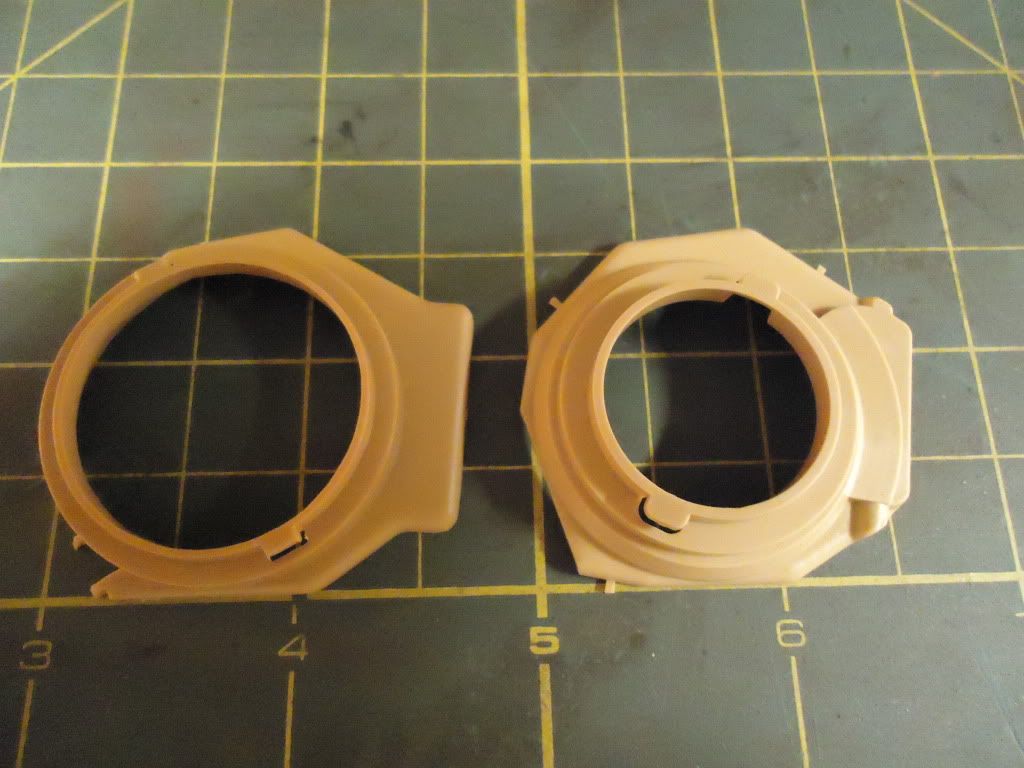
Cut the ring off the hull

and cut the bottom ring off the turret

then made a spacer by stacking flat styrene and cut to shape.  Once cemented and puttied in place should work fine.
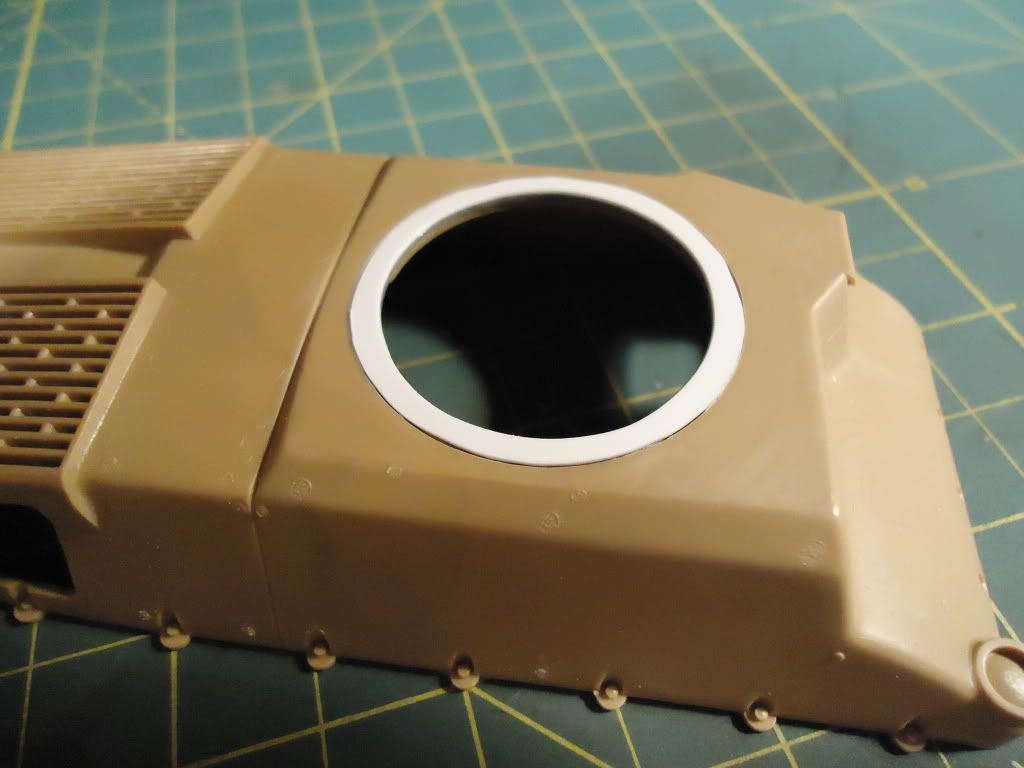
This is how the turret will now fit

Rob

  • Member since
    July 2004
  • From: Sonora Desert
Posted by stikpusher on Monday, September 26, 2011 10:42 PM

Shellback, the track sag is molded in place. The discoloration was caused by the glue I used to soak thru from the top down to the return rollers to insure the top run sat in place quickly and properly. Plastruct Weld. Pretty "hot" for a liquid cement.

Panzerbob, yup that is the kit part. I did not find much helpful in the way of online reference before I started this kit so I had no idea about that part. I could easily have thinned down the edges had I known ahead of time. Ah well, I doubt if anybody at AMPS or IPMS chapters will knowWink Unless it is a mainstream subject like a Mk IV,Tiger, Sherman, or Abrams, it wont be overly scrutinized. HmmI am trying a different technique learned from another AMPS builder I have yet to try before, for painting so keep your fingers crossed for me. I figure the monotone green scheme will be a good place to try it.


F is for FIRE, That burns down the whole town!

U is for URANIUM... BOMBS!

N is for NO SURVIVORS...

       - Plankton

LSM


  • Member since
    October 2009
Posted by PANZERWAFFE on Monday, September 26, 2011 10:44 PM

Carl, The lower and upper hull indeed went together very nicely.  That was some really good work straightening and joining the two Beer  That seam on the rear plate should not be to hard to get to and fill with putty.

Rob

  • Member since
    March 2006
  • From: Right Side of a Left State
Posted by Shellback on Monday, September 26, 2011 10:48 PM

Rob , good job on getting the Tamiya turret to fit .Did you say why you used the Tamiya turret ?

Stik , i have some of that Pastrut glue .  Like you said , hot stuff .

  • Member since
    March 2006
  • From: Right Side of a Left State
Posted by Shellback on Monday, September 26, 2011 10:51 PM

PANZERWAFFE

Carl, The lower and upper hull indeed went together very nicely.  That was some really good work straightening and joining the two Beer  That seam on the rear plate should not be to hard to get to and fill with putty.

I changed my mind and  filled it with C.A. . Waiting for it to cure . Sometimes i have better luck with C.A. over putty .Yes

  • Member since
    October 2009
Posted by PANZERWAFFE on Monday, September 26, 2011 11:18 PM

Carl, As said the decision was back and forth for a while.  Neither turret is accurate but the Tamiya turret is more so and the detail of the parts are way better.  Had also wanted to remove the ring on the hull and by doing so it would have left a large gap if using the Heller turret.  The over all shape and SIZE of the Tamiya turret was just better IMO.  Would not have stole the Tamiya turret if I did not have two B1 kits in the stash but since I do, one kit will be a B1 and the one with the missing turret, have been wanting to try to convert it into a Geschutzwagen B2.

Rob

  • Member since
    March 2006
  • From: Right Side of a Left State
Posted by Shellback on Monday, September 26, 2011 11:35 PM

Ok Rob . I understand the plan now . That will be a strange looking vehicle with that 105 mm .

  • Member since
    January 2011
  • From: The Great North Woods, Maine
Posted by Chazzer on Monday, September 26, 2011 11:57 PM

Hey guys, I will start the Matilda soon. Looking forward to a fun time. Thanks in advance for all your help.

Scott

ChazzerBlack Eye

JOIN OUR COMMUNITY!

Our community is FREE to join. To participate you must either login or register for an account.

SEARCH FORUMS
FREE NEWSLETTER
By signing up you may also receive reader surveys and occasional special offers. We do not sell, rent or trade our email lists. View our Privacy Policy.