SEARCH FINESCALE.COM

Enter keywords or a search phrase below:

The unOFFICIAL 2011/20012 Veteran's Group Build

52130 views
309 replies
1 rating 2 rating 3 rating 4 rating 5 rating
  • Member since
    October 2008
  • From: New Jersey
Posted by oddmanrush on Monday, January 9, 2012 9:29 AM

Oops, didn't even see you posted pics Stik. Lookin' good! Do you prefer to glue the tools on the hull first prior to painting them? I do it that way too but wasn't sure if that's the best way to go about it. 

Jon

My Blog: The Combat Workshop 

  • Member since
    July 2004
  • From: Sonora Desert
Posted by stikpusher on Monday, January 9, 2012 1:03 PM

I think it depends upon the tools and how they mount. In this case since I needed to create a little extra mounting channel, glue them directly to the top deck with no locater pins,  and since I will be painting the tools in OD and Black like we used to, gluing ahead of time was the only way to go.


F is for FIRE, That burns down the whole town!

U is for URANIUM... BOMBS!

N is for NO SURVIVORS...

       - Plankton

LSM


  • Member since
    October 2008
  • From: New Jersey
Posted by oddmanrush on Monday, January 9, 2012 1:36 PM

stikpusher

I think it depends upon the tools and how they mount. In this case since I needed to create a little extra mounting channel, glue them directly to the top deck with no locater pins,  and since I will be painting the tools in OD and Black like we used to, gluing ahead of time was the only way to go.

That brings me to another question...in real life, are the tools painted the same colors as the fighting vehicle (like you say, OD and black)? I'm asking this because I am finishing up an AFV Club Centurion and I glued the tools down before painting. But I painted them with wood colored handles and steel heads....I understand the Centurion is not an American tank so maybe painting practices are different, or perhaps you'd know? Seems to me that if you could paint them the same as the base color, that takes some of the difficulty out of the process.

Jon

My Blog: The Combat Workshop 

  • Member since
    July 2004
  • From: Sonora Desert
Posted by stikpusher on Monday, January 9, 2012 2:37 PM

Not to sound like Manny, but yes and no. Tools come new like you would pick them up from Sears or elsewhere, bare wood handles, some parts such as the tankers bar bare steel, and some parts such as the axe shovel and pick mattock heads painted- black, red, blue, etc. After each field usage the tools, and everything else, are cleaned. At that point, depending on the unit, they may be repainted. Ours were always painted. Supply provided us with cans of GI black and OD spray paint. Sometimes we painted them solid in one color, and sometimes we painted them with black wood and OD steel, or vice versa. After which we would stencil the vehicles' bumper number onto each tool. GIs are notorious for roaming the motor pool to snatch up a "replacement" item for something they have lost in the field so they will not have to go out and buy one out of their own pocket. The OD GI spray paint we were issued was not FS# 34087. Nor was it the Forest Green 34079 MERDC base color that was on all vehicles until the NATO CARC Green came along. It was darker, greener, and semi gloss compared to 34087.

I have seen photos of WWII vehicles being camouflaged at Engineer Painting points specificly for that purpose. In those cases, the camo paint was sprayed on over all items in place including tools, spare road wheels, sandbags, etc.

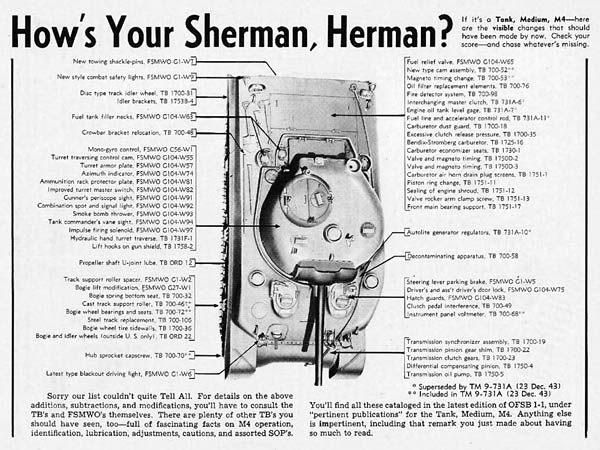
Now here we have a photo of a M4 straight out of a Manual opr some other sort of official publication. If you look at the stowed tools they appear to be in the same OD as the rest of the tank. So based on this photo, you could safely paint your tools in that manner

As far as our British Cousins go, I suppose you could PM Bish or Hinksy for information from them about their practices. But it would be safe to go with bare steel and wood weathered appropriately.


F is for FIRE, That burns down the whole town!

U is for URANIUM... BOMBS!

N is for NO SURVIVORS...

       - Plankton

LSM


  • Member since
    October 2008
  • From: New Jersey
Posted by oddmanrush on Monday, January 9, 2012 2:49 PM

Thanks Stik...I guess I'll leave them painted as they are for the time being. I guess leaving them in wood and steel color adds a bit more character, if not realism. 

Jon

My Blog: The Combat Workshop 

  • Member since
    July 2004
  • From: Sonora Desert
Posted by stikpusher on Monday, January 9, 2012 3:00 PM

It  gives more visual interest. Contrasting colors to break up what can be a monotone paint scheme. I think that is one reason that chipping and dot filters are so popular these days. Like super shiny NMF on aircraft, it is not "realistic" on operational service equipment, but it does make for an eye catching model. At least as things have been for me.


F is for FIRE, That burns down the whole town!

U is for URANIUM... BOMBS!

N is for NO SURVIVORS...

       - Plankton

LSM


  • Member since
    October 2008
  • From: New Jersey
Posted by oddmanrush on Monday, January 9, 2012 4:21 PM

I agree Stik, that is why I like to highlight panels and panel lines...perhaps a bit too much in some people's opinions. But I like to add depth and contrast to a model though I've never really gotten down the dot filtering or the NMF for that matter. 

Jon

My Blog: The Combat Workshop 

  • Member since
    December 2006
  • From: Kennewick, WA
Posted by kbuzz01 on Thursday, January 12, 2012 10:52 PM

Received my F-102 to TF-102 conversion kit from C & H Aero today.  Holy crap - what did I get myself into this time?!  Indifferent

Some progress on the Hasegawa P-51D:

DSC01734.jpg mains1

DSC01732.jpg top view1

DSC01737.jpg Bot view1

Ken


animation6.gif image by kbuzz_photos
  • Member since
    October 2008
  • From: New Jersey
Posted by oddmanrush on Friday, January 13, 2012 9:27 AM

Ken, nice looking Mustang so far. I've only done the Revell kit a few times, how does the Hasegawa compare?

Jon

My Blog: The Combat Workshop 

  • Member since
    December 2006
  • From: Kennewick, WA
Posted by kbuzz01 on Friday, January 13, 2012 7:22 PM

Thanks, Jon.  I've built the Tamiya and the Revell and now working on the Hasegawa.  Wish it was a littIe warmer here so I could do some painting.  I actually think that the previous two were both better builds than the Hasegawa.  Had some fit problems here with the left wing and fuselage bottom.  I guess I like the Tamiya best, probably because of the dropped flaps.  (Too lazy to cut and drop on the others.)  Whistling  Gosh, just noticed the Tammy doesn't have wing walkways.  Indifferent  Oh, well .......

Here's the Revell

DSC00641.jpg Done4

And the Tamiya

DSC00482.jpg P-51-1.jpg

Best of luck to you with your upcoming deployment!

Ken


animation6.gif image by kbuzz_photos
  • Member since
    October 2005
  • From: New Port Richey
Posted by deattilio on Friday, January 13, 2012 11:48 PM

I’ve only done some light sanding on my AAV but, I have picked up both of Voyager’s AAV PE sets as well as the E.T. Models offering.  Each has something a little bit different to offer, a nice touch from E.T. is a brass Mk19 barrel.  I will make more progress next weekend when I am done with school and can go back to enjoying my weekends.


WIP:
Trying to get my hobby stuff sorted - just moved and still unpacking.


"Gator, Green Catskill....Charlie On Time"


  • Member since
    October 2011
  • From: Henrietta, TX
Posted by Texas Tbone on Saturday, January 14, 2012 7:57 PM

Like many others I have just returned to modeling after a 25 year hiatus.  First I would like to thank everyone that posts on the Fine Scale Modeler forum the information that I read and information gathered has been a tremendous help.  So if its not to late I would like to join this group build.  I now I am probably going to bite, but I am going to start by building aTamiya 1/48 P51B Mustang (going to be my first model so wish me luck) my grandfather use to tell I neat story while is was a Captain in the Infantry during WWII about P51B Mustangs saving his company while crossing the Rhine river.  I am also going to build a1/72  Hasegawa UH-1 and Hasegawa UH-60 my father flew these during his Army career as a Medevac pilot.  If anyone has any suggestions for Medevac decals it will be greatly appreciated.  The final model is going to be for me from my Squadron in the Marine Corps.  I was with HMM-163 and served with the 13th MEU during Westpac 96 on the USS Tarawa.  I am planning to build a CH-46.  If anyone has suggestions on a manufactorer that make a great Frog kit please let me know.   Look forward to this build and meeting members from the group Ill warn you now probably going to have alot of posts asking for guidance Lol.......Semper FI

http://farm6.static.flickr.com/5304/5648056204_9a52bddd15.jpg

  • Member since
    January 2012
  • From: Camp Pendleton CA
Posted by usmcski on Monday, January 16, 2012 8:34 AM

Hello All,

Got some more work done on my 1/35 UH-1N.  She's about 85% done at this point, I still need to attach the windscreen permanently, wipers, weapons mounts, machine guns, etc.  Markings are painted on using custom Maketar masks courtesy of Mason Doupnik.  Photos by Paul Miles at Temecula Valley Model Club.  I'm pretty pleased how it's turned out so far, I just need to get to that finish line!

Semper,

Ski


[View:/themes/fsm/utility/IMG_5906_1:550:0]

"For the veteran, every day is Memorial Day."

  • Member since
    January 2012
  • From: Camp Pendleton CA
Posted by usmcski on Monday, January 16, 2012 8:38 AM

[View:/themes/fsm/utility/IMG_5928_23:550:0]

"For the veteran, every day is Memorial Day."

  • Member since
    January 2012
  • From: Camp Pendleton CA
Posted by usmcski on Monday, January 16, 2012 8:39 AM

[View:/themes/fsm/utility/IMG_5927_22:550:0]

"For the veteran, every day is Memorial Day."

  • Member since
    January 2012
  • From: Camp Pendleton CA
Posted by usmcski on Monday, January 16, 2012 8:40 AM

[View:/themes/fsm/utility/IMG_5925_20:550:0]

"For the veteran, every day is Memorial Day."

  • Member since
    January 2012
  • From: Camp Pendleton CA
Posted by usmcski on Monday, January 16, 2012 8:42 AM

[View:/themes/fsm/utility/IMG_5913_8:550:0]

"For the veteran, every day is Memorial Day."

  • Member since
    January 2012
  • From: Camp Pendleton CA
Posted by usmcski on Monday, January 16, 2012 8:45 AM

[View:/themes/fsm/utility/IMG_5936_31:550:0]

"For the veteran, every day is Memorial Day."

  • Member since
    January 2012
  • From: Camp Pendleton CA
Posted by usmcski on Monday, January 16, 2012 8:48 AM

[View:/themes/fsm/utility/IMG_5933_28:550:0]

"For the veteran, every day is Memorial Day."

  • Member since
    July 2004
  • From: Sonora Desert
Posted by stikpusher on Monday, January 16, 2012 12:43 PM

Looking real good ski!Yes

I have no progress pics to post currently... sort of in a slow build period right now


F is for FIRE, That burns down the whole town!

U is for URANIUM... BOMBS!

N is for NO SURVIVORS...

       - Plankton

LSM


  • Member since
    October 2011
  • From: Henrietta, TX
Posted by Texas Tbone on Friday, January 20, 2012 12:28 AM

Well I started the P51B Mustang and this is the progress so far.  This is my first model in a long long long time and my list of mustangs is getting bigger.  One thing I have noticed is there is a fine line between to much and to less of glue lol.  This is my first adventure with an airbrush and still fine tuning thinning paint.  Please let me know any comments or advice.   Thanks

http://i1162.photobucket.com/albums/q540/txredmeat/Snapbucket/FC5AC06C.jpg

http://i1162.photobucket.com/albums/q540/txredmeat/Snapbucket/00048275.jpg

http://i1162.photobucket.com/albums/q540/txredmeat/Snapbucket/455D092B.jpg

http://i1162.photobucket.com/albums/q540/txredmeat/Snapbucket/38FBDAF1.jpg

http://i1162.photobucket.com/albums/q540/txredmeat/Snapbucket/38FBDAF1.jpg

http://i1162.photobucket.com/albums/q540/txredmeat/Snapbucket/0D43B713.jpg

http://i1162.photobucket.com/albums/q540/txredmeat/Snapbucket/EAED7A85.jpg

http://farm6.static.flickr.com/5304/5648056204_9a52bddd15.jpg

  • Member since
    March 2009
  • From: Middletown, OH
Posted by Buffirn on Friday, January 20, 2012 6:45 AM

I will try to get some pictures of my BUFF up this weekend.  I am down to the final stages and it really should be done tonight. 

That model certainly isn't the best and it certainly isn't my best work.  I've been out of serious building for 15 years, I'll get better.


Jim

Jim Williams


  • Member since
    January 2012
  • From: Camp Pendleton CA
Posted by usmcski on Friday, January 20, 2012 9:59 AM

That's the spirit, Jim!  I hadn't touched plastic for over 10 years, but I started building again when I got home from Afghanistan last April.  My Huey is my second kit since I've rekindled my love of this hobby, and I think you'll find that after a long break, you're more patient and your skills probably haven't been lost (not too much, anyway!)  Before my decade-long hiatus, I treated every model like a sprint.  Now, it's more like a marathon, and I don't feel any self-imposed pressure to complete a kit in a weekend like I used to.  Take your time, and know when to step away from the workbench for a few minutes!Sleep

Semper,

Ski

"For the veteran, every day is Memorial Day."

  • Member since
    March 2003
  • From: Fort Worth, TX
Posted by RESlusher on Friday, January 20, 2012 10:08 AM

I'm going to shoot some pics my progress on the up-armored BMP-3 this weekend.  I've got the majority of the painting done.  I ended up having to scrap the plan to do a three color camo scheme due to technical issues with my airbrush.  I've still got to paint the the small parts (brush guards, headlights, etc.)

All in all though, I think it will still turn out right purrrty!  If I say so myself!  Cowboy


Richard S.

On the bench:  AFV Club M730A1 Chaparral

On deck:  Tamiya Marder 1A2

In the hole:  Who knows what's next!


  • Member since
    September 2009
  • From: Guam
Posted by sub revolution on Saturday, January 28, 2012 3:21 PM

usmcski - That huey is brilliant! The details are superb! Beer

NEW SIG

  • Member since
    July 2004
  • From: Sonora Desert
Posted by stikpusher on Saturday, January 28, 2012 8:10 PM

Today was some serious progress on my Vulcan. It was a warm sunny low himidity day hereCool- perfect conditions for airbrushing.Geeked I went with acrylics for quick drying.

So first up was an overall base coat of Polly Scale 34079 Green

then based upon what I could cobble together from various photos, I began to paint the camo scheme. First up was the blotches of Polly Scale 34151 Light Green.

Next was blotches of Polly S (not Polly Scale, but the older paint line) 30118 Field Drab

and finally blotches of the last color, Tamiya Flat Black

I know the pattern is not completely accurate, but based on photos, in the early daysof its usage, I have come to the conclusion that there were no standard pattern until later on.


F is for FIRE, That burns down the whole town!

U is for URANIUM... BOMBS!

N is for NO SURVIVORS...

       - Plankton

LSM


  • Member since
    March 2009
  • From: Middletown, OH
Posted by Buffirn on Sunday, January 29, 2012 11:16 AM

I finally finished the BUFF.  I need to build another one and correct all the flaws in this one.  Maybe next year!

I plan to take this thing and hang it in the office.  When I do, I'll post some "Flying" pictures.

Jim Williams


  • Member since
    July 2004
  • From: Sonora Desert
Posted by stikpusher on Sunday, January 29, 2012 6:55 PM

Buffrin, your BUFF looks good. I'll wait until you have the "flying" pics before I add her to the front page completed builds.

Today I made some minor progress. I painted the track shrouds, pioneer tools, gunners seat, and a few items in the turret.


F is for FIRE, That burns down the whole town!

U is for URANIUM... BOMBS!

N is for NO SURVIVORS...

       - Plankton

LSM


  • Member since
    December 2006
  • From: Kennewick, WA
Posted by kbuzz01 on Sunday, January 29, 2012 10:45 PM

Stik and Buffirn - looking good!  YesYes  Stik, is that base coat really green?  It looks really blue on my monitor.


Made a little progress on the Mustang.  I was going to put the gear covers on to paint, but they weren't even a close fit so I built some covers out of thin cardboard.

DSC01744.jpg build4

It actually warmed up here so was able to put on some paint.  (I don't have an indoor booth)  This is MM aluminum plate buffing metalizer.  The last time I used this, I overcoated with Future and was not very pleased with the result. It seemed to dull the finish.   I think they make a clear coat specifically for use with the metalizer - guess I'll see if I can find that.

DSC01763.jpg buffed1

More later

Ken


animation6.gif image by kbuzz_photos
  • Member since
    July 2004
  • From: Sonora Desert
Posted by stikpusher on Monday, January 30, 2012 2:27 AM

Well it does have a hint of blue to the Mk I eyeball. But between the flash and the camera, the blue hue shows up more distinctly here.And that Mustang looks quite sharp so farYes


F is for FIRE, That burns down the whole town!

U is for URANIUM... BOMBS!

N is for NO SURVIVORS...

       - Plankton

LSM


JOIN OUR COMMUNITY!

Our community is FREE to join. To participate you must either login or register for an account.

SEARCH FORUMS
FREE NEWSLETTER
By signing up you may also receive reader surveys and occasional special offers. We do not sell, rent or trade our email lists. View our Privacy Policy.