SEARCH FINESCALE.COM

Enter keywords or a search phrase below:

The Official 1942 70th Anniversary Group Build

78947 views
567 replies
1 rating 2 rating 3 rating 4 rating 5 rating
  • Member since
    September 2009
  • From: Guam
Posted by sub revolution on Wednesday, June 6, 2012 11:33 PM

Thanks again for all the comments, guys. Means a lot!

Also, a little inspiration to keep the thread alive on the 70th anniversary of Midway:780px-SBDs_and_Mikuma

Dauntless dive bombers about to attack the Japanese fleet, in the photo that became synonomous with the battle.

Hiryu_f075712

The Hiryu avoids bombs from a B17.

USS_Yorktown_hit-740px

USS Yorktown under attack.

Thanks,  -Budd

NEW SIG

  • Member since
    May 2012
  • From: Milford, Ohio
Posted by Old Ordie on Saturday, June 9, 2012 7:07 PM

sub revolution

... Also, a little inspiration to keep the thread alive on the 70th anniversary of Midway:http://farm8.staticflickr.com/7238/7347258372_e162d2a308_z.jpg

Dauntless dive bombers about to attack the Japanese fleet, in the photo that became synonomous with the battle.

sub revolution,

Stirred by your dauntless dauntlessness and the sincerity of your sincere reverence for history, I hereby enlist in the 1942 Group Build 2012.  If accepted, I will build a Revell 1/48 SBD-3 Dauntless like the ones in the photo, dauntlessly (if not too well).  (Cool badge.)

Salute!

Flight deck:  Hasegawa 1:48 P-40E; Tamiya 1:48 A6M2 N Type 2 ('Rufe')

Elevators:  Airfix 1:72 Grumman Duck; AM 1:72 F-4J

  • Member since
    September 2009
  • From: Guam
Posted by sub revolution on Sunday, June 10, 2012 11:07 AM

Old Ordie- Welcome Sign Front page is updated. Looking forward to it!

And yes, I model for two reasons: I love airplanes, and I think it helps me connect with history and those who made it.

Thanks,  -Budd

NEW SIG

  • Member since
    May 2012
  • From: Milford, Ohio
Posted by Old Ordie on Sunday, June 10, 2012 1:40 PM

sub revolution

Old Ordie- Welcome Sign Front page is updated. Looking forward to it!

And yes, I model for two reasons: I love airplanes, and I think it helps me connect with history and those who made it.

Thanks,  -Budd

That's why I do it, too.  Exactly.  Yesterday afternoon I had a little too much sun and a few too many, which is something I don't do often anymore (for obvious reasons Embarrassed).

What I meant to say was how glad I am you are having this 1942 gb.  1942 was a year unlike any other in US history.  The entire nation rode the rollercoaster from Pearl Harbor to Midway and Guadalcanal, from fear of great peril to the changing of the tide at Midway and Guadalcanal.  I am pleased to be here, remembering them.

Flight deck:  Hasegawa 1:48 P-40E; Tamiya 1:48 A6M2 N Type 2 ('Rufe')

Elevators:  Airfix 1:72 Grumman Duck; AM 1:72 F-4J

  • Member since
    May 2012
  • From: Milford, Ohio
Posted by Old Ordie on Monday, June 18, 2012 11:43 AM

Flight deck:  Hasegawa 1:48 P-40E; Tamiya 1:48 A6M2 N Type 2 ('Rufe')

Elevators:  Airfix 1:72 Grumman Duck; AM 1:72 F-4J

  • Member since
    October 2008
  • From: italy
Posted by bsyamato on Monday, June 18, 2012 12:39 PM

Yes

  • Member since
    April 2005
  • From: Australia
Posted by taxtp on Monday, July 2, 2012 5:52 AM

I'd like to join with an Academy 1/72 Hurricane IIc. The kit comes with decals for a night fighter flown during 1942.

Cheers

Tony

I'm just taking it one GB at a time.

  • Member since
    August 2005
  • From: Los Angeles, CA
Posted by corvettemike on Wednesday, July 4, 2012 12:38 AM

I'm thinking I'll do the little Revell 1/48 Spitfire Mk. II if there's still room to join. I'm researching markings for it to see if I can fit it in with OOB decals. Version 1 I know won't count (the aircraft of Cmdr. Douglas Bader) as this plane saw action in 1940 and was shot down by a Messerschmitt in 1941. NK-K "Bette" flown by P.O. A.S.C. Lumsden saw most of it's fighting in 1941 before it's engine stalled on a night landing in August sending the plane in to a fence. NK-K was sent for repairs and returned to service on 5/16/1942 and sent to Rednal Airfield 61 Operational Training Unit as a trainer. So I'm gonna say "Bette" will be the way to go since though it didn't see combat in '42 it was still active in the RAF training pilots for combat.

Rise my brothers we are blessed by steel in my sword I trust...

Arm yourselves the truth shall be revealed In my sword I trust...

Havoc Models

  • Member since
    May 2012
  • From: Milford, Ohio
Posted by Old Ordie on Friday, July 6, 2012 9:14 PM

The Revell Dauntless is underway.  Here are a couple of progress photos:  the pilot and gunner, and the basic cockpit view (pilot isn't even glued in - he's just sitting there for now).

My camera is a cheapy, and doesn't do close-ups very well.  I'll post more when I have it.

Flight deck:  Hasegawa 1:48 P-40E; Tamiya 1:48 A6M2 N Type 2 ('Rufe')

Elevators:  Airfix 1:72 Grumman Duck; AM 1:72 F-4J

  • Member since
    February 2006
  • From: Smithers, BC, Canada
Posted by ruddratt on Sunday, July 8, 2012 1:36 PM

Lookin' good, Ordie! Keep the pics comin'!

Lots of good stuff on display here. Good thing I finally got crackin' on my Oscar. The 'pit is almost done - should have some pics up soon.

Mike

 "We have our own ammunition. It's filled with paint. When we fire it, it makes pretty pictures....scares the hell outta people."


  • Member since
    August 2011
  • From: Variable
Posted by Lt. Smash on Sunday, July 15, 2012 11:30 AM

Sherman II at El Alamein: Background

Finally, I am ready to start my project for this group build.  This will be the first in a series of posts.  Here, I'll provide some background on my subject.  Next, I'll review the kit.  Then, I'll move onto a series of posts that follow construction.  Enjoy. - Lt. Smash

In 1942, the Axis was winning World War II.  While victory appeared certain at the beginning of the year, it was in doubt by end of the year.  The United States war machine had been kicked into high gear turning out weapons at a massive scale, and its forces were beginning to arrive in theaters around the world.  As the year progressed, the Allies had stopped German progress on all fronts, winning notable battles in every theater including victories at Stalingrad, Guadalcanal, and El Alamein.

The iconic-Sherman tank made its combat debut in 1942.  While the Sherman is a product of American industry, it first saw battle in October, 1942 in the Second Battle of El Alamein as part of the British Eight Army.  The first Shermans were rushed into combat, taken from US Army’s 2nd Armored Division, and shipped to the Eighth Army on the SS Seatrain Texas.

Montgomery had 252 of Shermans at the beginning of El Alamein.  Designated the Sherman II by the British and the M4A1 by by the Americans, these tanks took the German’s by surprise.  Until this point in the war, the Allied tanks were designed for infantry support and struggled in tank-versus-tank combat. The Sherman changed that.

 When fielded at El Alamein, the Sherman was the most powerful tank on the battlefield.  Its 75mm gun could engage targets at 2,000 meters.  Its armor could withstand hits from most enemy shells. And, perhaps most importantly, as it proved throughout the war, the Sherman was reliable.  It was a workhorse that required little maintenance compared with its German counterparts, and repairs and modifications that needed to be done, could be done in the field.

As mentioned above, the Sherman II was really an M4A1 and these tanks that fought at El Alamein where the first ones to roll off the Lima Locomotive Works assembly line in February 1942.  These early production M4A1s included riveted construction of the lower hull and armored doors covering the direct-vision slits in the hull in front of the driver and co-driver. 

In my next post, I will review  the “El Alamein Sherman” from  Dragon Models.  This is the kit that I’ve selected to base my build on.

On the bench:  Tasca M4A1 Sherman (Direct Vision Type)

Build Log: www.ltsmashsmodels.com

  • Member since
    October 2010
  • From: Hobart, Australia
Posted by Casper the Chihuahua on Sunday, July 15, 2012 4:51 PM

Ok, been a longtime since I've done any work on the Anson. Got the final wing attached. Because this kit has not guiding pins or anything helpful, the wings were attached with patience, CA glue and kept stable with whatever I could find to get the dihedral correct.

Next up is finishing the canopy masking and a frightening amount of puttying to do!

Cheers

On the bench: A-4F 1/32 Hasegawa

Just deployed: F6F-5N Hellcat Nightfighter 1/48 Eduard

Up next: A6-E Intruder 1/48 Revell

  • Member since
    September 2009
  • From: Guam
Posted by sub revolution on Sunday, July 15, 2012 8:59 PM

Whew! Seems like me going away for a few days is a magnet for people to post here! Let me catch up a bit...

First of all, welcome aboard to taxtp and corvettemike! Looking forward to those two.

taxtp, I hope you give some good feedback on your kit, since I would like to do a Hurricane myself, and I seem to like Academy kits for the most part.

corvettemike, good to see you did some homework! I like a model with a good story behind it.

Speaking of homework, Lt Smash!!! Thank you for that excellent segment! That's the kind of thing I was really hoping for with this GB. A very well done overview and explanation of how your model fits in.

Old Ordie, looks like some nice work on those figures, good detailing.

Casper, good to see you are still onboard. Still nice to see an unusual project here!

Keep 'em coming, guys! I apologize for my absense at the moment, but I'll be around.

Thanks, Budd

NEW SIG

  • Member since
    May 2012
  • From: Milford, Ohio
Posted by Old Ordie on Monday, July 16, 2012 8:28 PM

Here it is so far:

I scratched out some crude additions to the cockpit, which you'll see all of when the rear cockpit is finished - radio gear, etc.  I used a piece of .030 styrene to put the instrument panel decal on, to bring it out into view a bit.  Just trying to bring a little something that'll look good through a canopy to an otherwise sparse cockpit.

I still have seams to fill along the wingroot, but not too bad, as you can see below.  Here are some photos:

After I get some putty into the wingroot, and put the horizontal stabilizers on, it'll be time to stuff it full of wet tissues and start up the airbrush ... more when I have it!

Flight deck:  Hasegawa 1:48 P-40E; Tamiya 1:48 A6M2 N Type 2 ('Rufe')

Elevators:  Airfix 1:72 Grumman Duck; AM 1:72 F-4J

  • Member since
    April 2005
  • From: Australia
Posted by taxtp on Tuesday, July 17, 2012 2:44 AM

Looks good Ordie, I must get around to one of those sometime.

I'm just taking it one GB at a time.

  • Member since
    July 2007
  • From: Southern New Jersey
Posted by troublemaker66 on Tuesday, July 17, 2012 5:28 PM
Hey guys! I'm still working on the Buffalo...hadn't been at the bench in 3 weeks due to working like a dog after the storm that hit South Jersey...smashed alot of Atlantic county...our phone cables and poles were down everywhere..liking the money tho'....lol. Gonna do a little tonight..almost done.

Len

Len Pytlewski

  • Member since
    August 2005
  • From: Los Angeles, CA
Posted by corvettemike on Wednesday, July 18, 2012 3:33 PM

I'll be starting my Mk. II in a little bit. I'm waiting on a box to come from my online supplier with all the paint, etc... I'll need for it.

Rise my brothers we are blessed by steel in my sword I trust...

Arm yourselves the truth shall be revealed In my sword I trust...

Havoc Models

  • Member since
    September 2009
  • From: Guam
Posted by sub revolution on Thursday, July 19, 2012 1:42 AM

Sounds good, everybody! I'm disapearing for a few days again, but I'll be back....

Thanks, Budd

NEW SIG

  • Member since
    August 2011
  • From: Variable
Posted by Lt. Smash on Monday, July 23, 2012 7:49 PM

Sherman II at El Alamein: The Kit

There are many ways to model a Sherman II at El Alamein in 1942.  The two leading kits are from Tasca and Dragon.  I’ve read very good things about both kits, but while it seems that everybody loves Tasca, I found the Dragon kit for about a third of the price which made my decision very easy.

The Dragon kit comes with more than 330 parts molded in light gray and clear styrene on 11 sprues.  A photo etch fret is included as is wire for the tow cable and two tan lengths of track.  The kit includes two-color instructions along and decals for nine tanks deployed at El Alamein in 1942.

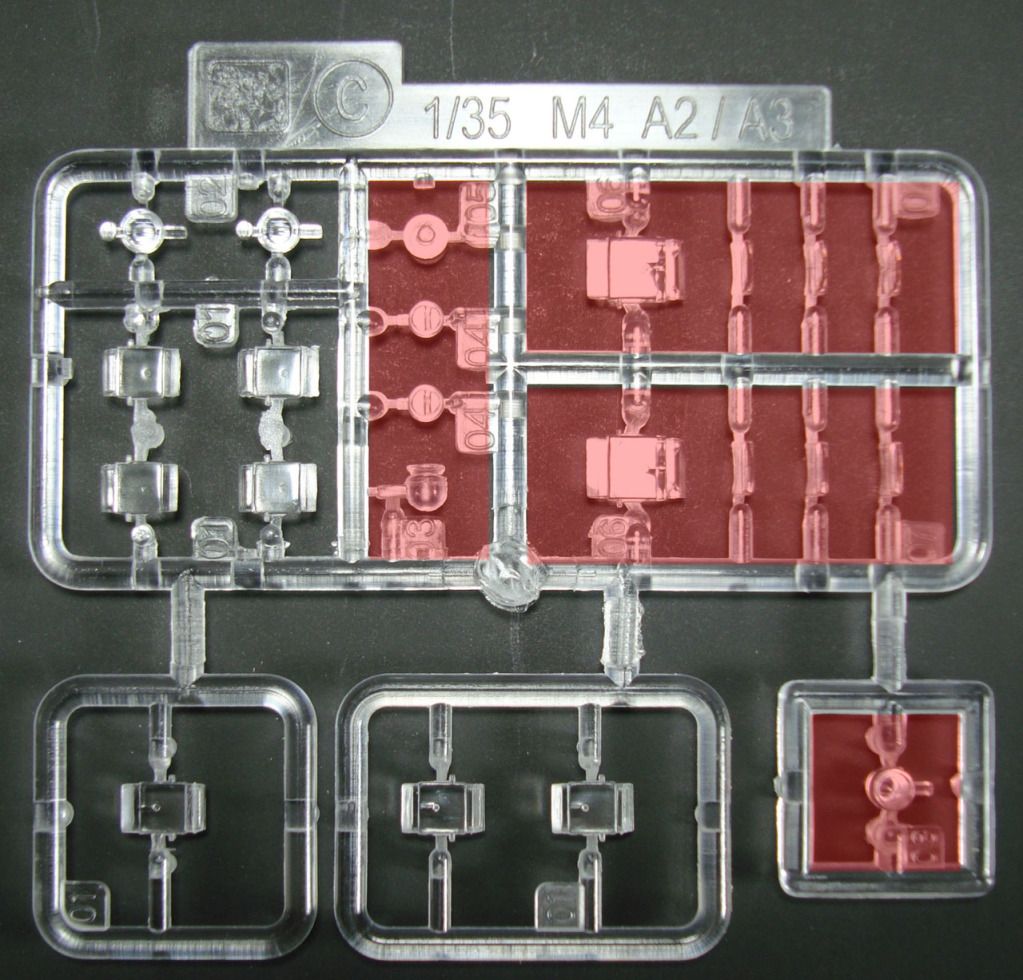
Let’s start by taking a look at each sprue.  As with many Dragon kits, this one is based on another Sherman variant and additional sprues have been added to allow you to model this particular Sherman. As a result, there are many, may extra parts for the spares box.  To make it easy to see which parts are used, I’ve shaded the unused parts in the pictures below red.  You can click on any of the images to get a larger view (albeit not huge).

In that vein, here is the A sprue:


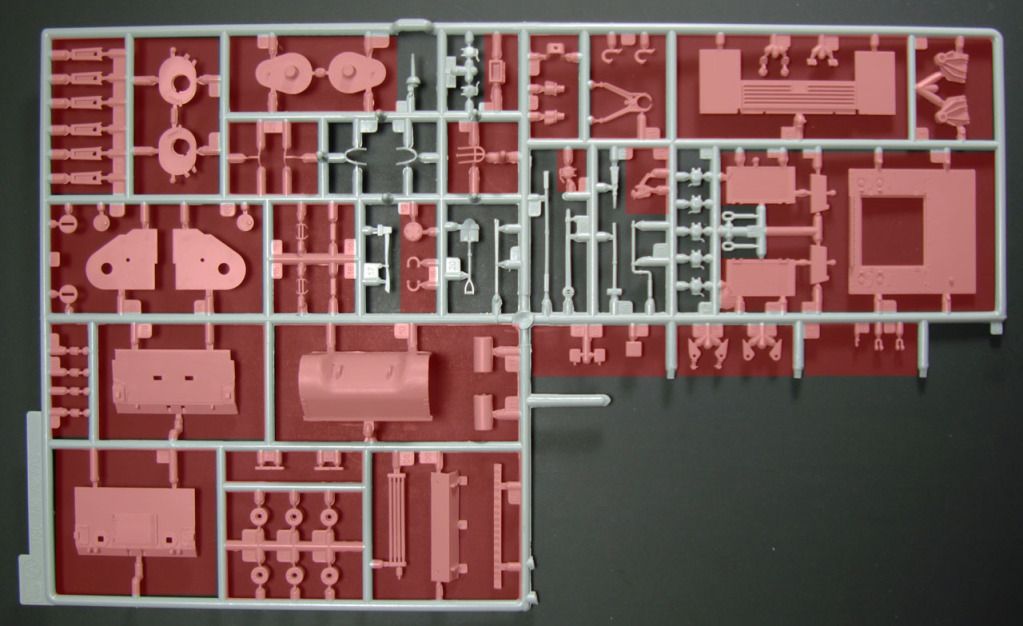
As you can see, very little is used.   In fact, some of the parts shown will be replaced by PE pieces.  In the end, I’ll use the tools and various caps.  Generally, the molding is nice with little flash.  In fact, A sprue requires some clean-up but the rest of the kit looks pretty flash-free.

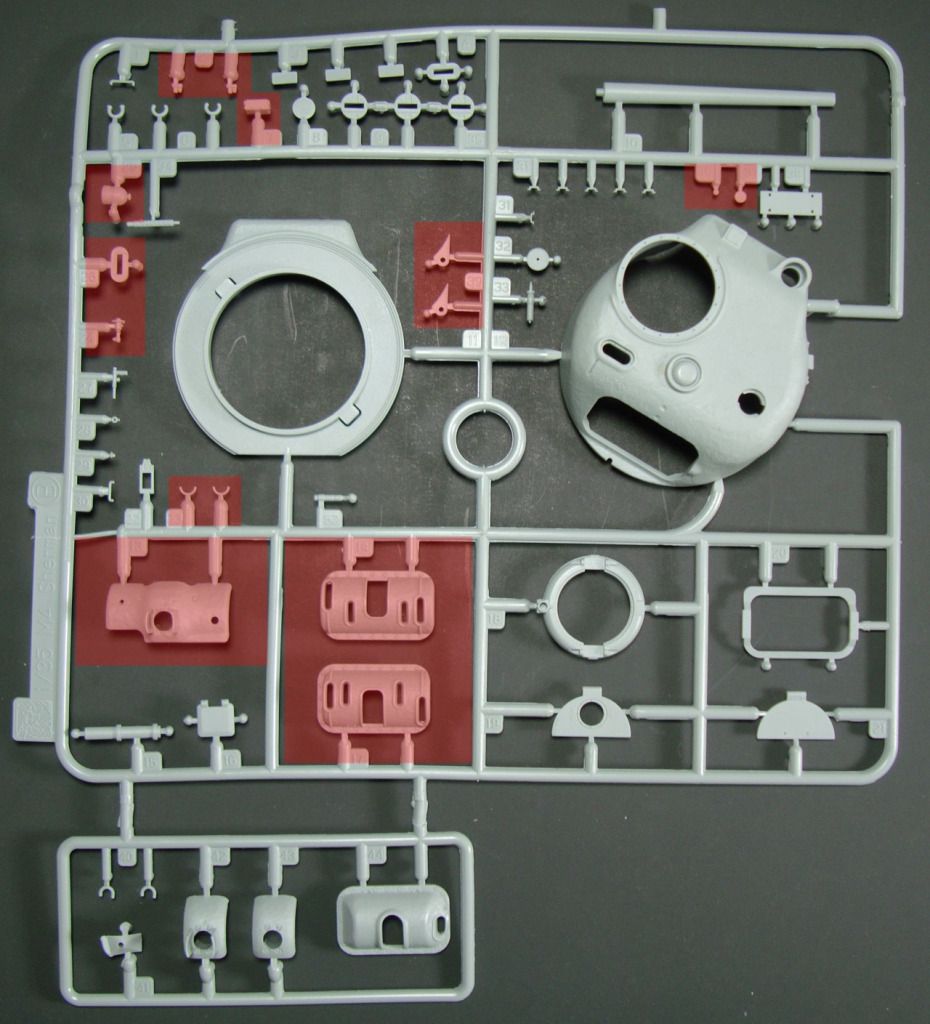
While the kit uses very few parts from A sprue, B sprue is another matter and almost all of its parts will be used..  This sprue contains many of the turret’s parts including several variations of the rotor shield, the commander’s hatch, and half of the 75mm barrel.  If you look at the top left hand corner of the picture you can see the sprue is warped.  The good news is that none of the parts are affected.

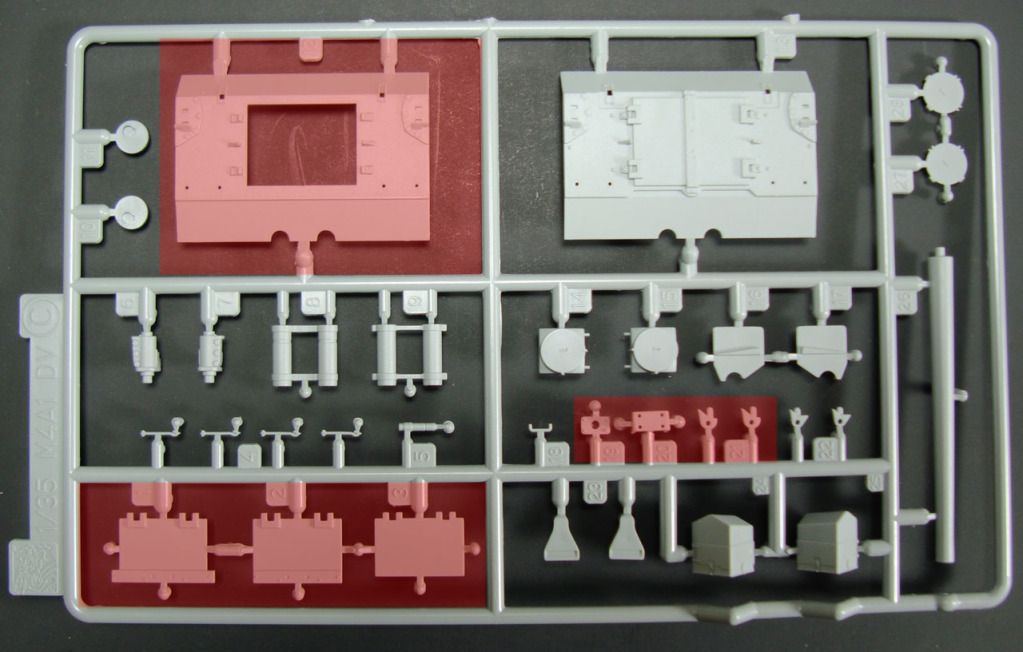
The C sprue contains may parts for the rear of the tank.  If you had an engine, it appears that you could leave the rear doors open to show your work.  But, one is not supplied and thus, not used.  Also, not the other half of the 75mm barrel is provided here.


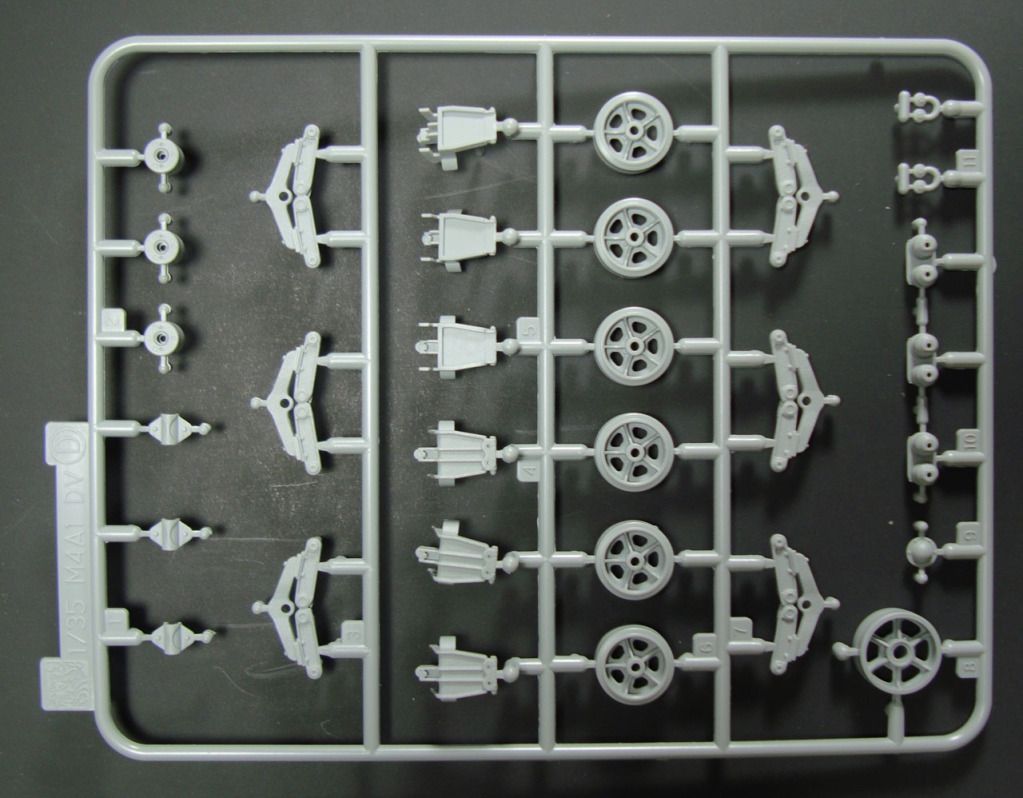
Two D sprues are provided.  Each contains the road wheels and suspension.  Remember, the Shermans at El Alamein were some of the first in production.  As a result, they used the M3-style VVSS suspension and early welded wheels.  These appear to be accurately portrayed in this kit.


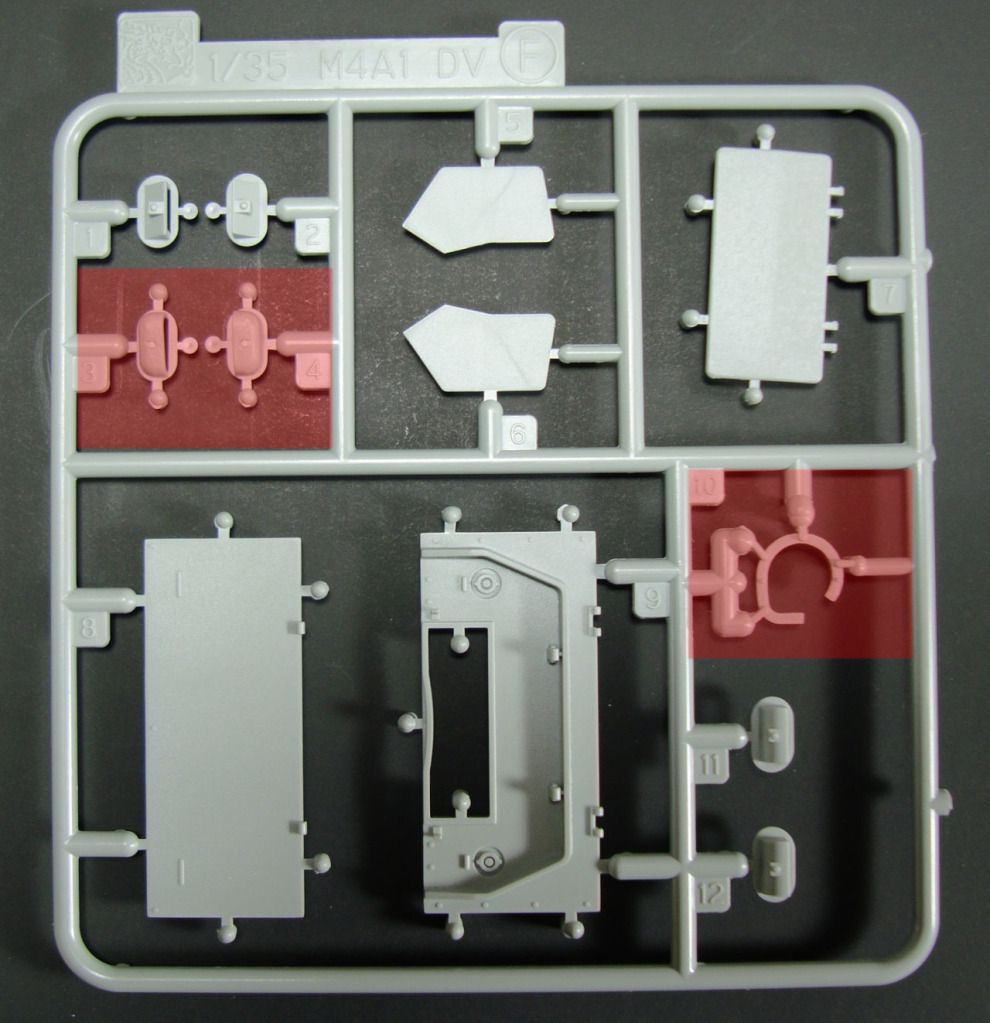
The rear deck is made up of multiple parts and they are provided on F sprue.  In this shot, you can see the number of little plastic nubs (I’m not sure what the right term is for  them) that will need to be cleaned up.  Each of the vents (parts 1 and 2 on the left) and the panels have them.  I saw this on the M1A1 kit that I built, too.  Good thing I’m not trying to build quickly!

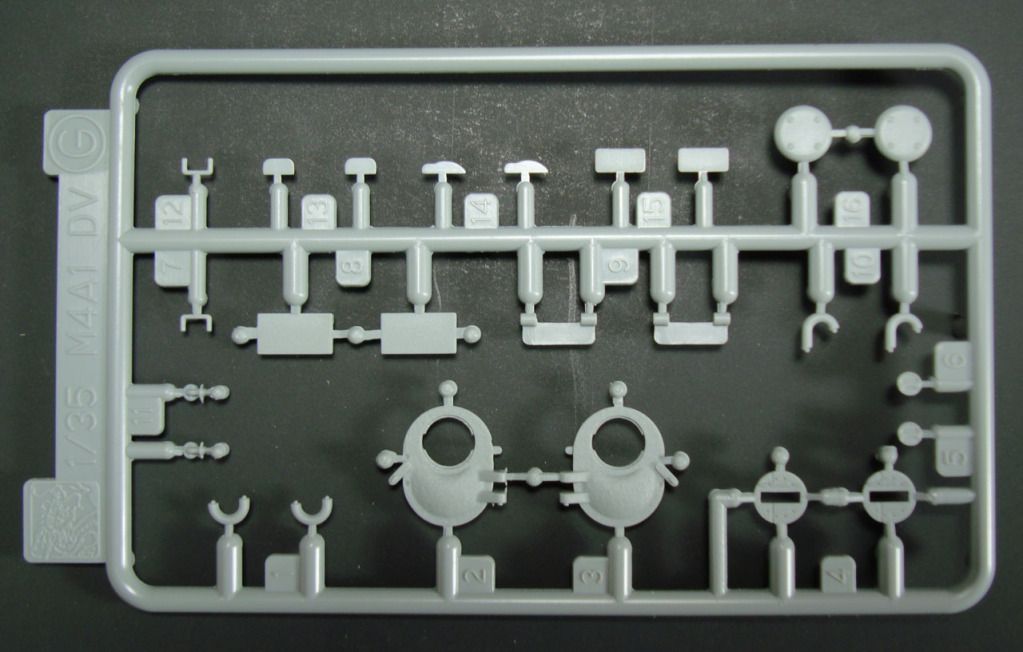
G sprue contains the small hatches with the direct vision aperture as well as miscellaneous hand grabs and accessories.

 Sprue H contains the Sherman II’s transmission cover and other parts that will attach to the front of the lower hull.

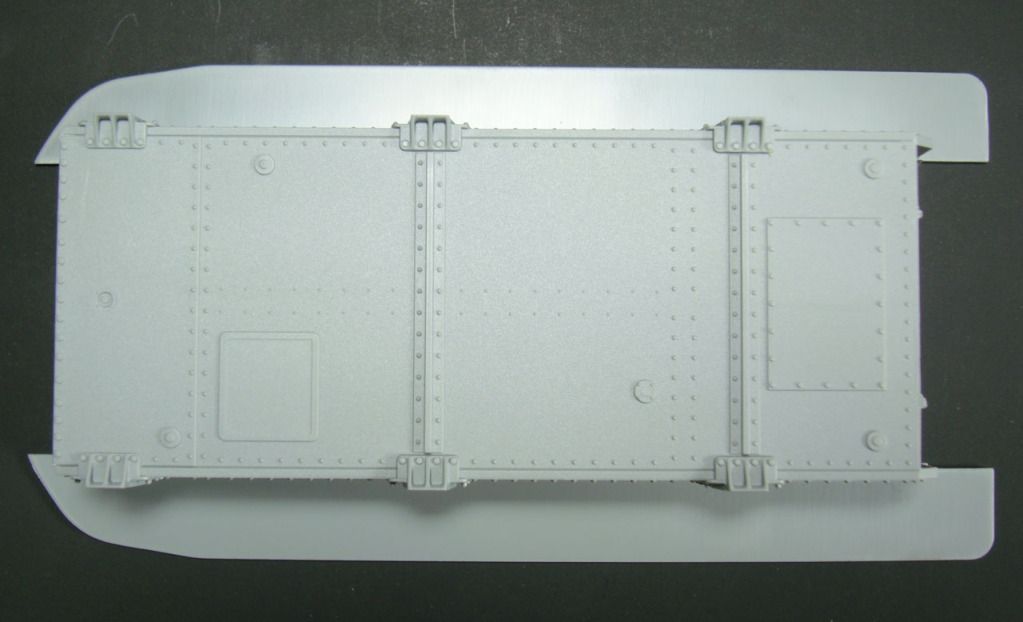
Speaking of the lower hull, it is provided on its own and referred to in the instructions as part K.

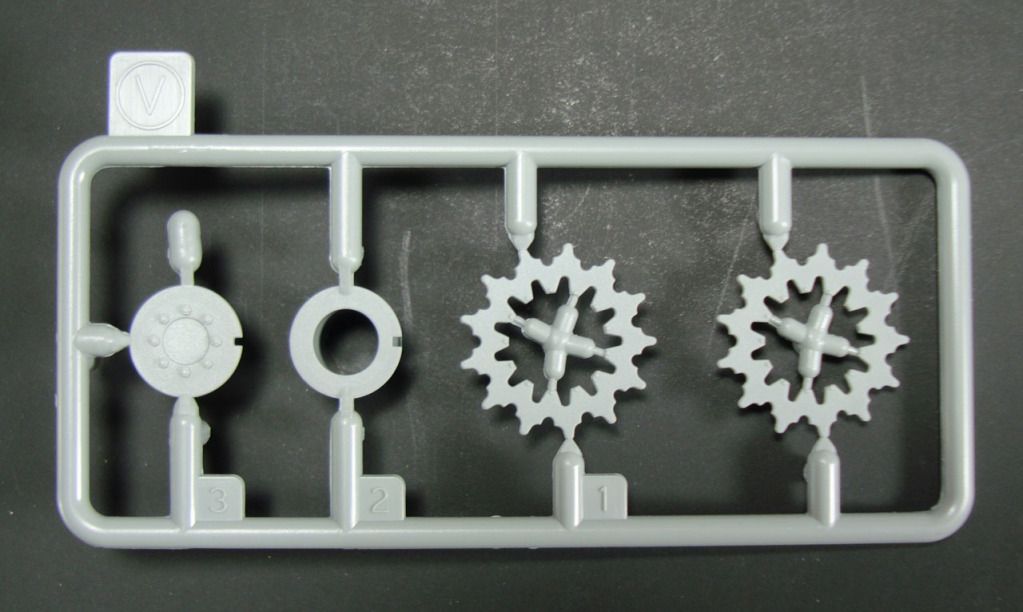
The drive sprockets are provided on V sprue.  You get two of these sprues.

The clear sprue must be used on many, many Dragon kits.  Few pieces are used.

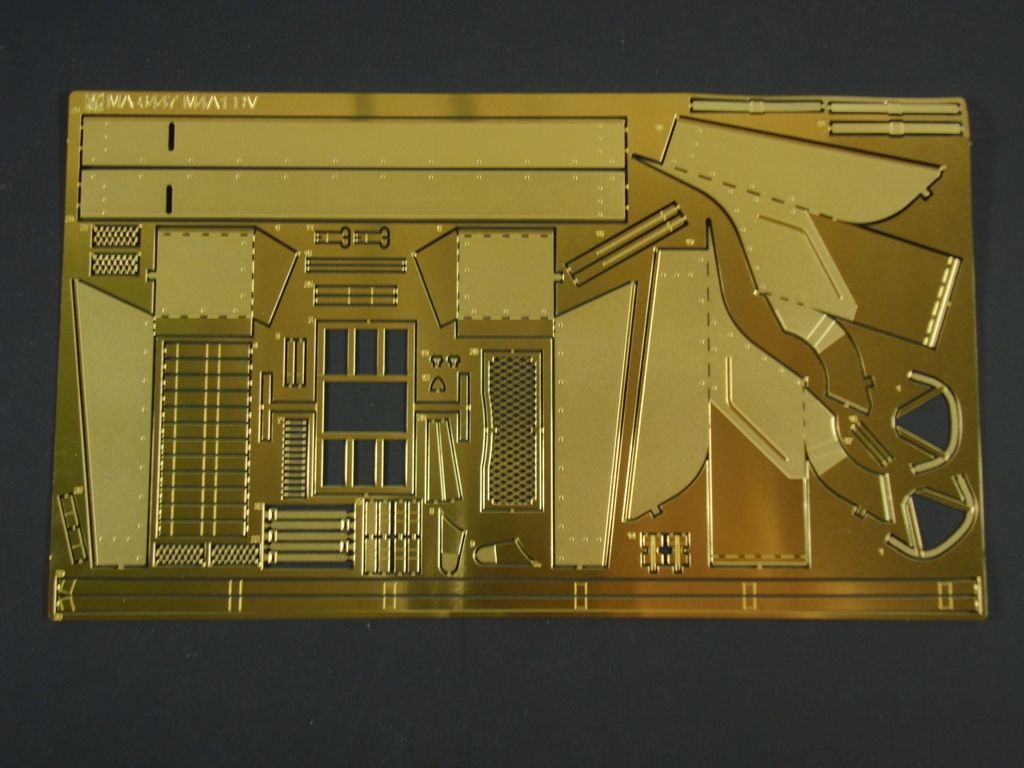
The photo etch fret is a monster.  I’ve got lots of bending and folding in front of me!  I’ve read several posts online where modelers discuss the best way of mounting the fenders.

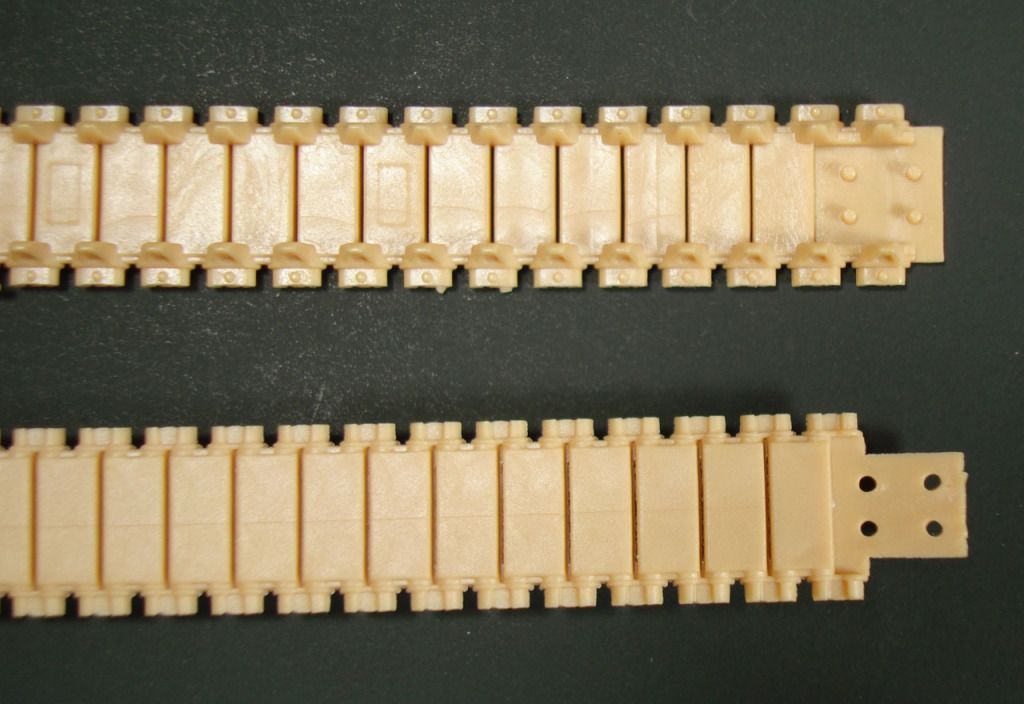
The tracks are made of two tan belts.  I am not sure I’m crazy about them but I’m also not sure they are worth replacing.

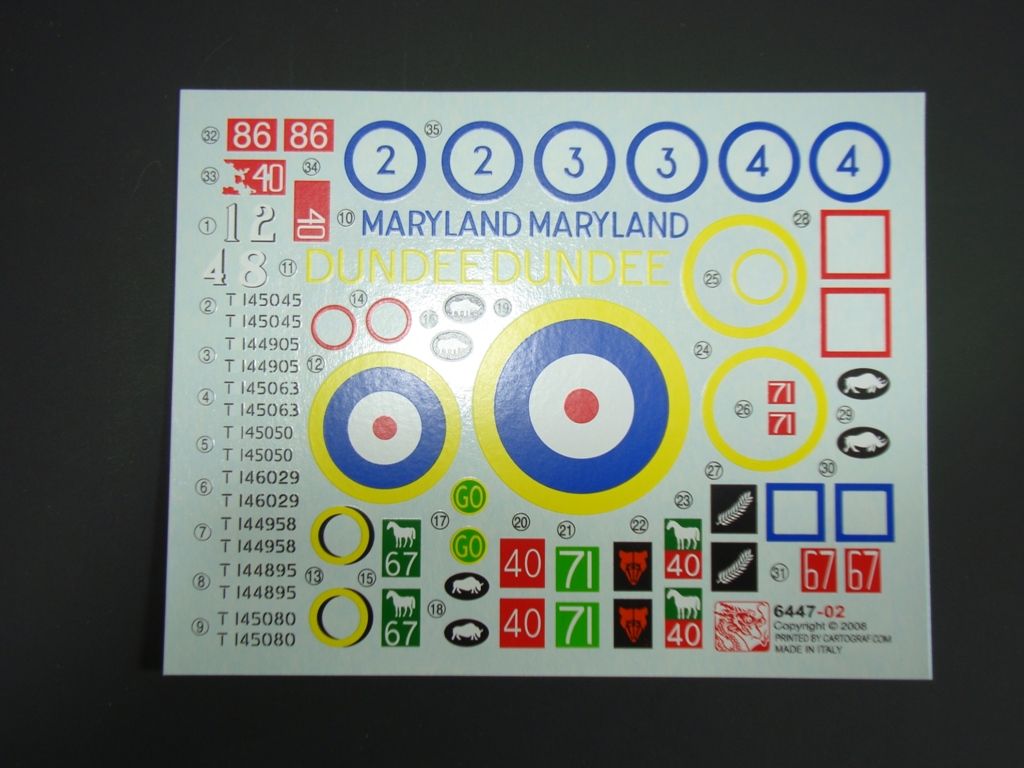
Finally, we have the decals.  They look nice but I’ll reserve judgment.  I was excited about the aftermarket decals I bought for my USS Marsh project and ended up being quite disappointed.

Generally, the kit looks good.  The directions seems straightforward.  I’m looking forward to diving into the build.  I plan to provide a more-or-less step-by-step log of this build.  And, my next post will start construction with the suspension and the lower hull.


On the bench:  Tasca M4A1 Sherman (Direct Vision Type)

Build Log: www.ltsmashsmodels.com

  • Member since
    May 2012
  • From: Milford, Ohio
Posted by Old Ordie on Tuesday, July 24, 2012 3:13 PM

SBD-3 update:

Well, the primer is on.  I had to back up a little after the first application, rework the wing root seams some (I'm still not very good at filling seams and gaps), then re-primer.  Still isn't anything like perfect, but I'm ready to move on to my first two-tone paint job.  Later!

Flight deck:  Hasegawa 1:48 P-40E; Tamiya 1:48 A6M2 N Type 2 ('Rufe')

Elevators:  Airfix 1:72 Grumman Duck; AM 1:72 F-4J

  • Member since
    September 2003
  • From: AandF in the Badger State
Posted by checkmateking02 on Tuesday, July 24, 2012 10:09 PM

Nice work.  You did a good job with eliminating the seams.  Looking great.


  • Member since
    August 2011
  • From: Variable
Posted by Lt. Smash on Sunday, July 29, 2012 8:12 AM

Sherman II at El Alamen: Construction (Lower Hull)

Construction of Dragon’s El Alamein Sherman II starts with the suspension and lower hull.  The instructions give four steps to assemble six bogies, two sprockets, the three-piece transmission cover, and the rear panel which includes the two track idlers.

The M3-style suspension is accurately modeled and went together remarkably well.  The bogies are intricate, but With careful use of glue, the suspension remains workable after assembly.  Each bogie is made up of nine parts. A little clean-up is required.  The wheels have three sprue connection points and a seams which requires sanding.  I used a Flex-I-File for this work.

The return rollers contain several marks.  You can see them in the picture above.  At first, I thought these were ejector pin marks and thought they needed to be filled.  However, after some research, it appears that these marks actually appeared on some (but not all?) M3-type bogies.

The transmission cover went together easily.  The two arches of bolts that appear on the front of the Sherman’s welded transmission cover are provided as separate pieces.  The instructions are not clear as to which way the pieces should be attached to the transmission cover.  Source material showed that the tapered end should be pointed upwards towards the turret.

The rear panel gave me some problems.  First, I managed to lose a rear tow hook. If you look closely at the picture below, you can see that there is a tow hook just to the left of the doors but none on the right.  Looks like I’ll be scratchbuilding a new one.

My second challenge was with the two large air filters that are affixed to the top of the rear plate. The instructions for assembly are ambiguous and the parts are quite fragile. While test fitting, I snapped locating pins off of each filter. Eventually, I was satisfied that I knew how they were going together only to realize after gluing them and letting them sit for 30 minutes that they were wrong.

Carefully, I was able to take the air filters apart and reassemble them correctly.  This caused some excess glue to mar the plastic.  Then, when attaching them to the rear plate, I decided to put a little extra glue in place to make up for the missing locator pins.  Of course, this dissolved the remaining locator pin.  In the end, I temporarily attached the upper hull to make sure that the position of the filters looked correct and then let the entire assembly set overnight.  The good news is that these canisters will largely be hidden when the model is complete.

The next day, I attached the transmission cover and temporarily affixed the bogies, sprockets and track idlers in place to show my progress.

Next, I’ll turn my attention to the upper hull.  The instructions cram a bunch of parts into two measly steps and it includes shaping some photo-etch with a Dragon-supplied jig.  Should be fun!  So, stay tuned. 

On the bench:  Tasca M4A1 Sherman (Direct Vision Type)

Build Log: www.ltsmashsmodels.com

  • Member since
    September 2003
  • From: AandF in the Badger State
Posted by checkmateking02 on Sunday, July 29, 2012 9:14 AM

Nice work here, Lt.  Very neat assembly.


  • Member since
    September 2009
  • From: Guam
Posted by sub revolution on Wednesday, August 1, 2012 6:00 AM

Back again!

Good to see Ordie and Smash still plugging away! Thank you again Smash for your very detailed posts. And Ordie, good luck on your first two-tone job! It's not terribly hard, not nearly as much as camo!

Thanks, Budd

NEW SIG

  • Member since
    May 2012
  • From: Milford, Ohio
Posted by Old Ordie on Friday, August 3, 2012 2:19 PM

Finally got the paint on - my first two-tone job.  Not thrilled with it, but not depressed about it, either.  A few small chips of paint and primer came off with the masking tape, but they are small and in out of the way places, so ...  I let the underside paint dry for three days before I masked it, so I don't know what else I can do to prevent pulling off bits of paint.  The paint is Vallejo Air, U.S. Blue-Grey above, U.S. Light Grey below.  I think they are nice shades.  Dries around the tip a little quick, compared to Model Master acryllics, which is what I'm familiar with.  Also, I have the canopy taped and painted, and am waiting overnight to peel the tape ...  I'm using a few parts left over from my SNJ build, some canopy sections and the spinner, and am scratching a few simple items for the otherwise sparse cockpit, but more about all that at a later date.  Some photos:

More when I have it!

Flight deck:  Hasegawa 1:48 P-40E; Tamiya 1:48 A6M2 N Type 2 ('Rufe')

Elevators:  Airfix 1:72 Grumman Duck; AM 1:72 F-4J

  • Member since
    April 2006
  • From: ON, Canada
Posted by jgeratic on Friday, August 3, 2012 2:38 PM

I don't think anything can be done to guarantee 100% that tape will not pull up paint.  Perhaps acrylics, particularly flat, are more prone to this?

Some things you can try next time if you haven't already, is wash the plastic parts in dish soap (but then you still have the oils from your hands to deal with).  This should allow better adherence for primer/paint.  Also decrease the tackiness of the tape.  Rub it on a clean surface, such as your work table, before applying to the model.

regards,

Jack

  • Member since
    May 2012
  • From: Milford, Ohio
Posted by Old Ordie on Friday, August 3, 2012 3:29 PM

jgeratic1,

Thanks for the tips.  I did wash the parts in lukewarm water and Dawn at the start, but have, of course, handled everything since.  I will try reducing the tackiness of the tape next time.

Thanks again,

Ord

Flight deck:  Hasegawa 1:48 P-40E; Tamiya 1:48 A6M2 N Type 2 ('Rufe')

Elevators:  Airfix 1:72 Grumman Duck; AM 1:72 F-4J

  • Member since
    September 2003
  • From: AandF in the Badger State
Posted by checkmateking02 on Friday, August 3, 2012 5:26 PM

Just before you're ready to paint, you can wipe everything down with a cotton ball dipped in denatured alcohol--just a little damp.  That will remove hand oils.

Nice-looking paint application, by the way.


  • Member since
    May 2012
  • From: Milford, Ohio
Posted by Old Ordie on Friday, August 3, 2012 6:59 PM

checkmateking02

Just before you're ready to paint, you can wipe everything down with a cotton ball dipped in denatured alcohol--just a little damp.  That will remove hand oils.

Nice-looking paint application, by the way.

Thanks for both the tip and the compliment!

Flight deck:  Hasegawa 1:48 P-40E; Tamiya 1:48 A6M2 N Type 2 ('Rufe')

Elevators:  Airfix 1:72 Grumman Duck; AM 1:72 F-4J

GAF
  • Member since
    June 2012
  • From: Anniston, AL
Posted by GAF on Friday, August 3, 2012 11:15 PM

Ordie,

Nice to see your progress on the SBD!  I've been following your build since the propeller  thread.

I was so inspired I went out and bought one of the Revell kits.  It might be a while before I get to assembly, but I'll keep your build as a guide.

Gary

JOIN OUR COMMUNITY!

Our community is FREE to join. To participate you must either login or register for an account.

SEARCH FORUMS
FREE NEWSLETTER
By signing up you may also receive reader surveys and occasional special offers. We do not sell, rent or trade our email lists. View our Privacy Policy.