SEARCH FINESCALE.COM

Enter keywords or a search phrase below:

The Official 1942 70th Anniversary Group Build

78947 views
567 replies
1 rating 2 rating 3 rating 4 rating 5 rating
  • Member since
    September 2009
  • From: Guam
Posted by sub revolution on Saturday, August 4, 2012 4:55 AM

Ordie- Did you use Future (or equivalent) on the surfaces before you taped them? I have had paint peel up if I don't use Future, but have never had an issue with peeling when I do use it. Except with metalizers. Those just can't be masked.

Thanks, Budd

NEW SIG

  • Member since
    April 2005
  • From: Australia
Posted by taxtp on Saturday, August 4, 2012 9:39 AM

I like the tones of your Dauntless too Ordie, they look just right to me. It's coming up well, isn't it.

Cheers

Tony

I'm just taking it one GB at a time.

  • Member since
    May 2012
  • From: Milford, Ohio
Posted by Old Ordie on Saturday, August 4, 2012 4:03 PM

sub revolution

Ordie- Did you use Future (or equivalent) on the surfaces before you taped them? ... 

No, I didn't - which makes me feel a little dumb, because my next step is to coat it with Future prior to decaling.  I sure could have done so before adding the topside paint.  (Next time, I will!)

GAF - There are a few additional things I've seen others do with this kit that I could have tried to do also, but lacked the nerve (it's only my fourth aircraft build, and fifth overall, and while I want to stretch each build a little further, I am hesitant to over-extend myself on any particular one ...).  I'll share all that when it's finished, and I have photos with which to illustrate ...

taxtp - Yup, I think so, too.  Thanks!

Smile

Flight deck:  Hasegawa 1:48 P-40E; Tamiya 1:48 A6M2 N Type 2 ('Rufe')

Elevators:  Airfix 1:72 Grumman Duck; AM 1:72 F-4J

  • Member since
    August 2011
  • From: Variable
Posted by Lt. Smash on Sunday, August 5, 2012 9:54 PM

Sherman II at El Alamein: Construction (Upper Hull)

Let’s pickup with my build of Dragon Model’s El Alamein Sherman with the upper hull.  Ultimately, construction involves adding detail – lots of it – to the one-piece upper hull.

The instructions provide two steps in which dozens of small plastic and photo-etch parts are installed.  Interestingly,  these are steps 5 and 7.  Step 6 has you building  the commander’s hatch for the turret but turret construction doesn’t really start until step 8.  So, for now, I’m going to skip step 6 and just focus on the upper hull.

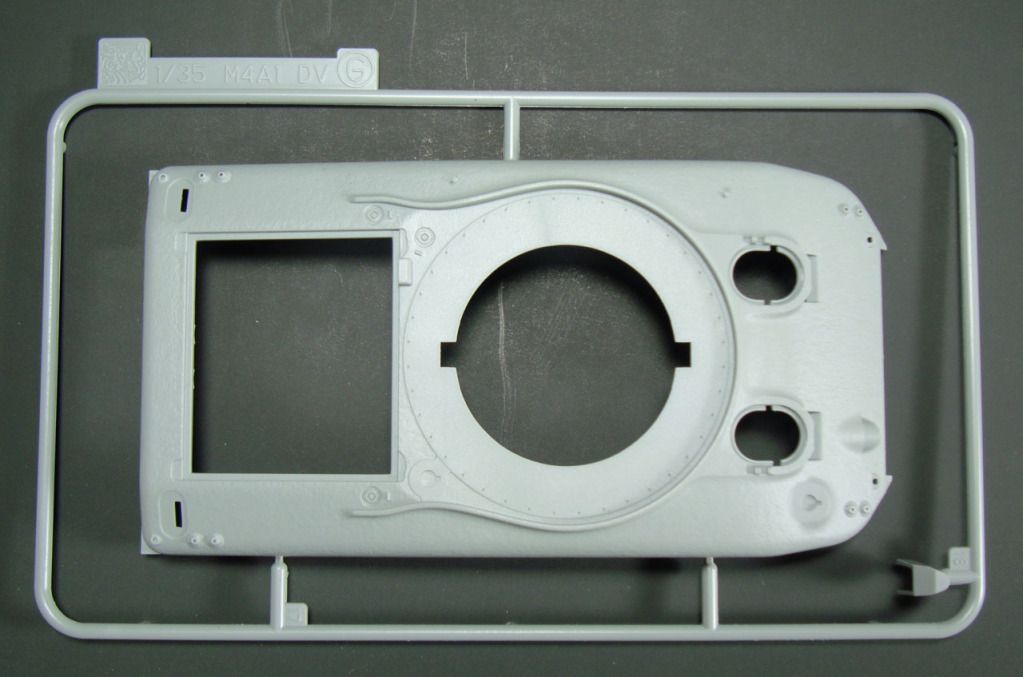
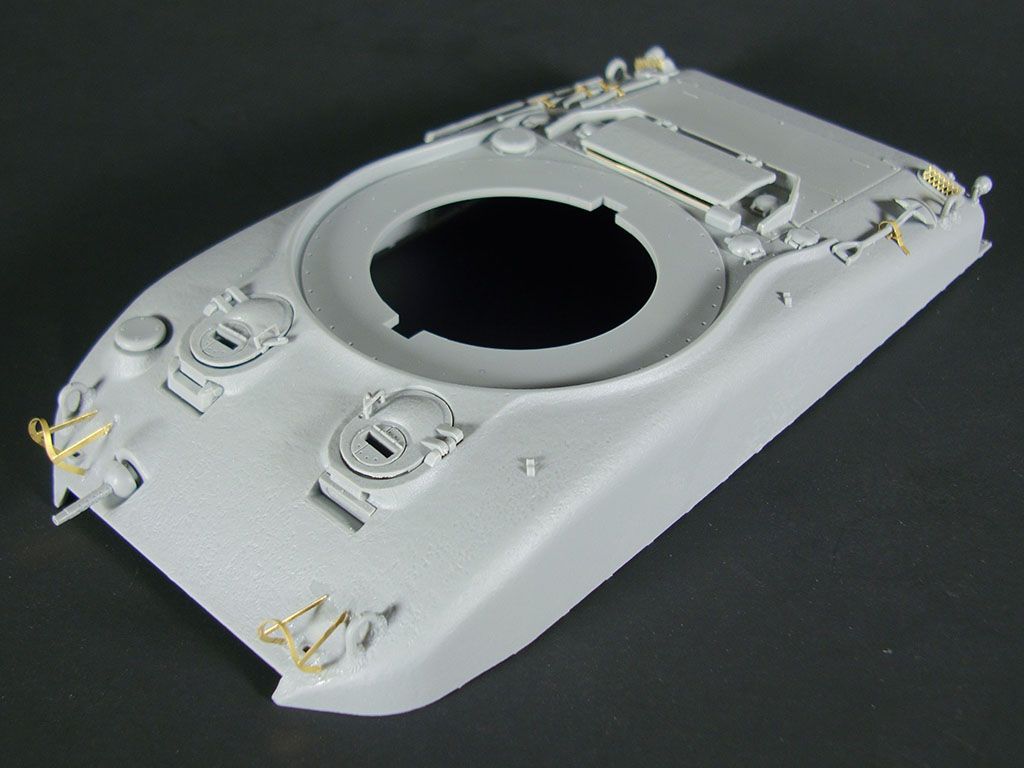
The upper hull itself comes mounted on a sprue with three attachment points.  I carefully scraped and sanded the nubs left by these attachment points so that I would not hurt the cast iron effects molded on the hull.  While the hubs are still visible, they should be hidden by the photo-etch sand shields that will be installed later.

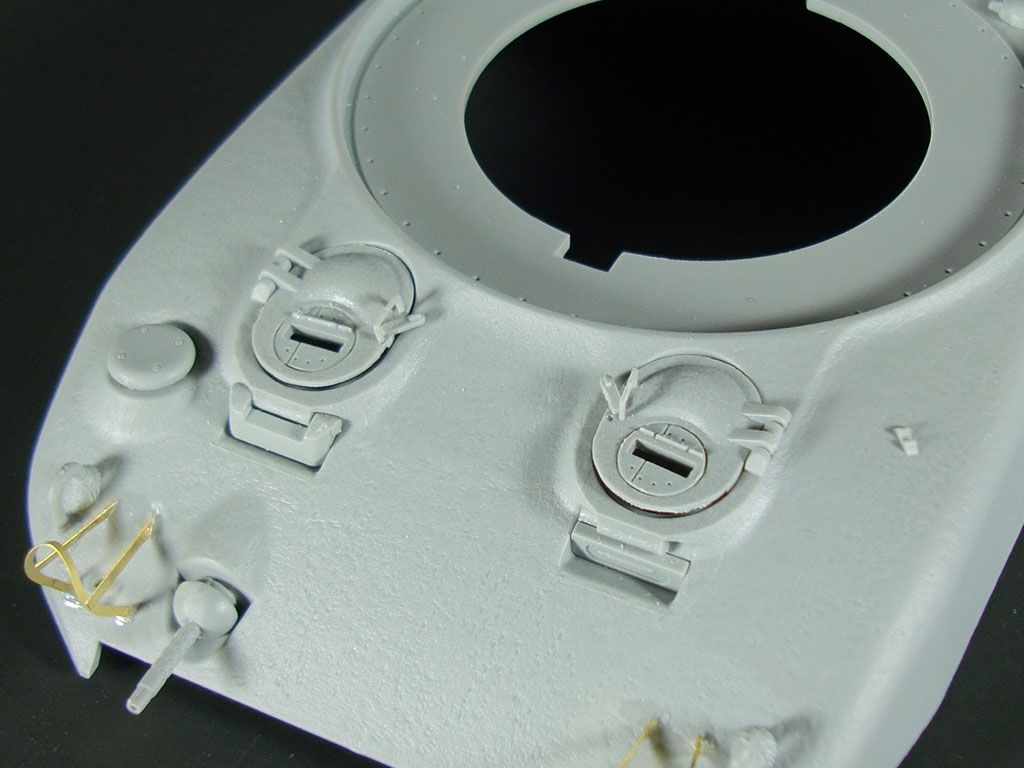
I started my work with the driver and assistant driver’s hatches.  These consist of five parts each, including a clear periscope.  Due to their small size and difficulty masking them, I chose to leave the periscopes and their covers off for the time being.  I decided to use the kit provided hand grabs as they seemed to scale and I was able to successfully clean up the small parts without breaking them. (Please note, the hatches are not attached, yet.  I’ve just positioned them in place for the picture below.)

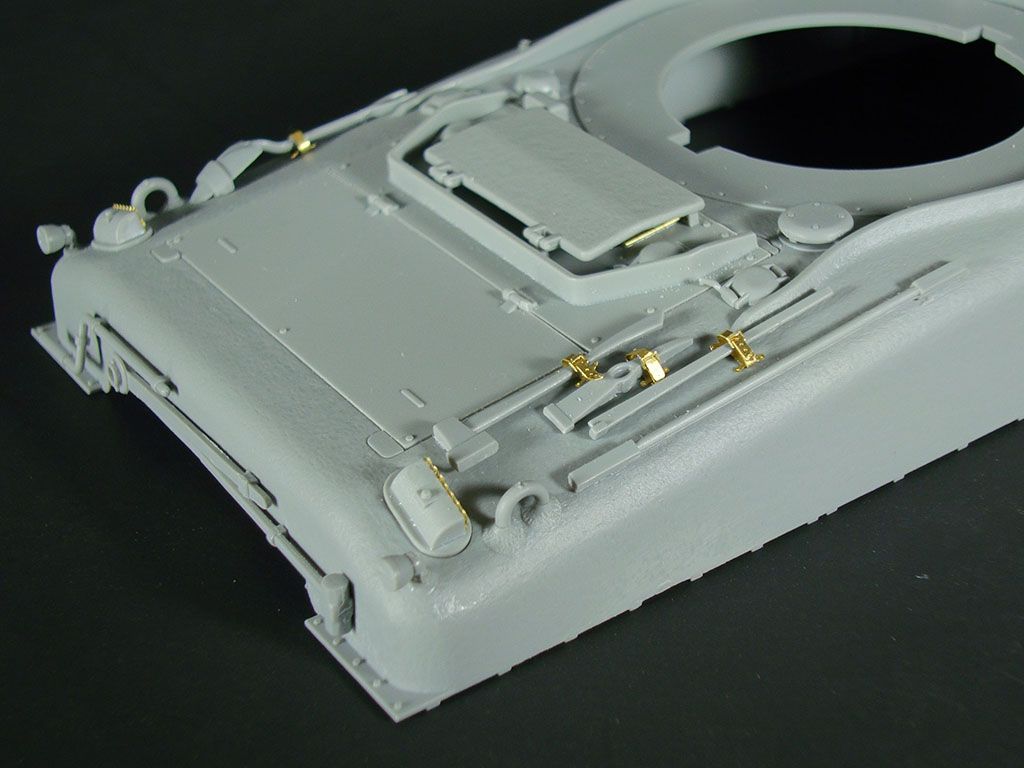
Next, I built the rear panel.  This consists of two large pieces of plastic which represent the engine cover, a small photo etch screen (not visible in the picture below), plastic cover for the screen and a few small caps/covers.  Unfortunately, I was too aggressive my sanding one of the panels, taking the panel out of square.  I considered replacing it with plastic card but after test fitting it, the mistake was not too noticeable.

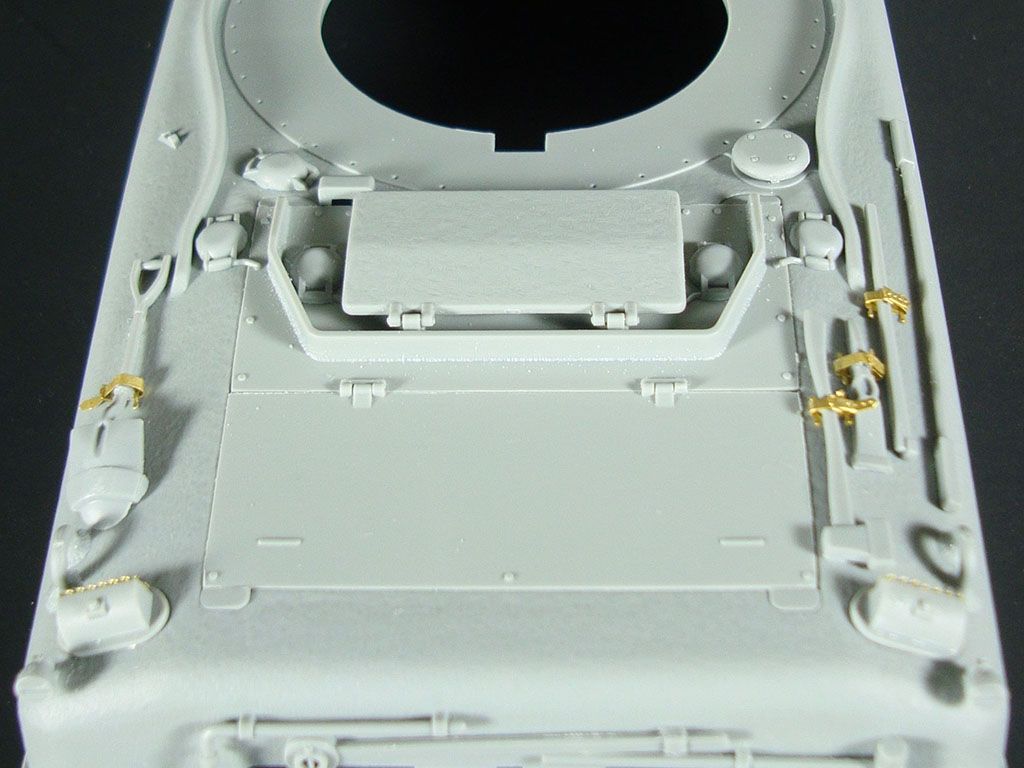
At this point, I also added the exhaust pipes, tail lights, and two vents with photo-etch screens to the rear of the tank.  Dragon gives you options for these vents: rounded and angled.  Each version has its own photo etch.  I decided to use the rounded vents as I didn’t see any reference photos of the other but, while I chose the rounded vents, I found the angled screen fit best.  Go figure.

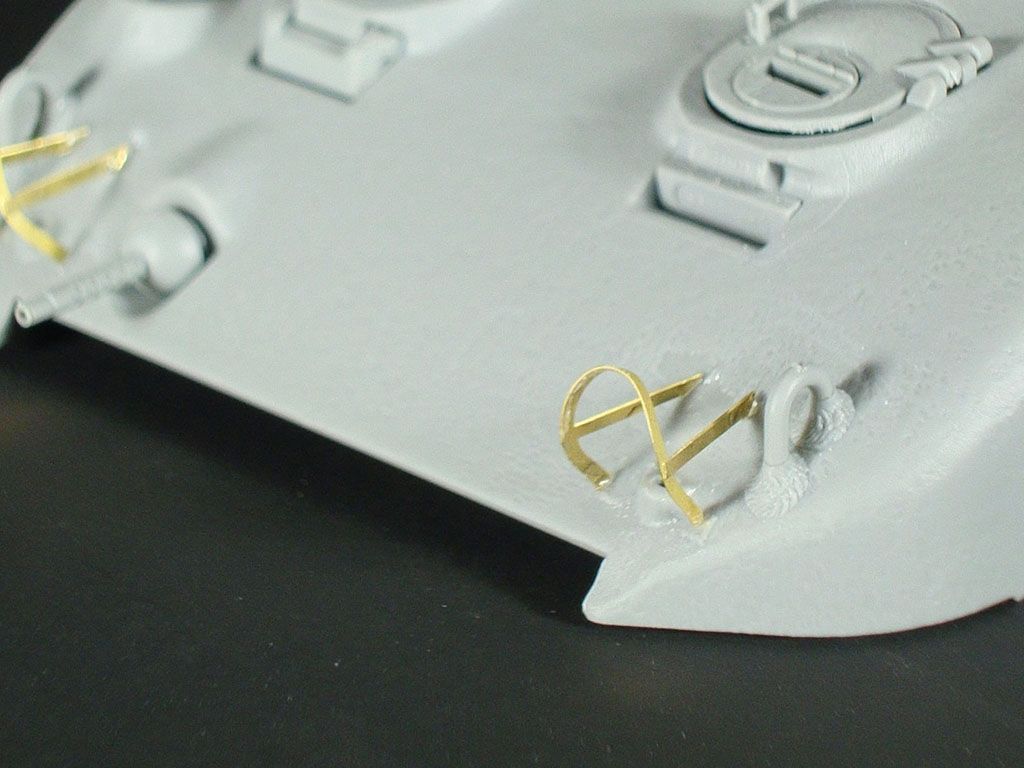
With most of the plastic attached to the upper hull, I now had to muster the courage to install the photo etch headlight guards.  This requires curving a flat piece of photo etch into the shape of the guard and attaching it to the front of the upper hull.

Dragon provides a jig to help you get the right shape.  The jig includes a small ridge.  By lining up the piece with the ridge, enough PE will be exposed on the back of the jig to attached it to the model.  Unfortunately, the ridge was too shallow and my fingers too stubby to make this work effectively.  Still, the jig was useful to get the correct rounded shape.

The next challenge was getting the glue to set while I held the curved piece and jig against the model.  After several tries with small amounts of thin cyanoacrylate, I eventually used thick CA with an accelerant to bond the PE to the plastic.

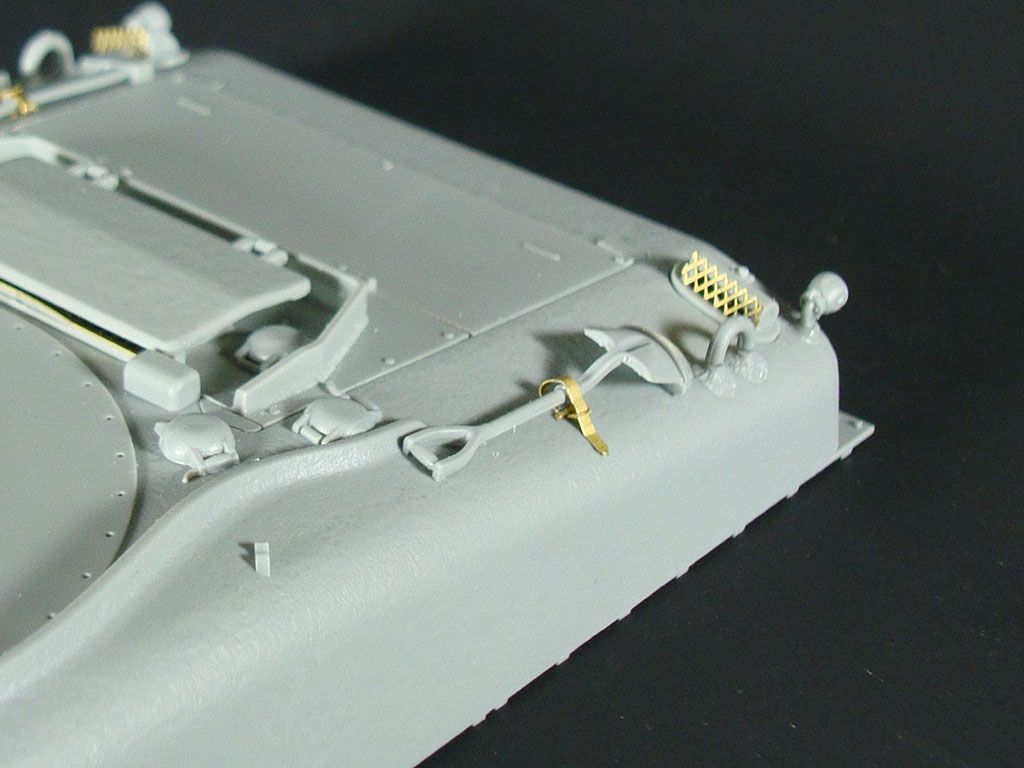
Finally, I turned my attention to the tools.  There are several tools mounted to the back of the Sherman II.  The tools are nicely molded but several have locator pins on them.  Since the upper hull in this kit does not have any locator holes, I removed the pins before getting into the fun stuff.

The instructions call for four of the tools to have photo-etch straps attached to them. Each strap has two small PE parts that mimic the bolts that hold the strap to the tank.  The directions are not particularly clear.  I found a nice blog of another El Alamein Sherman build.  After examining his pictures, I eventually figured out how to wrap the PE strap loosely around the tool and mount it with thin CA, pinch the sides of each strap and slide a small hanger into each pinched-corner.  These hangers were also glued with thin CA.

Once the PE straps were on the tools, I attached all the tools to the hull using plastic cement for plastic-on-plastic contact and thin CA to attach the PE to the hull.

At this stage, I’m happy with my project.  While there are lots of parts, the kit has really gone together well and it has been rewarding to see how my skills have improved since I built the USS Marsh last winter.

In the next post, I’ll construct the turret before turning my attention to final assembly and the piece de résistance of this kit: the large, photo-etch sand shields.

On the bench:  Tasca M4A1 Sherman (Direct Vision Type)

Build Log: www.ltsmashsmodels.com

  • Member since
    September 2003
  • From: AandF in the Badger State
Posted by checkmateking02 on Monday, August 6, 2012 11:49 AM

Nice job with the photoetch, Lt.  


  • Member since
    February 2011
  • From: Ontario, Canada
Posted by gunner_chris on Monday, August 6, 2012 10:40 PM

I have been very absent in my 1942 build, but my goal is to have it done before the anniversary of Dieppe.

I've got the base paints down for the top and bottom of the plane, and now started on the first coat of the dark green for camo.

  • Member since
    July 2007
  • From: Southern New Jersey
Posted by troublemaker66 on Tuesday, August 7, 2012 5:02 AM

Hey Chris...you put that tan paint on a little thick....Stick out tongue....what is that stuff...silly putty, poster tack ?


Len

Len Pytlewski

  • Member since
    February 2011
  • From: Ontario, Canada
Posted by gunner_chris on Tuesday, August 7, 2012 7:20 AM

Lol

Silly putty

Though I just noticed my dark green seems off

It calls for dark green over ocean grey.  I don't recall where I found this reference but when I bought my tamiya paint I felt I needed dark green 2.  It looks all wrong.

Luckily I have some modelmaster dark green which should work better.

  • Member since
    May 2012
  • From: Milford, Ohio
Posted by Old Ordie on Tuesday, August 7, 2012 1:50 PM

Lt. Smash - checkmateking02 is right.  Excellent job with the PE!

Flight deck:  Hasegawa 1:48 P-40E; Tamiya 1:48 A6M2 N Type 2 ('Rufe')

Elevators:  Airfix 1:72 Grumman Duck; AM 1:72 F-4J

  • Member since
    August 2011
  • From: Variable
Posted by Lt. Smash on Tuesday, August 7, 2012 5:29 PM

Thanks, checkmateking02.  Thanks, Old Ordie.  I appreciate the encouragement.

On the bench:  Tasca M4A1 Sherman (Direct Vision Type)

Build Log: www.ltsmashsmodels.com

  • Member since
    February 2011
  • From: Ontario, Canada
Posted by gunner_chris on Saturday, August 11, 2012 11:08 AM

I fixed the green but now the dark green seems to be higher then the grey.  Noticeable ridges so hopefully a light sanding will fix that with ruining the grey.

  • Member since
    August 2005
  • From: Los Angeles, CA
Posted by corvettemike on Sunday, August 12, 2012 1:30 PM

I really need to start my build lol. They say all work and no play makes jack a dull boy but sometimes too much play and jack forgets what he's supposed to be playing with. Trying to juggle starting my lil' plane between a 1/35 T-34, 1/25 AMT Dodge Superbee, and a 1/12 Tamiya Kawasaki ZX-14. I got 52 days left before a show to get both the T-34 and ZX-14 done for a show so most likely you won't see any trace of me starting until the 1st week of Oct which will put me in a crunch time wise unless I really focus ^^

Rise my brothers we are blessed by steel in my sword I trust...

Arm yourselves the truth shall be revealed In my sword I trust...

Havoc Models

  • Member since
    September 2003
  • From: AandF in the Badger State
Posted by checkmateking02 on Sunday, August 12, 2012 6:46 PM

Nice-looking camouflage paint job, Chris.  I always get some ridges when I do schemes like this.  I don't really know how to avoid it.  Fortunately, they don't seem to be too distracting or noticeable.


  • Member since
    September 2003
  • From: AandF in the Badger State
Posted by checkmateking02 on Sunday, August 12, 2012 6:47 PM

Focus, Mike.  Be one with the plastic.


  • Member since
    May 2012
  • From: Japan
Posted by Frightful6_7 on Sunday, August 12, 2012 8:40 PM

Hey heres some of my work so far.  The kit is airfix 1/76 M4 Sherman and a Dragon SD.KFZ.260 1/72


Sorry that some of the pictures are blurry.

http://i852.photobucket.com/albums/ab85/Tempest977/Rising%20Sun%20Group%20Build/zero1-2-1-2.jpg

  • Member since
    August 2011
  • From: Variable
Posted by Lt. Smash on Sunday, August 12, 2012 11:15 PM

Sherman II at El Alamein: Construction (Turret)

The turret assembly is straight forward.  It is based on subassemblies for the main gun, the commander’s hatch, a turret stowage box.  Combined with the top and bottom halves of the turret and few detail pieces and your done!

Ok, that was a quick.  Let’s look at the build process in more detail.

Let’s start with the main gun assembly.  While Dragon does not ship this Sherman with a metal barrel, it does come in one piece rather than two halves.  As a result, except for cleaning up the sprue connectors, no work was required.

The kit comes with several rotor shields to handle just about any version of the M4 Dragon provides.  Here, I mistakenly used the “late” M34 rotor shield, which has small plates that surround the barrel of the gun near its base, rather than the “early” model that leaves the barrel "naked".  By the time I realized my mistake the plastic cement had cured.  Fortunately, I did not use much cement.  So, with careful work with the tip of a No. 11 blade, I was able to loosen the “late” rotor shield and install the “early” shield.

After assembly, the 75mm gun and coaxial machine gun elevate but the assembly is very loose causing the guns to stay at its lowest elevation.  I may end up gluing this in place later, but for now, I left it loose.

The turret goes together like a clam shell. The fit is ok, but there is an obvious seam along the turret bustle.  There is also a notch in the lower part of the hull that the instructions tell you to fill with putty.  I filled the seam and the notch with Squadron Green Putty.  I let the putty cure overnight and then sanded the seam smooth.

As a quick aside, I have to admit that I’m undecided on the Squadron Green Putty.  I used good old Testors Putty from the grey tube with the Marsh build.  I used some Testors and some Squadron with the M1A1 build.  And while I like the Green putty better than the Testors (it thins and cures better), I’m not sold.  I've got a tube of Squadron White Putty sitting in my toolbox and plan to pick up the Tamiya putty, too.  Expect more discussion about putty in the future!

Also, on the turret, the molded casting texture basically stopped along the back on the turret. I’ve seen tanks where the casting texture is inconsistent in real life but this was extreme.   I thought it was best to add casting texture to the rest of the turret.

To do that, I followed a technique described in “Building and Detailing Realistic Sherman Tanks” by James K. Wechsler.  This involves painting liquid cement to the surface and then stippling it with a stiff brush.  A little sanding smooths the stippling and the result is a good-looking casting texture that blends nicely with the pre-molded one.  The photo below really shows off the new casting effect well thanks to the green putty.

The commander hatch, stowage box, and the rest of the turret went together just fine.  I was a little frustrated that there are no locating holes in the turret for the lifting rings that mount to the rear quarter of either side of the turret, causing me to guess where they go based on reference photos.  The same was true for the stowage box.

(And I just noticed – thanks to the photos – that I need to reapply CA to the PE straps on the stowage basket and clean up the lifting rings a little bit!)

I also had to research which antennae to include on the turret.  There are two antennae mounted on the turret.  The instructions give you an option to install either a conical or a cylindrical antenna on the left side.  Fortunately, I was pointed to a great thread on the Missing Lynx Discussion Groups that explained that the British No. 19 radio had two antennae.  The left one was a long range “a” antenna while the right one was a short range “b” antenna.   A picture included in the discussion shows the top of the “a” antenna which should be the conical part.  And, of course, I plan to add brass wire to complete the antennae during final assembly.

Now, all that’s left (queue dramatic music) is assembling the massive photo-etch sand shields, which has been the thing I’ve read other modelers complain about most.  I plan to solder them, which will be a first for me.  So, stay tuned.

On the bench:  Tasca M4A1 Sherman (Direct Vision Type)

Build Log: www.ltsmashsmodels.com

  • Member since
    May 2012
  • From: Japan
Posted by Frightful6_7 on Monday, August 13, 2012 3:37 AM

Heres what i have done to dayBig Smile

the paint was still drying when i took the pictures.  Smash what kit are you using?

http://i852.photobucket.com/albums/ab85/Tempest977/Rising%20Sun%20Group%20Build/zero1-2-1-2.jpg

  • Member since
    October 2008
  • From: italy
Posted by bsyamato on Monday, August 13, 2012 5:17 AM

Great progress and good work on the tanks guys Toast

Hope to get back soon with my kit

  • Member since
    August 2011
  • From: Variable
Posted by Lt. Smash on Thursday, August 16, 2012 1:56 AM

Frightful6_7, I'm using the Dragon El Alamein Sherman (#6447).

On the bench:  Tasca M4A1 Sherman (Direct Vision Type)

Build Log: www.ltsmashsmodels.com

  • Member since
    May 2012
  • From: Milford, Ohio
Posted by Old Ordie on Friday, August 17, 2012 10:01 PM

OK, finally back with some progress on the good old SBD.  I'm afraid that a decal disaster (Boo Hoo) has made my "Battle of Midway" build a "Battle of the Coral Sea" build instead.  I ended up using decals from five different sources to get the Coral Sea presentation, but at least I was able to scrape them together.  I used some from the SBD kit, some from my last build (SNJ), some from an Aero Master numbers set, some from a Starfighter Brewster Buffalo decal set, and two cut from decals in my stashed AM 1:72 F-4J kit that I know I won't need.

The worst part of the switch from Midway to Coral Sea has been the rudder, which I hand painted, having no stripes decals that were the right dimensions to even cut to fit ... then hand painted it over again the next day ... then yet again the day after that Bang Head.  Lesson learned - I will never try to hand paint an area that size ever again.  Next time, it's airbrush or nothing ...  I'm taking it the way it is, but am less than happy about it. 

The best thing about the switch is that I'm now doing aircraft number 10, Scouting Five (VS-5), USS Yorktown, the plane Stanley 'Swede' Vejtasa flew in the battle, and the one in which he shot down three Zeros in aerial combat over the Coral Sea.  That's right - he shot down three Zeros with the forward fixed .50s of his SBD (and was immediately afterward transferred to Fighting Ten, where he flew a Wildcat, and shot down seven more Japanese planes in a single day at the Battle of Santa Cruz).  Paying tribute to this particular Navy pilot is a heartfelt homage for me, as I served under Captain Vejtasa in 1968, when he was Commander Fleet Air Miramar - his last aviation command before he retired - and I was a ninteen year old aviation ordnanceman in one of his fighter squadrons (VF-121).

What I am also happy with is that all the detail painting is done along with the decaling.  I'll be putting another coat of Future on it in the morning, then, day after that, I'll be applying the wash.  Then comes the flat-coat, with some more scratching in the cockpit after that, finishing up painting the bomb and propeller, followed by final assembly  Geeked.  It is getting close to that time ...  Big Smile.

Here are some photos:

That's it for now, more when I have it.

Ordie

Flight deck:  Hasegawa 1:48 P-40E; Tamiya 1:48 A6M2 N Type 2 ('Rufe')

Elevators:  Airfix 1:72 Grumman Duck; AM 1:72 F-4J

  • Member since
    September 2009
  • From: Guam
Posted by sub revolution on Saturday, August 18, 2012 1:03 AM

Looks good to me, Ordie! And I love the backstory! Seems a very appropriate subject for you to make.

NEW SIG

  • Member since
    February 2011
  • From: Ontario, Canada
Posted by gunner_chris on Saturday, August 18, 2012 7:22 AM

I'm making decent progress with my spitfire but I won't have it done in time for the Diepe anniversary :(

Still a bit of painting to do, decals and finish off the canopy.

Might finish this week but not tommorrow.

  • Member since
    August 2011
  • From: Variable
Posted by Lt. Smash on Saturday, August 18, 2012 9:38 AM

Ordie, that is a great looking bird.  I'm sorry to hear about the decal disaster but you've made the most of it.  It looks sharp and I can't wait to see the final product.

On the bench:  Tasca M4A1 Sherman (Direct Vision Type)

Build Log: www.ltsmashsmodels.com

  • Member since
    September 2003
  • From: AandF in the Badger State
Posted by checkmateking02 on Saturday, August 18, 2012 11:34 AM

Looking very good, Ordie.  I'd have never had enough nerve to handpaint the tail.  

And, ah!  The decal disaster!  I've had it happen too many times:  everything perfect; everything fine.  And the very last steps, the decals--they shatter; they curl; they wrinkle; they silver; they don't settle.

It's a tragedy of Shakespearean proportions.

But you bounced back well.  It's a very appealing plane.  I've been waiting for someone to stock the re-release of Airfix's Dauntless, since I build only in 1/72.  I've got the Testors version sitting on a shelf--unopened, but I hear that one is horrendous.


  • Member since
    October 2008
  • From: italy
Posted by bsyamato on Saturday, August 18, 2012 12:15 PM

Nice dauntless Ordie !

  • Member since
    May 2012
  • From: Milford, Ohio
Posted by Old Ordie on Saturday, August 18, 2012 2:04 PM

checkmateking02

And, ah!  The decal disaster!  I've had it happen too many times:  everything perfect; everything fine.  And the very last steps, the decals--they shatter; they curl; they wrinkle; they silver; they don't settle.

It's a tragedy of Shakespearean proportions.

There is no greater truth than that, checkmateking02, LOL!  I lucked out on the extra decals I had handy.  If only some Dauntless rudder stripes had been among them ...

Thanks to all for the compliments and the encouragement.  I appreciate every bit of it.  You are a great bunch of build mates Smile

I'll expand just a bit on the 'Swede' Vejtasa Coral Sea story when I post my completion photos (but there may be another progress report before that, so stay tuned to the year 1942!).

Ordie

Flight deck:  Hasegawa 1:48 P-40E; Tamiya 1:48 A6M2 N Type 2 ('Rufe')

Elevators:  Airfix 1:72 Grumman Duck; AM 1:72 F-4J

GAF
  • Member since
    June 2012
  • From: Anniston, AL
Posted by GAF on Saturday, August 18, 2012 4:44 PM

Too bad about the decals, but she looks good nonetheless!  I'll watch the decals when I get around to building my Revell SBD.  Aftermarket might be a good idea.

Returning to 1942....

Carlson's Raiders begin withdrawing from Makin Atoll...

"At 09:00 on 18 August, the subs sent a rescue boat to stretch rope from the ships to the shore that would allow the remaining Raiders' boats to be pulled out to sea. But just as the operation began, Japanese planes arrived and attacked, sinking the rescue boat and attacking the subs, which were forced to crash dive and wait on the bottom the rest of the day. The subs were undamaged. At 23:08, having managed to signal the subs to meet his Raiders at the entrance to Makin Lagoon, Carlson had a team led by Lt. Charlie Lamb build a raft made up of three rubber boats and two native canoes, powered by the two remaining outboard motors. Using this raft, 72 exhausted Raiders sailed 4 miles from Butaritari to the mouth of the lagoon, where the subs picked them up."

USMC casualties were given as 18 KIA and 12 MIA. Of the 12 Marines missing in action, one was later identified among the 18 Marine Corps graves found on Makin Island. Of the remaining eleven Marines missing in action, nine were inadvertently left behind or returned to the island during the night withdrawal. They were subsequently captured, moved to Kwajalein Atoll, and executed by Japanese forces. Two are MIA.

And the Marines are fighting in a "Canal"?

  • Member since
    May 2012
  • From: Milford, Ohio
Posted by Old Ordie on Saturday, August 18, 2012 5:35 PM

GAF,

I was going to use decals from another kit as it was (the national insignia from the Revell SBD kit are kind of odd looking).  But, alas, I ruined one, and didn't have extra "non-red" ones like were in use at Midway, so had to cast about.  I highly recommend that you pre-provision with after-market decals, as you suggest you might (get extras).

The newspaper front you posted is amazing.  Can you imagine reading one like that every single day for four years?

Ord

Flight deck:  Hasegawa 1:48 P-40E; Tamiya 1:48 A6M2 N Type 2 ('Rufe')

Elevators:  Airfix 1:72 Grumman Duck; AM 1:72 F-4J

  • Member since
    August 2005
  • From: Los Angeles, CA
Posted by corvettemike on Tuesday, August 21, 2012 12:08 AM

I have alot on my plate at the moment so I'm gonna have to do a build swap here. I was initially going to do a 1/48 Spitfire Mk. II but I simply do not have the time to get it done along with everything else I need to do by the end of 2012. I'm instead going to do Tamiya's BMW R75 in 1/35 with sidecar. It's a small uncomplicated build I can actually meet the deadline with. 16,500 pieces were built between 1940-46 and saw action all over Europe and North Africa. I'll be doing mine in the Afrika Corps desert yellow scheme to appear as a R75 would have around the time of Tunisia or Operation Torch Nov 8-11, 1942.

Rise my brothers we are blessed by steel in my sword I trust...

Arm yourselves the truth shall be revealed In my sword I trust...

Havoc Models

  • Member since
    September 2003
  • From: AandF in the Badger State
Posted by checkmateking02 on Tuesday, August 21, 2012 1:33 PM

Say, Ordie, maybe you mentioned it and I missed it, but what brand of paint did you use on your SBD?  I have Navy Blue-Gray from both Testors MM and WEM Colourcoats, and yours doesn't look like either of them; although maybe its a computer-type variation.  I like the colors you used.


JOIN OUR COMMUNITY!

Our community is FREE to join. To participate you must either login or register for an account.

SEARCH FORUMS
FREE NEWSLETTER
By signing up you may also receive reader surveys and occasional special offers. We do not sell, rent or trade our email lists. View our Privacy Policy.