SEARCH FINESCALE.COM

Enter keywords or a search phrase below:

The Official 1942 70th Anniversary Group Build

78947 views
567 replies
1 rating 2 rating 3 rating 4 rating 5 rating
  • Member since
    May 2012
  • From: Milford, Ohio
Posted by Old Ordie on Tuesday, August 28, 2012 8:23 PM

All,

I added the photo below to my original completion post above.  I regret the oversight.

  Lt. Stanley 'Swede' Vejtasa, USN, circa 1942/43

Later,

Ordie

Flight deck:  Hasegawa 1:48 P-40E; Tamiya 1:48 A6M2 N Type 2 ('Rufe')

Elevators:  Airfix 1:72 Grumman Duck; AM 1:72 F-4J

  • Member since
    May 2012
  • From: Milford, Ohio
Posted by Old Ordie on Tuesday, August 28, 2012 8:00 PM

GAF - I'll write up the build a little, after a bit, and share some of what I did with the kit.  And there was more that could have been done.  Edit - I gotta confess, I did the radio antenna three times.  that's where the big glob of CA on the antenna mast came from, LOL! - end Edit

Stik - Don't have a reference for the color, other than 'light grey'.   Was reading about it on a website, how the Navy painted their bombs into at least early 1943, and 'light grey' was the color.  I used Navy logic on it, and decided to go with the under-color of the aircraft, which is US Light Grey (Vallejo). (All the iron bombs I ever saw were green, the real ones, I mean,  LOL!)  http://tailspintopics.blogspot.com/2010/01/us-navy-bombs-up-through-wwii.html

checkmateking02 - Thanks, man.  I appreciate it.

Later,

Ordie

Flight deck:  Hasegawa 1:48 P-40E; Tamiya 1:48 A6M2 N Type 2 ('Rufe')

Elevators:  Airfix 1:72 Grumman Duck; AM 1:72 F-4J

  • Member since
    September 2003
  • From: AandF in the Badger State
Posted by checkmateking02 on Tuesday, August 28, 2012 7:09 PM

Really nice looking SBD, Ordie.  You've done a fine job.  And an excellent tribute to Captain Vejtasa.  It's a very appealing aircraft.


  • Member since
    July 2004
  • From: Sonora Desert
Posted by stikpusher on Tuesday, August 28, 2012 6:17 PM

Great work on the SBD Ordie! I really love the finished buildYes What made you go with gray on the bombs? I know pics of early war SBDs show them in gray, but do you have a good reference as to what shade of gray was used?

I cant even recognize that old prop... she looks great Toast


F is for FIRE, That burns down the whole town!

U is for URANIUM... BOMBS!

N is for NO SURVIVORS...

       - Plankton

LSM


GAF
  • Member since
    June 2012
  • From: Anniston, AL
Posted by GAF on Tuesday, August 28, 2012 6:11 PM

Outstanding job!  The aerials are really good, and the weathering is subtle and not over-powering.  The prop looks like it was always there.  I like!

And great background on "Swede".  Smile

Gary

  • Member since
    May 2012
  • From: Milford, Ohio
Posted by Old Ordie on Tuesday, August 28, 2012 5:44 PM

sub revolution, everyone, my 'Swede' Vejtasa Coral Sea Tribute is finished.  I was so anxious to share it that I took pictures outside (to show the actual color) after the sun was well down below the treeline.  I'll take more tomorrow when the sun is up.

Aircraft number 10, Scouting Five, USS Yorktown

Dateline May 8, 1942 - the second day of the Battle of the Coral Sea:  The carrier Shoho having been mortally wounded in the previous day's fighting, the Japanese Navy pilots were out for blood.  With many of the American F4F Wildcats off on other combat assignments, SBD-3 Dauntless dive bombers were pressed into service flying CAP over the American fleet. They were briefed to watch for, and to attack, enemy torpedo planes and dive bombers.  Theirs was a desperate bid to protect the carriers Yorktown and Lexington from the determined Japanese counter-punch.  A flight of six of those SBD's, from Scouting Five (VS-5) aboard the Yorktown, soon found itself the object of an attack by a dozen swarming IJN Zeros that quickly sent two of the SBD's spiraling down in flames.

A hundred miles per hour slower, far less agile and lightly armed relative to their adversaries, the situation seemed bleak for the remaining four Dauntlesses.  Flying VS-5 aircraft number 10, Lt. Stanley 'Swede' Vejtasa toggled the intercom and spoke to his radio/gunner in the rear cockpit.

"Son," he said, "we're in a scrap.  Keep your head and conserve your ammunition … I'll take care of the rest."

His radio/gunner kept his head that day, and, by judicious use of his swiveling .30 caliber machine gun, kept the SBD's flanks and rear clear of the swift Japanese fighters.  'Swede' Vejtasa, as good as his word, took care of the rest.  Maneuvering himself into successive head-on situations with three different Zeros - the only tactic that gave him anything remotely like an even chance - he sent each in turn spinning into the sea with deadly-accurate bursts from his two forward fixed .50's.  Shortly after the battle, Vejtasa was transferred from dive bombers to fighters, ending up on the Enterprise, flying a Wildcat with the legendary Fighting Ten (VF-10) Grim Reapers.

For shooting down three Zeros over the Coral Sea (and for scoring a direct hit on the Shoho the day before - both deeds are mentioned in the citation, along with other of his exploits in the battle), Lt. Stanley 'Swede' Vejtasa was awarded his second Navy Cross, the Navy Department’s equivalent of the DSC.  The first had been awarded Lt. Vejtasa for his sinking of a Japanese seaplane tender while flying an SBD at Salamaua and Lae, New Guinea, on March 10, 1942, scoring a direct hit on the hapless ship with his centerline ordnance.  His third Navy Cross was awarded for shooting down seven Japanese planes (two Vals and five Kates) on October 26, 1942, before running out of ammunition while defending the 'Big E' during the Battle of Santa Cruz.  Lt. Stanley 'Swede' Vejtasa finished the war with 11 aerial victories.  He was assigned in April, 1943 to the task of training new fighter pilots at NAS Atlantic City, New Jersey.

Stanley Vejtasa exemplifies  those Americans who, in the darkest days of 1942, took obsolescent ships and aircraft into harm's way, and, with gallant disregard for personal safety, brought an end to Imperial Japan's military expansion in the Pacific.  I dedicate this reproduction of aircraft number 10, VS-5, USS. Yorktown, to him. 

  Lt. Stanley 'Swede' Vejtasa, USN, circa 1942/43

Hand salute.

As I have written here before, I had the privilege of serving under Captain Vejtasa for the better part of 1968, when he was Commander Fleet Air Miramar (his last aviation command), and I was a ninteen year old Aviation Ordnanceman in one of his fighter squadrons (VF-121).  (I guess that gives me a scant two degrees of seperation from The Battle of the Coral Sea, May 7 and 8, 1942 ... )

And now, more photos of the plane:

Thanks to sub revolution for throwing the build, and for letting me join.  Thanks to Stikpusher for giving me the prop that made the unintentional SBD-4 that came in the kit into an SBD-3.  Thanks to all y'all for being great build-mates.  I'll be around ...

Ordie Cool

Flight deck:  Hasegawa 1:48 P-40E; Tamiya 1:48 A6M2 N Type 2 ('Rufe')

Elevators:  Airfix 1:72 Grumman Duck; AM 1:72 F-4J

  • Member since
    October 2008
  • From: italy
Posted by bsyamato on Tuesday, August 28, 2012 8:53 AM

Great updates here guys Toast

  • Member since
    September 2009
  • From: Guam
Posted by sub revolution on Tuesday, August 28, 2012 6:35 AM

I agree. Looks great!

NEW SIG

  • Member since
    May 2012
  • From: Milford, Ohio
Posted by Old Ordie on Sunday, August 26, 2012 7:08 PM

I've yet to get any of that weathering stuff right myself, in my own eyes anyway.  All I'm trying to do is get a simple wash on there so that it highlights details and looks a little dirty.  (Weathering can be used to hide boo boos, too, seems to me Wink.)

Flight deck:  Hasegawa 1:48 P-40E; Tamiya 1:48 A6M2 N Type 2 ('Rufe')

Elevators:  Airfix 1:72 Grumman Duck; AM 1:72 F-4J

  • Member since
    September 2003
  • From: AandF in the Badger State
Posted by checkmateking02 on Saturday, August 25, 2012 4:17 PM

Thanks, Len and stik, for the suggestions.  I'll probably give something a try, next build I start on.


  • Member since
    July 2004
  • From: Sonora Desert
Posted by stikpusher on Friday, August 24, 2012 1:37 PM

Checkmate, just give it a shot and you will find that you are pleasantly suprised at how simple some of these techniques are. Just like Troublemaker says. And having an old build to experiment upon using various techniques is a great idea. I had an old Monogram P-51B that took on a funny appearance as I attempted pre shading and post shading with my airbrush. One suggestion before trying those- no caffeine ;-)


F is for FIRE, That burns down the whole town!

U is for URANIUM... BOMBS!

N is for NO SURVIVORS...

       - Plankton

LSM


  • Member since
    July 2007
  • From: Southern New Jersey
Posted by troublemaker66 on Friday, August 24, 2012 4:53 AM

[quote user="checkmateking02"]

[/quote......  I don't do weathering so well.  Only recently got up enough nerve to try some pinwashes--but all that pre-shading, post-shading, salt-masking, etc. etc--intmidating.


[/quote]I had a boss, back when I first started with the phone company, who would say to the new guys, "the devil hates a coward" and, "ain`t nothin` you can f#@$% up that can`t be fixed"....his sayings hold true with modeling. I was the same way and just decided to try weathering, realized how easy it was and now do some form of it on every kit I build. There`s tons of step-by-step tutorials on the web to help ya out. Try some pre-shading 1st...the most forgiving type...don`t like it, you just paint over it and try again! I,and many others, have a paint mule to try out different techniques before using on a real build...good way to build up confidence. Good luck Brother!

Len

Len Pytlewski

  • Member since
    September 2003
  • From: AandF in the Badger State
Posted by checkmateking02 on Thursday, August 23, 2012 6:07 PM

stikpusher

Checkmate, I don't think I can ever get bored with USN aircraft. You can have too much fun with the finish, from lightly weathered to beat to snot. Especially a well used PTO bird.

 
Well, there's the problem for me right there, Stik.  I don't do weathering so well.  Only recently got up enough nerve to try some pinwashes--but all that pre-shading, post-shading, salt-masking, etc. etc--intmidating.
 
SBD is looking good, Ordie.


  • Member since
    May 2012
  • From: Milford, Ohio
Posted by Old Ordie on Thursday, August 23, 2012 5:38 PM

Thanks, Stik.

Flight deck:  Hasegawa 1:48 P-40E; Tamiya 1:48 A6M2 N Type 2 ('Rufe')

Elevators:  Airfix 1:72 Grumman Duck; AM 1:72 F-4J

  • Member since
    July 2004
  • From: Sonora Desert
Posted by stikpusher on Thursday, August 23, 2012 4:17 PM

YesLookin' good to me Ordie Stick out tongue


F is for FIRE, That burns down the whole town!

U is for URANIUM... BOMBS!

N is for NO SURVIVORS...

       - Plankton

LSM


  • Member since
    May 2012
  • From: Milford, Ohio
Posted by Old Ordie on Thursday, August 23, 2012 3:19 PM

Last update before completion ...

I put one too many coats of matte varnish on her, I think.  I also over-dirtied her with wash (though my general view is that you can't put too much dirt and sludge on a Navy plane, especially if you are portraying one under protracted combat conditions).

I'll be finishing up inside a week.  Until then, here are the last 'in-progress' pictures.  I took them outdoors, so the actual color of the paint shows (with one top view indoor shot at the end so you can see the difference the light makes - and, BTW, it looks a lot different than I thought it did ...):

The dive brakes open and close, and I didn't have them open at equal angles when I shot the photos, so they look a little unbalanced in the pictures.  All my wash jobs have been overdone so far (four planes and a ship) - maybe someday I'll get the hang of it.  As for the excessive flat-coat varnish, that's just too bad, and I guess I'll just have to live with it ...

Later,

Ordie

Flight deck:  Hasegawa 1:48 P-40E; Tamiya 1:48 A6M2 N Type 2 ('Rufe')

Elevators:  Airfix 1:72 Grumman Duck; AM 1:72 F-4J

  • Member since
    July 2004
  • From: Sonora Desert
Posted by stikpusher on Thursday, August 23, 2012 2:18 PM

Thanks Ordie. Currently I am posting what little work I have done on it lately in the No More Excuses 2, Git 'er Done GB. I dont remember where I was posting work on it before this build has been going on for longer than I have been on FSM. I honestly can say that I have been working on this SBD kit since before I had a digital camera or a home computer- sometime in the mid to late 1990s is when I started. It is that old of a project. Of course each time I ran into a snag I sidelined it for untold time. But now finish line is actually in sight. And yes It can be a very nice addition to any collection. All one needs is time, patience, a few AM replacement parts and/or some salvaged stuff from the spares bin, and a good reference source. If I were to start it now, with all that I have learned in techniques it would be even better.


F is for FIRE, That burns down the whole town!

U is for URANIUM... BOMBS!

N is for NO SURVIVORS...

       - Plankton

LSM


  • Member since
    May 2012
  • From: Milford, Ohio
Posted by Old Ordie on Thursday, August 23, 2012 2:04 PM

Lt. Smash - Your Sherman is looking great.  I can't wait to see it when it's complete Stick out tongue.

Stik - Welcome to 1942!  I advise everyone to keep checking out your SBD, wherever you are posting it (Stikpusher has done most of the modifications to his kit I was too faint-hearted to try ...).  This kit can make a creditable addition to any collection, if all the necessary mods are done to it.

Flight deck:  Hasegawa 1:48 P-40E; Tamiya 1:48 A6M2 N Type 2 ('Rufe')

Elevators:  Airfix 1:72 Grumman Duck; AM 1:72 F-4J

  • Member since
    July 2004
  • From: Sonora Desert
Posted by stikpusher on Thursday, August 23, 2012 1:04 PM

Lt Smash, thanks for the enlightenment on soldering those sand shields. I have that same kit in my stash and have not done any soldering in well over 30 years since high school Electronics class. I do recall reading that those sand shields were a bit of a bear to tackle.

Checkmate, I don't think I can ever get bored with USN aircraft. You can have too much fun with the finish, from lightly weathered to beat to snot. Especially a well used PTO bird.


F is for FIRE, That burns down the whole town!

U is for URANIUM... BOMBS!

N is for NO SURVIVORS...

       - Plankton

LSM


  • Member since
    September 2003
  • From: AandF in the Badger State
Posted by checkmateking02 on Thursday, August 23, 2012 12:32 PM

Excellent work, Lt. Smash.  Soldering is far too intimidating to me, ever to try it again.  You've done a nice job here.


  • Member since
    September 2003
  • From: AandF in the Badger State
Posted by checkmateking02 on Thursday, August 23, 2012 12:29 PM

Stik:  that is a radically different shade from the others.  Thanks for posting yet another variation.  I would think no one would be bored with Navy planes, given this wide latitude in color interpretation.


  • Member since
    August 2011
  • From: Variable
Posted by Lt. Smash on Thursday, August 23, 2012 10:27 AM

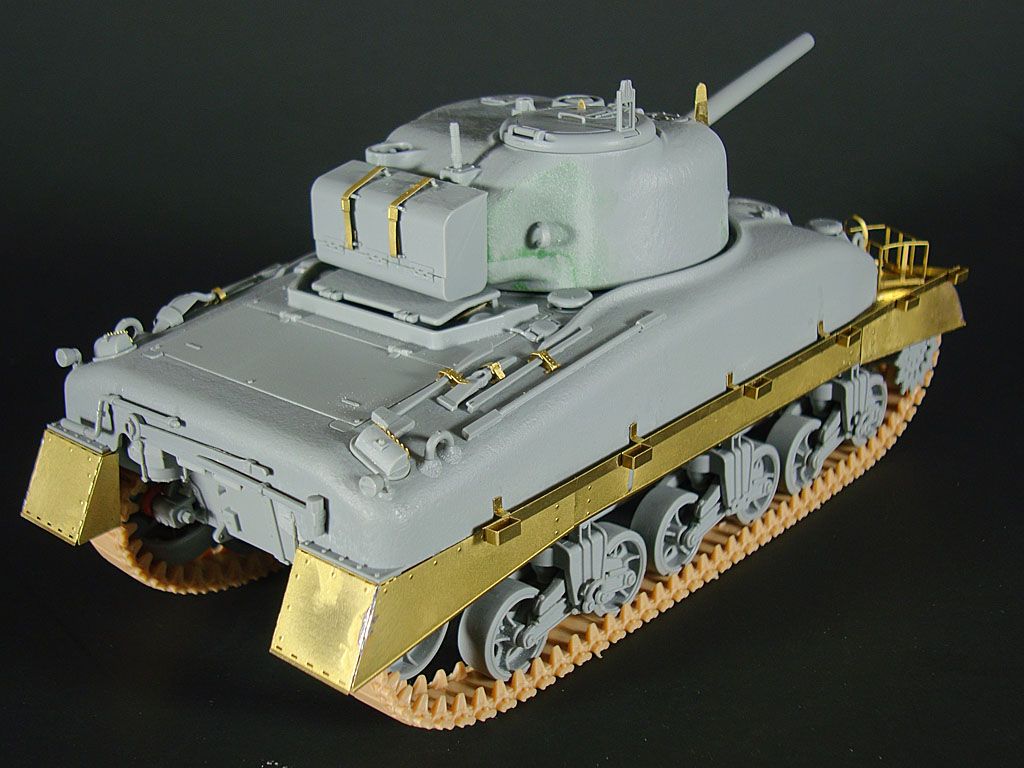
Sherman II at El Alamein: Construction (Final Assembly)

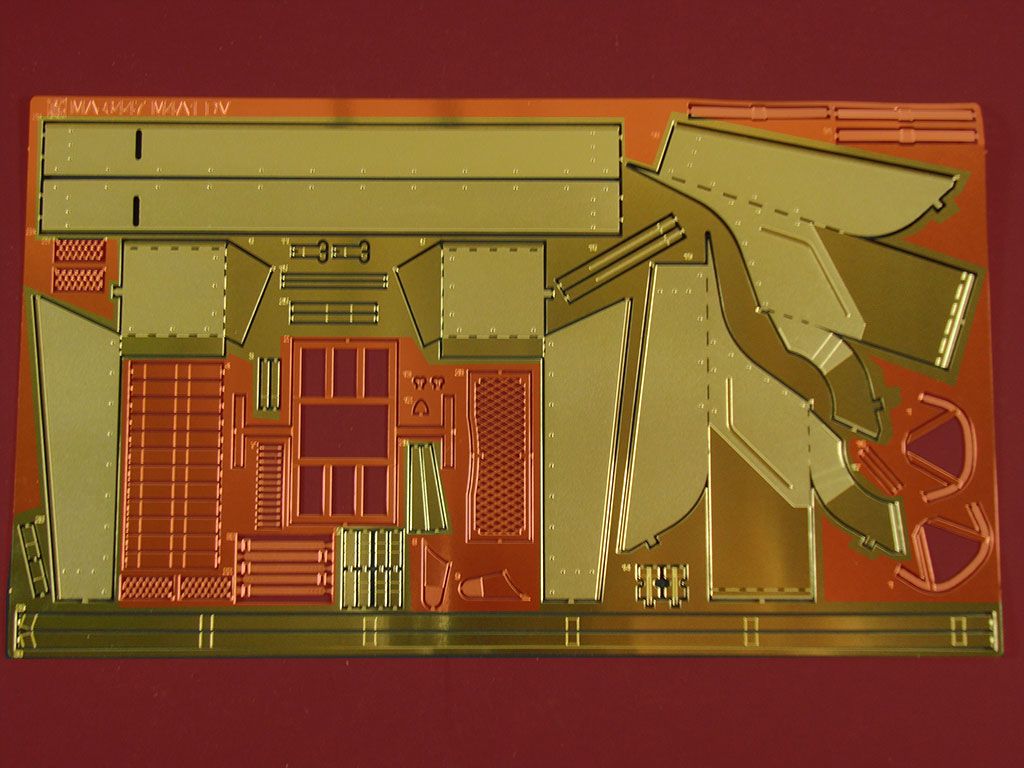
I’m in the home stretch for assembly now. The last things on the list – and they are big things – are the photo-etch sand shields.

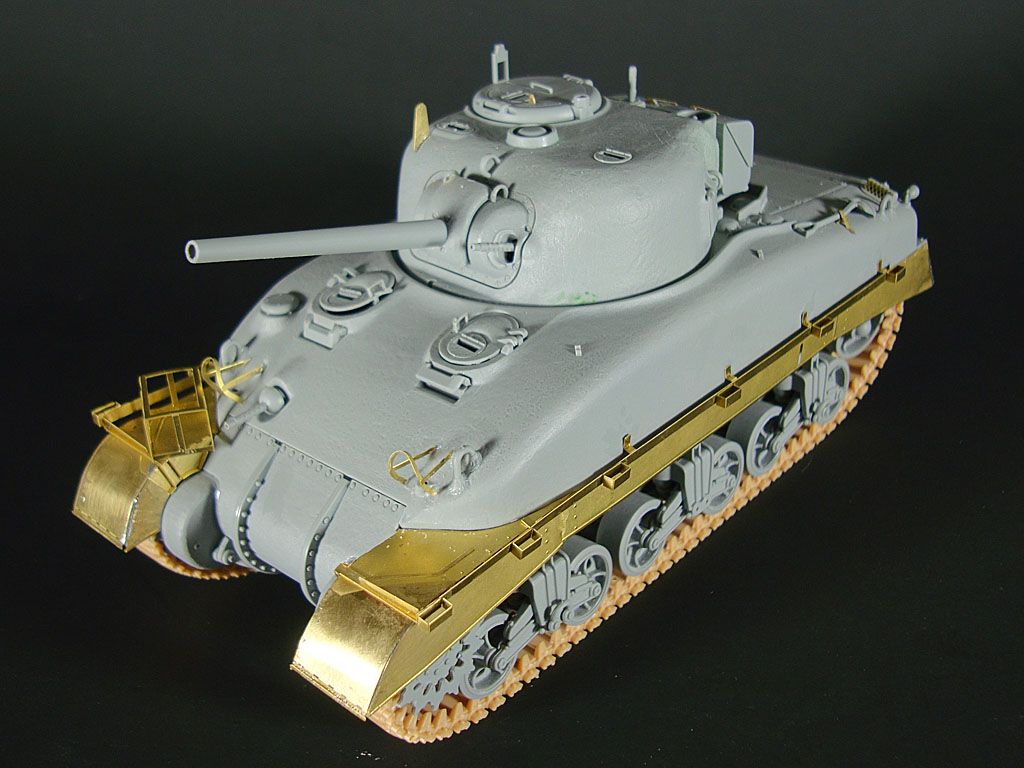
The sand shields consist of many PE parts but the main structure – and there is one on each side – consists of three large pieces: the front “fender” which curves around from the transmission cover to the side, a flat panel which runs about three-quarters of the length of the tank, and the rear “quarter panel” which covers the last quarter and takes a sharp 90-degree turn around the back to the air filters and exhaust. In addition to the big pieces, each shield gets a handful of details.

If you’ve read any other modelers posts on these beasts, they sound quite intimidating.  Still, I thought, “How bad can it be?  I’m sure some thick CA and CA accelerator can handle this.”  But, after I started folding them, I had second thoughts.  Of all the parts, the ones that had me most concerned were the front fenders which need to be rounded something less than a perfectly round arc.  After playing with it, I realized that the only way to get it all to fit together nicely and stay was to solder it.

Being my first foray into soldering, I read about how to solder PE on the internet, went to RadioShack buy a soldering iron and supplies, reread the internet articles, and plunged in at my first attempt at soldering.  After the fact, I found this great article about soldering Sherman fenders from Dragon kits which I highly recommend to anybody about to embark on a similar project. 

For those that haven’t soldered before, there are two approaches to it:

The first – which is the “correct” way according to the internet authors – is to apply flux and a small piece of solder to the joint that you want to assemble and then heat the part with the soldering iron.  Eventually, the part will get so hot that the solder will melt.  When, it does, you simply remove the soldering iron. The solder hardens as it quickly cools and the joint is secure.

The second – which is the “incorrect” way – is to apply solder to the soldering iron and “paint” the solder against the joint that you want to assemble.  Again, when you remove the soldering iron, the solder hardens as it cools and the joint ends up being secure. Apparently, this is “incorrect” because it can foul your tip and, based on experience, it is less precise.

I tried both approaches both out of curiosity and out of necessity.  I definitely prefer the heat-the-part method but I struggled with it.  I think I struggled for three reasons.  First, I bought a 25-watt soldering iron and had a tough time getting my solder to melt by heating the part.  I may want to try a 30- or 45-watt soldering iron in the future.  Second, I used silver solder which, as I read later, is more difficult to use than traditional lead solder.  It has a higher melting point (which may have been exacerbated by my first point).  Third, I had very thin solder which tended to leak between the gap in the joint rather than fill the gap which I had expected/hoped.  I think a thicker lead solder may have filled the joint better even after it melted.  All of these hypotheses can be put to test later on because I’m excited to try soldering again in the future.

Back to the build: since this was my first time soldering, I started with the rear quarter panels. The shape was square, and the fit was better.  So, I figured it would be easier.  I was right.  I tried each method with the quarter panels with some success.  I had quite a bit of solder leak through the joint in my first attempt in which I tried the heat-the-part method.  I tried the paint-the-solder approach with the second piece and ended up with a better looking joint but used a lot more solder.  Still, the joint was secure and looked pretty good.

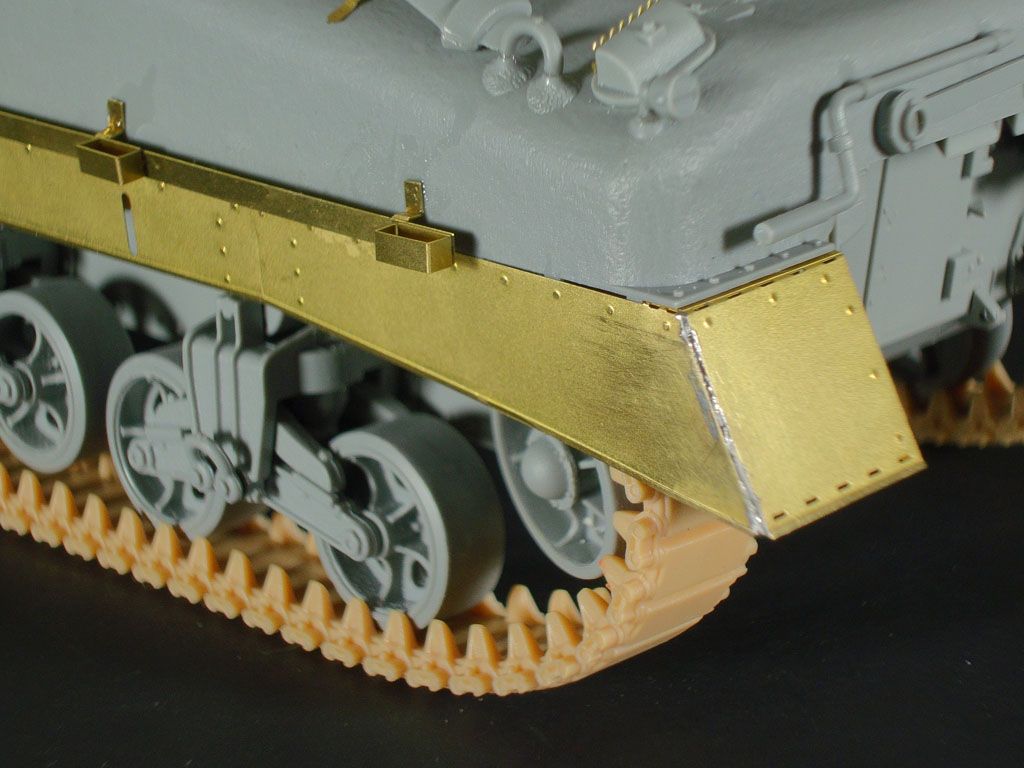
With a little confidence under my belt, I started work on the front fenders.  As I mentioned the fenders need to be curved.  I ended up taking a dowel and rolling the PE against the dowel to get the approximate shape.  Then, I tried to make small adjustments to fit the top, curved piece to the sides. Finally, I took thin strips of low-tack blue tape to hold the part as I wanted it.

The fenders have small tabs which help align everything.  I tried to tack down with a small piece of solder.  Unfortunately, I couldn’t get it to stay.  As I applied more solder and heated the part, the small piece of solder would melt again, and the part would pop apart.  In the end, I painted the solder into the joint on both parts.  Even this was a trick because as the part heated up, the glue melted on the tape and the joint would pop unless there was some solid solder in critical sections of the joint.

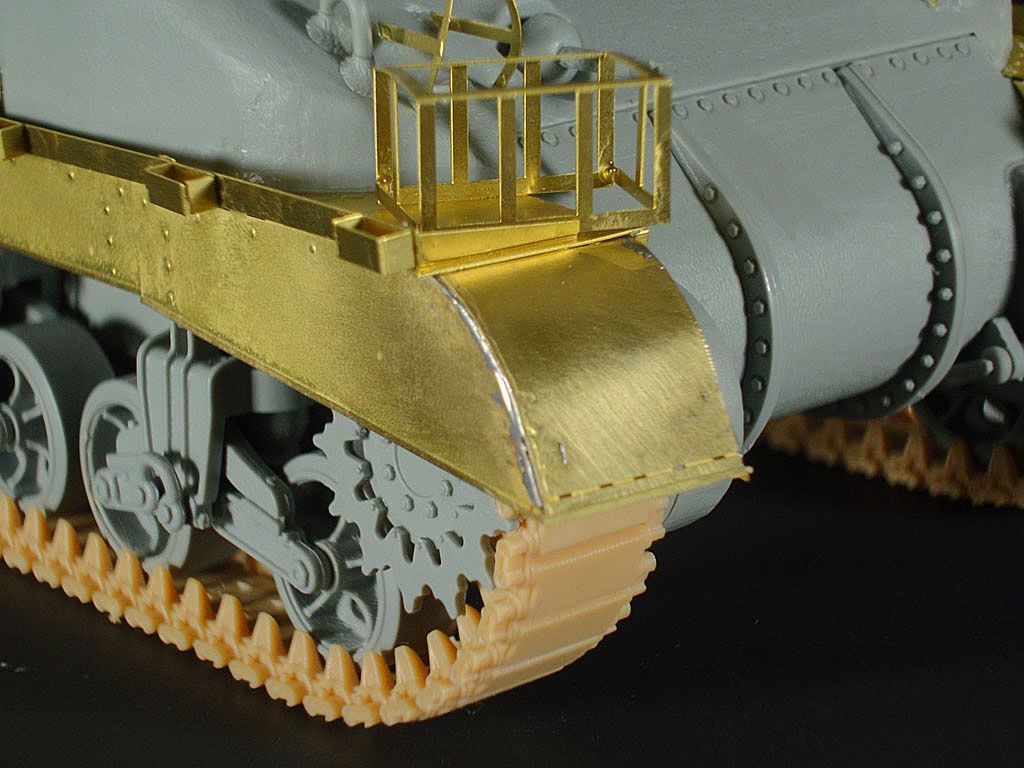
With the soldering done, I used CA to glue small rails/guides to the front fenders that created a horizontal lip to cover the seem between the fenders and the lower hull and to provide a place for the fenders to rest on the hull, providing them with necessary strength. 

Next, I glued the three-pieces of each sand shield to the upper hull.  The contact point between the PE and the hull is very small.  So, to join these parts together, I used small amounts of thin CA to tack each part in place.  Then, I applied a liberal amount of thick CA to the underside of the upper hull to strengthen the joint and let it dry. 

My two disappointments were:

  1. The seams between the panels are fairly conspicuous. While I can see similar seam in reference photos, they do not look as pronounced as on my model.  In hindsight, I wonder if I should have soldered all three pieces together before attaching them to the model.  I chose not to because I was concerned that the three pieces would not fit perfectly but I’m still not sure what the right answer is.
  2. The front left fender is not squarely attached to the upper hull and appears to dip a little compared with the right one.  This is user error and nothing wrong with the kit.  And, while this arguably looks like it may be worn and make it more authentic, I would have preferred it to look a little more symmetrical.

Finally, with the sand shields secure, I was able to add the final PE details. 

Now, while things look mostly finished, I still have a punch list to which glue needs to be applied:

  • the bogies, sprockets and idlers are not glued to the lower hull
  • the track is not yet installed
  • the lower and upper hulls have not been joined,
  • the “a” and “b” antennae for the radio need to be cut and glued in place, and
  • I have several periscopes to install. 

However, I need to get paint on this bad boy before I stick all that stuff together.  So, next time: paint.  Can’t wait!


On the bench:  Tasca M4A1 Sherman (Direct Vision Type)

Build Log: www.ltsmashsmodels.com

  • Member since
    July 2004
  • From: Sonora Desert
Posted by stikpusher on Wednesday, August 22, 2012 9:57 PM

Holy smokes I need to start paying attention to what is going on in here!Surprise I will be starting my TBD shortly after I get one more WIP build clear of my workbench.  

Ordie and Checkmate, just for discussion purposes, here is another shade of USN Blue Gray, this one from Aeromaster (a discontinued paint line). It is bluer that what any of you guys have posted so far. The same SBD kit as Ordies. Mine is gonna be in VS-71 markings during Guadalcanal I have decided upon after researching the Bu, No. of the aircraft.


F is for FIRE, That burns down the whole town!

U is for URANIUM... BOMBS!

N is for NO SURVIVORS...

       - Plankton

LSM


  • Member since
    May 2012
  • From: Milford, Ohio
Posted by Old Ordie on Wednesday, August 22, 2012 3:30 PM

checkmateking02

... I kind of like using different paints with different appearances.  It  keeps everything from looking the same.

Yep.  I try not to fret too much about shades of paint, 'cause that's not fun.  But I do know what I like Wink.

Flight deck:  Hasegawa 1:48 P-40E; Tamiya 1:48 A6M2 N Type 2 ('Rufe')

Elevators:  Airfix 1:72 Grumman Duck; AM 1:72 F-4J

  • Member since
    September 2009
  • From: Guam
Posted by sub revolution on Wednesday, August 22, 2012 5:39 AM

Corvette mike- Your build is updated. Looking forward to it!

NEW SIG

  • Member since
    September 2003
  • From: AandF in the Badger State
Posted by checkmateking02 on Tuesday, August 21, 2012 9:56 PM

Well, your humble opinion is as good as any, and I kind of like using different paints with different appearances.  It  keeps everything from looking the same.


  • Member since
    May 2012
  • From: Milford, Ohio
Posted by Old Ordie on Tuesday, August 21, 2012 5:42 PM

checkmateking02

... I wonder who is closest to being right?  Could there have been that much variation in the original product? 

Yes, I think there is reason to believe that back in 1942-'43, before production was ramped-up and standardized and lines of supply firmly established, that the boatswains and even the manufacturers were 'making do', and that shades of paint varied from place-to-place and time-to-time.  Also, camera lenses and film of the period leave much to be desired, both color (especially blue) and stability wise.  That said, I'm also sure that the actual specified blue grey paint (or components) was (were) available most places at least some of the time.  Short of asking a WWII vet who has actually seen it, I'm not sure how we can know for sure, but I'm hoping for deliverance on that.  Until then, I have an idea of what I think it might have looked like (visibly blue, but muted down pretty good with grey).  The mid-war and late-war camo paints were probably more universally available and more consistantly formulated place-to-place (and besides, the overall sea blue paint scheme lasted well into the 1950's, so we have better references for that).  Just my humble opinion.

Flight deck:  Hasegawa 1:48 P-40E; Tamiya 1:48 A6M2 N Type 2 ('Rufe')

Elevators:  Airfix 1:72 Grumman Duck; AM 1:72 F-4J

  • Member since
    September 2003
  • From: AandF in the Badger State
Posted by checkmateking02 on Tuesday, August 21, 2012 4:51 PM

I have never had any kind of luck spraying acrylics, so I stear clear of them now and only use enamels.  Too bad, since I do like the way your Navy colors turned out.

As for variations of the colors from different sources, I'd agree.  I'm going to check my photobucket here.  OK, back again, with photos posted.

I built a 1/72 Wildcat years ago and used MM.  Then I built some 1/700 Devastators for USS Lexington, using WEM Colourcoats.  I was astonished at the vast difference.  WEM is much, much darker than MM, and MM is definitely more blue-gray than blue-gray, and pretty light besides.  I think you can see the difference in the photos below, despite being on a computer monitor.

Both of these photos would have been taken under similar conditions, using the camera-mounted flash, in the kitchen, under those new light bulbs we all have to buy now days.

I wonder who is closest to being right?  Could there have been that much variation in the original product? 


  • Member since
    May 2012
  • From: Milford, Ohio
Posted by Old Ordie on Tuesday, August 21, 2012 3:44 PM

checkmateking02

Say, Ordie, maybe you mentioned it and I missed it, but what brand of paint did you use on your SBD?  I have Navy Blue-Gray from both Testors MM and WEM Colourcoats, and yours doesn't look like either of them; although maybe its a computer-type variation.  I like the colors you used.

I like them, too.  They're Vallejo Model Air US Blue Grey - 71.114, and Vallejo Model Air US Grey Light - 71.045.  Acryllics.  They went through my airbrush fine right out of the bottle.  I have some unopened MM Blue Grey acryllic on hand, and so haven't yet compared the two.  I've read that there are some significant shade differences among various manufacturer's blue grey paints, and was happy I liked the colors of both of the Vallejo paints, the first I've tried (I get lucky right out of the gate sometimes Smile).  I'll probably stick with them for early WWII Navy camo (or some MM toned to look like the Model Air, LOL!).

As for the shade you see in the photos, they were taken without flash under mostly flourescent light.  The shade in the photos is a bit off in a flourescent light kind of way, if you know what I mean (I don't have the technical vocabulary for this).  But it is not all that much different, and the actual blue grey color in natural light is even more like what I think that color should look like than it appears in the photos.  (We're all just guessing what it really looked like, I think, so season to taste ... Wink.)

Flight deck:  Hasegawa 1:48 P-40E; Tamiya 1:48 A6M2 N Type 2 ('Rufe')

Elevators:  Airfix 1:72 Grumman Duck; AM 1:72 F-4J

  • Member since
    September 2003
  • From: AandF in the Badger State
Posted by checkmateking02 on Tuesday, August 21, 2012 1:33 PM

Say, Ordie, maybe you mentioned it and I missed it, but what brand of paint did you use on your SBD?  I have Navy Blue-Gray from both Testors MM and WEM Colourcoats, and yours doesn't look like either of them; although maybe its a computer-type variation.  I like the colors you used.


JOIN OUR COMMUNITY!

Our community is FREE to join. To participate you must either login or register for an account.

SEARCH FORUMS
FREE NEWSLETTER
By signing up you may also receive reader surveys and occasional special offers. We do not sell, rent or trade our email lists. View our Privacy Policy.