SEARCH FINESCALE.COM

Enter keywords or a search phrase below:

Steel Cats (Sept. 2012-Aug. 2013)

322302 views
3330 replies
1 rating 2 rating 3 rating 4 rating 5 rating
  • Member since
    April 2006
  • From: ON, Canada
Posted by jgeratic on Saturday, October 27, 2012 3:08 PM

Ben, great job on the camou Yes - it really looks the part.  One method I found that helps with a busy pattern is to slightly water down the colour(s) and apply with a hairy stick.  Then go back over with an airbrush to get the feathered edges.  Not the way it actually was done out in the field, but at this scale it does make it easier to gauge the position of each portion of the patterns.  Since the surface is covered in zim, that might not work as well if you load the brush too much as it will run all over the place, so a pencil of the appropriate colour might be better.

Good question about the use of satin finish.  I think it's use is more for scale effect.  An example would be the WW1 fighters that  had clear doped surfaces - satin would look better compared to a high gloss finish, the latter making it too toy like.  As for sealing decals, I think gloss might be slightly better, but I could be wrong.

Steel road wheels - no doubt there is more than one way of painting these.  You can try painting them a flat grey with a hint of brown, and then rubbing on some graphite.

regards,

Jack

Carl, just saw your wheels - good stuff Yes

  • Member since
    September 2009
  • From: Rugby, England
Posted by Hinksy on Saturday, October 27, 2012 4:18 PM

Hi guys,

Cheers for the comments!

Shellback - I'm going to try that method of yours - definately! I've got a couple of chunky 2B Graphite sticks and have just tried one wheel now. The effect is superb!

Ben

:-)

On the Bench - Dragon Pz. IV Ausf. G (L.A.H.) Yes

Your image is loading...


  • Member since
    March 2006
  • From: Right Side of a Left State
Posted by Shellback on Saturday, October 27, 2012 5:39 PM

Ben ........Good ! Let me know if you any problems / questions .Toast

  • Member since
    November 2009
  • From: SW Virginia
Posted by Gamera on Saturday, October 27, 2012 6:08 PM

Marc: all she needs is a dusty dirt road to drive down.

Ben: coming right along!

Carl: thanks for the photos. I'm doing steel road wheels and figured I'd just hit them with a little steel paint, love what you've done there- think I'll do the same.

Btw: don't have any postcards but what the heck:

Beautiful sunny pre-hurricane Florida. Thankfully it blew right past here and today was really nice:

Sorry she's not an AFV but I stopped by to see the second USS Yorktown:

"I dream in fire but work in clay." -Arthur Machen


  • Member since
    March 2003
  • From: Rain USA, Vancouver WA
Posted by tigerman on Saturday, October 27, 2012 9:18 PM

Ben- Sweet camo. It really looks the part.

Carl, I'm running out of words to praise you my friend. The wheel look sweet.

Cliff, love the York. That is an Essex-class carrier isn't it? It appears pretty modified, but I love the original class myself. My fave US carrier class.

   http://i7.photobucket.com/albums/y269/wing_nut_5o/PANZERJAGERGB.jpg

 Eric 

  • Member since
    November 2009
  • From: SW Virginia
Posted by Gamera on Saturday, October 27, 2012 9:36 PM

Yeah, she's CV-10 the second carrier. The first York was sunk at Midway. In 1955 the second ship got an angled deck and enclosed bow to handle jets like the F9F Panther.

"I dream in fire but work in clay." -Arthur Machen


  • Member since
    March 2003
  • From: Rain USA, Vancouver WA
Posted by tigerman on Saturday, October 27, 2012 11:58 PM

I mean that I loved the Essex-class carriers.

I noticed the hurricane bow and that was the noticable difference,

   http://i7.photobucket.com/albums/y269/wing_nut_5o/PANZERJAGERGB.jpg

 Eric 

  • Member since
    March 2006
  • From: Right Side of a Left State
Posted by Shellback on Sunday, October 28, 2012 12:43 AM

Clay the ocean looks a little rough , was that the storm in S.C. ? I was reading about the Yorktown . Looks like she was about ready to be scrapped . Glad she will be saved . Thanks for the pics .

  • Member since
    November 2009
  • From: SW Virginia
Posted by Gamera on Sunday, October 28, 2012 6:02 AM

Eric: ok sorry mistook your meaning there.

Carl: thanks. And the storm photo was taken in Florida Friday evening as the hurricane heads up the Eastern seaboard. Didn't hit down here, I think it's still on to hit the mid-Atlantic later this week.

"I dream in fire but work in clay." -Arthur Machen


  • Member since
    March 2006
  • From: Right Side of a Left State
Posted by Shellback on Sunday, October 28, 2012 1:50 PM

Everyone is holding their breath waiting to see what "Sandy" wii do .........................

  • Member since
    March 2006
  • From: Right Side of a Left State
Posted by Shellback on Sunday, October 28, 2012 1:53 PM

Marc , nice looking kit . Yes

  • Member since
    March 2006
  • From: Right Side of a Left State
Posted by Shellback on Sunday, October 28, 2012 1:55 PM

Cable spool came out great also .Yes

  • Member since
    September 2009
  • From: Rugby, England
Posted by Hinksy on Sunday, October 28, 2012 2:26 PM

Hi guys,

Just a quick update for today:

I'm supposed to be working from home today but it's been mega quiet so I've been able to get a nice bit done!

First off on with the decals and then and overall layer of varnish as I'm planning to keep washes to mainly pin-type washes. I thought I'd be marking her with a number '1' but it seems that I had 1, 2 or 3 to choose from and I thought that the 3 looked the best. It's not easy getting them to sit down on that Zim!

In brief I wanted to get the wheels on but that meant adding some muck build-up behind the wheels. I made up a mix using Plaster of Paris and Tamiya Earth coloured Acrylics to make a nice dry mud accumulation which I applied using an old brush and stippled it on lightly in a thin layer. I'll be able to add some additional colourations later.

Each wheel, which I had already painted with Dunky last week, had the rims painted with Gunze Metalcolour Stainless and then polished to a nice worn metal shiny look. The outer wheels I did the rims using a 2B Graphite stick as they are the ones that can be seen properly and the effect from the Graphite looks better than the Stainless paint imo. I drybrushed the outer faces to show worn metal on the raised areas and added some Mig Brown Wash to each wheel face - the effect looks great. I must have spent two hours on the wheel detailing and it was definately worth it!

Next week I want to paint the turret hatch interior and paint and fit the tools and the tow cables before I start on further weathering. I must start on the Friuls too. I'm using some of my holiday up so will have the Friday and Monday off either side of next weekend - it's my Birthday on the Sunday so a long weekend will be perfect!

Here's a few photos:

So, that's where I'm up to. I hope you like her so far!

Back to work tomorrow so updates a-plenty next week during my 4 day weekend!

Have a good week lads,

Ben Toast

On the Bench - Dragon Pz. IV Ausf. G (L.A.H.) Yes

Your image is loading...


  • Member since
    April 2005
  • From: Australia
Posted by taxtp on Sunday, October 28, 2012 6:19 PM

I like the look Ben. I've made a start on my 1/48 tiger so I might use your method of adding muck behind the road wheels.

Cheers

Tony

I'm just taking it one GB at a time.

  • Member since
    November 2009
  • From: SW Virginia
Posted by Gamera on Sunday, October 28, 2012 8:08 PM

Marc: yeah, looks like a nice kit there. Even in 1/72nd the Tiger ll is gonna be a big model.

Ben: she's coming along great! The steel rimmed road wheels look good, going to aim for the same look on mine. And btw happy birthday sir!

"I dream in fire but work in clay." -Arthur Machen


  • Member since
    July 2012
Posted by Hasenpfeffer on Sunday, October 28, 2012 8:10 PM

Alrighty then... falling behind again in the comments department. (Thanks for the kind words on the last post.)

Marc - Great job on your finished Panther G. I am hoping to achieve some of the same great weathering effects on mine... Beer Good luck with the 1/72 KT. I personally would go insane trying to master the microscopic scales.. so I'll leave that to you and a few others with high power magnification. Smile Looking forward to seeing how you tackle it.

Carl - Really neat finish on all your painting. I like the concept of the DY over the primer. I can't wait to see it all come together. And to answer your earlier ? about the conduit for the light... I'm not sure the conduit is visible on this variant. I think it runs straight down into the glacis plate from the mount. So... none needed! Stick out tongue

TB379 - Looking forward to your progress as time allows.

SMJ - Super job on the WW. I love how it came out scruffy. Just like the real thing. I can appreciate how much practice this must take as I'm nowhere near that level of expertise yet. (I've tried it once with not the greatest results...) So, YesYes to you sir. Marvelous!

RBaer - Great idea for the Al tubing for the exhaust. Is it difficult to get the correct shape?

Ben - Camo and filter/washes look great. She's really starting to come to life. Trying to keep up with ya... and I have a 4 day weekend next week too starting Saturday. Beer (or I see you seem to prefer Toast...lol)

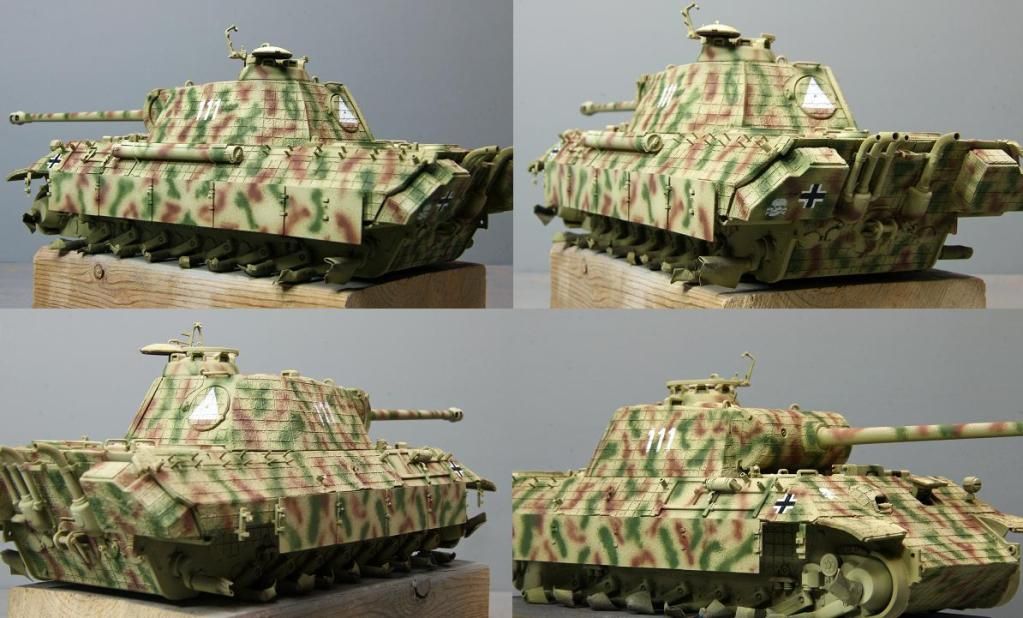
So, here we go. I've got the base camo coat on. The colors are a little lighter than I usually use... but it's growing on me. I am not completely blown away with what I've done... but I have to remember this is just the beginning. Now I get to try to apply all the neat things I've learned on these and other forums for the last couple years... and try not to get too confused in the process. It's GO time!

OK, colors are Nato Green with a touch of Flat White and Red Brown with, yes you guessed it, a touch of white. All Tamiya. All of the markings are painted on except the front 2 Balkan Kreuz. I made a stencil for the turret numbers and the triangle on the loader's hatch. The Death's head (x2) and rear Balkan Kreuz are stencils from Alliance Modelworks. This is the 1st time I've had the real estate to use them and they are - well, you be the judge. (I love 'em!)

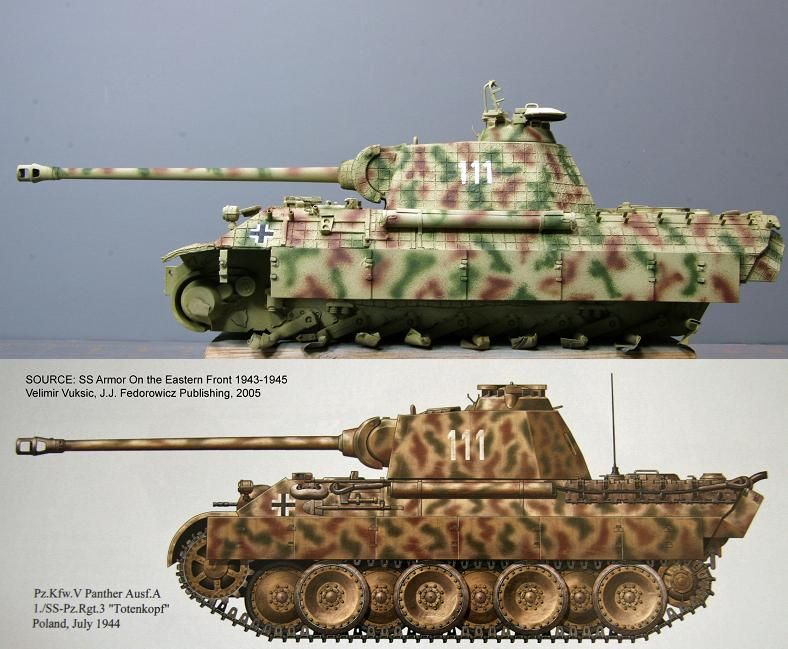
And the comparison to what I was trying to emulate;

Any critiques, comments welcome... thanks for looking.

Dave

  • Member since
    November 2009
  • From: SW Virginia
Posted by Gamera on Sunday, October 28, 2012 8:22 PM

HP: nice work! I like it a lot. Looks pretty darn close to the painting to me.

"I dream in fire but work in clay." -Arthur Machen


  • Member since
    March 2006
  • From: Right Side of a Left State
Posted by Shellback on Sunday, October 28, 2012 9:26 PM

Ben , looks like the decals snuggled down well over the zim . The mud build up looks authentic also .Yes

  • Member since
    March 2006
  • From: Right Side of a Left State
Posted by Shellback on Sunday, October 28, 2012 9:54 PM

Hasen ,Beautifully done camo ! You really matched the drawing . And your correct . No conduit . I didnt think that the electrical would be run down thru almost 5 inches of armor steele on the glacis ..............wow ! Seems like vulnerable area .

I found this photo of an ausf. A and it shows the electrical running down thru the glacis directly behind the light . Yes

Here's the link with more pics of the Panther ausf A

http://www.worldwar2aces.com/panzer-tank/panther-tank/

  • Member since
    March 2003
  • From: Rain USA, Vancouver WA
Posted by tigerman on Sunday, October 28, 2012 11:01 PM

A little disappointed. I got the cats paws on (wheels on the Tiger). the first 4 steps to the Tiger are finished. Slow, but steady.

   http://i7.photobucket.com/albums/y269/wing_nut_5o/PANZERJAGERGB.jpg

 Eric 

  • Member since
    July 2012
Posted by Hasenpfeffer on Monday, October 29, 2012 6:14 AM

Thanks guys for the compliments.

Carl, special thanks to you for the research and the pictures. These just further muddy the waters of course. The bracket that holds the Bosch headlamp on my Panther is a little different than the one shown in the pics you show. (See below). It is more like the Panther A in these pics. I can't determine if the wiring goes straight down into the glacis plate or not. But I have decided not to worry about it. (I like how you can read the stamped Bosch in these pics too.)

Other interesting things I noticed quickly looking through the pics from the link are that Panther has a Notek headlight on the right side. I don't recall ever seeing one of these on a Panther, but that is from memory and I know from experience to never say never. Also, maybe the exhaust setup seems to be reversed. In my resource material they don't have the stack of three on the right side ever, but the reverse.

Anyway, interesting stuff. I'll have to give the pics a better look through when I have some more time. Unfortunately, time to make the donuts....

Dave

  • Member since
    September 2009
  • From: Rugby, England
Posted by Hinksy on Monday, October 29, 2012 7:05 AM

Cheers for the kind words lads Yes

Gamera - thanks for the Happy Birthday but it's NEXT Sunday (4th November), hence the reason for booking the Friday off at the end of this week - unless it was a pre-emptive Bithday greeting?

Dave - Panther cammo looking sweet!

Ben Toast

On the Bench - Dragon Pz. IV Ausf. G (L.A.H.) Yes

Your image is loading...


  • Member since
    August 2009
  • From: MOAB, UTAH
Posted by JOE RIX on Monday, October 29, 2012 7:34 AM

Ben - Very impressive work.

Hasen - Excellent! You may not have got the camo pattern dead on but that is NOT the point. point is that you absolutely nailed the essence of that pattern. It looks awesome.

 Not  much progress but a liitle. Assembled the exhaust stacks. Cut and bent some PE. Moving along.  

"Not only do I not know what's going on, I wouldn't know what to do about it if I did". George Carlin

  • Member since
    November 2009
  • From: SW Virginia
Posted by Gamera on Monday, October 29, 2012 7:34 AM

Ben: whoops-pre-emptive yeah that's it!

"I dream in fire but work in clay." -Arthur Machen


  • Member since
    April 2005
  • From: Australia
Posted by taxtp on Monday, October 29, 2012 8:16 AM

Got the Tiger started.

Cheers

Tony

I'm just taking it one GB at a time.

  • Member since
    April 2005
  • From: Piscataway, NJ!
Posted by wing_nut on Monday, October 29, 2012 8:21 AM

Ben that really is looking very shrp indeed.

Carl, like the effect the pencil has on the steel wheels.  And I just happen to have some steel wheels to do soonWhistling

With regards to the mention of the stain finish. Dunno how much that applies to armor cuz just the amount of dust a 1:1 will have will make it pretty much dead flat.  And AC is a different story.  Even when dirty, when the light catches it in a certain way there is a sheen that it has that I have rarely been able to achieve.  I have seen model with the "look" and it really give the impression of a panted metal surface.  You can almost "see" a thin metal skin  on the aircraft.  Look at the spinner and around the teeth.


Like a lot of others I am riding out Sandy and hope to get some good bench time today and tomorrow. 

But sorry... I have a little bit of a rant...

 I am not saying that this will not be  a bad storm, and you really do need to be ready for it, but I am already getting pretty sick of hearing the newscasters going nuts with their descriptions of what may happen and even about what is actually happening.  One was standing at the edge of the Hudson River this morning going on and on about how horrible the conditions are and OMG what are we going to do.  There weren't even any whitecaps on the water behind her.  How about giving us some facts to be prepared and stop trying to out do the other networks by trying to embellish more than what is actually happening.

But then again, if journalists didn't tell us that everything is worse then it really is... how would we know the truthConfused

Having said that... if your in the path... be safe and build a model.


Marc  

  • Member since
    April 2009
  • From: Carmel, IN
Posted by deafpanzer on Monday, October 29, 2012 10:25 AM

SMJmodeler

deafpanzer: Thanks for the compliment on the whitewash.  You going to go for a worn finish too?

SMJ- Back home from DC trip just in time to escape Sandy.  Yes, that's my plan... I may have OCD but I love dirty worn finished tanks! 

Marc- Beautiful work on the Panther!!! YesYes And a Beer too!  Looking forward to follow your another build. 

Carl- Excellent work on the wheels and thanks for another tip! Beer

Ben- Love the camo work!  Probably your best camo job so far! Yes

Dave- Stunning camo work too!!! It looks like it was actually done by the tank crew using sprayer at 1:35 scale! 

Andy

  • Member since
    April 2005
  • From: Piscataway, NJ!
Posted by wing_nut on Monday, October 29, 2012 11:40 AM

With the storm coming and my jobs being postponed I am looking at a couple of good bench time days.  Should have a few updates with the next 2 days.  Started working on the little kitty last night.


The extra track hooks are molded to the turret and are not “hooks”. These where straightened to make the tracks fits better and the end bent a bit into hooks to look better.


The front mud guards were cut off as these and the side fenders scale up to 4.5’.  A new front mud guard can be seen in a pic a further down.  Just a couple of sections of the fenders will be made from sheet styrene.


Some surface texture was added with a rock.  I have a couple of different rocks that I press into the surface then sand down and ridges formed.


Big gap in the back and while I think I have the piece properly set against the guides on the inside I really find it hard to believe that Dragon could have gotten it that wrong.  But stranger things have happened.  Regardless, there is enough flex that the clamps will hold it right until some glue sets.


I made new tools to hang in the side.  The hammer and axe handles on the top of the hull were undercut a little to give the appearance they are not molded on the surface.  Can’t see it the pic though.


Marc  

  • Member since
    March 2006
  • From: Right Side of a Left State
Posted by Shellback on Monday, October 29, 2012 11:55 AM

Marc ,Keep dry there in Jersey !

The King looks like it had a clamp fest ! Nice start , enjoy your time at the bench ,

  • Member since
    October 2009
Posted by PANZERWAFFE on Monday, October 29, 2012 12:02 PM

Still lurking......

Very, very fine work being done guys....all of you.  Too much to point out but will still be watching with much envy.  Keep it up.

MARC, Beautiful build and finish on your Panther Yes  On another note, the Dragon 1/35 KT I had built had the same large gap on the engine deck.  Never could figure what I had done wrong and now with yours believe it may be that Dragon just got it wrong.  I too was able to clamp things together and in the end could not tell there was originally a problem.

Rob

JOIN OUR COMMUNITY!

Our community is FREE to join. To participate you must either login or register for an account.

SEARCH FORUMS
FREE NEWSLETTER
By signing up you may also receive reader surveys and occasional special offers. We do not sell, rent or trade our email lists. View our Privacy Policy.