SEARCH FINESCALE.COM

Enter keywords or a search phrase below:

Steel Cats (Sept. 2012-Aug. 2013)

322302 views
3330 replies
1 rating 2 rating 3 rating 4 rating 5 rating
  • Member since
    November 2009
  • From: SW Virginia
Posted by Gamera on Thursday, November 22, 2012 7:56 PM

Thanks Jack, wow those buckets are insane, love the detail there.

"I dream in fire but work in clay." -Arthur Machen


  • Member since
    September 2009
  • From: Rugby, England
Posted by Hinksy on Thursday, November 22, 2012 8:01 PM

Hi guys,

Great stuff going on!

I'm so damn busy at work bench time is really at a premium at the minute in the run-up to Chritmas. Still, I shouldn't moan because I actually have a job (and one that I enjoy)! Something not many folk can say Tongue Tied

So, this weekend I'mm be finishing the Friuls, adding washes and showing some bare metal with the file and finally I'll be fitting them - then work can begin in earnest!

Andy - I'm loving that PE work - seriously impressive! Wow! Cool

I know it's obvious but be careful when fitting that replacement barrel. My RB one's for my Initial Tiger and for the Tiger I E I'm building now didn't have a lot of 'extra' barrel to push into the collar so after carefully measuring and double checking how much of the barrel should be left protruding from the plastic Mantlet collar I had to pack the collar with Milliput to hold it all tight and then added CA gel to fully fix.

Be careful dude!

Ben Toast

On the Bench - Dragon Pz. IV Ausf. G (L.A.H.) Yes

Your image is loading...


  • Member since
    April 2011
  • From: imperial beach, ca
Posted by malone duke on Thursday, November 22, 2012 10:30 PM

  • Member since
    April 2011
  • From: imperial beach, ca
Posted by malone duke on Thursday, November 22, 2012 10:33 PM

theres some more pics, gotta little filtering, wash, and chipping done.  on to a bit of pigments and a tiny bit of rust here and there and she'll be done. hope ya like.  i'm itchin to get going on another already.  and also the work on here has been a joy to follow...  very inspirational.  glad to have my butt in gear again.

  • Member since
    June 2012
Posted by ghostt180 on Friday, November 23, 2012 2:46 AM

Hey malone duke. Love the Tiger so far, the Zim and camo is looking great. Just wondering what unit, location of the camo, and meaning of the designation 'C'? Would be a great help to myself and some others on here who are keen on history. Well done on this tiger.

  • Member since
    August 2009
  • From: MOAB, UTAH
Posted by JOE RIX on Friday, November 23, 2012 7:28 AM

Marc - Again, I am really impressed with the effect you obtain.

Andy - I'm here to tell you that your PE work is definitely inspirational. Certainly after seeing your work there will be little or no bellyaching over PE bending and gluing on my part.

Gamera - You've got it going on. Nice work. I'm liking your set up a lot and I'm very much looking forward to seeing the end product you pulloff.

Duke - That there is some really nice work.

I'll be getting some progress photos on today. Managed a bit of bench time yesterday in between helping clean house, cooking and some football.

"Not only do I not know what's going on, I wouldn't know what to do about it if I did". George Carlin

  • Member since
    August 2009
  • From: MOAB, UTAH
Posted by JOE RIX on Friday, November 23, 2012 8:16 AM

Here be bit of an update for ya'll. Although it's not a whole lot it is progress for me nonetheless. Unfortunately the wrap around zimm for the turret is a bit off on both side with hole misalignment on the left side and coming up a bit short of the front of the turret on the right side. I figure I'll be able to touch that all up with some putty and CA. I adonized the whole piece with a micro torch which made bending this around the turret much, much easier. There are small gaps along the top and bottom edges in spots and I'm filling those in with CA. I do like the overall effect of the PE zimm other than unless you have the PE part unbent and flat then you get an unrealistic hard edge to the zimm. So, I've been trying to even that out with CA applied with the clipped sewing needle.

100_0879.jpg

100_0877.jpg

100_0878.jpg

"Not only do I not know what's going on, I wouldn't know what to do about it if I did". George Carlin

  • Member since
    November 2009
  • From: SW Virginia
Posted by Gamera on Friday, November 23, 2012 9:01 AM

Malone: Great work! Nice weathered look and I love the chipping on the tow cables and the muffler guards.

Joe: Good looking zimmerit there, I see what you mean about fitting it around a curved surface, I was lucky the KT I'm doing is mostly just slab-sided.

BTW: Grabbed some photos that I hope don't suck quite so hard. Tiger here is still shiny, still need to fade the wheels some. I'm still fumbling around with the treads, when I finish them I'm going to put them on and spray a couple of thin coats of tan/brown 'dirt' shade on the whole running gear.

Now that the crew has turtle waxed the Tiger they're working on their mime act and cleaning the barrel with an invisible cleaning rod. Mostly done here, need to dirty them up a little more and add a good coat of matte varnish. Still working on the commander, I'm intending on having him sitting of the turret with a pair of field glasses on the look-out for rampaging T34 that want to wreck his tank now that he's got her all clean and shiny... 

PS: Dumb question but what would the crew use to clean the barrel? Water, gasoline/petrol, paint thinner/turpentine? Sorry, I'm not sure and not sure where I'd even look something like that up. 

"I dream in fire but work in clay." -Arthur Machen


  • Member since
    November 2003
  • From: Nashville, TN area
Posted by bobbaily on Friday, November 23, 2012 9:23 AM

Duke-I can't really add anything that hasn't been said-very nice build-I especially like the camo scheme & weathering.

Joe-you're build is coming along nicely-and thanks for the tips on working with the PE zim-I've not tried it before but I have a Panzer IV Ausf J in the stash that has PE zim with it.  Question for you-would you do PE zim again or try something different?

Gamera-new pics make a difference-excellent job on the figures.

Bob


  • Member since
    April 2011
  • From: imperial beach, ca
Posted by malone duke on Friday, November 23, 2012 9:38 AM

My tiger is from Stab/pz.abt 507.  Early 44.

  • Member since
    December 2002
  • From: Bury St Edmunds, Suffolk, England
Posted by Bish on Friday, November 23, 2012 1:33 PM

Malone, thats one nice Tiger. I can't say i have ever seen a vehicle marked like that before. But then with german armour, nothing surprises me. Did they come with the kit or are they AM. I don't have a kit in the stash for the 507 and wouldn't mind doing that one myself.

I am a Norfolk man and i glory in being so


On the bench: Airfix 1/72nd Harrier GR.3/Fujimi 1/72nd Ju 87D-3

  • Member since
    March 2003
  • From: Rain USA, Vancouver WA
Posted by tigerman on Friday, November 23, 2012 1:36 PM

Sheesh Malone, that is a beautiful Tiger. Camo is great and I like the subtle chipping and cables. Gonna be a winner for sure when finished. glad you're going after another.

Joe, keep at it, that zim is looking good.

   http://i7.photobucket.com/albums/y269/wing_nut_5o/PANZERJAGERGB.jpg

 Eric 

  • Member since
    April 2011
  • From: imperial beach, ca
Posted by malone duke on Friday, November 23, 2012 2:13 PM

thanks for the comments guys...  hey bish, the decals came with a book i got from kagero or something.  it comes with decals in all three scales.  get ahold of me on the side, ill photo copy from the book and send you the decals that are in 1/35 if you want...  the actual tank was supposed to have some modifications but the kit didnt have spare track links and i couldnt find any am in time so i just went basic before mods on this one.

  • Member since
    December 2002
  • From: Bury St Edmunds, Suffolk, England
Posted by Bish on Friday, November 23, 2012 2:26 PM

I have heard of those kagero books and seen some that have decals. But never got round to getting any. I really must sort that out. PM in bound

I am a Norfolk man and i glory in being so


On the bench: Airfix 1/72nd Harrier GR.3/Fujimi 1/72nd Ju 87D-3

  • Member since
    April 2009
  • From: Carmel, IN
Posted by deafpanzer on Friday, November 23, 2012 6:21 PM

Guys- Thanks for your nice comments!

Marc- You know I have already said how much I love the job filter has done on your KT.  Thanks for the catch!  I wasn't sure if it was supposed to be there or it is ejector pin mark? LOL  Will have them cover next... 

Dave- Thanks!  Already took care of the muzzle brake... fixed now. I use CA.  Always wanted to learn how to solder... that's something I want to learn in 2013.   NO KIDDING about gravy... two Thanksgiving meals in two days... think I am in turkey coma now. 

Gamera-  Great work on your KT! Love the figures too! 

Jack- Thanks for the nice words!  Maybe RB models sell buckets in 1/48 too?  They sell "ready to use" buckets in 1/35 just for few bucks.  

Malone- Duke- LOVE the camo work on your Tiger. Zimm looks great too!

Joe- Looking good.  I have couple of brass Zimm sets but I haven't tried them yet.  

Andy

  • Member since
    April 2005
  • From: Piscataway, NJ!
Posted by wing_nut on Friday, November 23, 2012 7:02 PM

ANDY STOP!!!!!!!!!!!!!!!!!!!!!!!!!!!!!!!!!

I just noted the same small depressions at the front of my KT so I am guessing they are supposed to be there.

Marc  

  • Member since
    April 2009
  • From: Carmel, IN
Posted by deafpanzer on Friday, November 23, 2012 7:04 PM

LOL!  Just saw your post... was going to check my reference books just to make sure. LOL

Andy

  • Member since
    July 2012
Posted by Hasenpfeffer on Friday, November 23, 2012 11:50 PM

Hey guys - just sneaking a quick reply in while I can... great work all around. Just wanted to show a couple photos I found for those interested.

This one, for you Ben. It appears in this case the loader hatch is definitely all interior off white color.

And I found one close to malone's Tiger... this could be from the same unit, but I don't know for sure.

  • Member since
    May 2005
Posted by pyrman64 on Saturday, November 24, 2012 12:37 AM

Dave: That Tiger is, indeed, part of sPzAbt.507.  The Stab had 3 Tiger I's and they were marked A, B & C - per Tigers In Combat.

As for the inside surface of the loading hatch, it was the same dunkelgelb as the exterior - all hatches that opened outward were painted in the exterior paint. White reflects light...it was added defense from being spotted by a/c.

Malone: you did a nice job on that Tiger I  Toast

Greg H

"There is many a boy here today who looks on war as all glory, but, boys, it is all hell." Gen. Wm T. Sherman (11 April 1880, Columbus, Ohio)

  • Member since
    April 2005
  • From: Piscataway, NJ!
Posted by wing_nut on Saturday, November 24, 2012 7:03 AM

Joe, the PE zim looks pretty darn good.  never gave it any thought about what do you do it things don't line up exactly.  With the resin stuff pulling and tugging usually does the trick

MD that's a nice looking Tiger you got going there.

Gamera, that should make for an interesting scene.  No definitive answer on the cleaning but I would figure some sort of solvent followed by oil.

So... how is someone that had a huge turkey dinner and decanted spray paint the same?  They both have to sit for a while de-gassing.  At least this "someone" was able to sit at the bench.  Hmmm? Alone for some reason.

Spent time finishing up paint and marking then working on the weathering.  Added the dots fr the ambush scheme and the turret number.  I may have opened a can of worms with the cross under the 222.  from what I have read this has been discussed at great length.  Not sure why since it was not too difficult to find photos that show the cross.  Some dot filtering, pin washes and streaking.  In the smaller scale I have to be careful not to over do  the weathering so I am already thinking to do very little more.  maybe just a bit of road dust.

I figured that if the camo was added with all the fenders on then when they came off the base would be yellow so I painted that in and made it dirtier for the crud that would have gotten in there with the fender in place.  Painting all the tools and cables in place was a test of patience... which almost gave a out a couple of times.

Marc  

  • Member since
    August 2009
  • From: MOAB, UTAH
Posted by JOE RIX on Saturday, November 24, 2012 7:14 AM

bobbaily

Duke-I can't really add anything that hasn't been said-very nice build-I especially like the camo scheme & weathering.

Joe-you're build is coming along nicely-and thanks for the tips on working with the PE zim-I've not tried it before but I have a Panzer IV Ausf J in the stash that has PE zim with it.  Question for you-would you do PE zim again or try something different?

Gamera-new pics make a difference-excellent job on the figures.

Bob - To answer your question, yea, I'd use the PE zimm again. Given what I have learned from this go around, sure. Should note though that I would also be open to trying something else as the PE does have its challenges 

"Not only do I not know what's going on, I wouldn't know what to do about it if I did". George Carlin

  • Member since
    November 2009
  • From: SW Virginia
Posted by Gamera on Saturday, November 24, 2012 7:49 AM

Marc: Coming along great! I've always really liked the ambush scheme and you've done a great job there. I love the streaking - due to the zimmerit I didn't try any on mine, I really need to practice on that technique.

"I dream in fire but work in clay." -Arthur Machen


  • Member since
    July 2012
Posted by Hasenpfeffer on Saturday, November 24, 2012 7:58 AM

Wow Marc. That turned out A.W.E.S.O.M.E. I think it was fate that the toothpaste thing didn't work out as I think this result is way better than you would have gotten otherwise. It really looks first rate.

Greg - I posted that pic as it appeared to me that the interior color is Elfenbein. I am not going to debate it as I'm not that type of person. I respect that most other on this forum will have far superior knowledge than I when it comes to steel cats and have far more resources at their disposal. I do not doubt that the crews (or even the factory) painted the interior of the hatches the same color as the exterior. I've built plenty of Pz III and Pz IV to know that. In the picture, there appears to be a color difference on the edge of the hatch surface (added orange arrows). Almost as if there is some brush "slop" on the edge. I interpreted that to be the difference between Elfenbein and DY. There are also some shadows cast across the hatch to make things a little more difficult. Anyway, that's the reason I posted what I did. In the end I will defer to the experts.

  • Member since
    December 2002
  • From: Bury St Edmunds, Suffolk, England
Posted by Bish on Saturday, November 24, 2012 9:17 AM

When it comes to these hatches, i don't think is is a deffinate answer. The hatch in question was not intended to be open in battle. It was an escape hatch. It just so happened that it was handy for loading shells. It is possable that the factory painted it off white and then it was painted DY by crews in the field.

The image below shows a Pz IV. The commanders hatch, intended to be open in combat, seems to be paited DY. The drivers and Radio operators hatchs, not intended to be open in battle, seem to be to be white. This shows that not all hatchs were painted DY, and i think its

And this is the inside of Tiger 131 at Bovington.

I think it is safe to go with either white of the external colur. Both are right. And unless you can find a photo of the actual tank with the hatch open, you can'ty be proved wrong. 

I am a Norfolk man and i glory in being so


On the bench: Airfix 1/72nd Harrier GR.3/Fujimi 1/72nd Ju 87D-3

  • Member since
    September 2009
  • From: Rugby, England
Posted by Hinksy on Saturday, November 24, 2012 9:43 AM

Hi guys,

Awesome work as per usual. During the last two weeks I've treated 230 Tiger I Friul links with AK Soloution, I have assembled and test fitted one run and have completed 50% of the second run. I'm working daft hours due to the Christmas run-up and am getting no time in but luckily I can take a spare 20 minutes to make a run of 10 Friuls when I get home from work (which is usually midnight and I'm knackered Sleep)! Seriously, Even when I've had 3 minutes before I leave for work before 1:15pm (I work 2pm-late at present) I will nip off and assemble two links! Big Smile

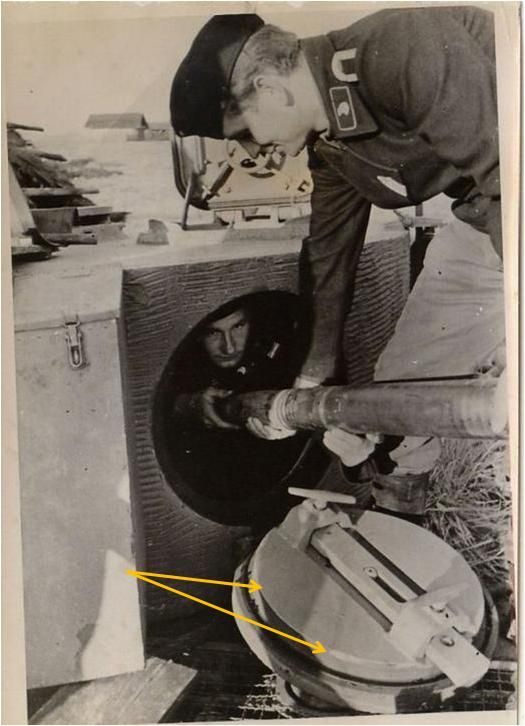
Hasenpfeffer - you are a TOP bloke for looking into this interiour colour 'conundrum' for me. Now, I want to STRESS that there is to ne serious angry debating and falling out/arguing between folk when discussing this!

I HAVE POSTED HASENPFEFFERS PHOTO AT THE BASE OF THE POST FOR YOU TO LOOK AT:

Greg - your theory makes sense and I know the turret roof hatches aren't white inside but the photo that Has posted makes me once more think - hmmm? Confused

EVERYONE! - I'll be finishing the Friuls today and although I'm working from home tomorrow it should be VERY quiet so I will be painting this interior and then, finally, I can start weathering!

I've looked at photos of models built by other guys and they have used off white and Dunky for their hatches so it's a case of personal taste for these guys BUT this being a build that is looking like it's going to be a special one I need to get this right. I'd pay money for a colour version of Has's photo!

  • Imo I reckon that hatch was painted off white interior colour but the crew painted it using Dunky to hide the white and that is why the rims of the hatch door looks lighter as the dunky added by the crew has worn out exposing these lighter areas (basically the original, overpainted off-white)?

I'm now SERIOUSLY thinking about painting the hatch interior off white and then adding AK Worn effects light chipping fluid then adding Dunky over the top and adding chips to expose the off white underneath?

What do you think?

I also found this photo of a Tiger I interior - obviously a museum piece?

Cheers guys,

Ben Toast

On the Bench - Dragon Pz. IV Ausf. G (L.A.H.) Yes

Your image is loading...


  • Member since
    September 2009
  • From: Rugby, England
Posted by Hinksy on Saturday, November 24, 2012 12:05 PM

Hi guys,

Right - I've just painted the hatch interior and the round doorframe with Gunze 'off-white' and will leave that until much later to set hard. I may need to leave it overnight so I'll get up real early, paint a few coats of AK Chipping Solution on it and will then paint the basecoat colour on top of the white. When that's dry I'll gently chip the edges of the round door to show wear where the door has been been opened and closed exposing the 'off-white' underneath.

I've painted the whole interior in 'off-white' including the locking bar so after chipping I'll go back with a fine brush and really detail-up the sliding bar and handles which lock the hatch door. I'll probably paint the metal squared-off bar in a simple bare metal colour and the handles will be black to add contrast.

Paints for the job - the Gunze Metalcolour will be used on the sliding bar lock:

Now - thest's get these darn Friuls finished!

Update tomorrow - a 'proper', decent update! Wink

Ben Toast

On the Bench - Dragon Pz. IV Ausf. G (L.A.H.) Yes

Your image is loading...


  • Member since
    November 2009
  • From: SW Virginia
Posted by Gamera on Saturday, November 24, 2012 1:23 PM

Nice work there Ben. And I don't have any clue what colour to paint the hatch insides but like the idea of painting them exterior mustard yellow and then chipping them to expose the off-white underneath.

"I dream in fire but work in clay." -Arthur Machen


  • Member since
    May 2005
Posted by pyrman64 on Saturday, November 24, 2012 1:28 PM

Ben, Dave, Bish & et al: My posting is not theory, it's actual orders from the defense ministry to the manufacturers.  Also, what you are seeing is not the difference in colors, but a difference in light reflection/refraction.  It's not about whether a hatch will be open during combat, it's about a hatch being open in a combat zone, where light reflection can give away a vehicles location to the enemy.

Ben: nice Tiger you've built there Toast  just one suggestion, you might want to add a bit of bare steel to the air defense gun ring.

cheers!

Greg H

"There is many a boy here today who looks on war as all glory, but, boys, it is all hell." Gen. Wm T. Sherman (11 April 1880, Columbus, Ohio)

  • Member since
    March 2006
  • From: Right Side of a Left State
Posted by Shellback on Saturday, November 24, 2012 2:13 PM

Well i'm back on the forums !!! Looks like everyone has been busy . Some of you guys are getting close to finihing . I went back a couple of days and looked but i didnt see any new completed builds . I have the tracks assembled for my KT and will be getting some paint on them now . I see the debate about the escape hatch is still being debated . Interesting , these little details . Too bad them German tankers didnt take the time to take more photo's of the details ................and in color!!!!

  • Member since
    April 2006
  • From: ON, Canada
Posted by jgeratic on Saturday, November 24, 2012 3:35 PM

To me the hatch appears to be the exterior colour, definitely not white.  I also copied the photo and viewed it in a paint program.  It is interesting that both with an eyedropper tool and  crop comparisons the lightest parts of the hatch are still (ever so slightly) darker than the bottom right hand corner of the tool bin.

Not sure when the official directive went out that eliminated "white" hatches, but it stands to reason that by this stage of the war when the Allies had air superiority, you definitely would want to hide your presence from air patrols.

Marc and Andy, good question about the detail on the front bow.  This is the best pic I can find, but when looking at the Bovington Tiger, the area is smooth and devoid of any detail.

regards,

Jack

JOIN OUR COMMUNITY!

Our community is FREE to join. To participate you must either login or register for an account.

SEARCH FORUMS
FREE NEWSLETTER
By signing up you may also receive reader surveys and occasional special offers. We do not sell, rent or trade our email lists. View our Privacy Policy.