SEARCH FINESCALE.COM

Enter keywords or a search phrase below:

Steel Cats (Sept. 2012-Aug. 2013)

322302 views
3330 replies
1 rating 2 rating 3 rating 4 rating 5 rating
  • Member since
    August 2009
  • From: MOAB, UTAH
Posted by JOE RIX on Sunday, November 25, 2012 8:17 AM

OH BOY! Am I ever having fun now! Yeah, and I also love gluing mad badgers to my head. Trust you me I am only going to do this to the spare links. If I attempted to do all 200+ links the GB would long be over before I would. Delightful.

 100_0881.jpg

"Not only do I not know what's going on, I wouldn't know what to do about it if I did". George Carlin

  • Member since
    September 2009
  • From: Rugby, England
Posted by Hinksy on Sunday, November 25, 2012 9:22 AM

Hi guys,

Thanks for the helpful info.

Pyrman64 - Re the painting on my Tiger, so far all it has had it the basecoat and cammo application. I'm going to start painting little details like the gun ring (I'll drybrush that) and the hatch from now onwards. I'll be fitting both Friuls later and will then start the full weathering process.

I've just this second painted the round hatch door interior using my basecoat shade (I used a brush to make it look like the crew had hurriedly slapdash painted it to hide the white). I painted the off-white last night and then left it overnight to fully cure. I've applied the AK Mild Chipping stuff and as soon as the DY cures I'll chip it up.

These damn Friuls are taking FOREVER! The links are so big and all my 0.5mm - 0.65mm drill bits for the pin vice have blunted badly which is slowing me down but I've only got about 40 links to go so not much left.

Update later!

Ben Toast

On the Bench - Dragon Pz. IV Ausf. G (L.A.H.) Yes

Your image is loading...


  • Member since
    November 2003
  • From: Nashville, TN area
Posted by bobbaily on Sunday, November 25, 2012 9:36 AM

Marc-your weathering on your KT is spot on-especially more impressive is that it is 1/72 scale (that's right, isn't it?)

Ben-your Tiger continues to impress-the Fruils will be a great addition.

Bob


  • Member since
    March 2003
  • From: Rain USA, Vancouver WA
Posted by tigerman on Sunday, November 25, 2012 2:15 PM

A bit busy today, but I hope to get some painting done later in the day. Perhaps start in on the tools as well, but i'm not sure that is a good idea yet.

   http://i7.photobucket.com/albums/y269/wing_nut_5o/PANZERJAGERGB.jpg

 Eric 

  • Member since
    December 2002
  • From: Bury St Edmunds, Suffolk, England
Posted by Bish on Sunday, November 25, 2012 3:25 PM

A bit later than planned, but finally have something worth up dateing. I got the rest of the camo on and then gave it a light misting of very thin DY. After that, thge marathon thgat was the decals. All 3 of them.


 I have just ordered some weathering products from AK. I have never used these before but been wanting to give them a try. So next step is a couple of coats of future and then wait for the postie.

I am a Norfolk man and i glory in being so


On the bench: Airfix 1/72nd Harrier GR.3/Fujimi 1/72nd Ju 87D-3

  • Member since
    September 2009
  • From: Rugby, England
Posted by Hinksy on Sunday, November 25, 2012 3:58 PM

Hi guys,

A quick Sunday update:

Finally both sets of Friuls are on and are looking good. They can stay on for the minute but will have to come off again soon so I can add my Friul washes and take the file to the guide gorns and raised areas on the tread sections.

  • Somehow I can't get this AK chipping stuff to work properly so ignore the tatty finish as I need to back to it. The label says to airbrush it on but I'm not airbrushing that tiny section! I painted the hatch interior off-white and let that dry overnight. I then brushed on a couple of layers of AK Mild Chipping Solution which was totally dry after 30 minutes. I then brushed on the Dunky which I intended to chip to show some white underneath. I let the DY dry for about 2 hours. I then humidified the hatch with water as per the label and took a toothbrush to it to show some light wear BUT it hardly had any effect? I then tried it again using the Heavy Chipping stuff as I'd bought both types but hardly any effect? I mean VERY little!
  • I know this stuff works so where did I go wrong? I'm sure it has something to do with drying times maybe? How long should the top coat be on before I chip it. Does it need to be left overnight to cure or just for a couple of hours until it's touch dry? No problem - I'll sort it!

Anyway, Friuls are on so weathering can begin in earnest next weekend!

Photos from today:

I hope you like her so far guys - comments very welcome!

Have a good week fellas and take care!

Ben Toast

On the Bench - Dragon Pz. IV Ausf. G (L.A.H.) Yes

Your image is loading...


  • Member since
    December 2002
  • From: Bury St Edmunds, Suffolk, England
Posted by Bish on Sunday, November 25, 2012 4:08 PM

Very nice work Ben, loveing it.

I am a Norfolk man and i glory in being so


On the bench: Airfix 1/72nd Harrier GR.3/Fujimi 1/72nd Ju 87D-3

  • Member since
    April 2005
  • From: Australia
Posted by taxtp on Sunday, November 25, 2012 5:29 PM

Hi Everyone,

I've made some more progress on my 1/48 Tiger.

Here it is, primed, with some pre shading.

Then I sprayed with Tamiya XF-62 German Grey, in three shades. The natural XF-62 for the undersides, wheels and lower hull sides, with a bit of buff added to lighten it for the upper vertical surfaces, and still more buff for the upper surfaces. Lots of detail painting and weathering to come yet.

Certainly not perfect, but I'm trying to learn/practice new techniques to improve the realism of my armor models. The difference in shades or more obvious that I am able to show with my basic photography skills.

Cheers

Tony

I'm just taking it one GB at a time.

  • Member since
    November 2003
  • From: Nashville, TN area
Posted by bobbaily on Sunday, November 25, 2012 5:36 PM

Tony-you're off to a good start....very nice build in progress....looking forward to more progress pics.

Bish-great work-very nice camo scheme-can't wait to see more.

Bob


  • Member since
    July 2012
Posted by Hasenpfeffer on Sunday, November 25, 2012 8:17 PM

Hey guys - loving all the progress and great work!

Gamera - the new photos look better. The KT looks pretty darn good to me. The figures look great and the whole deal should make for a cool final scene. I'm really dreading painting my commander. It's been awhile and I've never been too great at figure painting. I'm really hoping I can learn some things from the forums, etc., and practice a bit first.

Joe - That PE zimm looks sweet! It's gonna be crazy seeing that Tiggy all brassed up when it's done. And yeah, ya made me almost spit out my coffee this morning. Mad badgers. LOL. Filling those ejector marks will be worth it. I'm with ya on the whole tracks though. They will most likely be hidden anyway.

Bish - Very nice job with the camo. I'm really looking forward to seeing this one progress. Is it weird that tank reminds me of a BMP?

Ben - Congrats on finishing those tracks. It always seemed like the never ending pile didn't it? They look great on the Tiger. Sorry I can't help ya with the AK chipping stuff. I know Andy has used it though, so he'll probably have some advice.

I didn't have as much time as I would have liked. Too much social time! -haha- I got a little further on the weathering. I also either fixed or test fixed the tools and such. There is a lot of touch up to be done there, I know. Some of the stuff still needs paint. But it's starting to look closer to being finished. Then the dreaded figure...

Here she is:

And for fun... some mild Photoshop action.

  • Member since
    March 2003
  • From: Rain USA, Vancouver WA
Posted by tigerman on Sunday, November 25, 2012 11:31 PM

Tony, I imagine that the preshade looks better then the photos. Probably a bit too much light on them.

Ben, the Friuls look good as always.

Bish, great to see the camo on it.

Dave, you're almost home. Swell looking Panther.

   http://i7.photobucket.com/albums/y269/wing_nut_5o/PANZERJAGERGB.jpg

 Eric 

  • Member since
    November 2003
  • From: Nashville, TN area
Posted by bobbaily on Monday, November 26, 2012 6:08 AM

Dave-Job well done!  Weathering looks great and the Photoshop pic is a nice touch....you should be proud.

Bob


  • Member since
    May 2005
Posted by pyrman64 on Monday, November 26, 2012 6:52 AM

Dave: uhmmm...I really don't know what to say....other than....holy crap....WOW!! Wow Bow Down

Greg H

"There is many a boy here today who looks on war as all glory, but, boys, it is all hell." Gen. Wm T. Sherman (11 April 1880, Columbus, Ohio)

  • Member since
    November 2009
  • From: SW Virginia
Posted by Gamera on Monday, November 26, 2012 7:11 AM

Dave: Wow, that's beautiful work! And I love the photoshopped photo! YesCool

"I dream in fire but work in clay." -Arthur Machen


  • Member since
    August 2009
  • From: MOAB, UTAH
Posted by JOE RIX on Monday, November 26, 2012 7:25 AM

Bish - That is a superb job you've done on the camo.

Andy - What can I say, Your patience and effort certainly paid dividends. Those tracks are just remarkable.

Tony - Excellent start. It's looking right nice there.

Dave - Wow! What an oustanding Panther. That it definitely something to appreciate. I know I do.

 Discovered something a bit disturbing yesterday. While fiddling with the spare tracks on the turret it came to my attention that there are no lower mounting brackets/pins. Not in the kit nor on the PE set. Now, I certainly could scratch those but, for the sake of expediancy is anyone aware of an AM set that may have those?

Thanks for all incredible builds gentlemen and for all the excellent skills and knowledge you are all sharing.

Carry On.

"Not only do I not know what's going on, I wouldn't know what to do about it if I did". George Carlin

  • Member since
    April 2005
  • From: Piscataway, NJ!
Posted by wing_nut on Monday, November 26, 2012 9:25 AM

Jeez guys!!!   Nice stuff

Bish the camo looks great.

Ben, like what you've done with the hatch.

Tony, nice tonal quality in a "sinbgle" color

Dave, the is just awesome.  Until I actually read some of the text I was thinking that your model had the best camo matching to a photo I had ever seen.  Now I know whyWhistling

Marc  

  • Member since
    November 2009
  • From: SW Virginia
Posted by Gamera on Monday, November 26, 2012 10:29 AM

BTW: Guys just looking at the Sprue Brothers website and they have a Cyber Monday deal going with 15% off all armour kits...

"I dream in fire but work in clay." -Arthur Machen


  • Member since
    December 2002
  • From: Bury St Edmunds, Suffolk, England
Posted by Bish on Monday, November 26, 2012 11:56 AM

Dave, thanks. And now you menation it i can see what you mean. A bit BMP 3ish. As for your Panther, what Greg said. Stunner.

Thanks guys, it does look better with some colour on it.

I am a Norfolk man and i glory in being so


On the bench: Airfix 1/72nd Harrier GR.3/Fujimi 1/72nd Ju 87D-3

  • Member since
    April 2005
  • From: Piscataway, NJ!
Posted by wing_nut on Monday, November 26, 2012 3:45 PM

I started to work on the tracks.  DS tracks are not my favorite.  Are there AM tracks in 1/72 scale?

Anyway... mixed some hull red and NATO black for a burnt sienna(ish) color and painted the extra tracks for the turret.  I want to get a bit more of a rust patina on them.

i7.photobucket.com/.../P1160700.jpg

One of the reason I am not a fan of the DS tracks is the test fut process.  There are instances where the DS tracks are too long so you gotta try 'em 1st with all the road wheels on.  These little buggers would not stay on so I glued them.  But I had not yet done the steel rim so that task will be a real joy.

For the main tracks I turned them inside out and hit that surface with some metallic gray.  The area that the wheels rid eon was taped off and the the whole thing got the same color the turret tracks got.  I only taped the outermost section as the inner scraped areas will be hidden by all the overlapping road wheels.

i7.photobucket.com/.../P1160697.jpg

i7.photobucket.com/.../P1160698.jpg

Marc  

  • Member since
    April 2005
  • From: Piscataway, NJ!
Posted by wing_nut on Monday, November 26, 2012 3:46 PM

I started to work on the tracks. DS tracks are not my favorite. Are there AM tracks in 1/72 scale?

Anyway... mixed some hull red and NATO black for a burnt sienna(ish) color and painted the extra tracks for the turret. I want to get a bit more of a rust patina on them.

One of the reason I am not a fan of the DS tracks is the test fut process. There are instances where the DS tracks are too long so you gotta try 'em 1st with all the road wheels on. These little buggers would not stay on so I glued them. But I had not yet done the steel rim so that task will be a real joy.

For the main tracks I turned them inside out and hit that surface with some metallic gray. The area that the wheels rid eon was taped off and the the whole thing got the same color the turret tracks got. I only taped the outermost section as the inner scraped areas will be hidden by all the overlapping road wheels.

Marc  

  • Member since
    April 2005
  • From: Piscataway, NJ!
Posted by wing_nut on Monday, November 26, 2012 3:49 PM

What the...?  Don't know... Don't care.

Marc  

  • Member since
    April 2006
  • From: ON, Canada
Posted by jgeratic on Monday, November 26, 2012 6:09 PM

Marc - looking good, it's amazing how a few little flecks here and there of exposed paint help convey the look and feel of metal.

Dave - great update and I have to admit that I too for a moment thought I was looking at a period war photo.  That is actually a neat way to test the progress of a build, at least in a tonal way.

Tony - good progress and nice to see another 1/48 Tiger on the go.  I see you have the same slight gape as I have between the front hull plate and forward hull deck/roof.  

Ben - coming along nicely, but clearly see the problem you have run into with the AK chipping.  Honestly I sometimes wonder if some of these techniques are a bit too technical and are more about selling new products.  From what I see with your skills you should be able to wrestle it down.  MiG seems to have something similar and their website  has a video tutorial on their chipping product.

Also ran across that escape hatch photo in a book with some interesting info provided in the caption. Apparently the hatch could not be closed from the inside (too heavy?) and when in the opened position obstructed the traverse of the turret.

Much more work to comment on, but yes Bish, Gamara, Malone and Joe - it's all looking very good.

Myself got in about four hours bench time.  Ran into a snag with having to scratch build the bases for the lights.   The 1st company Tigers of 501 had them moved down from atop the hull to a position located against the front hull glacis plate.  Voyager PE set does have the stands for this, but I couldn't save the base plates when they were shaved off the main hull.

regards,

Jack

  • Member since
    August 2009
  • From: MOAB, UTAH
Posted by JOE RIX on Monday, November 26, 2012 6:18 PM

Marc- Like what your doing with the tracks. Very nice indeed.

"Not only do I not know what's going on, I wouldn't know what to do about it if I did". George Carlin

  • Member since
    April 2010
  • From: Yuma, AZ
Posted by Ripcord on Monday, November 26, 2012 7:01 PM

Hey,  Never built armor before...  Can I get in with this?


and if I do, is there a solid color panther.  Also what color is it?  I dont think I ready for camo yet.  This kit came with some earth and bricks...


Mike

  • Member since
    April 2005
  • From: Piscataway, NJ!
Posted by wing_nut on Tuesday, November 27, 2012 12:06 AM

Hey ripcord

Welcome to the GB.  And what and honor to have it as your 1st armor build too.  Without knowing how accurate the scheme on the box is a 2 tone camo would be pretty easy.  The broad flat surfaces should make masking easy or even brush painted as I did.  At this scale a feathered edge can be done as a hard line on the model and look just fine.

BTW. with regards to the thread about the AM tracks in the armor section.  No need for you to apologize for anything.  Yours was the only answer that had anything to do with the question.  Thanks.  I didn't want to make a big deal in that thread.  I made my point.

Marc  

  • Member since
    March 2003
  • From: Rain USA, Vancouver WA
Posted by tigerman on Tuesday, November 27, 2012 1:01 AM

Hey Ripcord. Welcome aboard with the itsy-bitsy Jagdkitty. Gonna need some serious magnifiers for that guy. Anyone know if this is a rebox of the old matchbox kit?

   http://i7.photobucket.com/albums/y269/wing_nut_5o/PANZERJAGERGB.jpg

 Eric 

  • Member since
    April 2006
  • From: ON, Canada
Posted by jgeratic on Tuesday, November 27, 2012 2:42 AM

Ripcord - welcome to the group.  Man that takes me back to the days of braille scale.  Given the odd scale and quite familiar base, I'm very certain this was originally the Matchbox kit.

regards,

Jack

  • Member since
    September 2009
  • From: Rugby, England
Posted by Hinksy on Tuesday, November 27, 2012 6:11 AM

Hi guys,

Hasenpfeffer - looking GREAT! A Superb build! Well done Bow Down I'll comment more later as I'm off to work now!

btw - My Christmas Panther G Late arrived today and it looks great!

Jgeratic - When my Tiger is on the base the idea is it is supposed to be stationary with that hatch open like they are reloading. You'll see what I mean when she's complete. Basically, it's artistic licence I know, but I like the opportunity to add any splash of colour where I can Wink

I know where I went wrong with the chipping solution - I should have glossed or put future over the white to allow the paint to chip properly. Live and learn - I'll sort it this weekend!

Ben Toast

On the Bench - Dragon Pz. IV Ausf. G (L.A.H.) Yes

Your image is loading...


  • Member since
    August 2009
  • From: MOAB, UTAH
Posted by JOE RIX on Tuesday, November 27, 2012 8:12 AM

Ripcord - A hardy welcome to the GB. It is awesome to have you on board and getting to know you along the way. Take comfort, as this may not be my first ever armor build, it is though my first one in a very very long time and as such I am new to much of the skills and techniques. The folks here are as outstanding , helpful and genuine as you will find. I am certainly looking forward to see what you are able to do with that Jagdpanther in that scale Enjoy!!!! 

                    Joe 

"Not only do I not know what's going on, I wouldn't know what to do about it if I did". George Carlin

  • Member since
    July 2012
Posted by Hasenpfeffer on Tuesday, November 27, 2012 9:35 AM

Thanks for all the kind words and encouragement, fellas. Kinda humbling. Embarrassed

Tony - Nice work on the modulation. At first the grey looked a little too light to me, but after really looking at it and realizing your Tiger is 1:48, I think it will be perfect. I'm kinda new to the modulation thing too. Mine consists of doing the base, adding a little white, spraying the upper surfaces and then adding more white and hitting the upper most areas. It's over simplified for my level of expertise. I've seen some pretty cool stuff with modulation - even to the point of painting shadows and highlights with oils after the main AB work. (Maybe that's the way the technique works... Surprise)

Marc - The KT... man the KT. I have to keep reminding myself it's only 1:72. I want to build one, but think I'll stick to 1:35. I haven't come across any AM tracks, but will let you know if I do.

Ripcord - Welcome to the fray. I think you'll have a lot of fun here. The guys are great and very helpful. I just got back into this hobby ~2 years ago and only recently started to get really serious again. The things I've learned from the various forums in that time are just mind boggling. I haven't the time to try out all the new stuff. I usually try to incorporate a couple learnings into each new build... so at this point I'm at about 6. Stick out tongue Good luck with the Jagdpanther. Looking forward to seeing it come together.

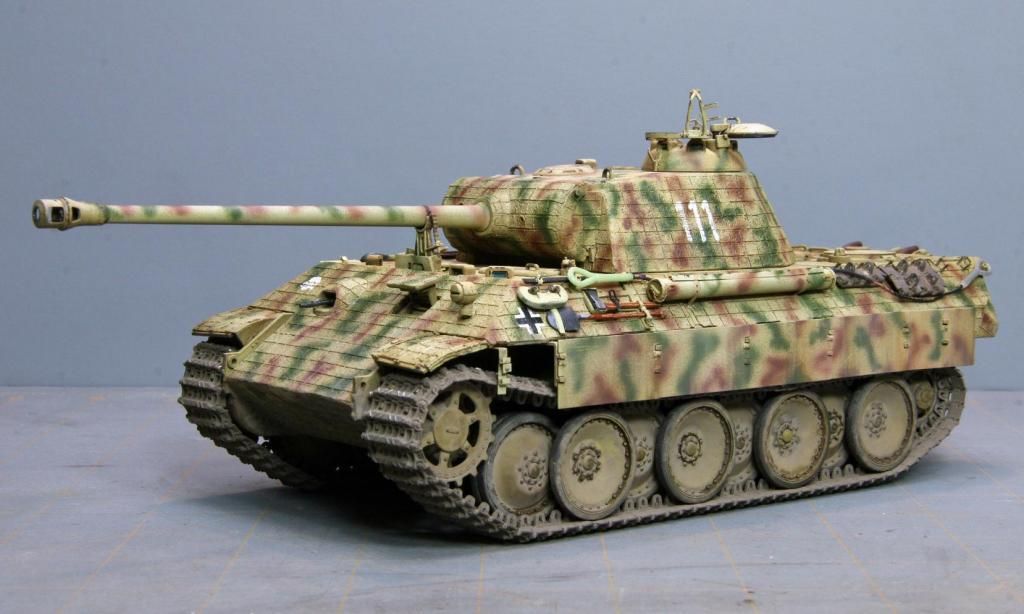
And for a little encore, here are some larger pics. On these you can definitely see what I still have to do. Let me know if you'd like to know how I did something. Since I'm new to the GB scene I always feel everyone already knows, or does it better. Also, any constructive criticism is appreciated. Part of the reason I'm here is to learn ya know... Cool

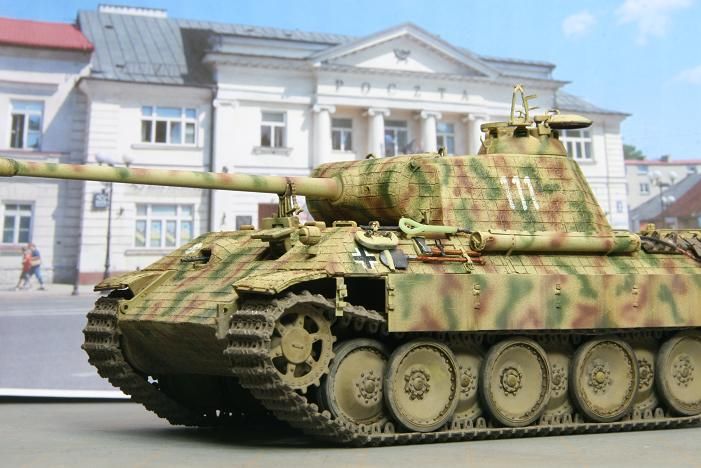
And - for those interested, here is the actual photo I took for that BW fake wartime pic. (Glad I fooled some of you - haha Wink) I basically just printed the photo of the present day building I found that matched the one in the 1944 photo and hung it behind my Panther. BW filter, film grain and old photo action in Photoshop and 5 minutes later...

JOIN OUR COMMUNITY!

Our community is FREE to join. To participate you must either login or register for an account.

SEARCH FORUMS
FREE NEWSLETTER
By signing up you may also receive reader surveys and occasional special offers. We do not sell, rent or trade our email lists. View our Privacy Policy.