SEARCH FINESCALE.COM

Enter keywords or a search phrase below:

Steel Cats (Sept. 2012-Aug. 2013)

322303 views
3330 replies
1 rating 2 rating 3 rating 4 rating 5 rating
  • Member since
    March 2003
  • From: Western North Carolina
Posted by Tojo72 on Saturday, December 1, 2012 4:18 PM

I was finally able to get a small start on my Tamiya Early Tiger

  • Member since
    September 2009
  • From: Rugby, England
Posted by Hinksy on Saturday, December 1, 2012 5:50 PM

Hey Bish,

I use anything between a size 0 brush to a size 5/0 brush to apply the streaking effects. First off you make sure that you shake the bottle well and keep stirring it as all the good stuff sinks to the bottom very quickly.

On the turret roof for example I used 'Winter Streaking Grime' and a size 0 brush. I applied many lines on the sloped area of the roof - too many but it doesn't matter. I wait about 3 minutes and then take a flat tipped brush humidified with AK Odourless Thinner and gently 'pull' the painted lines down the turret until they change from thick lines to quite faint, thin ones.  For this I used a sturdy bristled flat-tipped brush about 0.75" wide. It's honestly very simple matey - if I can do it then you definately can Bish!

Note: when applying the streaks before thinning them dont paint them on in broad stokes. I put the right amount on the small brush and 'flick' it up and down quite quickly so the brush just makes contact. Don't paint it on as if painting a line.

I'm sure I've shown you this link but just incase - watch this clip from 24 minutes onwards and you will have an idea. Unfortunately he is showing run off from around riveted areas so is displaying a lot more control than I would use it for on my turret roof as he is trying to shape the streaks:

The AK Washes, Fading and Oils DVD is what you need!

http://www.youtube.com/watch?v=mJH6LqczUK0

Good luck old buddy,

Ben Toast 

On the Bench - Dragon Pz. IV Ausf. G (L.A.H.) Yes

Your image is loading...


  • Member since
    April 2005
  • From: Piscataway, NJ!
Posted by wing_nut on Saturday, December 1, 2012 9:22 PM

I have that DVD and I could not agree more.  Very informative.  And very simple techniques that have great results. 

I have the winter technique DVD too but have not looked  at it yet.  But since I had a Panther A in my hands today thanking that it would look nice in a winter scheme.  Guess i will be watching that video soon. 

Eric... i think I will likely have a 3rd entry fore the build.Stick out tongue


Ben that Tiger is smokin'.  I like the tracks added tot ge front.

Marc  

  • Member since
    December 2002
  • From: Bury St Edmunds, Suffolk, England
Posted by Bish on Sunday, December 2, 2012 3:24 AM

Nice one Ben, thanks.

I am a Norfolk man and i glory in being so


On the bench: Airfix 1/72nd Harrier GR.3/Fujimi 1/72nd Ju 87D-3

  • Member since
    August 2009
  • From: MOAB, UTAH
Posted by JOE RIX on Sunday, December 2, 2012 8:33 AM

Ben - Absolutely Outstanding. I really love the weathering effects. Looking forward to the final pics so I can give this sweet cat a thorough looking over.

Tojo - Very nice start. Heck, it appears you're a bit further along than me.

"Not only do I not know what's going on, I wouldn't know what to do about it if I did". George Carlin

  • Member since
    November 2003
  • From: Nashville, TN area
Posted by bobbaily on Sunday, December 2, 2012 8:48 AM

Ben-Again, very nice build.  Are you going to build your Panther G for this GB?  Hope so-that's the kit I'm working on and would love to see how you tackle it.

Tojo-Great start-looking forward to more progress pics.

Bob


  • Member since
    March 2003
  • From: Rain USA, Vancouver WA
Posted by tigerman on Sunday, December 2, 2012 11:52 AM

Ben, that zimmerit really does look great on the Tiger, especially after the wash. I too have the same Panther G in my stash. I heard it was a flawless kit and the G is my favoirte. I built the older Night fighting one years ago and it was a decent kit, but heard it was a knock off of the Gunze multi-media kit.

Tojo, glad to see some work. I feel so useless here anymore, it's very frustrating. Hopefully I can get my camo on next weekend.

Malone, good for you on another entry.

   http://i7.photobucket.com/albums/y269/wing_nut_5o/PANZERJAGERGB.jpg

 Eric 

  • Member since
    March 2003
  • From: Rain USA, Vancouver WA
Posted by tigerman on Sunday, December 2, 2012 11:56 AM

Malone, I must have missed your completed build, can you post another picture so i can get it on page one with the others. thanks.

Dave, you're still working on the panther correct?

   http://i7.photobucket.com/albums/y269/wing_nut_5o/PANZERJAGERGB.jpg

 Eric 

  • Member since
    September 2009
  • From: Rugby, England
Posted by Hinksy on Sunday, December 2, 2012 1:31 PM

Hi guys,

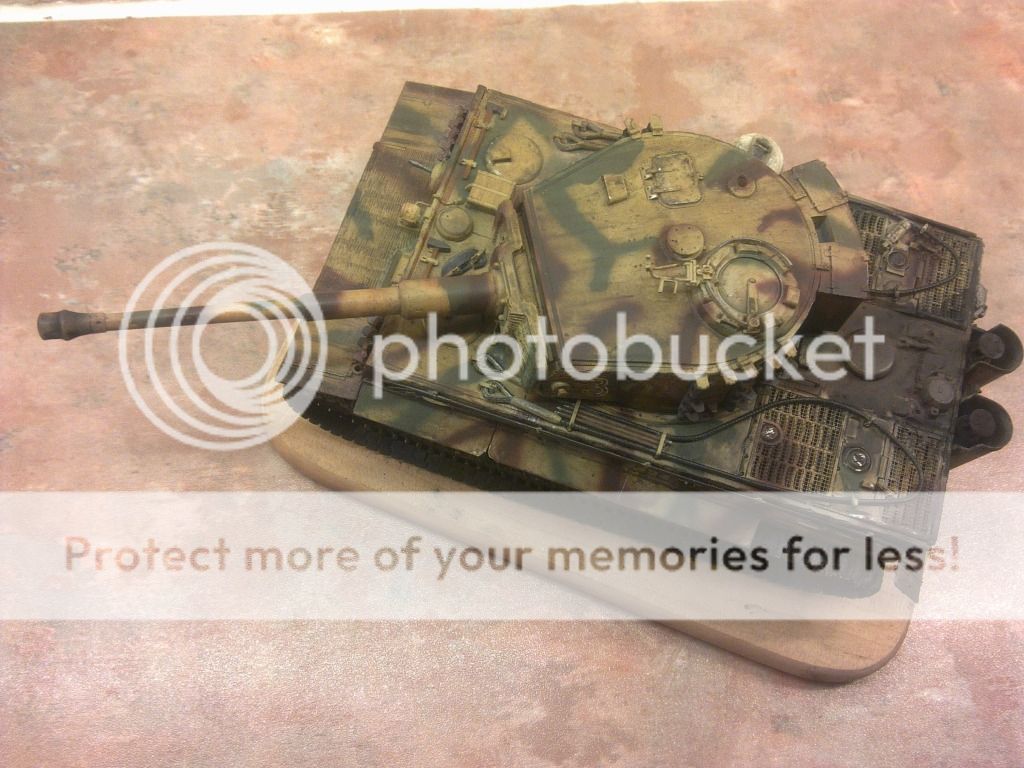
Well, after a few frantic hours this afternoon I'm pleased to be able to say that the TIGER I IS COMPLETE

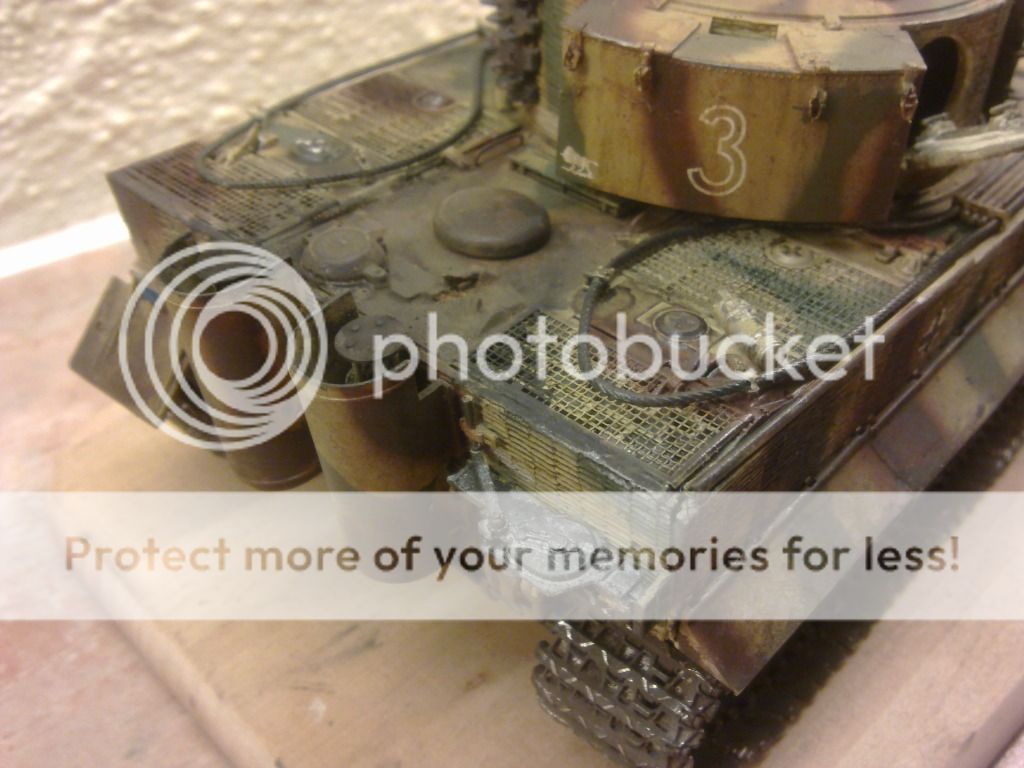
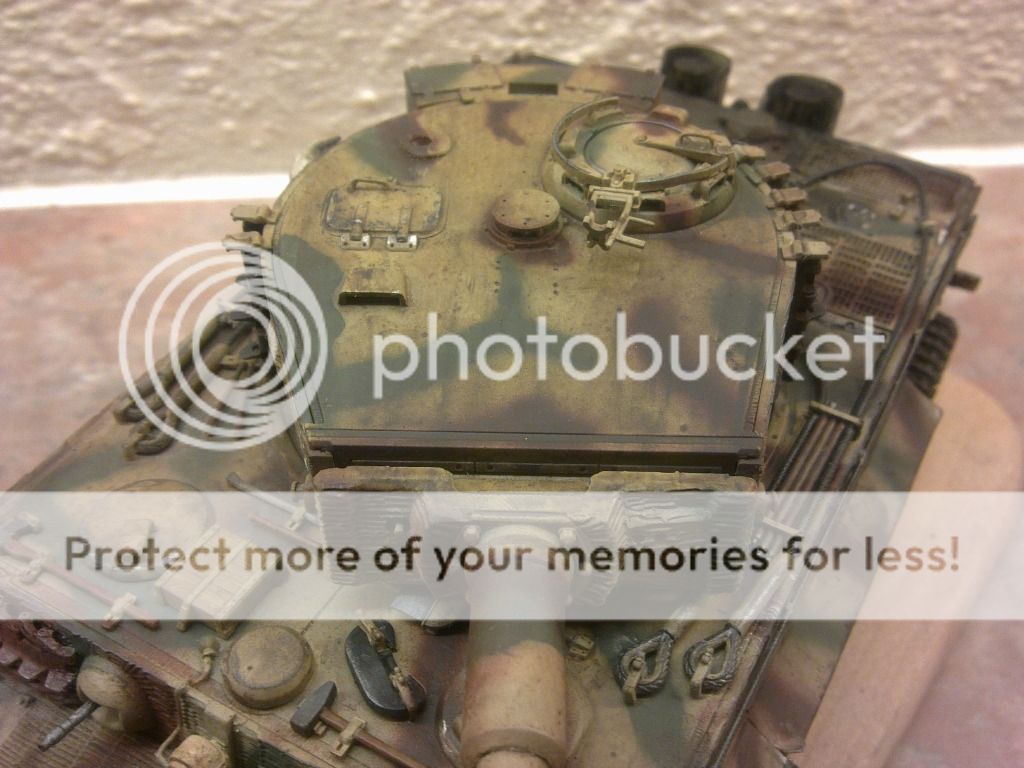
I started the day by adding a light airbrushing of Vallejo Matt Varnish and I then added the pigments - both loose and fixed using thinners. The exhausts have been treated with black soot and the engine deck has been treated with thinned Mig Grease/Oil mixture and Black Soot.

The Friuls, apart from being blackened using AK's Burnishing Fluid have been coloured by flooding them with a mix of Mig Russian Earth Pigment and Thinner which dries to a nice dry mud appearance - I finished them off prior to fitting by filing the guide horns and raised areas on the treads.

Before I post photos for you guys to look over I'd like to mention that I'm going to be taking this build to a lot of shows next year so I'm going to be making up a simple rocky base. The spent shells will be added when she is on the base. I'll be starting the base next weekend onwards and will be working on it as and when but I'd like to have the base ready by Christmas. I'll still be posting updates but the build is complete. I might add a couple of spare helmets on the turret links etc but this is my entry into the GB:

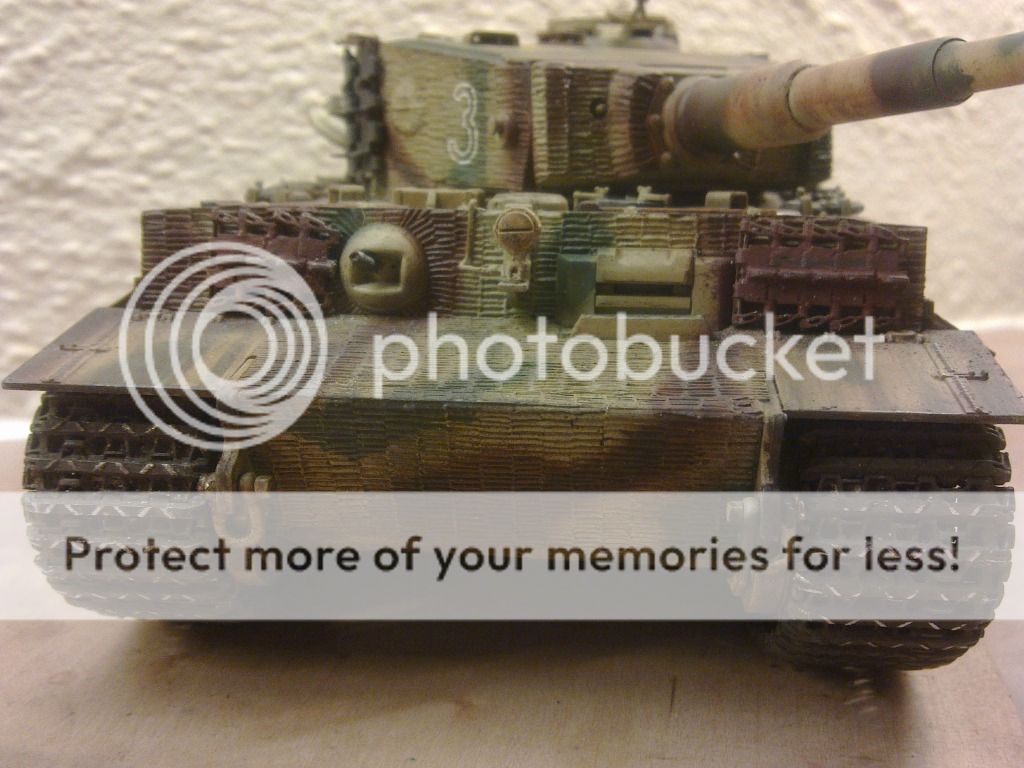
1/35 Tiger I Ausf E in Anzio, Italy 1944 (c/w Friuls and RB Barrel):

Thanks for looking guys - I'd love to hear any comments and suggestions for the base that I'll be building.

A huge thanks goes to Tigerman who has been a great host for this great GB! Thanks Buddy!

I'll be starting a new build after Christmas but am undecided between that Elefant, Pz. IV G, my Christmas Panther or my Flakpanzer I A (all 1/35 Dragon kits)! Not forgetting that Bronco Comet too! 

I'm feeling a bit of love for that Elefant at the minute but that Panther looks great too!

Cheers guys,

Ben Toast

On the Bench - Dragon Pz. IV Ausf. G (L.A.H.) Yes

Your image is loading...


  • Member since
    April 2011
  • From: imperial beach, ca
Posted by malone duke on Sunday, December 2, 2012 2:17 PM

Hinsky: it looks great to me man, the only concern I have is the fire extinguisher on the back deck. I would either change the tone or paint it a different color. Just to give it separation from the overall color of the tiger. Otherwise it's spot on. Good job.

Tiger man:  I'm still waiting for some proper lighting for my final pics. My lamps at the desk are just too yellow.  Still plugging holes in the panther.  Honestly this guy reminds me of Swiss cheese.

  • Member since
    September 2009
  • From: Rugby, England
Posted by Hinksy on Sunday, December 2, 2012 4:35 PM

Thanks Duke - that's the kind of honest feedback I need.

I'm calling it 'done' but whilst I'm working on the base and shell cases it's stuff like this that can be looked at.

How do you think I should paint it? I was under the impression that is should match the basecoat or be of a similar shade?

Cheers buddy,

Ben Toast

On the Bench - Dragon Pz. IV Ausf. G (L.A.H.) Yes

Your image is loading...


  • Member since
    November 2009
  • From: SW Virginia
Posted by Gamera on Sunday, December 2, 2012 9:48 PM

Looks great to me Ben! Love the dark streaking effects you did on the turret.

Come on- go Christmas Panther- it's newest so you must want to build it the most!

"I dream in fire but work in clay." -Arthur Machen


  • Member since
    April 2011
  • From: imperial beach, ca
Posted by malone duke on Sunday, December 2, 2012 10:30 PM

Hinsky I'm gonna post a pic that will help tomorrow. Along with a few others. But I've seen them grey, green, tan and red.

  • Member since
    March 2003
  • From: Rain USA, Vancouver WA
Posted by tigerman on Sunday, December 2, 2012 11:18 PM

Thanks Ben, I appreciate you and your WIP. It's been a pleasure to follow.

If you go for that gorgeous Panther G, you'd qualify for two badges. Big Smile

   http://i7.photobucket.com/albums/y269/wing_nut_5o/PANZERJAGERGB.jpg

 Eric 

  • Member since
    April 2006
  • From: ON, Canada
Posted by jgeratic on Monday, December 3, 2012 1:51 AM

Ben, your Tiger turned out great, really grubby n' grimy  like a battle hardened  veteran.  Is the dark dirt on the lowers representative of wet mud?  If so then the base should reflect this I think.

For the fire extinguisher to stand out, maybe adding some dark pin washes around the straps, and possibly add a label to it?  Some of the tool clamps could also use the above pin wash.  Missing-lynx has a good thread on panzer fire extinguishers, and lots of pics.

http://www.network54.com/Forum/47207/thread/1163250742/external+fire+extingushers

It looks like there is a MG in the mantlet, if there isn't then just ignore this part.  In the photo from a bird's eye view, it looks like the muzzle is dark yellow - maybe it is suppose to be that colour?

Lastly, I think the darker exposed metal looks very convincing, while the brighter metallic  spots might be a bit too much, particularly the hinges on the loader's hatch on the turret top.  (I dunno, maybe judges aren't this anal - lol).

regards,

Jack

  • Member since
    September 2009
  • From: Rugby, England
Posted by Hinksy on Monday, December 3, 2012 6:11 AM

Hi guys,

Righto - I feel I've been a bit hasty in claming my build as 'complete' because it isn't. It will be complete when it's on the base and I'm happy with it!

Jgeratic - thanks for the photo of the extinguisher. I'm sure I've got a PE extinguisher mount/clamp somewhere and a spare extinguisher so I'm going to do that again. As for the Bow MG - the muzzle is fine, I've just checked but thanks for raising it as potential oversight on my part. Finally, the metallic spots on the hatch were an oversight so I'll be taking some weathering product to that area to tone it down. Thanks matey Beer

I've also just noticed that I forgot to show wear on the drive-sprocket teeth so I'll be sorting that asap too!

So, the Tiger I isn't finished but will be completed over the next few weekends - I'll claim my badge then!

I also want to sort my good camera out and take some decent photos so I'm going to need to sort out some extra lighting and buy some proper background paper - taking final photos on the kitchen worktop beneath the undercupboard flourescent lighting was lazy - apologies Embarrassed

I'm also going to start the Christmas Panther next so I'll be entering that into this GB too Yes

Take care guys,

Ben Toast

On the Bench - Dragon Pz. IV Ausf. G (L.A.H.) Yes

Your image is loading...


  • Member since
    March 2003
  • From: Rain USA, Vancouver WA
Posted by tigerman on Monday, December 3, 2012 9:43 AM

Sweet Ben. Can't wait to see my favorite tank built up.

   http://i7.photobucket.com/albums/y269/wing_nut_5o/PANZERJAGERGB.jpg

 Eric 

  • Member since
    April 2011
  • From: imperial beach, ca
Posted by malone duke on Monday, December 3, 2012 12:29 PM

hinsky, here's those pics

  • Member since
    April 2011
  • From: imperial beach, ca
Posted by malone duke on Monday, December 3, 2012 2:35 PM

here some completes

  • Member since
    April 2011
  • From: imperial beach, ca
Posted by malone duke on Monday, December 3, 2012 4:11 PM

and some more in progress shots, i finally get to add some pieces tonight

  • Member since
    November 2003
  • From: Nashville, TN area
Posted by bobbaily on Monday, December 3, 2012 6:20 PM

Malone-Again, nice job on the Tiger.  I really like the camo scheme.

Questions about your current build-what brand is it and I noticed the big holes filled in-was it necessary to drill out some imperfections or remove some raised detail?  You may have mentioned it & if so, I apologize.

Bob


  • Member since
    April 2005
  • From: Piscataway, NJ!
Posted by wing_nut on Monday, December 3, 2012 6:34 PM

Tojo... looking good buddy... keep at it.

Ben... It looks great.

MD...  Nice completion and a good start all at the same time.

OK... officially done now.  The guys are glued in w/cigarette burning, jack, jack block, cupola MG and blister MG added.

To me this is one of those that falls in the gray area between a base and a dio.  A bit more than the former but not as elaborate as the latter.  Lots of stupid title ran though my head but I think I like... very unofficial of course...

"When do you 3 dummkoffs start smoking?"

Build #3 TBA... soon!Stick out tongue

Marc  

  • Member since
    April 2009
  • From: Carmel, IN
Posted by deafpanzer on Monday, December 3, 2012 7:42 PM

Marc- I enjoyed following your WIP and I still find it hard to believe it is only in 1/72 scale.  

Ben- I know I have said this already

Guys- Holy smokes!!!  My last Tiger post is on 11th page already.  I am so glad this GB is still kicking! Finally found the way back to my work bench over the weekend.  My plan to work on Tiger over long holiday weekend failed big time.  Here's why...

Nice owner at my fav hobby shop gave this kit to my son for free while we were shopping.  My son wanted to build it as soon as we got home. LOL Soon he wants me to paint it too... 

Back to my Tiger... Jack was correct.  I found a good diagram in one of my reference books.  I will fill in the pin marks when I have the chance.  Photo for discussion purpose only! 

Also I have corrected the length of turret MG... it was too long earlier.

Finally started the turret...

Was planning to use this set but realized they are not dressed properly for the winter in Russia and they are really for early Panzers.

This arrived today... going to use them.

Hoping things slow down at work due to the holidays that I can have more bench time during week nights if I am not too tired. 

Andy

  • Member since
    April 2011
  • From: imperial beach, ca
Posted by malone duke on Tuesday, December 4, 2012 1:46 AM

Bobbaily.  It's the dragon kit. The holes were for mounting the tools etc. also there is a lot of chunky detail to remove.

Wingnut   That's one sweet set up.

Deaf panzer. Your build looks ultra clean. I'm excited to see how the alpine figures come out.

Sorry to say nothing to report on mine tonight. Me and the misses had the walking dead marathon dvred so we got glued to the idiot box.

  • Member since
    March 2003
  • From: Rain USA, Vancouver WA
Posted by tigerman on Tuesday, December 4, 2012 1:58 AM

Malone, beautiful Tiger. Just the right amount of weathering if you ask me. That zimmerit is perfect.

   http://i7.photobucket.com/albums/y269/wing_nut_5o/PANZERJAGERGB.jpg

 Eric 

  • Member since
    September 2009
  • From: Rugby, England
Posted by Hinksy on Tuesday, December 4, 2012 5:44 AM

Hi guys,

Looking good!

Malone - thanks for the photos of the extinguishers - they will help a great deal Toast

I think it was you who mentioned the MG on my Tiger saying the muzzle was painted DY - sorry but I thought you meant the bow MG - the turret MG IS painted DY and will be corrected presently! Doh! Embarrassed

Lovely Tiger btw - perfection!

Andy - C'mon buddy, let's see some colour! If you paint and weather this to your recent standards he's gonna be the top build of this GB - GO ANDY!

Wingy - that KT looks great. I can't believe it's braille scale. Top job!

Ben Toast

On the Bench - Dragon Pz. IV Ausf. G (L.A.H.) Yes

Your image is loading...


  • Member since
    November 2003
  • From: Nashville, TN area
Posted by bobbaily on Tuesday, December 4, 2012 5:48 AM

Marc-the figures & base add a lot to an already excellent build.

Andy-I'm still in awe over your Tiger-the PE adds so much-I think a PE bending tool just got added to my Christmas wish list.

Bob


  • Member since
    November 2009
  • From: SW Virginia
Posted by Gamera on Tuesday, December 4, 2012 7:27 AM

Malone: The Tiger looks fantastic and the Panther looks like another winner there!

Marc: Wow! I thought your Tiger looked good before but she looks even better now with the figures and base in place. Personally I'd suggest as a title 'Smoke 'em if you got 'em' as a title though Wink

Andy: Great work with all the brass, love the co-axial MG. And sharp looking figures, I'm generally too cheap to spring for high quality figures like Alpine but they look so good painted up! BTW: are you going to post photos of the pirate pistol when you're done? Don't know what forum it would be but I'd like to see how it comes out. 

"I dream in fire but work in clay." -Arthur Machen


  • Member since
    May 2005
Posted by pyrman64 on Tuesday, December 4, 2012 8:22 AM

Malone: Nice 507 Tiger....no unit marking? Toast

Marc: Wonderful KT and base. Bow Down  The base seems to be missing something, maybe a section of fence or hedgerow? Huh?

Greg H

"There is many a boy here today who looks on war as all glory, but, boys, it is all hell." Gen. Wm T. Sherman (11 April 1880, Columbus, Ohio)

  • Member since
    April 2011
  • From: imperial beach, ca
Posted by malone duke on Tuesday, December 4, 2012 9:48 AM

Pyraman it's there. On the back plate to the left of the exhaust. Everything is tiny on this guy and my camera isn't the best. Hopefully well be getting my daughter a good one for Xmas so I can rob it and get better pics of these tiny beast.

JOIN OUR COMMUNITY!

Our community is FREE to join. To participate you must either login or register for an account.

SEARCH FORUMS
FREE NEWSLETTER
By signing up you may also receive reader surveys and occasional special offers. We do not sell, rent or trade our email lists. View our Privacy Policy.