SEARCH FINESCALE.COM

Enter keywords or a search phrase below:

Steel Cats (Sept. 2012-Aug. 2013)

322302 views
3330 replies
1 rating 2 rating 3 rating 4 rating 5 rating
  • Member since
    July 2012
Posted by Hasenpfeffer on Tuesday, December 11, 2012 1:18 PM

Andy - Those helmet liners look pretty cool. Nice touch. I have an observation: Should the outer most surface of those lifting studs be flat (like pic below)? or did some have the hole/indent?

and good call on that upside down helmet! Wink

  • Member since
    April 2005
  • From: Piscataway, NJ!
Posted by wing_nut on Tuesday, December 11, 2012 1:25 PM

I had heard the atak zim was thicker and I was looking for a Cav zim set for this kit but couldn't find one.  I've used the cav zim before  and love it but never tried the atak.  What is the number of the set you have?    The atak set I ordered says it is for the late a and this dragon kit bit the photo show the turret side as having the pistol port hole when the late A turret does not have that feature.  And I think I will chill a bit after this one.  But... ya never know.

Andy, love the added touch of the helmets.  And really dig that liner too.  Nice.

Marc  

  • Member since
    July 2012
Posted by Hasenpfeffer on Tuesday, December 11, 2012 1:38 PM

Hey Marc, the set I have is 35041. May be the same one, but since they make about 5 different patterns for Panthers, you never know. If it's the square pattern one that I have, there weren't pistol ports cut out of the turret sides. Not sure why they show it in the product pic.

And yeah, I spent WAAAY more time sanding the back of that stuff (carefully since any catch with the sandpaper was likely to buckle or break the pieces at the score lines) than actually applying it. You can see my learning curve if you look at the build pics.... pretty thick on the chassis/hull to looking pretty good on the upper hull/turret.

  • Member since
    April 2009
  • From: Carmel, IN
Posted by deafpanzer on Tuesday, December 11, 2012 1:48 PM

Marc- Thanks buddy!!!

Hasen- Great catch there... thanks!  I will check my reference book one more time before I have it primed.  Where do you get all of those great pictures!?!?!?  Dig the pic with helmet hanging that way.  It is really great having you with us in GBs.  

Andy

  • Member since
    July 2012
Posted by Hasenpfeffer on Tuesday, December 11, 2012 2:01 PM

Thanks, Andy. Glad to be here, man. I can admit that I spend a fair amount of time just looking for the pics on the internet. It's a great/cheap way to supplement my modest collection of reference materials. I never tire of coming across new photos, especially ones that show detail. Wink

  • Member since
    April 2011
  • From: imperial beach, ca
Posted by malone duke on Tuesday, December 11, 2012 4:17 PM

  • Member since
    April 2011
  • From: imperial beach, ca
Posted by malone duke on Tuesday, December 11, 2012 4:22 PM

ok i guess the first post didnt work so ill try again. so here;s some more pics. the wheels are all separate luckily, and i've added a few more parts here and there.  the turret was missing the rear hatch so i crafted one from a jagdpanther.  so tonight i should be able to add some pe.

  • Member since
    September 2009
  • From: Rugby, England
Posted by Hinksy on Tuesday, December 11, 2012 5:53 PM

Hi guys,

Andy - SWEEEEEET work old chum (as usual) Stick out tongue Seeing your post made me remember that I forgot to add a couple of spare helmets to my turret track links but in order to obtain spare helmets at the minute it would mean robbing them from my figure sets I've got saved up - they are moulded to fit actual figures so aren't hollowed out inside. I must buy some dedicated spare helmets - nice PE straps too Yes

SMJ & Hasenpfeffer - I'm simply going to stain that base a darker brown and add four sticky feet and use it as a simple base - I'll sort a nameplate for it next time I'm up town. I'm set on making a base for the Elefant - it's going to be a big build once assembled so I'll either use that big MDF base I have now or see what I can pick up at the UK Hinckley model show in March as I'll be aiming to complete the build around then? Thanks for all the tips re base-making guys as it will all help me!

I'm MUCH happier with that turret hatch closed now. It was totally wrong, should have been wide open and looked like it was just floating! It was bugging me BIG TIME! It would have worked as static scene with figures reloading through the hatch but of course the hatch needed to be wide open. Live and learn!

The Panzer III links are supposed to look like theyve been welded on. I was thinking about making up bolt head and small metal sheet detail to make them look like they'd been fixed that way but I'm ok with them as they are at the minute? Something to look into definately!

I'm chuffed to bit's with the Tiger - definately my best yet (imo at least). I'll be having those professional photos taken by my Godfather who is photography nuts at the weekend - the plan is to make them my completed pics then onto the Elefant (but I'm still not 100% - that Panther G sure does look nice and would make a great second GB entry)!

Cheers fellas - great GB Cool 

Ben Toast

On the Bench - Dragon Pz. IV Ausf. G (L.A.H.) Yes

Your image is loading...


  • Member since
    April 2006
  • From: ON, Canada
Posted by jgeratic on Wednesday, December 12, 2012 2:00 AM

Guys, awesome work!

For those interested in German helmets, here are a few manufacturers.  Both Ultracast and Attack Hobby make resin versions with liners already cast inside.

Or for those wanting to continue working with the shiny bits (and pay a premium price), brass version:

regards,

Jack

  • Member since
    March 2006
  • From: Right Side of a Left State
Posted by Shellback on Wednesday, December 12, 2012 2:02 AM

Joe , Dave , Steve thanks much guys .Toast

About the exhaust and chain weathering . I sprayed them Panzer gray as a base / primer color . I used Mig pigments over that . I use an empty container to mix the colors with water to make a small puddle of paste . Then i dab the paste onto the model with a stiff short bristled brush and let it dry  . When its dry i brush off the excess pigment with a soft long bristled brush . The first pigment was "smoke" . Over that i dabbed "old rust" then "standard rust " . Dont make these colors solid . A blotchy look is what your after . I added some blotches of "smoke " . Final color was "light rust " dabbed near the top curve of the exhaust . There is no straight forward steps to go through to get the look . I went back and forth with the colors and even started over twice . Using window cleaner with that stiff brush works well to remove most of the pigment but it sticks in the paint really well . Just keep working at it and be patient . Move onto another part of the model to break the monotony . A lot of times coming back to it gives you a fresh look at where your at . The chain was a pain , i attached it when it was painted in the panzer gray and it chipped easily . After i had it attached i touched up the gray and then applied the pigments using the three rust colors . I used a little "dry mud " pigment to high light the dust look on the chain .

I think thats about it guys .Good luck and have fun .Toast

Carl

  • Member since
    November 2009
  • From: SW Virginia
Posted by Gamera on Wednesday, December 12, 2012 7:25 AM

Andy: Those PE brass helmet lines look insane (insanely awesome that is).

Jack: Thanks for the photos- I didn't even know anyone made brass helmets like that. A little out of my price range I'll warrant but it's still cool just to know stuff like that is out there.

MD: Nice work on the Panther, gee with all the road wheels piled up like that it does look like a zillion of the things.

"I dream in fire but work in clay." -Arthur Machen


  • Member since
    August 2009
  • From: MOAB, UTAH
Posted by JOE RIX on Wednesday, December 12, 2012 8:21 AM

Carl - Thanks for tips. Immensely helpful.

"Not only do I not know what's going on, I wouldn't know what to do about it if I did". George Carlin

  • Member since
    April 2009
  • From: Carmel, IN
Posted by deafpanzer on Wednesday, December 12, 2012 9:34 AM

Guys- Thanks for the comments!

Jack- Great info about those resin helmets with liners.  Will keep that in mind when I am too old or tired to deal with PE. LOL 

Quick update on my Tiggy... 

Yes it is finally primed... paint is next! 

Andy

  • Member since
    March 2003
  • From: Rain USA, Vancouver WA
Posted by tigerman on Wednesday, December 12, 2012 10:39 AM

What do you use for your primer Andy?

   http://i7.photobucket.com/albums/y269/wing_nut_5o/PANZERJAGERGB.jpg

 Eric 

  • Member since
    April 2009
  • From: Carmel, IN
Posted by deafpanzer on Wednesday, December 12, 2012 10:51 AM

Meet my best friend Mr Surfacer... nobody does better job than those.  I was out of 1200 so I used 1000... just added more Mr Surfacer thinner.  Stick out tongue

Andy

  • Member since
    November 2009
  • From: SW Virginia
Posted by Gamera on Wednesday, December 12, 2012 12:55 PM

Carl: Thanks for the walk-though. I have a bunch of pigments but still not too good at using them.

Andy: Nice work! Love Mister Surfacer- not sure now how I ever did without it.

"I dream in fire but work in clay." -Arthur Machen


  • Member since
    December 2002
  • From: Bury St Edmunds, Suffolk, England
Posted by Bish on Wednesday, December 12, 2012 1:39 PM

Looking good Andy, though me thinks you may be takeing protection a tad to far. Smile

I am a Norfolk man and i glory in being so


On the bench: Airfix 1/72nd Harrier GR.3/Fujimi 1/72nd Ju 87D-3

  • Member since
    April 2005
  • From: Piscataway, NJ!
Posted by wing_nut on Wednesday, December 12, 2012 1:51 PM

Shades of Chukw. Stick out tongue 

Mr.S is a great product.

Marc  

  • Member since
    April 2009
  • From: Carmel, IN
Posted by deafpanzer on Wednesday, December 12, 2012 2:07 PM

Bish

Looking good Andy, though me thinks you may be takeing protection a tad to far. Smile

LOL!  Thanks guys!  Thought the picture would make you chuckle.  Too much protection?  Are you kidding me?  I wear helmet only when I model into very late night just in case my wife gets out of the bed to nag and throw objects at me for staying up so late... Wink

Andy

  • Member since
    December 2002
  • From: Bury St Edmunds, Suffolk, England
Posted by Bish on Wednesday, December 12, 2012 2:10 PM

I just make sure the Mrs is well satisfied the night before i want a late one. Works every time Wink

I am a Norfolk man and i glory in being so


On the bench: Airfix 1/72nd Harrier GR.3/Fujimi 1/72nd Ju 87D-3

  • Member since
    April 2007
  • From: Schroon Lake, NY
Posted by SMJmodeler on Wednesday, December 12, 2012 2:16 PM

Shellback:  Thanks for taking the time to describe your technique...unfortunately you didn't address the one thing I was hoping to learn about most...Black Eye...the dusty sloped armor was what really caught my eyeIndifferent.  I've seen this done before but I've been reluctatnt to try it because I'm worried that it will kill the color too much...yours is very well executed so I was hoping to pick your brain a bit for techniques.

  • Member since
    April 2005
  • From: Piscataway, NJ!
Posted by wing_nut on Wednesday, December 12, 2012 3:13 PM

Dave... so you felt the atak zim was so thick you wanted to (had to?) sand it down?

Mail comes in about an hour and hopefully there will be zim.  In the mean time, since I can't do too much, I noticed the welds on the top of the turret looked a little to deep down in a trough so that was filled with Squadron green, wiped with an acetone dampened q-tip and "welded' with one of my little tools for that task.

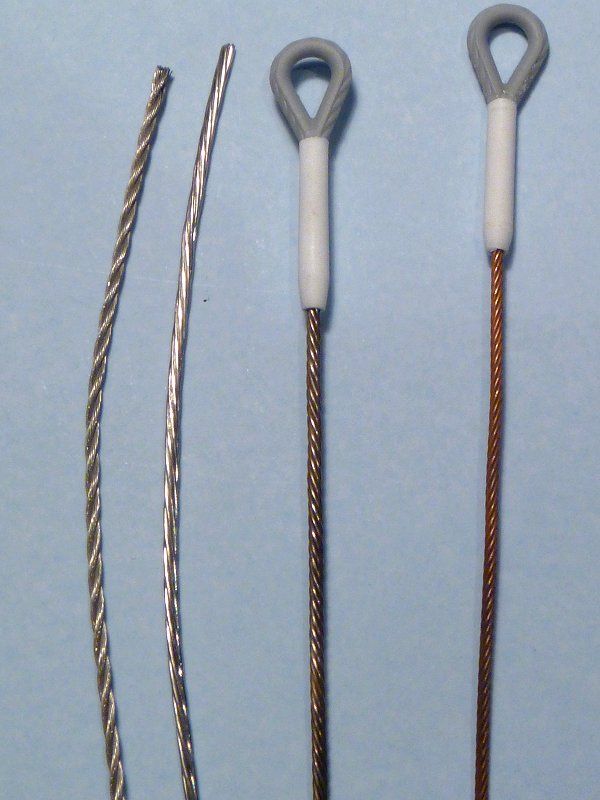
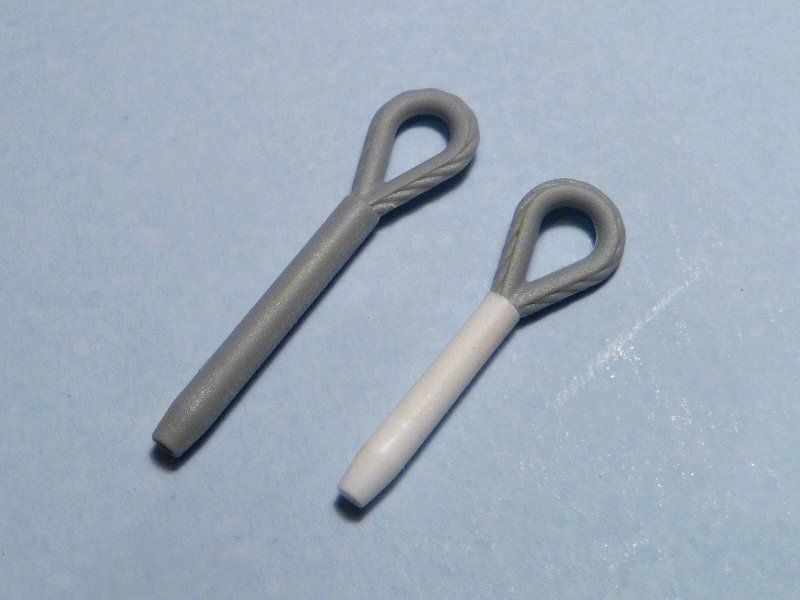
Kit didn't come with cables for some reason.  I had some extra tow loops in the sparse box.  The loop itself was the exact same size as the one the came in the G that was my 1st ever armor kit  from long ago in the before time.  The sleeve was too thick and long.  I chucked a piece of plastic tube in a Dremel and snaded from .095" to about .082", taped one end and glued the loop cut off the big one to the tube.

I went on a hunting mission yesterday looking for the cord that Carl used on his KT.  1st went to the biggest tackle shop around here... then Micheal,s AC Moore,  Hobby Lobby, Lowe's and Home Depot... NADA.  But I think I got this one all squared away.

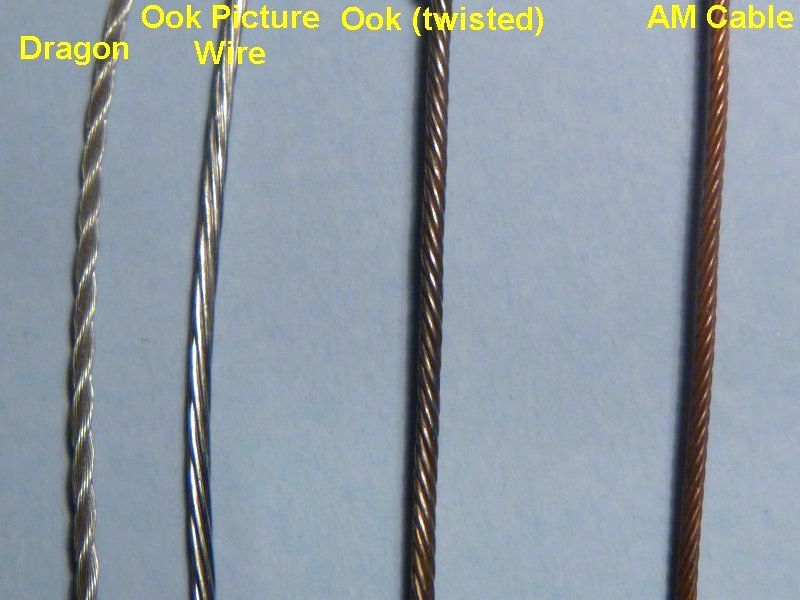
I've tried twisting all different kinds of wire in all different combinations and while some were OK... they were just OK.  If the twist was in any way uneven it didn't look right.   I've tried picture hanging wire before but it was of such poor quality... in the way it was twisted... it didn't look good either.   I looked at the picture wire section again and found one I had not seen before made by "Ook".  it covered with a clear plastic sheathing like an electric wire but the twist looked very even.  After taking the plastic off, annealing the cable to soften I tightened the twist and I am very pleased with the way it turned out.  The 1st pic below is a closeup of some wires/cables.  from left to right.. What usual comes in a Dragon kit (looks more like rope than cable), Then the Ook wire with the plastic off before and after annealing and tightening.  And an AM cable for armor.  Except for the fact the twist is opposite... and I won't tell anyone of you don't... the last 2 look pretty darn close to me.

The AM cable... $6 each and ya need 2.  The Ook cables... 9 feet for 3 clams.  At that price the twist nearly looks like it goes the right way after allWhistling

Marc  

  • Member since
    April 2007
  • From: Schroon Lake, NY
Posted by SMJmodeler on Wednesday, December 12, 2012 3:27 PM

deafpanzer

 
deafpanzer:  You use this stuff as a  PRIMER?...huhDunce  It sprays through an airbrush?  I've had some real clean-up nightmares with BRUSHES after applying Mr. Surfacer LET ALONE an airbrush!!!
 
I need some more info on this one because I'm intrigued by the idea...Do you texture the armor while it's wet for additional effects?

  • Member since
    April 2005
  • From: Piscataway, NJ!
Posted by wing_nut on Wednesday, December 12, 2012 3:37 PM

Steve I spray that through the AB all the time.  Thin with lacquer thinner to the consistency of any other paint.  The lacquer base gives it great "bite".  If you wanna do texturing with the stuff I would do that with a brush as it seems you may already be doing.

use the 1000 or 1200 for primer.  the 500 is best for texturing.  I have a really old jar of 500 that the top was maybe 99% sealed and over time it really got thick.  That stuff is texturing goldWink  And filling small gaps too.

Didn't mean to jump in on ya Andy but I happened to be here.

Marc  

  • Member since
    December 2002
  • From: Bury St Edmunds, Suffolk, England
Posted by Bish on Wednesday, December 12, 2012 3:45 PM

I keep hearing about this Mr Surfacer stuff. As i never prime, i haven't given it much thought. But the more i hear, the more it seems it has other uses. It might just be worth getting some.

I am a Norfolk man and i glory in being so


On the bench: Airfix 1/72nd Harrier GR.3/Fujimi 1/72nd Ju 87D-3

  • Member since
    July 2012
Posted by Hasenpfeffer on Wednesday, December 12, 2012 3:46 PM

Marc - Yeah, I thought it looked a lot better sanded down (the back side) so that the squares were barely held together by the extra resin. Was a challenge to be sure.

Great job on the tow loop. A little shorter but looks really good.

... and I won't tell anyone if you don't that if you flip the cable over end to end it will reverse the twist... Whistling

(EDIT: Never my my smartassedness... I was wrong!)

  • Member since
    April 2005
  • From: Piscataway, NJ!
Posted by wing_nut on Wednesday, December 12, 2012 4:07 PM

No worries Dave.  I didn't think you were a smart ass.  I knew you were wrongStick out tongue

Marc  

  • Member since
    July 2012
Posted by Hasenpfeffer on Wednesday, December 12, 2012 4:14 PM

Yeah, deserved that one, lol... ouch. Embarrassed

How'd you twist it tighter and evenly?

  • Member since
    April 2005
  • From: Piscataway, NJ!
Posted by wing_nut on Wednesday, December 12, 2012 5:40 PM

Nah, no ouch.  Just bustin' your onions.  One thing about me is I am rarely seriousBig Smile  You'll know when I am Whistling

I made a hook from a hat pin because that metal is really hard and has little flex.  Put that in a pin vise and got the chuck as tight as I could so it didn't spin.  Used pliers to really sung it down.  Twisted a small loop in one end of the wire and grabbed the other end with the pliers.

Marc  

  • Member since
    April 2009
  • From: Carmel, IN
Posted by deafpanzer on Wednesday, December 12, 2012 5:47 PM

SMJmodeler
deafpanzer:  You use this stuff as a  PRIMER?...huhDunce  It sprays through an airbrush?  I've had some real clean-up nightmares with BRUSHES after applying Mr. Surfacer LET ALONE an airbrush!!!
 
I need some more info on this one because I'm intrigued by the idea...Do you texture the armor while it's wet for additional effects?

Steve- Yeah like Marc said earlier I use it all the times as primer.  Nothing does better than Mr Surfacer.  Makes it a lot easier for me to paint on especially figures as it bites very well and stays ON too! 

Cleaning can be pain in ass but I am used to it.  I use Klean-Strip Lacquer Thinner and it worked very well.  One quart would go long way... that's why I wear mask and rubber gloves. 

Marc- Thanks for the great tip!  It bugs me alot when I cough so much just for two tiny AM cables... so I will definitely give OOK wire a try.   

Andy

JOIN OUR COMMUNITY!

Our community is FREE to join. To participate you must either login or register for an account.

SEARCH FORUMS
FREE NEWSLETTER
By signing up you may also receive reader surveys and occasional special offers. We do not sell, rent or trade our email lists. View our Privacy Policy.