SEARCH FINESCALE.COM

Enter keywords or a search phrase below:

Steel Cats (Sept. 2012-Aug. 2013)

322302 views
3330 replies
1 rating 2 rating 3 rating 4 rating 5 rating
  • Member since
    May 2011
  • From: Illinois
Posted by armor86 on Tuesday, December 25, 2012 11:09 AM

Greetings - Merry Xmas - enclosed photo of presents ...

Several AK interactive paint / weathering sets - Weathering Set for early panzers (AK 072), DAK weather set for Africa Korps Tanks (AK 068), Enamel Wash Dark Yellow AK 300.

CMK 5 cm KwK 39 L/60 gun & mantlet with spaced armor - Gun for Pz.Kpfw.III Ausf J (early)  

CMK 7.5 cm KwK 40 L/43 with mantlet & early muzzle Gun for Pz.Kpfw.IV Ausf. F 2

Bison Decals - Tigers in Africa #1 and #2 

Dragon 6406 - Tiger I Late - 3 in 1 kit. with DS track ... kit doesn't have Zimmerit - anyone have suggestions on which aftermarket would best suited ... Armor86


Dan

  • Member since
    December 2002
  • From: Bury St Edmunds, Suffolk, England
Posted by Bish on Tuesday, December 25, 2012 12:05 PM

Nice little haul Armour. I have the same Tiger kit, its looks a real nice one. Not sure on the Zimm as i do my own. I know i didn't go over board on the AM, just a Voyager set and a barrel.

I am a Norfolk man and i glory in being so


On the bench: Airfix 1/72nd Harrier GR.3/Fujimi 1/72nd Ju 87D-3

  • Member since
    November 2009
  • From: SW Virginia
Posted by Gamera on Tuesday, December 25, 2012 12:56 PM

She looks even better Bish with the sharper photos, can really see all the neat detail you put in there. Thanks for cleaning up the photos guys and congrads again Bish!

Armor86: Wow, Christmas feast with all the trimmings!

Didn't get any armour for Christmas, just the Masterbox figures I posted over on the Ready Room and a bunch of non-armour stuff. The tools are on the Tiger and worked on the tow cables last night while watching 'A Christmas Carol' and 'Miracle of 34th Street' Propeller

"I dream in fire but work in clay." -Arthur Machen


  • Member since
    March 2003
  • From: Rain USA, Vancouver WA
Posted by tigerman on Tuesday, December 25, 2012 5:20 PM

Armor, I have the same kit and picked up the Cavalier set for the Dragon Tiger I. I got mine at Spruebrothers.

Merry Christmas everyone.

   http://i7.photobucket.com/albums/y269/wing_nut_5o/PANZERJAGERGB.jpg

 Eric 

  • Member since
    September 2006
  • From: Dripping Springs, TX, USA
Posted by RBaer on Wednesday, December 26, 2012 10:27 AM

Merry Christmas to all, and it looks as if the modeling elves have been very busy lately.

Bish, nifty oddity there, nice dust.

Armor86, just looking at your pics makes my vision fuzzy.

Marc, jeez, man, nice work but slow down, dude. You make me look like I'm working in a different dimension or universe or something.

I have my friuls test-fitted, ready to come back off and be weathered. Then for some final dust and crew and I'll call this one done. Hopefully this will happen over the next few days......

Apprentice rivet counter.

  • Member since
    April 2005
  • From: Piscataway, NJ!
Posted by wing_nut on Wednesday, December 26, 2012 6:15 PM

OK... It's the 26th... fun's over. GET BACK TO WORK >:(

Hope everyone had a lovely day. We did what's sometimes referred to as the "Jewish Christmas"... a movie and Chinese food. And my wife should know ::) Saw "The Hobbit" in 3D... freakin' awesome.

Thanks you to all that took the time to stop by and commented.

1st thing this AM went out to get a gallon of lacquer thinner... LET THE PAINTING BEGIN! So far only primed with Mr. Surfacer 1200. Had a problem with the dk yellow. Mixed the paint, added the lacquer and it turned in the thick oily mess. You can see the slick on top and the way it's not coating the side of the cup. Anyone have this problem with Tamiya paints?

The PE track racks on the sides of the hull were too thin and the tabs were breaking. YO DRAGON! Why were these tabs separate and not all one piece to be bent and be STRONGER? Whatever. The plastic parts were sanded down to get them a bit thinner and drilled of drain.

Marc  

  • Member since
    March 2003
  • From: Rain USA, Vancouver WA
Posted by tigerman on Thursday, December 27, 2012 12:14 AM

Marc, I've only thinned Tamiya with alcohol. I think a lacquer would more more suited for enamels. Tamiya are acrylics.

   http://i7.photobucket.com/albums/y269/wing_nut_5o/PANZERJAGERGB.jpg

 Eric 

  • Member since
    March 2003
  • From: Rain USA, Vancouver WA
Posted by tigerman on Thursday, December 27, 2012 12:20 AM

Ok. My goal is to get back in the game on New Years Day, assuming the wife isn't gung ho about tearing everything down. I hope to get part two of the camo on and see how it stands. If all is well, then I'll camo the wheels and spray a lightened base coat.

   http://i7.photobucket.com/albums/y269/wing_nut_5o/PANZERJAGERGB.jpg

 Eric 

  • Member since
    April 2006
  • From: ON, Canada
Posted by jgeratic on Thursday, December 27, 2012 3:09 AM

Marc - your assembly line looks to be pumping out another winner.

As for the Tamiya problem, I've never used lacquer  to thin their paints, just their dedicated thinner - though they do have a lacquer type as well.  I did have a problem recently with another build when I added their white to lighten up another acrylic brand.  After stirring I never bothered to check the reaction, but poured this 'home brew' into the airbrush cup.  It worked for a few seconds then nothing.  Pouring out the paint, I discovered the Tamiya white had separated and had settled into a gooey mess.

regards,

Jack

  • Member since
    November 2009
  • From: SW Virginia
Posted by Gamera on Thursday, December 27, 2012 8:35 AM

I've been told Tamiya thins very well with lacquer thinner like Gunze. Tried it a few times and it worked pretty well but didn't see that big an improvement over  the windshield washer fluid I normally use. The times I did use it I didn't have it separate or do anything strange like that though- weird...

"I dream in fire but work in clay." -Arthur Machen


  • Member since
    December 2002
  • From: Bury St Edmunds, Suffolk, England
Posted by Bish on Thursday, December 27, 2012 8:39 AM

Gamera, RBaer, thanks very much. Well pleased with this and a big thank you to all those who helped with the photo's. Looking forward to seeing some more great builds on here.

I am a Norfolk man and i glory in being so


On the bench: Airfix 1/72nd Harrier GR.3/Fujimi 1/72nd Ju 87D-3

  • Member since
    July 2012
Posted by Hasenpfeffer on Thursday, December 27, 2012 12:21 PM

Mike (TB379) - Thanks a ton for the kudos, man. It's strange, I really liked the way it came out - my best ever, for sure - but I certainly don't feel like I'm in league with guys who get their stuff published... Tongue Tied Glad your move went ok. Looking forward to you getting sorted and some pics of the KT!

Marc - Panther is looking really good. I'm anxious to see it in it's winter jacket, and how you do it. I didn't like the PE spare track racks either. I bent them quite a bit, but was lucky they didn't break. A miracle for sure. They seem a touch thin, even for scale, along with the pins. As for the Tamiya paint fiasco, I've read (probably like you) of guys using lacquer thinner to good effect, but I've never tried it since I've had good results with isopropyl alcohol. There was no need to try anything different. At least you caught it before trying to apply it... or we'd have to come up with some catchy "paint master" type moniker for ya... Whistling

Eric - I've decided to try this next - if you'll allow it. I lightly started some engine detail ~25+ years ago. This is a far less detailed kit... I'll be adding the Cavalier zimmerit, the Bronco indy tracks, and some sort of AM barrel. Maybe the barrel from the CH kit I just made. We'll see, as plans seem to change as I go along. I also have a very old set of On the Mark PE (for an Ausf G) that I may scavenge from for some detail. I keep looking at this and asking myself where all the parts are...

and the engine detail I started as a teenager... haven't checked to see how correct it is yet, but not likely.

... and to prove I haven't given up on the figure for my finished Panther. A ton more to go. That camo is a real bugger. This is after a lot of practice on spare Pz IV side skirts and superfluous figures...

  • Member since
    December 2002
  • From: Bury St Edmunds, Suffolk, England
Posted by Bish on Thursday, December 27, 2012 12:55 PM

After doing dragon kits, some of these others can seem a bit sparse in the box. But nice to see these older kits still being built.

I am a Norfolk man and i glory in being so


On the bench: Airfix 1/72nd Harrier GR.3/Fujimi 1/72nd Ju 87D-3

  • Member since
    April 2005
Posted by Thunderbolt379 on Thursday, December 27, 2012 4:36 PM

Dave -- not at all, kudos where kudos are deserved! And that engine is very sharp work for a teenager, I sure couldn't add styrene and wire details when I was that age!

Looking forward to seeing the older Panther come together, I'm a big advacoate of modern techniques being used on older kits -- I love early Tamiyas, for instance, they are just such fun to build!

Can't wait to bring the KT together!

Cheers, Mike/TB379

http://worldinminiature.blogspot.com/

  • Member since
    March 2003
  • From: Rain USA, Vancouver WA
Posted by tigerman on Thursday, December 27, 2012 6:44 PM

Dave, sounds good to me. I welcome another Panther to the fold.

   http://i7.photobucket.com/albums/y269/wing_nut_5o/PANZERJAGERGB.jpg

 Eric 

  • Member since
    April 2005
  • From: Piscataway, NJ!
Posted by wing_nut on Friday, December 28, 2012 8:36 AM

Cool Dave, looking forward to another Panther.

I didn't use the metal barrel on mine so it's yours if you want it.  I had to use the plastic muzzle brake but if the Italeri's part is OK should be an easy to adapt.  PM your address if you want the barrel.

Marc  

  • Member since
    July 2012
Posted by Hasenpfeffer on Friday, December 28, 2012 9:36 AM

Hey Marc, that's a very gracious and generous offer! I really appreciate it. Yes I don't think I need to hit you up on this one though as I believe I have the same barrel left over from my finished "Black Knight" Panther... complete with muzzle brake. Of course, I lost that little intermediate ring you glue inside there. I haven't decided what I'm gonna do yet as the mantlet will have to be modified to accommodate any new barrel. (...and the kit barrel is too short)

I noticed while looking over the kit last night that the Cavalier supplied mantlet it pretty warped in 2 dimensions. Total bummer. I will try some hot water and tweaking, but it's thick enough that it may not be possible to reshape it enough - does that work w/resin? That left me with thinking about applying putty and raking it on the mantlet alone. If I do that, I will have to relocate the coaxial MG opening as it's badly misplaced on the Italeri part. This all should be fun in of itself...

Thanks again for thinking of me...

Cool 

  • Member since
    September 2006
  • From: Dripping Springs, TX, USA
Posted by RBaer on Friday, December 28, 2012 3:47 PM

Oy veh, Chinese Christmas.......  we ended up at a Friday's, only place open.

I have actually made progress, went to take pics this AM and didn't have the memory card in the camera....drat. Pics to come, I promise.  In the meantime, still lots of nice work going on here, good stuff.

Apprentice rivet counter.

  • Member since
    August 2009
  • From: MOAB, UTAH
Posted by JOE RIX on Friday, December 28, 2012 10:48 PM

Has - Alright, I'm looking forward to this project from you. like the others have said it will be great to see an older kit being put together. Gives me some inspiration since three of my meager armor stash are the older Tamiya Jagdpanther, an even older Italeri Elefant and an 80's Testors M4A3 Sherman. I've still wanted to build these so I hope to gain a little insight on improving them. As for the engine it sure appears to me that you were off to a rather nice start.

 Our trip here to Seattle is almost at an end and although I will be missing my new grand daughter I am terrible itchin' to get back to the bench where I will unburdened by the weight of x-mas and planning for travel and can fully focus on the Tiger for awhile.


"Not only do I not know what's going on, I wouldn't know what to do about it if I did". George Carlin

  • Member since
    March 2003
  • From: Rain USA, Vancouver WA
Posted by tigerman on Saturday, December 29, 2012 12:36 AM

Feeling excited. I hope to hit the bench on Sunday, but again, I feel I'll have "duties" to perform. Tuesday should be wide open I hope, so with some luck the camo will be on and maybe the tires painted. Then come the tracks. That will take a couple of days at least, not to mention the paint. Argh. The deadline seems much closer then it is.

   http://i7.photobucket.com/albums/y269/wing_nut_5o/PANZERJAGERGB.jpg

 Eric 

  • Member since
    April 2005
  • From: Piscataway, NJ!
Posted by wing_nut on Saturday, December 29, 2012 9:32 AM

No worries Dave, the offer stands if it works out that you need it.  If not and someone else wants it... give a shout out.

Painting camo sure is easy when you don't really care too much about the look.  This is all the base for the white wash.  And to be honest, taking the pressure off and it turned out pretty good i think and took about 3 minutes.  A test fit of the schurzen too.

Marc  

  • Member since
    March 2003
  • From: Rain USA, Vancouver WA
Posted by tigerman on Saturday, December 29, 2012 10:36 AM

Pretty nice camo job for such a quickie. I couldn't do better if I had more time.

   http://i7.photobucket.com/albums/y269/wing_nut_5o/PANZERJAGERGB.jpg

 Eric 

  • Member since
    July 2012
Posted by Hasenpfeffer on Saturday, December 29, 2012 11:39 AM

Marc - Lookin' good man... got any tips for getting the paint to stick to the aluminum or steel parts better? I had a heck of a time with those steel side skirts... even primed they wanted to flake big chunks off when handled just a little roughly.

Well guys, you sure know how to put the pressure on... LOL Whistling I hope I don't disappoint. I plan on using a fair amount of the vast amount of extra parts supplied in my last CH kit. I can't believe how much is left over. Barrel, cupola, tools... I want to add detail, but I really don't want to spend much money on this one. I'll see where I can get creative.

Here's a start - As mentioned previously, the replacement part (mantlet) that came with the Cavalier zimmerit set is a little warped. I am hoping to get it straightened out enough that I can use it since it is so much better looking than the others.

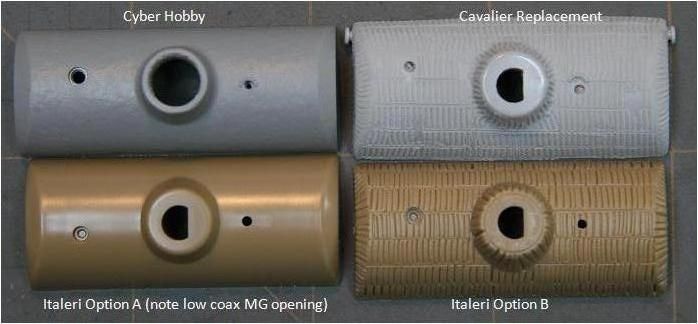
Second option is to add putty zimm to the original part. I'd have to correct the MG opening though. Not sure why it's like that since the replacement zimm'ed part seems to be correct. (Added the CH part to show dimensional difference in kits.)

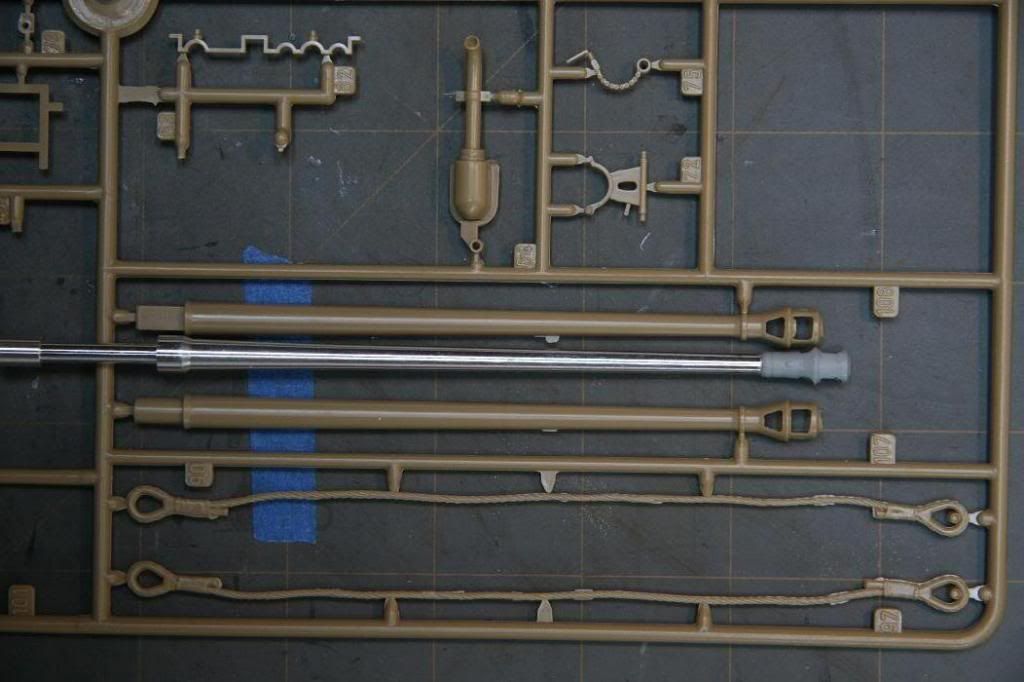
Here is the left over barrel I plan on using with some modification to the mantlet opening to accommodate. (Compared to Italeri kit part which is considerably shorter.)

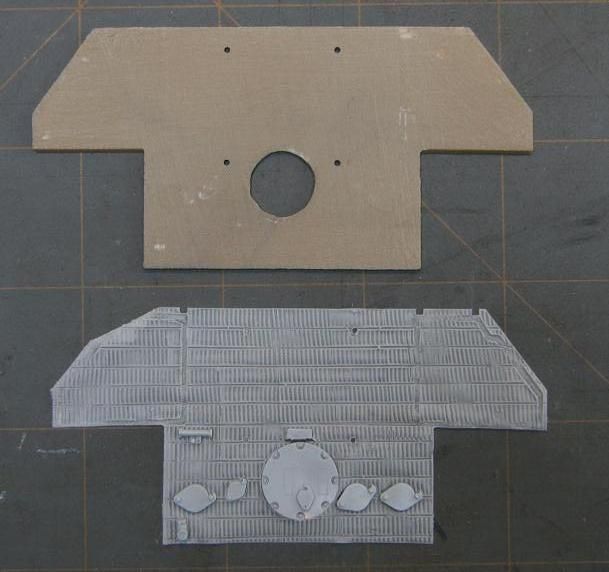
Here is a shot of what is required to use the Cavalier zimmerit here. All of the raised/molded on detail must be removed as it is included on the resin addition. Here is the rear hull plate with the detail removed and sanded. It left a hole where the main access cover was. I had to fill that in with some sheet styrene and putty as the replacement cover was located a little lower. The raised detail was also removed from the rear turret plate (rain shield and hatch retainer latch) for the Cavalier part.

(Upper left corner of Cavalier part came folded over... arg... Angry)

So - progress to date... lower hull started with some zimm applied. I like the thickness of the Cavalier zimmerit. It required less preparation of the actual part to be applied... but that was replaced by having to cut off raised detail/filling/sanding on the kit part - which can be a real PITA. Looks pretty darn good when it's finally on there though. 

  • Member since
    August 2009
  • From: MOAB, UTAH
Posted by JOE RIX on Saturday, December 29, 2012 11:40 AM

Very nicely done indeed Marc. I'm curious. What airbrush do you use to obtain such magnificant results?

"Not only do I not know what's going on, I wouldn't know what to do about it if I did". George Carlin

  • Member since
    November 2003
  • From: Nashville, TN area
Posted by bobbaily on Saturday, December 29, 2012 12:10 PM

Marc-If my camo would turn out half that well, I'd have to think twice before a white wash....looks great.

Dave-coming along very nicely-the zim looks good-you're going to have a very nice Panther once you're done.

Bob


  • Member since
    April 2011
  • From: imperial beach, ca
Posted by malone duke on Saturday, December 29, 2012 3:12 PM

i blinked, so sorry guys too much awesome stuff going on. just got back into town so i have to check up on every body's pics. i will say bish what a cool panther man. and the hooks are pe not wire. i aint that good yet. so here's some hull pics.

  • Member since
    May 2005
Posted by pyrman64 on Saturday, December 29, 2012 3:52 PM

MD: hate to be the bearer of bad news, but the sliding vents were only on the right side  vents.

On the other hand, that Panthere's looking mighty fine.

Greg H

"There is many a boy here today who looks on war as all glory, but, boys, it is all hell." Gen. Wm T. Sherman (11 April 1880, Columbus, Ohio)

  • Member since
    April 2011
  • From: imperial beach, ca
Posted by malone duke on Saturday, December 29, 2012 4:23 PM

NOT BAD NEWS AT ALL MAN, I HAVE LIKE NO REFERENCE, SO JUST FOLLOWING INSTRUCTIONS. I MAINLY POST SO YOU GUYS CAN HELP WHEN I'M OUT OF LINE.  SO BOTH VENTS ON THE RIGHT SIDE?  DRIVERS SIDE OR PASSENGER?

  • Member since
    July 2012
Posted by Hasenpfeffer on Saturday, December 29, 2012 4:39 PM

malone - for clarification, he means the rectangular air intakes on the left side would not have the shutters. Only the right side ones would. (grilles fore and aft of the taller circular heater unit would not include these shutters)

If you are still confused, I can dig up a pic...

EDIT: ok, so here is a pic from Achtung Panzer No. 4 of the engine deck. Should clear things up nicely. 

Panther is coming along nicely too. Love the detail for 1/72.

  • Member since
    April 2005
  • From: Piscataway, NJ!
Posted by wing_nut on Saturday, December 29, 2012 5:24 PM

Hey thanks guys.

Dave, I always go over any metal parts, whether it's PE or barrels or as in the this case the AL schurzen, with a sanding stick to give the surface some "tooth" for the paint to hold on to.  In this case though I am adding the step of some Krylon metal primer before the color coats.

Joe this was shot with a Badger 155 Anthem.

Bob, oh yes, there have been 2nd thoughts... but I must be strongStick out tongue  Besides, Dave already has the perfect 3 color camo late Panther A in the completed list.  I am old and fat and can't clear that barBig Smile

Marc  

JOIN OUR COMMUNITY!

Our community is FREE to join. To participate you must either login or register for an account.

SEARCH FORUMS
FREE NEWSLETTER
By signing up you may also receive reader surveys and occasional special offers. We do not sell, rent or trade our email lists. View our Privacy Policy.