SEARCH FINESCALE.COM

Enter keywords or a search phrase below:

Floatplane/Seaplane Group Build 2012

39353 views
189 replies
1 rating 2 rating 3 rating 4 rating 5 rating
  • Member since
    September 2003
  • From: AandF in the Badger State
Posted by checkmateking02 on Friday, September 21, 2012 10:02 PM

Helo H-34

the family have curtailed my spending on any more kits for the rest of the year .

John .

 
GASP!  Surprise Crying
 
I don't know how I'd survive!  Deepest sympathy. 


  • Member since
    July 2007
  • From: Southern New Jersey
Posted by troublemaker66 on Friday, September 21, 2012 8:02 PM

Old Ordie

Len,

By the start of WWII, most Seamews had been replaced in the fleet by the Kingfisher, though a few SOC3's did see action, IIRC.  By the end of the war, the Kingfishers were being replaced by Seahawks.  Is the Czech 1:48 kit still available retail, if you know?

Mark

I`m not sure if it`s still in production. I picked mine up on EBay and I still see them listed from time to time. I saw one for sale at either Bill & Walts Hobbies.com or plasticmodelkits.com. I took it out of the box with the intent on building it but put it right back when I realized it was gonna be a tough build...just got done the Modelcraft F-82 Twin `Stang...the mother of all builds..and didn`t want to jump into another nightmare. Good luck!

Len

Len Pytlewski

  • Member since
    May 2012
  • From: Milford, Ohio
Posted by Old Ordie on Friday, September 21, 2012 7:21 PM

Len,

By the start of WWII, most Seamews had been replaced in the fleet by the Kingfisher, though a few SOC3's did see action, IIRC.  By the end of the war, the Kingfishers were being replaced by Seahawks.  Is the Czech 1:48 kit still available retail, if you know?

Mark

John - Bummer about the curtailed model buying, dude.  Oh well, the New Year is not far off Smile.

Flight deck:  Hasegawa 1:48 P-40E; Tamiya 1:48 A6M2 N Type 2 ('Rufe')

Elevators:  Airfix 1:72 Grumman Duck; AM 1:72 F-4J

  • Member since
    July 2007
  • From: Southern New Jersey
Posted by troublemaker66 on Friday, September 21, 2012 5:17 PM

Old Ordie

Hello all,

I saw this kit in the new arrivals section of my favorite OHS, and thought I'd pass it on.  I looked for a Seamew a few months back when I was binge-buying floatplane/seaplane kits for my stash, but couldn't find an SOC3C for love or money anywhere.  This is a Sword kit in 1:72 (too bad - I'm a 1:48 guy by choice - but better than nothing, eh?).  I'll probably be picking one up for the stash sometime soon.

Smile

It`s an interesting looking plane but, a miserable failure IIRC. I have the 1/48 Czech model and it looks like it`s gonna be a bear....gotta love short-run kits....Big Smile

Len

Len Pytlewski

  • Member since
    September 2003
  • From: Australia
Posted by Helo H-34 on Friday, September 21, 2012 3:44 PM

Hi Ordie ;

That SOC3C kit looks very nice and very tempting . I may have to wait until the New year to pick one up as the family have curtailedmy spending on any more kits for the rest of the year .

Still no paint on the Sea Dart or Widgeon as yet , I did do some glueing on the Airfix Grumman Duck and the fuselage halves went together much better than the Airfix Widgeon , so I'm happy with how the Duck is progressing . I'll upload some WIP pic's shortly .

John .

  • Member since
    May 2012
  • From: Milford, Ohio
Posted by Old Ordie on Friday, September 21, 2012 2:43 PM

Hello all,

I saw this kit in the new arrivals section of my favorite OHS, and thought I'd pass it on.  I looked for a Seamew a few months back when I was binge-buying floatplane/seaplane kits for my stash, but couldn't find an SOC3C for love or money anywhere.  This is a Sword kit in 1:72 (too bad - I'm a 1:48 guy by choice - but better than nothing, eh?).  I'll probably be picking one up for the stash sometime soon.

Smile

Flight deck:  Hasegawa 1:48 P-40E; Tamiya 1:48 A6M2 N Type 2 ('Rufe')

Elevators:  Airfix 1:72 Grumman Duck; AM 1:72 F-4J

  • Member since
    May 2012
  • From: Milford, Ohio
Posted by Old Ordie on Monday, September 17, 2012 1:41 PM

taxtp

Having had a closer look at the Wildcatfish, the kit has a number of deficiencies. I'm looking at the option of combining a Hasegawa F4F-3 with the necessary parts from the Wildcatfish kit.

More info to follow.

Cheers

Tony

Actually increases the excitement of your build, I think, cobling the two kits together for a better product.  I'm looking forward to following along.  Combine away!

Smile

Flight deck:  Hasegawa 1:48 P-40E; Tamiya 1:48 A6M2 N Type 2 ('Rufe')

Elevators:  Airfix 1:72 Grumman Duck; AM 1:72 F-4J

  • Member since
    April 2005
  • From: Australia
Posted by taxtp on Sunday, September 16, 2012 7:33 PM

Having had a closer look at the Wildcatfish, the kit has a number of deficiencies. I'm looking at the option of combining a Hasegawa F4F-3 with the necessary parts from the Wildcatfish kit.

More info to follow.

Cheers

Tony

I'm just taking it one GB at a time.

  • Member since
    April 2005
  • From: Australia
Posted by taxtp on Sunday, September 16, 2012 7:29 PM

Probably a good thing Stoutfella. If you're not enjoying it, you're missing the point. I hope you enjoy the 109, those Tamiya kits are fantastic.

Cheers

Tony

I'm just taking it one GB at a time.

  • Member since
    May 2012
  • From: Milford, Ohio
Posted by Old Ordie on Friday, September 14, 2012 3:06 PM

stoutfella - Sorry to hear you are suspending your build, but not to worry.  I will keep you on the roll, and if you get back to it, great.  The build has already been extended once, and very well could be again, so there's time.  If you pick your Kingfisher back up, or start a different seaplane build, your already in.  Please do keep checking in with us.  Good scale modelling to you!

Ordie

Smile

Flight deck:  Hasegawa 1:48 P-40E; Tamiya 1:48 A6M2 N Type 2 ('Rufe')

Elevators:  Airfix 1:72 Grumman Duck; AM 1:72 F-4J

  • Member since
    September 2003
  • From: AandF in the Badger State
Posted by checkmateking02 on Friday, September 14, 2012 11:11 AM

Crying

Sorry to hear this, Stoutfella.  Maybe in a few months you can go back and redeem the effort. 


  • Member since
    January 2012
  • From: East Peoria, IL
Posted by stoutfella on Friday, September 14, 2012 9:12 AM

Greetings,

Thanks to all for the pep talks after my discouraging experience with the Kingfisher, but I'm afraid I'm calling quits on this one, at least for now. After stewing about it for a while, I tried to do some sanding on the gritty primer, and used a microbrush applicator to get most of the lint and gunk off the canopy ribs. I fired up the airbrush and sprayed a couple of coats of Tamiya flat white on the bottom surfaces, hoping it might go on smoothly enough to even things out a bit more. But it remains a big pebbly mess. I really screwed the pooch with my rattle-can primer experiment. I think the only thing for it at this point is to strip it all off and start over, and I haven't got the stomach for it right now. So I'm moving on to the Tamiya BF109E3 (and ordering some Mr. Surfacer 1200 for future priming).

I will continue to check in here and see how everyone else is doing, and one of these days I might have the fortitude to return to the Kingfisher.

Cheers,

Stoutfella

On the bench: 1/48 Tamiya Bristol Beaufighter

On deck: 1/48 Tamiya P51-B

  • Member since
    May 2012
  • From: Milford, Ohio
Posted by Old Ordie on Saturday, September 8, 2012 1:47 PM

Looking good, John.  I'm looking forward to seeing the SeaDart in all its glory. The Widgeon, too. Smile

Flight deck:  Hasegawa 1:48 P-40E; Tamiya 1:48 A6M2 N Type 2 ('Rufe')

Elevators:  Airfix 1:72 Grumman Duck; AM 1:72 F-4J

  • Member since
    September 2003
  • From: Australia
Posted by Helo H-34 on Saturday, September 8, 2012 12:39 AM

My Sea Dart and Widgeon are ready for masking and I'm quite happy that I'm almost ready to paint both builds

I took a bit of artisic licence with the Sea Dart cockpit and canopy , I scrounged around the decal spares box and found an instrument panel decal to use , an Airfix pilot has signed up for the first test flight and I decided to pose the canopy open by fitting a small brace piece to the inside of the canopy , ( i think it came from a Academy P-51D kit ) and two small support struts to hold it open . My canopy is tentatively sitting in place for photographic and visual reference ...( fancy speak for not glued in place yet )

She looks great being viewed from front on as well

Masking next then painting .

John .


  • Member since
    September 2003
  • From: AandF in the Badger State
Posted by checkmateking02 on Wednesday, September 5, 2012 3:07 PM

John, what an ingenious idea to fix the nacelles!  I don't think it would have ocurred to me.


  • Member since
    September 2003
  • From: AandF in the Badger State
Posted by checkmateking02 on Wednesday, September 5, 2012 3:05 PM

stoutfella

This has become the most frustrating build since I started back in the hobby at the start of the year. I may sleep on it, but I'm about ready to tuck this one in a corner somewhere and move on to the Tamiya BF-109 that's next in the stash.

Big sigh Dead

 
This, I know, is most disappointing, Stoutfella.  Hopefully you can redeem the situation somehow.  It seems that at any step in building, something can go terrifically wrong.  I'm certain we all know this from hard, disconcerting experience. 


  • Member since
    May 2012
  • From: Milford, Ohio
Posted by Old Ordie on Wednesday, September 5, 2012 2:48 PM

stoutfella - The catapault seaplanes of WWII took quite a beating during their service lives - the bumps could be blisters in the paint, or distressed rivets, or ????   Or, you might take some 1000 or 1200 grit sandpaper to the primer and even it out, no gimmick required (go easy on the raised lines, though).  Anyway, I hope you stick it out.  Good luck!

Flight deck:  Hasegawa 1:48 P-40E; Tamiya 1:48 A6M2 N Type 2 ('Rufe')

Elevators:  Airfix 1:72 Grumman Duck; AM 1:72 F-4J

  • Member since
    September 2003
  • From: Australia
Posted by Helo H-34 on Wednesday, September 5, 2012 7:34 AM

Well , we're certainly off to a not so great start when it comes to painting our builds , first Len's orange colour peels off in places and now stoutfella has a bit of bad luck with the primer . I hope these are only minor set backs guy's , especially given all the work that has gone into the builds so far .

A little more work done on my Grumman widgeon with the engine nacelle's fitting very nicely onto the wing and the wing assembly equally fitting quite well onto the fuselage .

When it came to glueing the fuselage halves together , I cut the locating pins from one fuselage side as it caused both halves to misalign with each other . In any case I'm happy how the engine nacelle's now look , with a big thankyou to len's 'psychic' abilities in sending he's thoughts through the air and waking me up at 5am with exactly the same idea.......'arn't group builds fun !

The canopy is a little too wide for the fuselage and there are some gaps along the top and bottom of the windscreen to deal with

I'm not too worried about the fit of the windscreen several applications of micro krystal kleer should fill the gaps nicely . At least now she's slowly looking like a sea plane .

John .


  • Member since
    July 2007
  • From: Southern New Jersey
Posted by troublemaker66 on Tuesday, September 4, 2012 9:18 PM

stoutfella

Greetings,

Sad to say, guys, but I'm extremely close to throwing in the towel on the Kingfisher. It just seems to be one of those cases where everything I touch turns to crap. The latest:

I plowed my way through masking the five Crying canopies and fastened them in place with Testors clear parts glue, preparing to prime the beast. I've had trouble finding a satisfactory, go-to primer and had seen some people on the forums say they've used rattle-can auto primer with good results, so thought I'd give that a go.

Stopped at the local Lowe's, which didn't have a huge selection, and picked up a can of Rustoleum automotive primer. I sprayed a bit on a sheet of leftover plastic and it seemed to go on relatively smoothly.

Trotted the Kingfisher out to the garage and proceeded to have at it. Sprayed a first coat as lightly as I could, but it seemed less smooth than my test. Sprayed a second coat and hoped for the best. But, as you can see below, the stuff went on super-thick and left a nasty, pebbly surface. Plus, just to top it all off, every bit of lint and dust in the air apparently landed on the ribs of the canopy between all the masking tape I laboriously spent hours putting down.
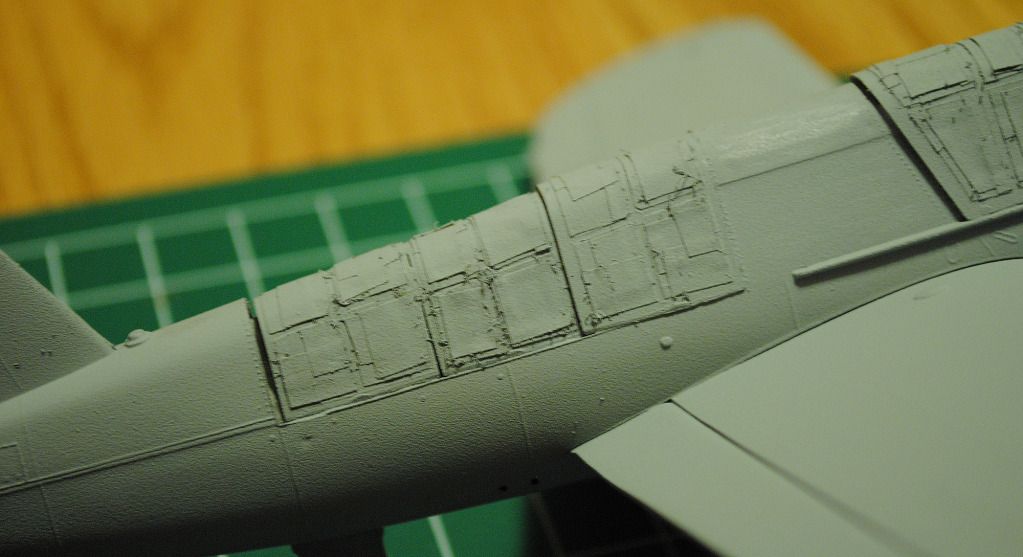
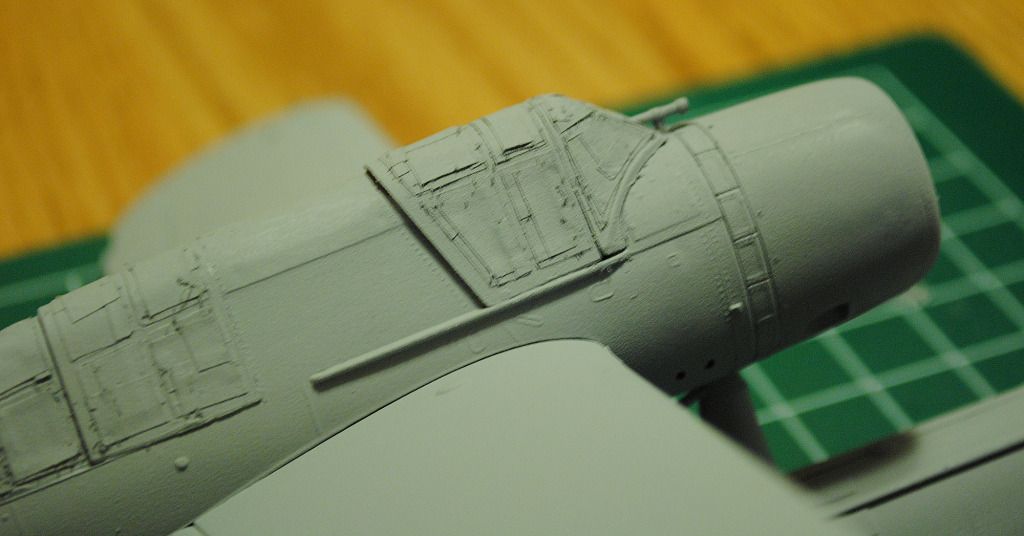
This has become the most frustrating build since I started back in the hobby at the start of the year. I may sleep on it, but I'm about ready to tuck this one in a corner somewhere and move on to the Tamiya BF-109 that's next in the stash.

Big sigh Dead

Let the primer dry thoroughly and just wipe off the "cobwebs" with a paper towel. I`ve had the same thing happen to me several times in the past...got alot of dust around my bench and before I lay down a finish coat I use a tack cloth. That isn`t a "build-killer". The best primer I used was Alclad`s primer/filler...kinda like Mr. Surfacer.. fills in slight scratches and puts a beauty of a primer down..nice and smooth. I don`t like rattle cans, no control. Try decanting the auto-primer and use your airbrush to apply it. I was just watching Galaxy Quest...never give up, never surrender!!Stick out tongueTongue TiedBig Smile

Len Pytlewski

  • Member since
    January 2012
  • From: East Peoria, IL
Posted by stoutfella on Tuesday, September 4, 2012 7:41 PM

Greetings,

Sad to say, guys, but I'm extremely close to throwing in the towel on the Kingfisher. It just seems to be one of those cases where everything I touch turns to crap. The latest:

I plowed my way through masking the five Crying canopies and fastened them in place with Testors clear parts glue, preparing to prime the beast. I've had trouble finding a satisfactory, go-to primer and had seen some people on the forums say they've used rattle-can auto primer with good results, so thought I'd give that a go.

Stopped at the local Lowe's, which didn't have a huge selection, and picked up a can of Rustoleum automotive primer. I sprayed a bit on a sheet of leftover plastic and it seemed to go on relatively smoothly.

Trotted the Kingfisher out to the garage and proceeded to have at it. Sprayed a first coat as lightly as I could, but it seemed less smooth than my test. Sprayed a second coat and hoped for the best. But, as you can see below, the stuff went on super-thick and left a nasty, pebbly surface. Plus, just to top it all off, every bit of lint and dust in the air apparently landed on the ribs of the canopy between all the masking tape I laboriously spent hours putting down.

This has become the most frustrating build since I started back in the hobby at the start of the year. I may sleep on it, but I'm about ready to tuck this one in a corner somewhere and move on to the Tamiya BF-109 that's next in the stash.

Big sigh Dead

Cheers,

Stoutfella

On the bench: 1/48 Tamiya Bristol Beaufighter

On deck: 1/48 Tamiya P51-B

  • Member since
    May 2012
  • From: Milford, Ohio
Posted by Old Ordie on Tuesday, September 4, 2012 6:56 PM

Neatly done, John.  Bravo!  Bow Down

Flight deck:  Hasegawa 1:48 P-40E; Tamiya 1:48 A6M2 N Type 2 ('Rufe')

Elevators:  Airfix 1:72 Grumman Duck; AM 1:72 F-4J

  • Member since
    July 2007
  • From: Southern New Jersey
Posted by troublemaker66 on Tuesday, September 4, 2012 3:53 PM

Helo H-34

I'm glad to hear things might be working out with the orange paint Len .

It's just after 5am here in Sydney and I suddenly woke up with a bit of a brain storm . Instead of filing and sanding and puttying the engine nacelles to fit on the Widgeon which would be a lot of work , I thought about splitting open the rear of the nacelles and adding a piece of plastic strip the appropiate thickness and just spread the back of the nacelle open to fit into the wing

This should work out nicely ...Wink

John .

You won`t belive this but, while reading your post earlier, I thought exactly the same thing about adding plastic to the cowl! I was in work and was rudely interrupted by, well, work....Wink and couldn`t reply. Anyway, great minds think alike...Beer

Len Pytlewski

  • Member since
    September 2003
  • From: Australia
Posted by Helo H-34 on Tuesday, September 4, 2012 2:41 PM

I'm glad to hear things might be working out with the orange paint Len .

It's just after 5am here in Sydney and I suddenly woke up with a bit of a brain storm . Instead of filing and sanding and puttying the engine nacelles to fit on the Widgeon which would be a lot of work , I thought about splitting open the rear of the nacelles and adding a piece of plastic strip the appropiate thickness and just spread the back of the nacelle open to fit into the wing

This should work out nicely ...Wink

John .

  • Member since
    July 2007
  • From: Southern New Jersey
Posted by troublemaker66 on Tuesday, September 4, 2012 10:25 AM

I just realized why the orange pulled up on my build...it`s sprayed on top of Tamiya aluminum and doesn`t have enough bite. I re-masked and sprayed the orange again, looks pretty good. Painted the wheel wells flat white and then sealed everything with future. More pics soon,prolly after some decaling.

Len

Len Pytlewski

  • Member since
    September 2003
  • From: Australia
Posted by Helo H-34 on Tuesday, September 4, 2012 7:26 AM

I don't know if it's just my computer but it took me qiute a few attempts at uploading the previous page as half the WIP pic's you guy's posted were not coming up , just big empty squares where the images should be .

I finally succeeded after a while ; Len , that's bad luck with the Tamiya orange peeling off in places . I airbrush mostly with Gunze and Tamiya acrylics and I know how sometimes the Tamiya acylic seems to dry a little soft compared to Gunze . If it were me I probably would try and re-touch the affected area's , although that's easierly said then done . I hope it works out anyway .

Ordie , great info on the P6M-2 Seamaster and I have to agree that it's a shame it didn't go into full production , I really like the look of this beast . My Mach 2 kit arrived today and I was allowed one quick look inside the box before it was put away for Christmas

Very , Very Nice.....Stick out tongue

I just need to add the pitot to the front of the Sea Dart and glue the canopy in place and it will be ready for painting . The Grumman Widgeon is coming along okay , despite the fit of the airfix kit not being all that great . I ditched the kit supplied pilot and found two (volunteer's) replacement figures from the spares box

There are going to be some major issue's fitting the engine nacells onto the wing as they are a little undersize in width when fitted back to the wing

another view from straight on

Their not glued on yet , just sitting in place but I may have to file/sand the molded sections on the wing and try and contour everything to look correct , perhaps even build up the back of each engine nacell with some putty as well . It's just a bit hard to belive they are so undersize this much .....Bummer .

I hope the 'Duck' fits together better !

John .


  • Member since
    January 2012
  • From: East Peoria, IL
Posted by stoutfella on Monday, September 3, 2012 3:26 PM

Len: i think the chipping looks fine, but yeah, if you wanted it to be clean it may bug you every time you look at it.

Ordie: yes, it was a pretty good size gap, but I made it harder than it needed to be. I've been using plain old vinyl spackle to fill gaps like that, after finding Squadron green putty impossible to work with. I know the spackle can be porous, but it's really easy to work with. Well, I was at Hobby Lobby last week and they'd gotten in some Tamiya putty and I decided to give it a try. But I really wish I wouldn't have tried it in that spot, as it's really difficult to sand it smooth without obliterating the raised detail. Just one more little frustration with this kit.

Cheers,

Stoutfella

On the bench: 1/48 Tamiya Bristol Beaufighter

On deck: 1/48 Tamiya P51-B

  • Member since
    May 2012
  • From: Milford, Ohio
Posted by Old Ordie on Monday, September 3, 2012 2:14 PM

Len - Yeah, I'll go along with checkmateking02 - but it does look like 'natural' weathering, in case you decide otherwise (I know I'd be thinking it over real hard if I were you - sanding on that raised detail ...).

stoutfella - Great job masking the canopy sections (the worst part of building for me). They'll look great after painting.  That was a big seam there between the elevator and the fuse, looks like.

Carry on.

Flight deck:  Hasegawa 1:48 P-40E; Tamiya 1:48 A6M2 N Type 2 ('Rufe')

Elevators:  Airfix 1:72 Grumman Duck; AM 1:72 F-4J

  • Member since
    September 2003
  • From: AandF in the Badger State
Posted by checkmateking02 on Monday, September 3, 2012 12:18 PM

Oh, I hate when that happens, Len.  If you originally wanted a pristine finish, then I think I'd fix it.  Of course, I always then worry that it'll happen again the second time.


  • Member since
    July 2007
  • From: Southern New Jersey
Posted by troublemaker66 on Monday, September 3, 2012 10:39 AM

OK...here`s the tail and main wing after removing the masks.(won`t even try to post between). Opinions are needed on the tail....some of the orange pulled up, exposing the aluminum underneath...kinda looks like weathering to me but I kinda wanted a pristine paint job. The Tamiya orange is a PITA...just doesn`t want to cover without a half dozen coats. What do you guys think...look like natural paint chipping or should I fix it?

The last few are a quick mock up...the wings fit so good I wouldn`t really have to glue `em...last is a shot of the decals.

Thanks for looking,

Len

P.S.   Decal obviously is next to last because this format stinks.....Bang Head

Len Pytlewski

  • Member since
    July 2007
  • From: Southern New Jersey
Posted by troublemaker66 on Monday, September 3, 2012 10:24 AM

Here`s an update on my Albatross...

masked off the tail, after painting most of it Tamiya orange, to paint the leading edges of the wings semi-gloss black for de-icing boots. Did the same for the main wing....Still having trouble with this @&*%$ format...trying to add text between pics and it won`t let me...this sucks!!! I`ll have to post a little at a time so everything makes sense...anyone know what`s wrong or what I`m doing wrong???

Len Pytlewski

JOIN OUR COMMUNITY!

Our community is FREE to join. To participate you must either login or register for an account.

SEARCH FORUMS
FREE NEWSLETTER
By signing up you may also receive reader surveys and occasional special offers. We do not sell, rent or trade our email lists. View our Privacy Policy.