SEARCH FINESCALE.COM

Enter keywords or a search phrase below:

Fw 190 Butcher Bird 2013 (extended to June 2014) Group Build

564320 views
5865 replies
1 rating 2 rating 3 rating 4 rating 5 rating
  • Member since
    April 2013
Posted by SchattenSpartan on Thursday, September 4, 2014 4:37 PM

I'd prefer to just glue them in there, but the PE set I'm using requires you to place PE parts around and in the holes. I guess I'll get me a few small drills at my LHS then... Thanks for the tip!

  • Member since
    April 2005
Posted by Thunderbolt379 on Thursday, September 4, 2014 6:03 PM

Thanks Greg, Rigidrider and Clemens -- I must say it looks good in the display case and in the end that's what matters! I'll forge ahead on the others today and hopefully have some progress to report tonight.

Clemens, you're certainly ambitious to work with the most temperamental kits, and then increase their complexity with the dreaded etch! My hat is off to you, sir!

Cheers, Mike/TB379

http://worldinminiature.blogspot.com/

  • Member since
    May 2013
  • From: Indiana, USA
Posted by Greg on Thursday, September 4, 2014 8:20 PM

SchattenSpartan

I'd prefer to just glue them in there, but the PE set I'm using requires you to place PE parts around and in the holes. I guess I'll get me a few small drills at my LHS then... Thanks for the tip!

Ahah!! That will solve the problem of what to fasten that center one to. Should be cool. Guessing with the PE as you described, the square hole won't have to be terribly accurate, which should help.

Re the drills, I use mine more often than I'd have thought. Don't forget a good pin vise! Tip: My Tamiya pin vise is the best one I've ever had.

  • Member since
    March 2012
  • From: Corpus Christi, Tx
Posted by mustang1989 on Friday, September 5, 2014 3:38 PM

Greg
Re the drills, I use mine more often than I'd have thought

I hear that!! I've gotten to where I'll use the pin vise to hold tire/wheel assys for painting. I usually drill into the tread on the bottom where the tire meets the ground to hold it for painting.


 Forum | Modelers Social Club Forum (proboards.com) 

  • Member since
    August 2009
  • From: MOAB, UTAH
Posted by JOE RIX on Friday, September 5, 2014 9:32 PM

Clemens: You Sir are making dynamite progress. Each part for each aircraft looks great. i especially like the effect you achieved with the mix of gold and titanium. That really does look good. Keep hanging in there buddy. It's coming along just fine.

Mike: You are a prime example of the saying, "When somebody hands you a lemon, make lemonade". You have transformed that cantankerous kit into one gorgeous piece of "Hot Damn"! That is a really fine example of excellent modeling skills. Give yourself a firm pat on the back and accept my hardy "WELL DONE"!! It has indeed been a real pleasure to watch you bring that kit to life.

"Not only do I not know what's going on, I wouldn't know what to do about it if I did". George Carlin

  • Member since
    April 2005
Posted by Thunderbolt379 on Saturday, September 6, 2014 12:12 AM

Joe -- thanks, buddy! I accept that pat on the back with the greatest gratitude! It was a challenge, to be sure, and I'm just glad I made a decent job of it!

I've made some progress on the Hobby Boss D-9 yesterday and today. The windscreen needed attaching, there was some rubbing down to do on the underside, then the canopy masks went on. It's actually a Ta-152 set which is slightly different and needed modification and completion with tape. In the end, I could have done the whole thing with tape, given the corrections necessary. Hey ho... Here she is, first a state-of-the-project shot:

And here's the canopy, with masking complete:

Next up, mask the wheelwells, tailwheel and gun barrels, then spray the 66 over the canopy, preshade in NATO black, and, if there's time, get the 76 onto the underside.

I'm hoping to just maybe have this one done by the time the decal issue for the A-8 is sorted, and cruise through them all...

Cheers, M/TB379

PS: I checked the decals in that Academy A-6 and they are useless, so that one remains on the back burner until the AM sheet I was going to use for it turns up -- it's around here somewhere...

http://worldinminiature.blogspot.com/

  • Member since
    April 2005
Posted by Thunderbolt379 on Saturday, September 6, 2014 3:50 AM

Right, made a little progress here, I got the canopy interior colour sprayed, then changed to black and preshaded the airframe. I was hoping to go right on to the 76 but the AB needs a strip and clean before I get to the main paintjob. Here she is with the colours to be used:

It's a good job the underpainting doesn't need to be precise -- because it sure won't be! :-)

Target for tomorrow is the 76, early enough to harden off during the day so it can be masked later, and maybe get to the 83.

Cheers, M/TB379

http://worldinminiature.blogspot.com/

  • Member since
    March 2012
  • From: Corpus Christi, Tx
Posted by mustang1989 on Saturday, September 6, 2014 4:28 AM

Mike:This one's coming right along Mike!  That prop spinner looks like a million bucks. Did you use a mask or decal on that? Oh and another question---Which pic of that beauty of a 152 did you want in the Completed Builds section.?

Clemens:Youre gonna have to go to work in the kit manufactuing business. Youre the next step in the assembly line of being able to rival Franklin Mint. Hell instead of the kit manufacture putting the sprues in the box, they could just give them to you to assemble (assembly line style that is) and kick out completed builds to sell. Good going here bud! Yes


 Forum | Modelers Social Club Forum (proboards.com) 

  • Member since
    April 2005
Posted by Thunderbolt379 on Saturday, September 6, 2014 7:53 AM

Mustang -- the spinner is a decal from the Superscale sheet for Rudel's bird. it was designed for a different kit with a very different incidence on the cone, because it really did not want to fit and had to be coaxed into place with setting solution and a knife. It'll look better with some touch-ups and a clearcoat, at the moment it's actually a bit scabby from some angles!

Re the 152, my second pic from the top in the sequence I posted would be a good one!

More updates soon,

Thanks again,

Mike/TB379

http://worldinminiature.blogspot.com/

  • Member since
    March 2012
  • From: Corpus Christi, Tx
Posted by mustang1989 on Saturday, September 6, 2014 8:02 AM

Man I hear ya on that spinner decal. Most of mine take in the upwards of 7-10 coats of Microsol before they "behave". Good job on yours.

I'll get your pic posted soon brutha!


 Forum | Modelers Social Club Forum (proboards.com) 

  • Member since
    April 2005
Posted by Thunderbolt379 on Saturday, September 6, 2014 8:25 AM

7-10 coats -- yep, that sounds about right. I was wondering if my chemistry was getting a bit old and losing its "oomph" but it sounds like that's normal!

Cheers, M/TB379

http://worldinminiature.blogspot.com/

  • Member since
    May 2013
  • From: Indiana, USA
Posted by Greg on Saturday, September 6, 2014 5:33 PM

Mike, you don't mess around, man. Looking good!

Hat's off to you, that spinner looks really good. Decals or masks, those spirals are not among my favorite things.

  • Member since
    April 2005
Posted by Thunderbolt379 on Sunday, September 7, 2014 8:36 AM

Thanks, Greg, they're a forbidding challenge, to be sure!

Progress today, I thoroughly cleaned the AB this morning, then got the 76 on. I gave it plenty of drying time, then made up some 75 and did the mottle on the replacement rudder of Rudel's bird with the fineline tip. To be sure of it staying where it should be, I put a couple of clear coats over it too:

The rudder is now masked and I'm working up the rest of the masking. The 76 showed up some imperfections in the leading edge that will get dressed before I move on, but my target for tomorrow is to get the 83 onto her.

I've looked at renditions of Rudel's plane and there seems to be a fair bit of interpretation in the markings, some folks are using the somewhat mysterious RLM 84 for the fuselage sides. I'm probably not going to go that way, but stay with a three-colour scheme -- we'll see!

Cheers, Mike/TB379

http://worldinminiature.blogspot.com/

  • Member since
    March 2012
  • From: Corpus Christi, Tx
Posted by mustang1989 on Sunday, September 7, 2014 3:50 PM

Thunderbolt379
Greg, they're a forbidding challenge, to be sure!

Forbidding....yes......impossible........no.

  Great progress Mike. I just love seeing these things in primer!!


 Forum | Modelers Social Club Forum (proboards.com) 

  • Member since
    April 2013
Posted by SchattenSpartan on Tuesday, September 9, 2014 7:06 PM

Thanks guys!

Joe: I came up with this paint mix by looking at the bottom of my Titanium Gold jar after giving it a good shake. The silver pigment at the bottom was only slightly colored by the solvent at the top and I thought it looked quite good...

Mike: Your Dora looks great! You (and most of the other fellas in here) sure are way, way braver than I am for using those bloody spinner decals. I got some sort of a plan to avoid that frightening experience, but more on that when my SprueBrothers order finally turns up...

  • Member since
    March 2012
  • From: Corpus Christi, Tx
Posted by mustang1989 on Wednesday, September 10, 2014 4:54 AM

SchattenSpartan
braver than I am for using those bloody spinner decals. I got some sort of a plan to avoid that frightening experience,

They aint that bad really. Try one on and just use Microsol. It'll work out fine.Wink


 Forum | Modelers Social Club Forum (proboards.com) 

  • Member since
    April 2005
Posted by Thunderbolt379 on Wednesday, September 10, 2014 8:06 AM

I must say the first spiral I did was on a Hasegawa 109 K-4 and it went on probably the best of the ones I've done to date. The decal has to be willing to absorb a fair bit of pushing and pulling, then pull into the surface tightly. It has to be willing to respond to ample wetting without grabbing too soon. If it'll do these things it's not too bad. Also, the incidence of the spiral should really be designed for the kit, it not you get all kinds of rucks and folds...

I was working the last couple of days and didn't get much done on the D-9 except to mask the 76, which includes cutting some soft masks. My plan is to apply them and get the 83 onto her tomorrow.

Cheers, M/TB379

http://worldinminiature.blogspot.com/

  • Member since
    April 2005
Posted by Thunderbolt379 on Thursday, September 11, 2014 2:12 AM

Progress report -- yesterday was busy, I only managed to get the soft masks cut for the 76, but today I applied them and went ahead and applied the RLM 83 (MM Acryl). here she is with the masks in place:

And with the 83 on:

Next up, cut soft masks for the wings and tail, apply them with blutac and spray the 82. Then unmask and change to the fine tip and needle to touch up as necessary and do the 83 mottle.

M/TB379

http://worldinminiature.blogspot.com/

  • Member since
    March 2012
  • From: Corpus Christi, Tx
Posted by mustang1989 on Thursday, September 11, 2014 5:00 AM

It's lookin' good from this angle buddy!!! I like the soft mask technique.


 Forum | Modelers Social Club Forum (proboards.com) 

  • Member since
    April 2005
Posted by Thunderbolt379 on Friday, September 12, 2014 2:17 AM

Thanks, Mustang. I have another update but PB is "down for maintenance," so I can't upload at the moment. The softmasks for the main camo are cut and applied, and the RLM 82 is on. Now comes the fiddly process of demasking and touching up as needed, including the 83 mottle.

Pics asap,

M/TB379

http://worldinminiature.blogspot.com/

  • Member since
    April 2013
Posted by SchattenSpartan on Friday, September 12, 2014 2:43 PM

Mike your Dora is coming along very nicely! I have to try that soft masking technique myself at some point (I'm freehanding everything ATM)

  • Member since
    April 2013
Posted by SchattenSpartan on Friday, September 12, 2014 3:09 PM

Well this week has been kinda good overall with one exception. I've been sick since Monday and today is the first day I'm really feeling well again. So what's good about that week then?

Well, MY GOODIE-BOX ARRIVED!!!

The mailman actually brought me two boxes today: The aforementioned box and this beauty here:

Now don't get me wrong, I love Doras and I think they are damn sexy machines, but this baby easily tops them all in my book! What's not to like about a Dora with a more brutal looking nose, a 4-bladed prop and a big honkin' supercharger housing on it's belly that is connected to the engines via exhaust pipes on the outside of the fuselage? The kit itself appears to be cast quite nicely with no bubbles or other flaws visible. There's just some resin flash to be removed on some of the larger parts, but I didn't notice any significant warpage either. It also comes with 2 vacu-formed canopies in case you break one (it has several supporting frames, so you can't use the normal canopy. The only thing missing now is a Hasegawa A-8 to use this conversion on. As luck would have it I stopped by at my LHS today and guess what, they just got a 2nd-hand A-8 kit in perfect condition for 50€ (standard price for those kits seems to be 70-80€).

Now on to the goodie-box contents (it's quite a lot so I was really happy when it finally got here).

This is my little collection of AM goodies for my assembly line (all of them, the ones I got earlier as well):

From left to right, top to bottom: New stuff from the box is written in bold text:

  • Eduard D-13 PE set
  • Eduard A-8 PE set
  • Quickboost D-11 air intake (x2)
  • Quickboost D-9 exhausts (x4)
  • Fusion Models D-11 prop and spinner (x4)
  • Ultracast A-model prop and spinner (x3)
  • Ultracast A-model prop and spinner w/ external weights
  • Master MG 131 barrels
  • Master A-6 gun barrel set
  • Master A-7/A-8 gun barrel set (x5)
  • Eduard Luftwaffe spinner masks
  • Eduard Dora spinner masks
  • Eduard A-5/A-8 canopy masks for Hasegawa (x2)
  • Eduard Dora masks
  • Montex F-8 canopy and insignia masks for Tamiya
  • EagleCals Fw 190 Dora decals
  • EagleCals Fw 190 A-8/A-9 decals

I'm still waiting on some Ultracast wheels (those are going to take some time) and a mystery item for the Eduard A-8 to arrive.

I hope I'll get some bench time in this weekend.

Cheers, Clemens

  • Member since
    April 2005
Posted by Thunderbolt379 on Friday, September 12, 2014 6:12 PM

Thanks, Clemens! That's a formidable haul you've just got there, it's terrifying to think of the work involved, but I can't wait to see the results!

Okay PB is back up, so here's the update from yesterday. I got the softmasks done over the 83:

And applied the 82:

Note one place where the cutting of the mask was just too fiddly, so I freehanded the demarcation.

Target for today -- progressive unmasking and touchups with the AB and brushes, get the flaps and gear bay doors into 76, do the mottle, underside oil stains, and hopefully get along to the first clearcoat.

More later!

M/TB379

http://worldinminiature.blogspot.com/

  • Member since
    March 2012
  • From: Corpus Christi, Tx
Posted by mustang1989 on Friday, September 12, 2014 10:21 PM

Clemens:Man I almost nabbed a  1/48 scale V-19 resin kit for this GB (ask Joe Rix ..LOL) but I had D-9 fever! These are beautiful machines no doubt and nice score on that kit. Man what a SL of goodies you've got there!!! Wow! Look at all that stuff will ya?

Mike:Your paint work is magnificent man! I just love those kooky colors on the D-9's. "Celery green" ......REALLY standin' out there! Good job! Yes


 Forum | Modelers Social Club Forum (proboards.com) 

  • Member since
    April 2005
Posted by Thunderbolt379 on Saturday, September 13, 2014 4:19 AM

Thanks, Mustang! I just wish I could tame the AB a bit more, it can still surprise me! Well, I unmasked, did two rounds of 82 touch-up, a round of 76 touch-up, and when I cleaned the AB one last time before switching to the 83 to do the last touch-ups and the mottle, the spatter monster returned. It was either something to do with the cleaning or with the way I mixed the paint, so right now I have it stripped and cleaned again, and I have a new acrylic cleaner to try as well.

I can do the oil stains on the underside, but until I can figure out how to get around this and get the mottle done, I'm stuck! Tomorrow is a new day, I'll clean it within an inch of its life and try again, I could also mix a new batch of paint and stick tightly to formula. I'll try soaking the air cap in the new cleanser as well, there might have been some contamination of the fine flow holes, but that's just a guess. It was flowing fine, if off to one side due to a buildup in the aircap/external nozzle, and after I cleaned that out, the spatter was back...

It makes me really look forward to some monocoloured subjects, like a mjdnight blue Corsair...

Cheers, M/TB379

http://worldinminiature.blogspot.com/

  • Member since
    May 2013
  • From: Indiana, USA
Posted by Greg on Saturday, September 13, 2014 12:34 PM

Mike, looking good. You do a nice job with the soft masks. I notice how nicely your pre-shade shows through the 83. I wish I could learn the patience to lay down a nice thin coat like that.

You are having more than your share of a/b woes, mate. I hate splatter and don't have enough experience to offer any useful advice.

Clemens, those are some nice looking goodies, mate. Hope you are feeling better.

  • Member since
    April 2005
Posted by Thunderbolt379 on Sunday, September 14, 2014 3:28 AM

Thanks, Greg, no worries -- the AB  woes have certainly cropped up lately. I seem to have it traced to my fineline tip and nozzle, so they're soaking in the new cleaner right now.

I tried the fine tip first thing today but it was not going to perform, so I worked today with the #3 medium tip, which is running fine. Problems make one mistrust the AB altogether, which is not really sensible. Anyway, I spent much of today doing touch-ups, basically chasing around, one colour after the other, fixing overspray and splatter, which is a frustrating job. the mottle ended up done with the #3 instead of #1 setup, so it's a bit coarser than I had hoped for, and it's also in RLM 82 instead of 82, as that paint was willing to play the game and the other wasn't.

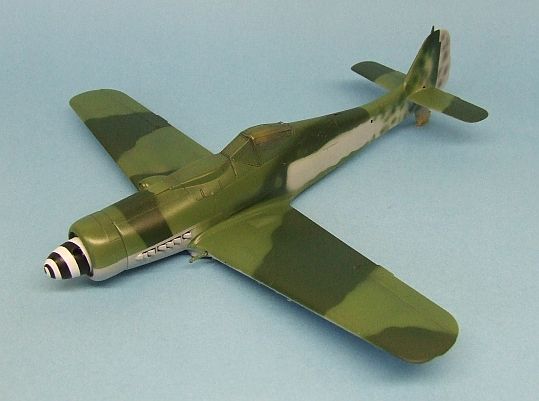
I also did some brush touch-ups, then completed the oil staining on the underside and laid on the first clear -- so the colours are officially done. Not as precise as I had hoped for, but good enough to run with. Here she is:
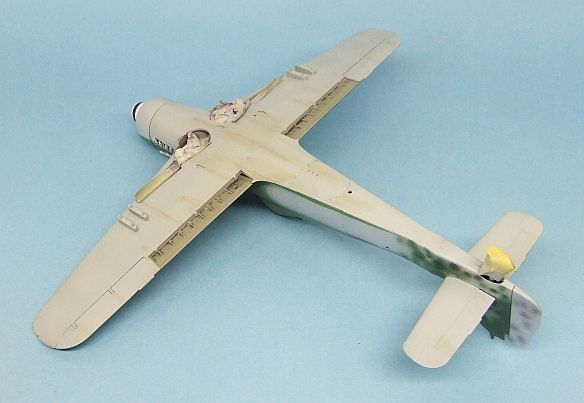
And the underside:

The next task is panel accents and I might get to that tonight. I should be into decals tomorrow, and aiming for completion in a few days -- basically as soon as possible (if they cooperate!).

One question for the Dora experts -- the area behind the spinner cone is detailed to look like radiator vanes -- should these be put into a metallic? The instructions call for 76, which is easily done, but is it right?

Cheers, Mike/TB379

http://worldinminiature.blogspot.com/

  • Member since
    March 2012
  • From: Corpus Christi, Tx
Posted by mustang1989 on Sunday, September 14, 2014 4:50 AM

So far so good on your painting Mike!! I will say that on mine I used a metailic with a heavy wash to tone the sheen down considerably. From what I can tell (and I'll see if I can dig up photo reference) some of them were 76. Lemme do some research and I'll get back to you here.


 Forum | Modelers Social Club Forum (proboards.com) 

  • Member since
    March 2012
  • From: Corpus Christi, Tx
Posted by mustang1989 on Sunday, September 14, 2014 5:54 AM

These are out of the Aero Detail #2 book that I have for the Dora. Hope this helps as they are the only true color ref's that I have. There is a bit of 76 on the lower part of the fins in one pic it looks like but one can never tell if that's not a mistake on the museums part for not masking properly.........Indifferent

Hope this helps you out Mike.........


 Forum | Modelers Social Club Forum (proboards.com) 

  • Member since
    April 2005
Posted by Thunderbolt379 on Sunday, September 14, 2014 8:10 AM

Thanks, Mustang, that helps a lot! I'll go with a metallic and a Florey wash to make the detail pop. I'm doing the panel wash right now before turning in, the underside is almost done and looks pretty good. I'm confident I'll be into decals tomorrow, and from there it's downhill to the finish. I'll put the bombs together for the wing racks. I saw a museum display with bombs and they were painted a kind of dark yellow with a greenish tint, which is most unusual... There's been a lot of discussion in the Stuka GB about bomb colours for German planes, which I'll have to review.

Cheers, and thanks again, M/TB379

http://worldinminiature.blogspot.com/

JOIN OUR COMMUNITY!

Our community is FREE to join. To participate you must either login or register for an account.

SEARCH FORUMS
FREE NEWSLETTER
By signing up you may also receive reader surveys and occasional special offers. We do not sell, rent or trade our email lists. View our Privacy Policy.