SEARCH FINESCALE.COM

Enter keywords or a search phrase below:

Fw 190 Butcher Bird 2013 (extended to June 2014) Group Build

564320 views
5865 replies
1 rating 2 rating 3 rating 4 rating 5 rating
  • Member since
    December 2002
  • From: Bury St Edmunds, Suffolk, England
Posted by Bish on Saturday, September 20, 2014 3:34 PM

Doug, I believe those types of markings were only used by the Geschwader and Gruppen Stab. Initial they were used on fighters, but from 1943 also used on Ground attack aircraft, but the system was not the same.

Greg, those markings are those of a Geschwaderkommodore of a ground attack unit. But in this case not just any Geschwaderkommkodore, this is the aircraft of the commander of SG 2 in April 1945, Hans Ulrich Rudel.

Mike, that is one sweet looking build and being Rudel's bird just makes it sweeter for me. Lovely. And the A-8 is looking just as good.

I know I haven't posted much, but I have been following along. Mustang, you can certainly be proud of yourselves, this is certainly the best GB I have been a part of. And that's not in any way putting down any of the others but simply shows how good this one was.

You certainly have a high aiming mark for the 109 GB.

I am a Norfolk man and i glory in being so


On the bench: Airfix 1/72nd Harrier GR.3/Fujimi 1/72nd Ju 87D-3

  • Member since
    October 2008
  • From: Georgia
Posted by Rigidrider on Saturday, September 20, 2014 7:10 PM

Gotcha Bish... But didnt the ground attack aircraft of the FW 190 and Bf109 class also carry a black or white triangle to ID them as ground attack? Or am I (as usual) turned around again...

When Life Hands You A Bucket Of Lemons...

Make Lemonade!

Then Sell It Back At $2 Bucks A Glass...

  • Member since
    May 2013
  • From: Indiana, USA
Posted by Greg on Saturday, September 20, 2014 8:53 PM

Thanks for the info, Doug and Bish.

Interesting stuff.

  • Member since
    December 2002
  • From: Bury St Edmunds, Suffolk, England
Posted by Bish on Sunday, September 21, 2014 4:04 AM

Doug, you are indeed correct. This was an early war marking for the Schlact units which also carried a single letter rather than a number. They were replaced with the new markings in April 1943, though I would bet the earlier ones will be seen after this.

You know the Germans, never like to make things easy.

I am a Norfolk man and i glory in being so


On the bench: Airfix 1/72nd Harrier GR.3/Fujimi 1/72nd Ju 87D-3

  • Member since
    March 2012
  • From: Corpus Christi, Tx
Posted by mustang1989 on Sunday, September 21, 2014 4:34 AM

I've been just kicking back and watching this discussion here. You learn something new every day.


 Forum | Modelers Social Club Forum (proboards.com) 

  • Member since
    April 2005
Posted by Thunderbolt379 on Sunday, September 21, 2014 7:56 AM

Thanks Clemens, Greg and Bish! Greg, the weathering techniques used on the underside are as follows: the oil stains are dabs of brown oil paint dragged into blown smears with a soft, flat brush wetted with enamel thinner, non-reactive with the underlying acrylics; the panel accents and shadowing in the wheel wells are done with clay-based Florey wash; and the gun carbon and dust effects are Mig pigments, applied with a small pointed brush.

I've been away over the weekend but will be back on the A-8 tomorrow. Oh, one of the kits I've already picked out for the 109 GB will be a 1:32 G-6 in Hartmann's markings, which I'm very much looking forward to.

I'm hoping to have the big one done directly -- it's fitting that it's a 32, because it's exactly 32 years since I last worked in that scale!

M/TB379

http://worldinminiature.blogspot.com/

  • Member since
    April 2013
Posted by SchattenSpartan on Sunday, September 21, 2014 8:08 AM

That's a nice choice, Mike! I'm going for one of those big Hasegawa 109s too, but with some fancy nightfighter markings. My 1/48 project for that one should fit your marking scheme kinda nicely though...

  • Member since
    December 2002
  • From: Bury St Edmunds, Suffolk, England
Posted by Bish on Sunday, September 21, 2014 8:16 AM

Mike, I take it that's the Hase kit. If so, I look forward to that one. I've got that kit and did consider it but decided to go with the simple scheme.

I am a Norfolk man and i glory in being so


On the bench: Airfix 1/72nd Harrier GR.3/Fujimi 1/72nd Ju 87D-3

  • Member since
    April 2005
Posted by Thunderbolt379 on Sunday, September 21, 2014 8:22 AM

Clemens and Bish -- yes on both counts! It's a beauty in the box, like the 48 on steroids and I'm really looking forward to cutting sprue. In 48 I've picked out Hans Trautloft's summer markings in a G-2, and am looking at one of the new-tool Airfix 72s as well.

M/TB379

http://worldinminiature.blogspot.com/

  • Member since
    May 2013
  • From: Indiana, USA
Posted by Greg on Sunday, September 21, 2014 10:35 AM

Mike, thanks for your weathering / finishing input.

Never thought of using Flory for wheel wells and the such, will have to try. What about the landing gear struts themselves? Flory or oil wash? (they look very good)

  • Member since
    April 2005
Posted by Thunderbolt379 on Sunday, September 21, 2014 6:36 PM

Greg -- yep, Florey on the struts too, brushed on liberally, then removed with a moistened q-tip. I painted the shockers silver, but have been wondering about using foil at 32nd scale...

M/TB379

http://worldinminiature.blogspot.com/

  • Member since
    May 2013
  • From: Indiana, USA
Posted by Greg on Sunday, September 21, 2014 9:37 PM

Great, thanks Mike!

I like Flory, just never thought to use it on other than a/c exterior. Will definitely be trying this, see if I can come close to emulating your work, mate.

  • Member since
    April 2005
Posted by Thunderbolt379 on Sunday, September 21, 2014 10:50 PM

Cheers, it's great stuff to work with (though their Black is not as good a consistency as their Dark Dirt -- it's too thin, at least the bottle I have.)

I just assembled the drop tank rack and will blow it into 76 -- sometimes it's represented in black, but not always, so I'll go with the conformal shade. Also there's a touchup to do in one spot where I topcoated without having cleaned up the panel wash...

M/TB379

http://worldinminiature.blogspot.com/

  • Member since
    March 2012
  • From: Corpus Christi, Tx
Posted by mustang1989 on Monday, September 22, 2014 3:49 AM

Gotta love those finishing touches. It's this point in a build that seems to take the longest for me. Can't wait to see pictures Mike. Sounds like its going well.


 Forum | Modelers Social Club Forum (proboards.com) 

  • Member since
    April 2005
Posted by Thunderbolt379 on Monday, September 22, 2014 4:07 AM

Thanks, Mustang! I had hoped to put up a picture tonight, but it'll be tomorrow. Today I did the panel accents on the drop tank, constructed the tank rack, sprayed it and that minor correction on the rudder, panel washed it and clearcoated all, then got the decals onto the tank. At the moment I have a few trim tab markings to go and the three parts of the prop spiral.

My target for tomorrow is decals fully completed and sealed, prop assembled, detail painting and landing gear underway. The burnt metal areas should be the last spray work on the model, to be done after final sealing.

I'll be glad to have this on finished, it's been a long job, I started it for RD III, which is a loojng time ago!

Cheers, M/TB379

http://worldinminiature.blogspot.com/

  • Member since
    December 2002
  • From: Bury St Edmunds, Suffolk, England
Posted by Bish on Monday, September 22, 2014 12:52 PM

I use Flory washes all over my aircraft kits now, love the stuff. I have never really noticed any difference in the black from the others.

I am a Norfolk man and i glory in being so


On the bench: Airfix 1/72nd Harrier GR.3/Fujimi 1/72nd Ju 87D-3

  • Member since
    April 2005
Posted by Thunderbolt379 on Tuesday, September 23, 2014 3:33 AM

Bish -- it might just be the bottle I've got that's a bit off formula...

Progress today, I finished the decals, including the spiral, blew a few small parts into 76, then sealed everything with clear (with the exception of the spiral, it's had six coats of setting solution and I'm still not happy with the settle-down, so I'll leave it till tomorrow, do some touch-ups and seal it then).

Here she is, not a great deal of visible progress:

Also today I did the wash detailing on the landing gear, sealed the tank rack and started work on the tailwheel. Target for tomorrow is to complete the prop and landing gear, and to have her up on her feet. from that point it's not far to the finish line. I think I have enough pressure in the bottle to do the burnt metal panels too, which I can mask for tomorrow.

Cheers, Mike/TB379

http://worldinminiature.blogspot.com/

  • Member since
    March 2012
  • From: Corpus Christi, Tx
Posted by mustang1989 on Tuesday, September 23, 2014 5:28 AM

Everything looks good so far Mike. Your paint job looks great and set off by those decals. It's funny how much difference a few decals can make in the look of a model. Yes


 Forum | Modelers Social Club Forum (proboards.com) 

  • Member since
    May 2013
  • From: Indiana, USA
Posted by Greg on Tuesday, September 23, 2014 11:36 AM

Really looking great, Mike. This particular shot and lighting really show off your lovely panel line etc finishing. And Joe is right, the decal are really making this one pop big-time.

  • Member since
    December 2002
  • From: Bury St Edmunds, Suffolk, England
Posted by Bish on Tuesday, September 23, 2014 1:02 PM

Looks really good to me Mike, nice work.

I am a Norfolk man and i glory in being so


On the bench: Airfix 1/72nd Harrier GR.3/Fujimi 1/72nd Ju 87D-3

  • Member since
    April 2005
Posted by Thunderbolt379 on Wednesday, September 24, 2014 3:58 AM

Thanks Mustang, Greg and Bush! Yes indeed, I've always felt the decals made a model come alive!

Today's progress hit most of my targets -- burnt metal masked and sprayed, spiral finished, touched up and sealed, prop assembled (blades needed touch-ups too), landing gear assembled and touched up, plus I painted canon barrels, unmasked MG barrels and separated and cleaned up the flaps. I had hoped to move into final assembly but a headache slowed me down.

Here's a view of the underside taken last night, with the masking away:

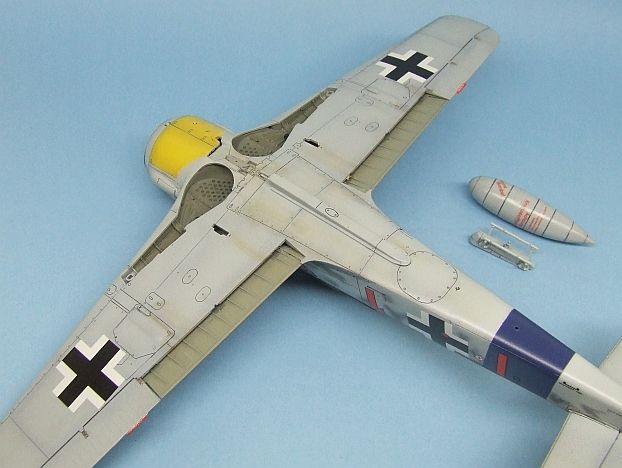
Note the two different shades of 02 -- that Tamiya in the wells, which were painted and weathered early in assembly. The flap bays were resprayed in MM Acryl at a later date, which is a truer representation of the colour.

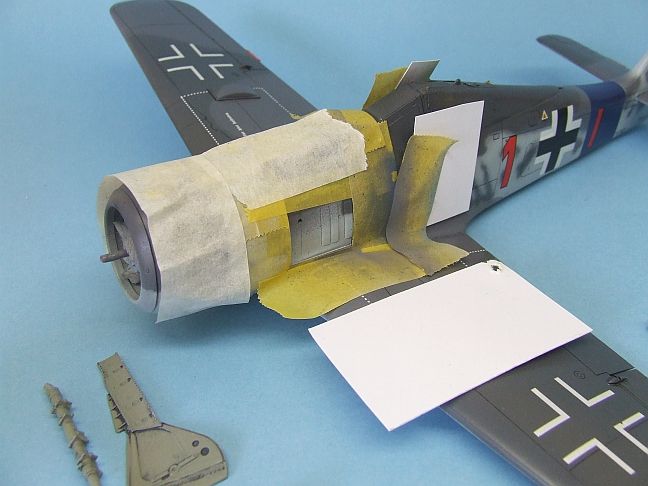
Next, this is the masking setup for the exhaust panels:

And lastly, the subassemblies ready to be added tomorrow:

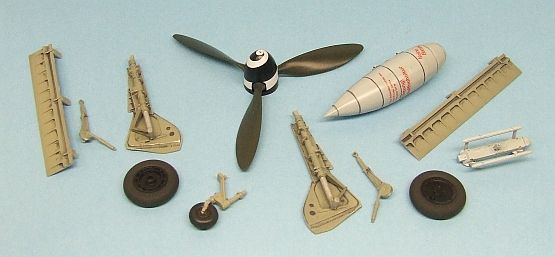
Target for tomorrow: mount all these parts plus the antennas and guns, add and paint the formation lights and pitot, do the carbon and dust work, unmask the canopy. Possibly rig a radio antenna in EZ line -- at which point she's done.

Cheers, Mike/TB379

http://worldinminiature.blogspot.com/

  • Member since
    March 2012
  • From: Corpus Christi, Tx
Posted by mustang1989 on Wednesday, September 24, 2014 11:09 AM

Gettin' close...........REAL close!


 Forum | Modelers Social Club Forum (proboards.com) 

  • Member since
    August 2009
  • From: MOAB, UTAH
Posted by JOE RIX on Wednesday, September 24, 2014 11:19 PM

Mike, Your big A-8 is looking awesome. I'm anxiously awaiting to see the finished product. Bring it home bro!

"Not only do I not know what's going on, I wouldn't know what to do about it if I did". George Carlin

  • Member since
    April 2005
Posted by Thunderbolt379 on Thursday, September 25, 2014 1:52 AM

Thanks Mustang and Joe! Well, she's almost done as I type this. All subassemblies from the last photo are now mounted, along with the inner gun barrels and underside antennas. The canopy is unmasked and the flaps are fitted. My next task is to do the dust and carbon work, add the pitot and paint it, and do the formation lights. Some bare metal drybrushing around the heavy wear areas and I'll be about ready to call it. There'll be a few small jobs leftover that will be put off for later, explained inn the final post.

Okay, hopefully the next thing you see will be the gallery shots!

M/TB379

http://worldinminiature.blogspot.com/

  • Member since
    April 2005
Posted by Thunderbolt379 on Thursday, September 25, 2014 4:19 AM

Okay, guys, I'm calling her done! As promised, here's the evidence. There are a few annoying aspects that will have to go on the back burner for some future time, and I'll have a grumble about them on my blog (last night I posted a review of the Hobby Boss D-9), but in short, they are: flaps set at an unrealistic 90 degrees, separate parts for the formation lights that were useless, a call to be made on what to use for the radio antenna -- is EZline too fine to use in this scale? -- and doubts about how well the pigments took over the satincoat -- they were starting to do the fingerprint powder trick but had not yet developed the kind of streak I'm used to getting at smaller scales. Also, I did not indulge in any significant chipping or worn edges, which I'll need to research at greater length. One last area concerns the outboard guns, which seem to have been "scabbed on" by Hasegawa, requiring more than a simple opening of a tab slot as I had originally assumed. The parts called for the cutting open of a teardrop shaped opening to fit the base of the canon parts, which would need to have been done well in advance, leaving me with a thorny bit of modification to mount them afterward. This also is in the too hard basket for the moment, and will be on the list to be attended to "later."

Right, here she is, Hasegawa's 1:32nd scale Fw 190 A-8, in markings for Hans Dortenmann's plane, about the time of the invasion of Normandy. It's been a long time coming and I'm glad to be able to call this one off the bench at last!

M/TB379

http://worldinminiature.blogspot.com/

  • Member since
    March 2012
  • From: Corpus Christi, Tx
Posted by mustang1989 on Thursday, September 25, 2014 4:33 AM

Man you've nailed as near a perfect build with this plane as I'd say you can Mike! I hear you on the 90 degree flap angle and don't know why some kit manufactures do that. The paint and weathering blow me away here as it's all well executed. With the antenna, use the sprue method. I was really bad at it too and forced myself to sit in front of a candle with piece after piece of straight sprue cut up beside it (dude I'm talking around 20-25 pieces here) and started stretching until I could succeed in making the same thin strand 5 times.  It really pays to learn this trick.

Let me know which pic you want to use for the intro pic and I'll get er pinned up! Thank you Mike for your participation here and looking forward to building with you again in the near future.


 Forum | Modelers Social Club Forum (proboards.com) 

  • Member since
    April 2005
Posted by Thunderbolt379 on Thursday, September 25, 2014 6:49 AM

Mustang -- thanks so much for the appreciation, it's high praise indeed! I'll have a crack at stretching some sprue and see what I can achieve, I certainly have plenty to go at given the amount that ends up binned when empty parts trees go out!

For the pic, how about the first one up above?

I have plans for anywhere up to six Bf 109s for the GB next year -- a D, 3 x E-4s, an F-2, G-2 and G-6... I might be over-ambitious there, but I guess we'll see!

Lots to do, the A-8 makes seven completions for me in this calendar year, and I have nine more on my roster for 2014, of which six are close to the painting stage at this time.

I look forward to seeing how Clemens brings in his schwarm of Butcherbirds -- and speaking of whom, many thanks once again for the help on decals!

Cheers, Mike/TB379

http://worldinminiature.blogspot.com/

  • Member since
    July 2011
  • From: minnesota
Posted by handiabled on Thursday, September 25, 2014 6:58 AM

Beauti of a build sir!

  • Member since
    August 2009
  • From: MOAB, UTAH
Posted by JOE RIX on Thursday, September 25, 2014 7:46 AM

Mike, What a marvelous piece of modeling you have produced. Really, really excellently done. Despite your misgivings with some aspects of the model you have built an FW 190 that appears every bit the look and feel of a Bad A Butcher Bird. Thank You very much for sharing your skills and talents with us all. It has been a real pleasure.

"Not only do I not know what's going on, I wouldn't know what to do about it if I did". George Carlin

  • Member since
    March 2010
  • From: MN
Posted by Nathan T on Thursday, September 25, 2014 10:16 AM

Hey Mike great work. Nice to see you finish here. Any way to modify the flap angle? And did you say there were no outboard 20mm on Dortemanns' bird?


JOIN OUR COMMUNITY!

Our community is FREE to join. To participate you must either login or register for an account.

SEARCH FORUMS
FREE NEWSLETTER
By signing up you may also receive reader surveys and occasional special offers. We do not sell, rent or trade our email lists. View our Privacy Policy.