SEARCH FINESCALE.COM

Enter keywords or a search phrase below:

Fw 190 Butcher Bird 2013 (extended to June 2014) Group Build

564929 views
5865 replies
1 rating 2 rating 3 rating 4 rating 5 rating
  • Member since
    April 2013
Posted by SchattenSpartan on Tuesday, September 2, 2014 2:37 PM

Looks like today was the last stressful day for me for a while, so I'm going to write that update untill tomorrow evening and post it. Hopefully I'll be able to get all the wing seams cleaned up properly in the next couple of days. There's still plenty of fine-tuning and a bit of filling needed, especially on the Eduard kits.

Then I'm going to concentrate on getting the Hasegawa and Tamiya 190s completely built up and ready for some paint while I play the waiting game (reason for that is below).

I ordered a lot of stuff at SprueBrothers a while ago (they had all the stuff I need available at the same time). The box with all the goodies arrived already and I got a notice to pick it up at my local post office. And that's where those damn morons messed up: There is no Censored box at the post office! It's just not there! And nobody knows where it landed! I complained about this incident and they are trying to find the packet now. Apperently it was deposited at a post office somewhere in Austria. I don't wanna tell you guys right away what's inside that box (it's a secret Wink), but I need some of those items to continue work on my Eduard 190s. I got another small order coming in from Canada (Ultracast to be exact) with a few more bits and pieces. I'm not going all in on those 190s, but I do want my fair share of AM for each of them... Those "few bits and pieces" add up when you're building 9 of them at the same time though... Embarrassed

  • Member since
    October 2008
  • From: Georgia
Posted by Rigidrider on Monday, September 1, 2014 4:17 PM

Excellent job Mike! The accents and highlites of the weathering are from my opinion spot on! Im not a huge Ta152 fan, but seeing yours and the others that were built here make me want to do one some day.

Again, Nice work!

Doug

When Life Hands You A Bucket Of Lemons...

Make Lemonade!

Then Sell It Back At $2 Bucks A Glass...

  • Member since
    May 2013
  • From: Indiana, USA
Posted by Greg on Monday, September 1, 2014 11:09 AM

I haven't done a slack antenna wire yet, Mike. Will be interested to see how you go about it.

I just found pics of a museum bird, good pics of the slack wire about half way down the page. (Hope it is ok to link to this)

  • Member since
    April 2005
Posted by Thunderbolt379 on Monday, September 1, 2014 8:47 AM

No worries, Greg --and thanks again!

Well, today was very busy with house cleaning so I didn't get done all I wanted to. I sealed the decals (including the upper white crosses) and gear bay doors, painted the trim tabs and running lights, and futured the latter; assembled and fitted the tailwheel, and painted some components of the main gear. Nothing worth a photo, I'm afraid.

Tomorrow will be another busy day cleaning in the morning, then going out to teach afternoon and evening, so I could be looking at the day after for finishing this bird.

With the canopy fitting so poorly I was thinking of trying to ease the mechanism back open, the poor fit will then be less obvious, and it'll show off the etched harness. However I have as yet no idea how to do a slack antenna wire. If I can open the canopy I might leave off the wire until I have more idea of how to go about it.

M/TB379

http://worldinminiature.blogspot.com/

  • Member since
    May 2013
  • From: Indiana, USA
Posted by Greg on Sunday, August 31, 2014 6:05 PM

Thunderbolt379

by the time she's done all the elements will have come together for a pleasing, convincing whole!

Ah, no worries, Mike. That'll be the case and for sure all you guys that actually know what you are doing are indeed your own harshest critics!

As a born-again newbie, I've been amazed at how these come together at the end. It's been an amazing 18 months for me to watch over and over here.

Even my own, 2 builds out of 3 so far since return from hiatus finished up better than I expected. And as Nicholson said in Mars Attacks, two out of three ain't bad. :)

  • Member since
    April 2005
Posted by Thunderbolt379 on Sunday, August 31, 2014 5:58 PM

Thanks, Mustang, SS and Greg -- it's great when folks as talented as I know you all are appreciate one's work! We all tend to be our own hardest critics and I see the shortcomings in my work -- I was feeling this one was not one of my best, but your appreciation makes me think that by the time she's done all the elements will have come together for a pleasing, convincing whole!

I'll do everything I can today -- sealing the decals should be the last spray work. I'm considering leaving the white crosses unsealed so I can potentially remove them and replace with stencilled crosses in future -- just a possibility.

Hopefully there'll be pics tonight,

Cheers, Mike/TB379

http://worldinminiature.blogspot.com/

  • Member since
    May 2013
  • From: Indiana, USA
Posted by Greg on Sunday, August 31, 2014 2:52 PM

Those are both looking great, Mike. Top-shelf work all-round.

Sorry I've not been keeping up on your progress, was gone for a week with little free time.

  • Member since
    April 2013
Posted by SchattenSpartan on Sunday, August 31, 2014 8:25 AM

Your 152 looks great, Mike! I love the weathering! Same story with the A-8, that's a top-notch paint job you got going there. I hope the new decals work out for you, I'll get them posted next week (most likely on Thursday).

I still didn't have time to write the update, but I'll post it as soon as I have the time to do so.

  • Member since
    March 2012
  • From: Corpus Christi, Tx
Posted by mustang1989 on Sunday, August 31, 2014 7:17 AM

This looks top notch! Decals and weathering bring out good paint jobs really well and this one here is a good example Mike. Really sweet looking crate man.


 Forum | Modelers Social Club Forum (proboards.com) 

  • Member since
    April 2005
Posted by Thunderbolt379 on Sunday, August 31, 2014 2:35 AM

Progress on the 152: the decals are complete and the oil streaking is done. I ended up using most of the kit stencilling, other than a couple of pieces that failed to grab and were replaced from the AM sheet. The Aeromaster sheet provided the insignia and swastikas. The white open crosses looked like an invitation to serious silvering, so I used 2000-grit paper to mill the surface of the clear coat -- it sure felt smoother! But as the decals dried some silvering came up anyway, and the ***-and-re-wet technique made about as little difference as ever. Well, I've seen worse and I can live with it, but the idea of masking the open crosses is getting very attractive.

Here's the sheet I used:
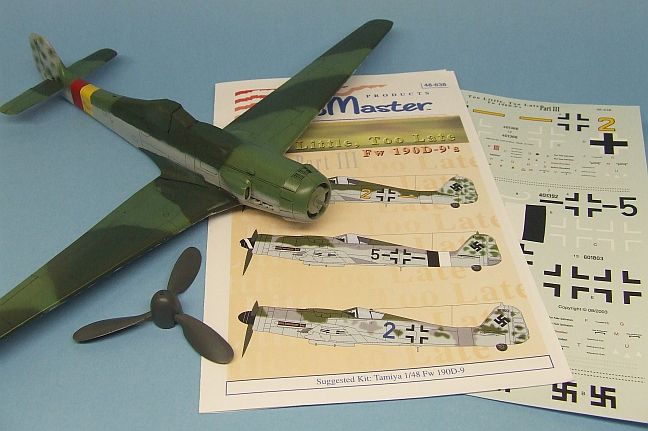
I raided Black 5, cutting the fuselage crosses free of the conjoined chevrons/arrows.
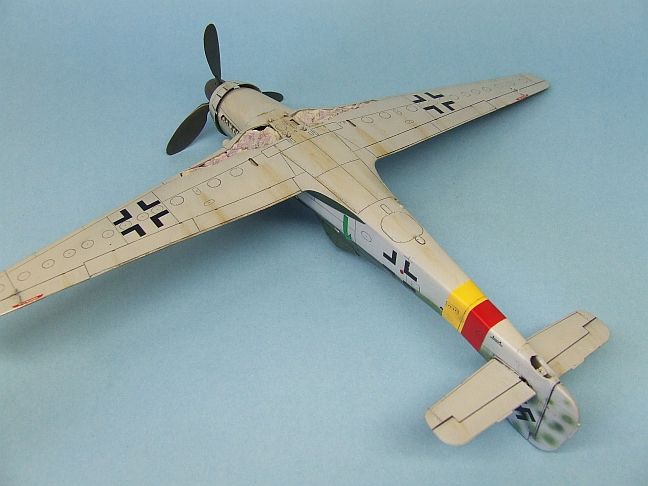
The oil wash technique worked just as well over the clear, so no problem there. I dirtied it up a bit anywhere it looked possible fluids might migrate to the exterior.
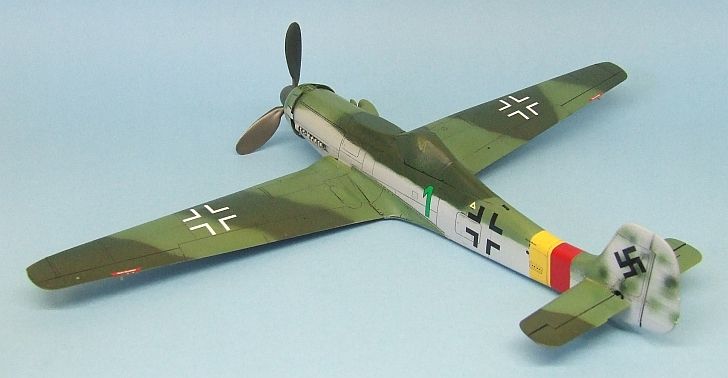
The green 1s are placed where the kit instructions said to put them, and they were on before I looked at other images -- they're about a scale foot too far forward. GRRRR. I have seen Green 1 depicted without the wing walkway stripes, so to simplify matters I left them off.

I'll paint the trim tabs red on all tail surfaces, as the decals are far too large to fit.

Targets for tomorrow: inspect overall, make any touch ups or adjustments, seal the decals, then get the landing gear assembled and installed. After that, add the prop and the various antennas, and brush paint small details. I'll see what I can get done, there's not far to go now.

Cheers, Mike/TB379

http://worldinminiature.blogspot.com/

  • Member since
    April 2005
Posted by Thunderbolt379 on Saturday, August 30, 2014 8:44 AM

Thanks, Joe. I'm just about to hit the hay down here in Aus, but I've made a start on the decals. So far a combination of Aeromaster and kit items -- the kit decals separate from their backing cleanly enough but appear to have almost no grip, so it's a toss-up at the moment if any of the stencils unique to the 152 will be there -- if they'll stay in place long enough to get zapped with a sealing coat, they'll be fine, but that's yet to be seen. Fingers crossed, I'm hoping this one will be in the display case in two or three days.

Cheers, M/TB379

http://worldinminiature.blogspot.com/

  • Member since
    August 2009
  • From: MOAB, UTAH
Posted by JOE RIX on Saturday, August 30, 2014 8:39 AM

Very sharp and clean paint work. Well done indeed.

"Not only do I not know what's going on, I wouldn't know what to do about it if I did". George Carlin

  • Member since
    April 2005
Posted by Thunderbolt379 on Saturday, August 30, 2014 3:57 AM

Progress today -- main  targets achieved. I did the 76 work on the gear bay doors and touched up the overspray amongst the tail mottle, then gave her a satin coat and accented the panel lines. The lines are shallow and inconsistently deep across the airframe, so in many places they are never going to hold a wash. Two applications and cleanup, then I sealed the wash with another clear. I got a little ahead of myself, forgetting to do the oil stains before starting, but that's okay, let's see how they go over the satin, whose lustre is not far above that of the MM paints to begin with.

After the business with the Hasegawa decals, I don't trust the Italeri kit sheet and will draw insignia, swastikas and data from an Aeromaster sheet. I have all three of the "Too Little, Too Late" sheets for the D-9 and I'm not going to build all twelve subjects, so I'm clear to heist some decals. All I'll need from the kit sheet is the green 1s, and possibly the trim tab warning flashes -- hopefully it'll play that far. I could even paint the trim tabs, and may do if the decals are either uncooperative and/or a bad fit.

Here she is at this moment:

I hope to start the decals tonight, complete them tomorrow, seal them and move ahead with final assembly and detail painting.

Cheers, M/TB379

http://worldinminiature.blogspot.com/

  • Member since
    April 2005
Posted by Thunderbolt379 on Friday, August 29, 2014 7:48 AM

Thanks, Joe! I've checked what remains to be done, and the outer faces of the gear ay doors are not yet painted, so I'll be putting some more 76 through the AB tomorrow -- in that case I may as well try to tidy up the overspray along the tail splotches at the same time. I'll be aiming to have her up to decals tomorrow, final assembly the day after... I might even start the paintwork on Rudel's D-9, while I have the 76 mixed!

M/TB379

http://worldinminiature.blogspot.com/

  • Member since
    August 2009
  • From: MOAB, UTAH
Posted by JOE RIX on Friday, August 29, 2014 7:40 AM

You're keeping it stunning Mike. Really nice paint work.

"Not only do I not know what's going on, I wouldn't know what to do about it if I did". George Carlin

  • Member since
    April 2005
Posted by Thunderbolt379 on Friday, August 29, 2014 3:03 AM

Thanks, Mustang! It's an interesting transition, to be sure -- from the clean, fresh paintjob to the plane as used, the clearcoat tying things together, the panel wash providing the core to the preshade effect, oil wash creating streaking, bare metal chips here and there, gun carbon, exhaust stains, fuel leaks, dust on the landing gear... It becomes a process we do so many times we sometimes need to stand back and think about it more deeply, as they're all done for solid reasons.

Touch-ups are underway, I *might* put some more 76 through the AB to clean up the overspray from the 83... Otherwise she's getting close to clear time!

M/TB379

http://worldinminiature.blogspot.com/

  • Member since
    March 2012
  • From: Corpus Christi, Tx
Posted by mustang1989 on Friday, August 29, 2014 2:50 AM

Both aircraft are looking great Mike. I like this stage of the painting process where your 152 is right now. From here it distinguishes the difference between "toy lke looks" to a weathered replica. Always fun to watch to transition. The paint job on that 152 looks awesome!!!


 Forum | Modelers Social Club Forum (proboards.com) 

  • Member since
    April 2005
Posted by Thunderbolt379 on Friday, August 29, 2014 2:21 AM

Quick update -- here's a photo of the A-8 with panel lines sealed that I missed uploading last time:

Progress on the 152, I have done spot spraying on the fine tip and needle with 76, 82 and 83 today, and am getting to the point where I can do any remaining touch-ups with a brush. There might be one spot where I need some more light green through the AB, I'll make a call on that.

All main masking is now away, the wheel wells are still protected. I can neaten up with a small brush in many places. Interestingly, the DOR bands unmasked clean, there was no residue left on the Tamiya flat red here, unlike the flat blue on the A-8. I got a bit of overspray from the dark green mottle, I'll have to make a call on whether I want to do anything about it or just crack on to the clear stage.

Next job, small brush stuff, and if I can get around that lot in decent time, I'll try for a clear coat either tonight or tomorrow -- depending on those calls.

M/TB379

http://worldinminiature.blogspot.com/

  • Member since
    April 2005
Posted by Thunderbolt379 on Friday, August 29, 2014 12:15 AM

Toughing up the 152 today, it's a bit frustrating as I'm chasing overspray, but if I can get it mastered I'll clearcoat her asap and get to the panel lines. I'm really hoping to be onto decals tomorrow -- fingers crossed they'll play!

M/TB379

http://worldinminiature.blogspot.com/

  • Member since
    April 2005
Posted by Thunderbolt379 on Thursday, August 28, 2014 6:14 AM

I've unmasked the Ta 152 and identified the touch-ups required. I'd have been on the job today only I came down with a migraine this morning and spent most of the afternoon heading it off... Will get to it tomorrow!

M/TB379

http://worldinminiature.blogspot.com/

  • Member since
    March 2012
  • From: Corpus Christi, Tx
Posted by mustang1989 on Thursday, August 28, 2014 3:56 AM

SchattenSpartan

Mike I might be able to help you out on this one. I'm sorry for the late reply but I've been really busy the last couple of days (the update I promised you guys is delayed because of the same reason).

I have exactly the same kit in my stash and I could send you the decals. I don't know if they are any better than the ones in your kit, but I think it's worth a try? I can send you both the markings as well as the stencils.

Yes


 Forum | Modelers Social Club Forum (proboards.com) 

  • Member since
    April 2005
Posted by Thunderbolt379 on Wednesday, August 27, 2014 7:03 PM

Clemens, thankyou so much, buddy! PM coming your way!

http://worldinminiature.blogspot.com/

  • Member since
    April 2013
Posted by SchattenSpartan on Wednesday, August 27, 2014 11:32 AM

Mike I might be able to help you out on this one. I'm sorry for the late reply but I've been really busy the last couple of days (the update I promised you guys is delayed because of the same reason).

I have exactly the same kit in my stash and I could send you the decals. I don't know if they are any better than the ones in your kit, but I think it's worth a try? I can send you both the markings as well as the stencils.

  • Member since
    April 2005
Posted by Thunderbolt379 on Wednesday, August 27, 2014 8:17 AM

Thanks, Mustang -- but it's actually Hans Dortenmann's Red 1. Dahl's plane appears to have a red band. I'm not sure what to do at this point, if I can get a replacement sheet from Hasegawa that would be great -- or even, on the grapevine, a cut sheet from which the other option was built, and I can add AM stencils...

I unmasked the Ta 152 today. It'll need the mottle on the tail and some general touch-ups to complete the paintjob, then onto clear, and that gets me to approximately the same position as with the A-8. I'm soaking the #1 tip overnight and will take a crack at the fineline work tomorrow.

Cheers, M/TB379

http://worldinminiature.blogspot.com/

  • Member since
    March 2012
  • From: Corpus Christi, Tx
Posted by mustang1989 on Wednesday, August 27, 2014 5:00 AM

With the blue band I have to assume that this is Walter Dahl's "Blue 13". If I'm right theres a set of decals here:www.eagle-editions.com/.../eaglecals-77-32-fw-190-a-8s-detail.html

I hope I'm right : )


 Forum | Modelers Social Club Forum (proboards.com) 

  • Member since
    May 2013
  • From: Indiana, USA
Posted by Greg on Tuesday, August 26, 2014 8:51 PM

You are having your share of troubles, Mike. Hope you get it sorted out.

Is it typical for 10 yr old decals to go bad? 10 yrs doesn't seem that long to me.

Brings back memories of getting replacement stuff as a kid. Was all via snail mail and slow, but always got what I asked for. Been wondering about the changes over the decades.

  • Member since
    August 2009
  • From: MOAB, UTAH
Posted by JOE RIX on Tuesday, August 26, 2014 8:46 PM

Hey Mike, Certainly everything about your 190 looks fantastic. That is indeed a major bummer about the decals. Mike, I just received my Montex masks for my bf 109F and you indeed put them on after the camo is on. Yet, your question gave me a moment of pause. I had assumed that you put them on after but, you got me thinking about that. So, I pulled them out to check for sure and upon close examination it is actually possible to paint them either before or after. Just a matter of how you manipulate the masks. They really look great. I'll admit that I'm a bit apprehensive about using them mainly over getting them placed exactly right. It's not like a decal where you can slide it around into place. So, the Montex masks may very well be an option for you. Mine arrived in a rather timely manner. About a week as I recall. Sure hope this helps

"Not only do I not know what's going on, I wouldn't know what to do about it if I did". George Carlin

  • Member since
    July 2011
  • From: minnesota
Posted by handiabled on Tuesday, August 26, 2014 7:37 PM

Thin but thankfully yes better, not the potato chip like ones to begin with,, even blasting with bonder didn't help............  again like you said,,,, locked into a paint scheme, what do you do ?? Keep my fingers crossed they have a sheet closer than one of the moons of Jupiter for you !

  • Member since
    April 2005
Posted by Thunderbolt379 on Tuesday, August 26, 2014 7:28 PM

Oh, man!!! I can sure see how all those stars and bars match the packing slip stating "Messerschmitt decals." GRRRRR -- you'd think Japan's ability to pack product to the world would extend to bilingual customer service. Ah well, if that's the road I need to go then that's about all that can be done. I checked for stencil data and I don't seem to have that sheet I thought I had. I'd be looking at something like $60, including shipping, to source all the markings on separate sheets, and I just can't see my way to doing that at this point in time...

I have that 109 as well, and certainly hope it's decals behave themselves. Was the replacement sheet you eventually got okay?

M/TB379

http://worldinminiature.blogspot.com/

  • Member since
    July 2011
  • From: minnesota
Posted by handiabled on Tuesday, August 26, 2014 7:17 PM

I hate to say, I just went thru the same deal with Hobbico,,,, they told me the new sheet had to come from Japan, nothing else could be done,,, 6 weeks later I received my decal sheet.......


Surprised to find these in the package......................


They finally got the correct ones to me but it took over three months !    I started the 1/32 Hasegawa BF109G-6 in January,,,,, I just finished it today,,,, I hope you have better luck man!


JOIN OUR COMMUNITY!

Our community is FREE to join. To participate you must either login or register for an account.

SEARCH FORUMS
FREE NEWSLETTER
By signing up you may also receive reader surveys and occasional special offers. We do not sell, rent or trade our email lists. View our Privacy Policy.