SEARCH FINESCALE.COM

Enter keywords or a search phrase below:

Still Too Many Props GB - 2013

40553 views
279 replies
1 rating 2 rating 3 rating 4 rating 5 rating
  • Member since
    August 2009
  • From: Borlando Fla home of the rat
Posted by TREYZX10R on Wednesday, July 31, 2013 11:26 AM

Bish thank you kindly and feel free to copy and save any of the pics of mine you want! I've also got some stills saved if you want them just let me know.

B17Pilot thanks,yes that nose chute is a poser for sure!

  • Member since
    April 2013
Posted by SchattenSpartan on Wednesday, July 31, 2013 7:01 PM

Great work, Trey! Those zip ties make for some good looking ammo chutes! Never thought of that.

  • Member since
    December 2002
  • From: Bury St Edmunds, Suffolk, England
Posted by Bish on Wednesday, July 31, 2013 7:04 PM

Thanks TREY, and any pics you have would be most welcome.

I am a Norfolk man and i glory in being so


On the bench: Airfix 1/72nd Harrier GR.3/Fujimi 1/72nd Ju 87D-3

  • Member since
    December 2002
  • From: Bury St Edmunds, Suffolk, England
Posted by Bish on Thursday, August 1, 2013 8:29 AM

Thought I would post a quick update mid weathering. The decals are now on and the exhaust staining added. I am now running pro modeller wash through the panel lines, still got the underside to do. I am going to leave this to dry for a while as I want to have a grimy look on this.

I may have to put this on hold for a bit. Its come to my attention that there should be a series of formation lights running along the top of the fuselage. The Hase instructions don't mention them, but the Hussar decal instructions do, but they don't include them. And they are visible on the photo's. They appear as small white squares. I don't have any decals that would work and I don't fancy trying to paint them. But I have found some xtradecal white stripes in different thicknesses which I think will work.  But I won't be ordering them for a couple of weeks. In the meantime I can finish the wings and work on the base. I just can't finish the fuselage off.

I am a Norfolk man and i glory in being so


On the bench: Airfix 1/72nd Harrier GR.3/Fujimi 1/72nd Ju 87D-3

  • Member since
    April 2013
Posted by SchattenSpartan on Thursday, August 1, 2013 9:18 AM

Very impressive work, mate! That exhaust staining on the wings adds a lot to the overall appearance! I love how it kinda blends the black and orange together to make it look more "natural".

  • Member since
    September 2009
  • From: Frisco, TX
Posted by B17Pilot on Thursday, August 1, 2013 10:29 PM

All ready for putty and it's going to need a lot of it. Good thing I'm going to do a OD/NG scheme and not NMF!

Downside of all this is I had to attach the main gear to get the engine nacelle on so that could be flared into the wing. Just another thing I have to watch out for and not break!

I tried several different ways around this but just couldn't find a good way to get the strut in with out compromising the integrity of it.Angry 


  • Member since
    April 2013
Posted by SchattenSpartan on Friday, August 2, 2013 11:33 AM

Looking nice, B17Pilot!

I don't like it either when the struts must be in place before adding the engine nacelles. It's the part I'm dreading most on my B-25. Speaking of the B-25: I am going to buy the last AM goodies I need for it tomorrow, so I'm going to start work on Sunday!

  • Member since
    October 2008
  • From: italy
Posted by bsyamato on Friday, August 2, 2013 11:44 AM

TREYZX10R

Time for another update(finally). Decided to tackle the ammo chutes and after a miserable attempt with the pe ones decided to use the old tried and true zip ties instead.

I had the same idea but never try to use :) excellent work on the fortress Yes Yes Yes

Great updated Bish ,really like the paint scheme you used !

Actually i'm a little busy out of workbench and just try to finish little projects that are about finish.. hope to get back soon with some beast 

  • Member since
    August 2009
  • From: Borlando Fla home of the rat
Posted by TREYZX10R on Saturday, August 3, 2013 8:40 PM

Schatten Spartan thanks ,I ca'nt take credit for the original zip tie idea stole it from another member here on the site. Sadly he no longer posts up here, otherwise I'de give him props.

Bish WOW!!!! That is looking great! Ca'nt wait to see that all together. Good luck with the formation lights,I'm sure you nail it!

B17Pilot I ran into the same problem with the P-38 struts. I solved it by notching one side of the retaining hole so I could swivel the gear in after the build.

Bsyamato thank you kind Sir!

A Bomb? Were you expecting one?

The long awaited final tweaks have been added and its almost time to close the Fuse up. So with a heavy heart I will entomb the details.

  • Member since
    April 2013
Posted by SchattenSpartan on Saturday, August 3, 2013 8:50 PM

Great work as always!

What were you using to hold the bombs?

I got the last AM bits today (gun barrels) and I'm ready to start work on this beast of a model airplane to which most people refer to as "B-25". 1/32nd FTW!!!

  • Member since
    December 2002
  • From: Bury St Edmunds, Suffolk, England
Posted by Bish on Sunday, August 4, 2013 3:53 AM

I can see one problem with that build TREY. Its going to be a real shame to close that up. What are those items on the floor by the entry hatch. I am guessing kit bags and personal gear. If so, great touch.

I am the same with landing gear. I prefer to leave it until as late as possible. Same goes with props and anything else that might break.

I am a Norfolk man and i glory in being so


On the bench: Airfix 1/72nd Harrier GR.3/Fujimi 1/72nd Ju 87D-3

  • Member since
    April 2013
Posted by SchattenSpartan on Monday, August 5, 2013 3:21 PM

Hello gents!

I made some progress on my B-25. Not much, but at least a start...

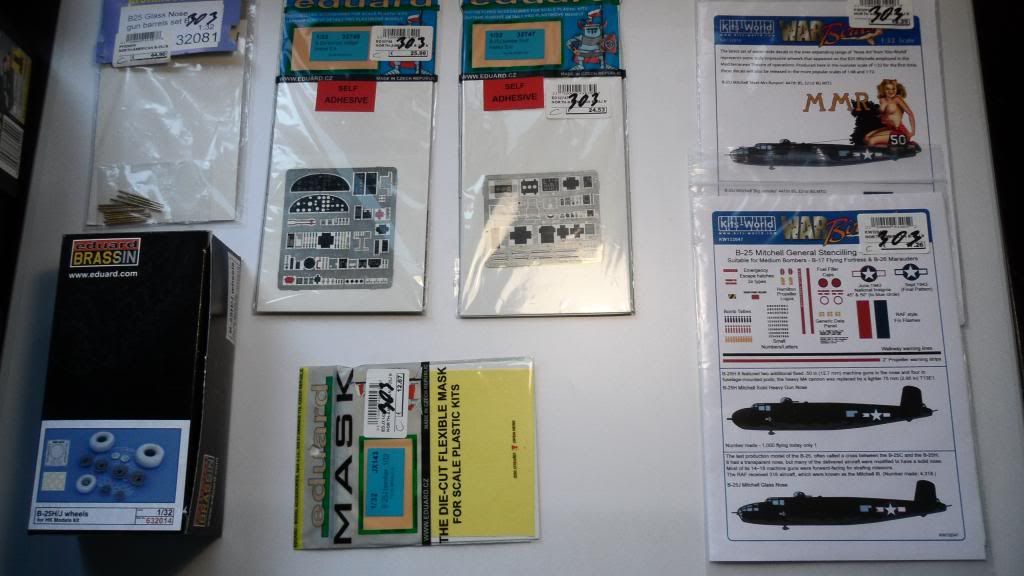
Here are all the AM goodies I'll use for this build:

  • Profimodeller gun barrels
  • Eduard cockpit PE
  • Eduard "greenhouse" PE
  • Eduard wheels
  • Eduard masks
  • Kits World stencilling decals
  • Kits World decals (Meet Miss Runyon)

Those Eduard sets look like nothing serious from the front, but as soon as you look at the back...
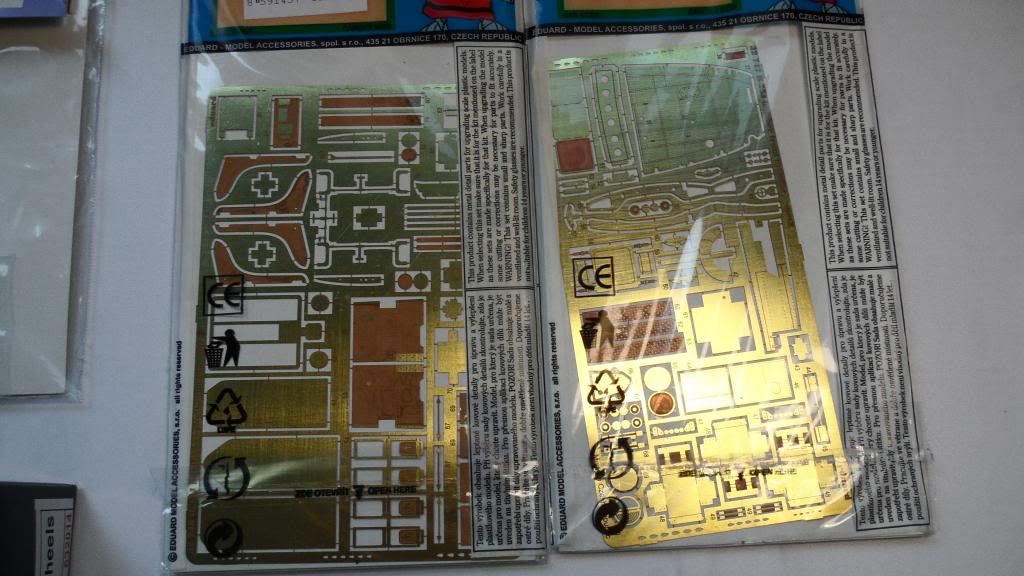
Now for some WIP pics:

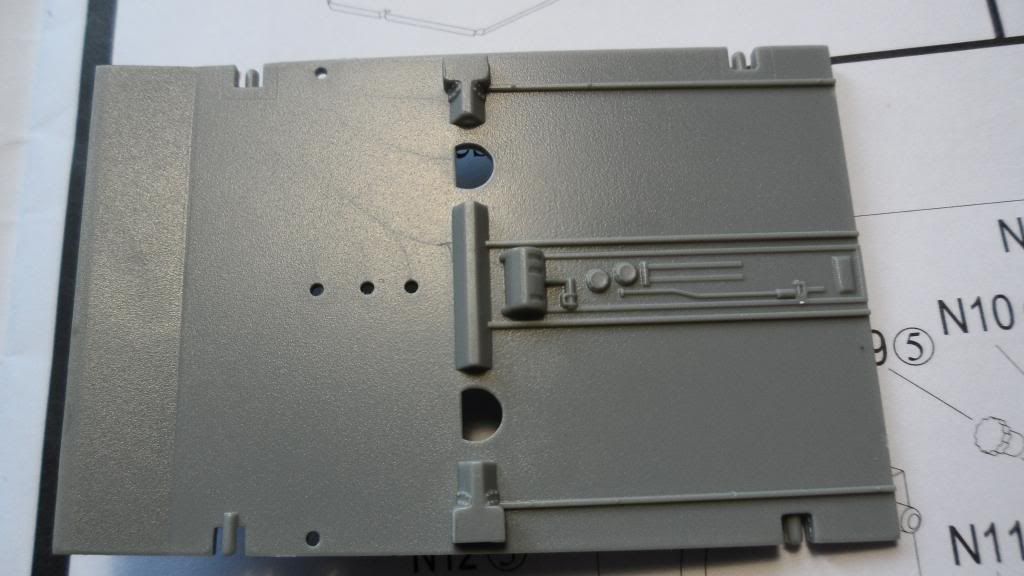
Here is the cockpit floor without the added PE:
I had to remove almost all the raised detail between the seat mounting rails. I scraped everything off with a round scalpel:
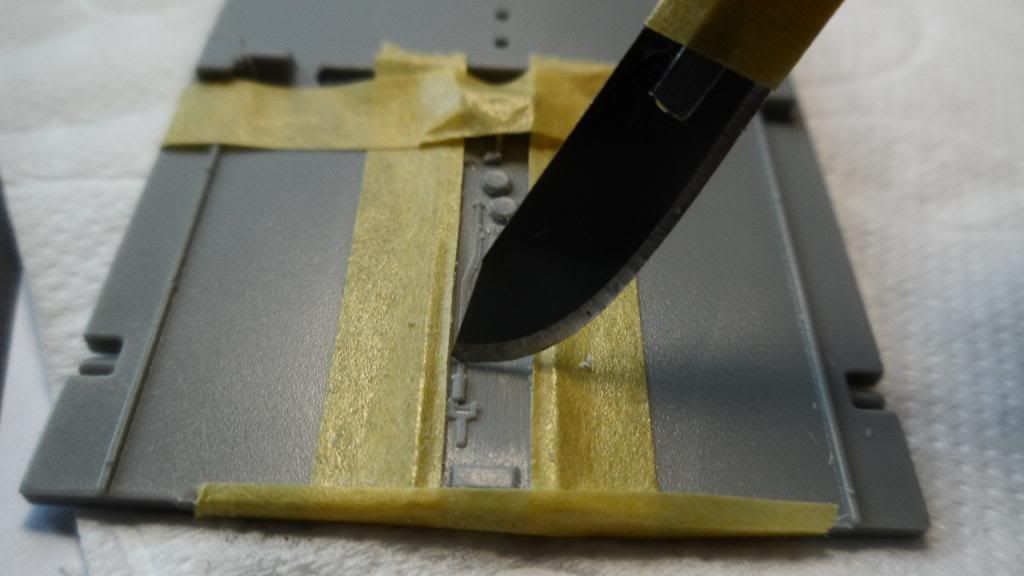
And this is how it looks after some clean-up:
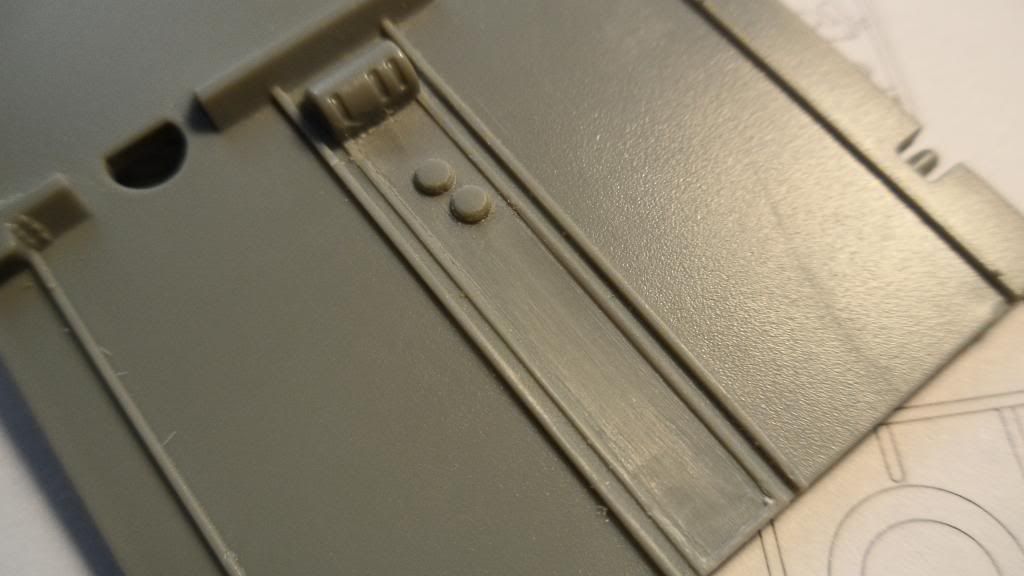
It looks like crap on this picture, but it is actually much smoother... Most of that area will be covered by PE parts anyway...

And this is where I am at the moment:
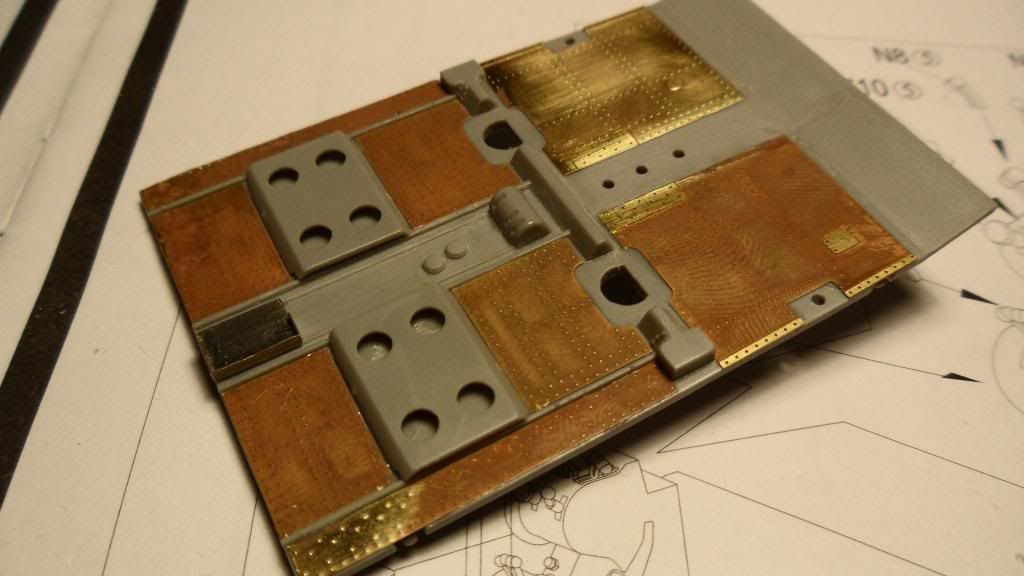
Some of the PE surfaces are shiny because i got some superglue on the PE plates and I had to sand it off using a glass-fibre "eraser"  (normally used to clean up welding spots on electronic devices). 

This is my first attempt at working with large PE plates, so it is by for no masterpiece, but I think it's going to look good once everything is painted, weathered and mounted between the fuselage halves.

Next task are the seats (with PE plates for the sides and PE armor plates at the rear)

I hope you like it...

Cheers, Clemens 

  • Member since
    December 2002
  • From: Bury St Edmunds, Suffolk, England
Posted by Bish on Wednesday, August 7, 2013 6:34 AM

Not so much an update as much as a request for opinions. I have got the wings finished, but am not sure if the weathering is to much. I have used AK streaking grime and I can remove more if needed. As you can see in the pic, one wing has more than the other. So I am wondering what you guys think.

Its mainly the underside I think might be over done, I am pretty happy with the top.

You have to keep in mind these were older aircraft and as they were not going to drop bombs on anyone, keeping them nice and clean would not be a priority. And the underside would have been left over from the previous scheme and the black and orange would be newer.

So what do you think.

In the meantime, I am working on the base and fuel truck. I am away next week so I will send my Hannants order off just before I come home, so should only be a couple of days after that when this is done.

I am a Norfolk man and i glory in being so


On the bench: Airfix 1/72nd Harrier GR.3/Fujimi 1/72nd Ju 87D-3

  • Member since
    April 2013
Posted by SchattenSpartan on Wednesday, August 7, 2013 9:12 AM

I like the look of them, but I think the gear legs are a bit too shiny Wink

  • Member since
    December 2002
  • From: Bury St Edmunds, Suffolk, England
Posted by Bish on Wednesday, August 7, 2013 9:21 AM

Ye, not weathered those yet. I prefer to do them in place.

I am a Norfolk man and i glory in being so


On the bench: Airfix 1/72nd Harrier GR.3/Fujimi 1/72nd Ju 87D-3

  • Member since
    April 2013
Posted by SchattenSpartan on Wednesday, August 7, 2013 9:46 AM

I kinda expected that answer. How did I know? Hmm Wink

  • Member since
    August 2009
  • From: Borlando Fla home of the rat
Posted by TREYZX10R on Wednesday, August 7, 2013 9:27 PM

Schatten nice upgrades you ordered,going to really make this one stand tall.

Bish The weathering looks spot on,not too heavy at all. You're quite right these airframes were beat up worn out and not really looked after compared to the airframes that were seeing active combat action.

The wings are up next ,starting with the turbo units. The resin upgrades are nicely molded and will really add to the underside detail. First I have to cut away the molded in kit units. I dremeled the inside first to thin the join areas then using a fresh #11 blade cut away the turbos

Next I added some scrap bits of sheet styrene to support the new turbo units

Cleaned up the resin parts and after test fitting I added some pilot holes and inserted stretched sprue for a sturdier glue joint to the tubes

Then another final test fitting

I then set to adding the pe bits

The finished units in place,they wo'nt be glued in until the very end after painting

Ruger is totally worn out,some guard dog huh?

  • Member since
    December 2002
  • From: Bury St Edmunds, Suffolk, England
Posted by Bish on Thursday, August 8, 2013 5:00 AM

Thanks for the input guys. My gut feeling was that it was ok, its just getting over the mind-set of it being to dirty. I have the opposite problem with armour when trying to do a not so dirty build.

Those resin exhaust looks nice, who are they from.

I am a Norfolk man and i glory in being so


On the bench: Airfix 1/72nd Harrier GR.3/Fujimi 1/72nd Ju 87D-3

  • Member since
    April 2013
Posted by SchattenSpartan on Thursday, August 8, 2013 5:35 AM

Really nice looking exhausts/turbochargers, Trey!

  • Member since
    April 2013
Posted by SchattenSpartan on Friday, August 9, 2013 10:40 AM

Here's another update on my B-25:

I managed to get all the PE glued to the seats. There are only 3 pieces of PE per seat, but they are a real pain to get right: The plates that go on the sides are slightly too small (I had to sand the seats down after aataching the PE parts) and didn't line up well, because of the form of the seats. The little PE strips gave me the most trouble though. They are not perfect, but I think it still looks decent.

Here are some pics:

I stuck the seats to the cockpit floor using some poster-tack:

 And here's a pic of the injector pin marks (2 per seat). I still have to remove the upper pin marks, but I'll leave the lower ones as they are, because you won't see them after the seats and the armored backplates are glued in place:

That's it for now. Next thing I'll do is add the PE bits for the instrument panel....

I have to admit that all this PE work is a lot of fun and kinda addictive, despite me being completely unexperienced in this stuff...

Cheers, Clemens 

  • Member since
    December 2002
  • From: Bury St Edmunds, Suffolk, England
Posted by Bish on Friday, August 9, 2013 10:44 AM

Looking good there Clemens. Not to bad ejector pin marks as they go. A little bit of sanding will soon have those away.

I am a Norfolk man and i glory in being so


On the bench: Airfix 1/72nd Harrier GR.3/Fujimi 1/72nd Ju 87D-3

  • Member since
    April 2013
Posted by SchattenSpartan on Friday, August 9, 2013 11:02 AM

Thanks mate!

Those ejector pin marks are indeed easy to remove. The realy bad pin marks are on the inside of the fuselage. Eduard saves the day though, because every single pin mark in the cockpit is covered by a PE plate or box Big Smile

  • Member since
    August 2009
  • From: Borlando Fla home of the rat
Posted by TREYZX10R on Monday, August 12, 2013 8:27 PM

Bish thanks the exhaust came with the Verlinden set. Still have'nt forgot about the reference pics for you. What would be easier just post them up ,pm or e-mail?

Schattenspartan The seats and pe are looking sharp,glad to hear the pin marks are an easy fix!

Moving on to the wings I dealt with the intake areas using some sheet styrene . I really could'nt stand the thought of paying the high dollar for a resin Paragon kit on evil bay. Took about an hour a wing to make the mods so it was'nt too hateful.

I used the inside curve of the wing to mark a template

After some trimming and sanding got a decent fit

Then added the top covers

The finished mods look the part and I saved some dollars to boot

Cheers Trey

  • Member since
    December 2002
  • From: Bury St Edmunds, Suffolk, England
Posted by Bish on Wednesday, August 14, 2013 3:40 PM

Looking good TREY. Like the bomb loader, I've got one of those in 72nd. Did that one come with the kit.

Would an e-mail be ok, if so I will PM you my addy.

I am a Norfolk man and i glory in being so


On the bench: Airfix 1/72nd Harrier GR.3/Fujimi 1/72nd Ju 87D-3

  • Member since
    April 2013
Posted by SchattenSpartan on Thursday, August 15, 2013 2:05 PM

Really nice work as always, Trey!

  • Member since
    August 2009
  • From: Borlando Fla home of the rat
Posted by TREYZX10R on Thursday, August 15, 2013 7:13 PM

Bish,thanks,send me your addy and I'll ship ya some pics.

Clemmens thank's!

4 hours of filling & smoothing seams ,drilling open intakes and the wings are ready for paint

the areas on the engine nacelles and next to the intakes were the worst

So now we come to it,thinking of cutting away these areas ,any thoughts? Yea or Nea?

  • Member since
    July 2007
  • From: Southern New Jersey
Posted by troublemaker66 on Thursday, August 15, 2013 7:29 PM

I would open up the fuse if I did all that detail work. When I get to mine, I`m either using the clear fuse half in the "Visible" kit or, just gonna have to figure out a way to leave the port fuse half off entirely...make it a shadow box or leave just enough of the fuse half to keep the wing root and the extreme outter edges so that I could still close the fuse but it would be wide open to see everything inside...make sense??

Len Pytlewski

  • Member since
    August 2009
  • From: Borlando Fla home of the rat
Posted by TREYZX10R on Thursday, August 15, 2013 7:40 PM

Yea Len that makes perfect sense thanks for the input. I'm only wanting to open it up to see some detail without showing the rougher unfinshed back sides of some of the resin bits. Hoping the areas I've marked will do just that. I like your idea about leaving just enough to hold the wings and had I started from the beginning of the build with that in mind it would be the way I would go! cheers Trey

  • Member since
    April 2013
Posted by SchattenSpartan on Friday, August 16, 2013 8:08 AM

I'm for cutting the marked areas away. Are you going to add some lighting?

JOIN OUR COMMUNITY!

Our community is FREE to join. To participate you must either login or register for an account.

SEARCH FORUMS
FREE NEWSLETTER
By signing up you may also receive reader surveys and occasional special offers. We do not sell, rent or trade our email lists. View our Privacy Policy.