SEARCH FINESCALE.COM

Enter keywords or a search phrase below:

Gift GB

73679 views
605 replies
1 rating 2 rating 3 rating 4 rating 5 rating
  • Member since
    December 2002
  • From: Bury St Edmunds, Suffolk, England
Posted by Bish on Monday, March 4, 2013 2:03 PM

I was just looking at that build. I am assuming this is a mix of kits. I will just put it down as a 72nd Lighting Delta.

I am a Norfolk man and i glory in being so


On the bench: Airfix 1/72nd Harrier GR.3/Fujimi 1/72nd Ju 87D-3

  • Member since
    October 2008
Posted by eatthis on Monday, March 4, 2013 1:54 PM


snow + 4wd + escessive hp = :)  http://www.youtube.com/watch?v=x7egUIS70YM

  • Member since
    October 2008
Posted by eatthis on Monday, March 4, 2013 1:54 PM

my memory is shocking lol

i forgot this gb even existed let alone id already posted in it!

that tsr2 is almost complete and its a swingwing tsr2

this kit is a 72 lightning that iv also chopped up and put a delta wing on it heres where its at atm

i46.tinypic.com/2ia3bxw.jpg


snow + 4wd + escessive hp = :)  http://www.youtube.com/watch?v=x7egUIS70YM

  • Member since
    December 2002
  • From: Bury St Edmunds, Suffolk, England
Posted by Bish on Monday, March 4, 2013 1:40 PM

You did post a message back on page 10 about entering your TSR2 build. I guess you missed my reply. Is that the kiot you want to enter, if so i'll add you. If not, let me know and i will still add you.

I am a Norfolk man and i glory in being so


On the bench: Airfix 1/72nd Harrier GR.3/Fujimi 1/72nd Ju 87D-3

  • Member since
    October 2008
Posted by eatthis on Monday, March 4, 2013 12:21 PM

how have i missed this?

cab i enter with a part started kit?


snow + 4wd + escessive hp = :)  http://www.youtube.com/watch?v=x7egUIS70YM

  • Member since
    May 2005
Posted by pyrman64 on Monday, March 4, 2013 10:25 AM

BL:  as alternative to aplying the dry transfers is putting in them onto clear decal paper, spray with a clear decal setter (Testors has a decal set) and apply as a wet decal.

Greg H

"There is many a boy here today who looks on war as all glory, but, boys, it is all hell." Gen. Wm T. Sherman (11 April 1880, Columbus, Ohio)

  • Member since
    April 2011
  • From: Silver Spring, MD
Posted by badlanguage on Monday, March 4, 2013 8:35 AM

Z Square 8

BL- does your kit have all the white lettering for all those pieces as decals?...wow, that build is awesome. I can see why you are referencing it.

Z, I'm going to have to try my hand at making some decals for this one. My kit came with some stick on decals - Bandai includes either stickers or dry transfer decals, and I prefer water slides. They really design these kits to be easy for novice builders, even though there's a lot of detail in them. Most modern Gundam kits are actually all snap together that would produce a decent model without paint. Anyway, the decal making is venturing into new territory for me, so we'll see how it goes! By the way, good progress on the 29!

  • Member since
    December 2012
Posted by Z Square 8 on Monday, March 4, 2013 7:16 AM

LOL on the Stumpy...or maybe Stumpy is really saying, "I get the whole modeling adlib thing, but don't think for a minute I'm giving up this part of the directions until I see some bloomin' catnip bub!!"

The prop capture looks very good!

CMK, you inspired me to take a good hard look at my sanding work last night...thank you! So I broke out a second 500W halogen work light and was disgusted. So, out came the Xacto for some light scraping and sand paper. Things are now looking much better...not perfect yet, but better.

I'll pass along a challenge on the 29 build...

 to the mid-left of the image, you'll see the 20mm cannon circled and it's version application point. Well, Z-8 did not use this pkg so I needed to cut off that big extension section on the tail piece labeled as "A". Labeled point "B", is this installed piece that was customized for historical accuracy...to get there was the challenge. As you can see by labeled point "C", the piece was a hollow, half round circle so to say. As I studied the depth of the mold from the inside, it looked like there was enough material to make that center area flat as shown by the directions. So off I went to cutting off the section in a concave fashion to keep that roundness. Then broke out the xacto to do the final carving and shaving.

Guess what...not enough material and a hole started to open up.Hmm

 This fix was my very first attempt with putty and sanding. Eventually, it turned out ok, but I may tweak this more. (you can see that I have yet to add the two barrels. With as much handling as the 29 will get before decals, I opted to install very last to prevent snapping them off and getting paint on them when I touch that flat area with paint)

--Rich

Site builder of CooksonTributeB29.com 


  • Member since
    September 2003
  • From: AandF in the Badger State
Posted by checkmateking02 on Sunday, March 3, 2013 9:16 PM

That's a great result you got from the photo, Z.  Very nice work--impressive.  I'll look forward to seeing how you do the rest.  The research you're doing is highly interesting.

A minor report on the Fairey Battle progress, and a minor failure. Crying

These little gems were supposed to go into the wing light bays.  I suppose they're bulbs or lenses, so I painted them a nice silver.

The numbers are the parts numbers, just in case these nuggets were wing-specific.

Then, the clear covers were supposed to go over the top and settle into slots in the wing.

When it came time to fix the clear covers, I found that the bulbs were too big and the covers too thick and nothing suited.  So I filed and sanded the bulbs, until they didn't look like they used to--and would not have enhanced the appearance of the wing. Ick!

So I just painted the covers silver on the back side and stuck them into the wing.  Problem solved, but it's sad! Sad

And as usual, Stumpy the Cat doesn't care.

Thanks for looking.


  • Member since
    December 2012
Posted by Z Square 8 on Sunday, March 3, 2013 4:25 PM

As I awaited on recommendations/advice last night...I decided to tinker with that nose paint image/work on the computer with Paint.net. Here is my hour of invested time results so far...

The original image...

and the initial rework to make a custom decal...need to rework a lot more, (like the "A" in Albuquerque  and include the "l" after the "A"),. I used a black outline of the lettering as a scissor guide to trim to the white lettering base like the original image shows. It's a start...


I will be trying Don's method of inkjet to white decal sheet ultimately and scaling her down to size. I still have yet to add color to it, but this is the first rendition in B/W...still needs quite a bit of work though. From other B/W images of hair color on the pin up gals, I am of the impression that this gal is blonde and maybe a tan color of shorts/skirt. We did make contact with the son of the crew chief of the Mission to Albuquerque a few weeks back (Sgt. George Lucas), and have added a new page to the website for him.

My hope is that his son may have a few images of this bird that I can add to the site and reference for detail for this build. (keeping my fingers crossed! Yes)

Additionally, none of our sources have yet to reply on the significance of "Hazel" as the name of the pin up gal...maybe Pilot's girlfriend? Or to the reason of the ship name of Mission to Albuquerque...again, fingers are crossed.

CMK- Thanks for the advice on fine tuning the surface area. Yep, she is huge. Finished size is about 3' wingspan and length around 2'. Does get a bit crowded on the work table!

--Rich

Site builder of CooksonTributeB29.com 


  • Member since
    September 2003
  • From: AandF in the Badger State
Posted by checkmateking02 on Sunday, March 3, 2013 3:19 PM

That's BIG, Z!  I haven't used Alclad, but most metallics show up scratches very well, so be sure to sand and polish as much as needed, to get the plastic smooth and shiny--although maybe the gloss black will take care of some of it.

It will be interesting to see the results.  Good luck!


  • Member since
    December 2012
Posted by Z Square 8 on Saturday, March 2, 2013 4:40 PM

Wow talentless!...that's quite a wait.

Here's WIP on the 29 build...she and I are just hangin' around...Cool

 2nd time for priming sanded areas...first coat of primer showed me all my sanding shortcomings.

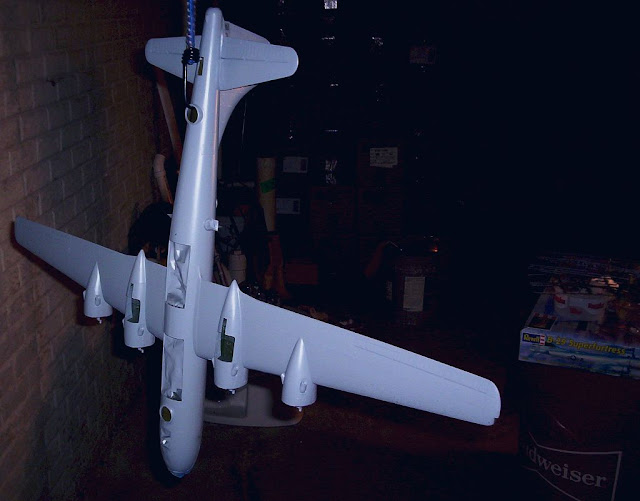
and her underside...she still has some flaws in putty/sanding, but getting concerned about over working her. trying to get her ready for the gloss black base. Completed the engine re-touch to rid myself of the polka dot engine port covers. Black Eye

Bay and wheel well doors, cowlings have the base applied below:


Question: Since the bird has had some sanding work, what would you guys recommend...cover her with future before gloss black base heading toward Alclad II? Not use future at all? Future afterward? Use micro fill or spend time with some really fine grit sanding efforts?

...keep in mind that my neighbor is going to let me borrow his airbrush for the Alclad and I have NO experience with one whatsoever. I'm anxious but aprehensive at the same time since the build is rapidly approaching a full on standstill until I get her cladded. Next biggest, remaining challenge will be to create the nose art on the computer and make the decal.

Up till now, its all been hand painted or sprayed from the can...

Appreciate any comments or advice as I have looked at so many painting tips in the forum, my head is spinning a bit  Confused


BL- does your kit have all the white lettering for all those pieces as decals?...wow, that build is awesome. I can see why you are referencing it.


--Rich

Site builder of CooksonTributeB29.com 


  • Member since
    January 2012
  • From: Hatfield
Posted by Misty on Saturday, March 2, 2013 10:03 AM

i ma supposed to be in this GB but am still waiting five weeks later for a PE set from WEM, god knows if ill even START this let alone finish it.

  • Member since
    September 2003
  • From: AandF in the Badger State
Posted by checkmateking02 on Saturday, March 2, 2013 9:11 AM

Z Square 8

BL- agree with CMK on how nice the effect is with the shading. The 5" tall when finished gives credence to the size of the pieces you are working with...nice job.

CMK- i really like what you did with the instrument panels. The last image certainly shows how clean and crisp the results will be of the battle. Looking great. (so are you going with a polka dot camo final paint scheme? lol)

I'll keep watching and learning....

 
Thanks, Z.  There will be splotches; sort of out-of-shape polka dots, maybe?


  • Member since
    April 2011
  • From: Silver Spring, MD
Posted by badlanguage on Friday, March 1, 2013 10:30 PM

Thanks for the feedback, Checkmate and Z. I'm hoping the paint gives me a good foundation for weathering. My inspiration is this guy's work:

www.gundampro.com/.../pg_rx78_c.a

You have to click on each jpg, which is annoying, but his weathering is nice! I've been studying his weathering and he seems to put it together with the effect I'm looking for in this model.

  • Member since
    December 2012
Posted by Z Square 8 on Friday, March 1, 2013 4:09 PM

BL- agree with CMK on how nice the effect is with the shading. The 5" tall when finished gives credence to the size of the pieces you are working with...nice job.

CMK- i really like what you did with the instrument panels. The last image certainly shows how clean and crisp the results will be of the battle. Looking great. (so are you going with a polka dot camo final paint scheme? lol)

I'll keep watching and learning....

--Rich

Site builder of CooksonTributeB29.com 


  • Member since
    September 2003
  • From: AandF in the Badger State
Posted by checkmateking02 on Friday, March 1, 2013 2:05 PM

You got a nice effect with the shading and painting, BL.  Looks really good.


  • Member since
    April 2011
  • From: Silver Spring, MD
Posted by badlanguage on Friday, March 1, 2013 1:22 PM

More updates to the Gundam. Did some construction and painting of arm and leg parts, and put a couple more pieces on the upper torso.

Some preshading:

On the legs, too:

After some grey paint:

And some more:

I just couldn't seem to take even a decent pic of the legs painted! Here's the upper torso with a couple more parts on. I'm holding it to give a feeling of scale for the model. It will end up being about 5" tall when it's done.

Hopefully I'll have more updates soon, we'll see what life allows me to do!

  • Member since
    September 2003
  • From: AandF in the Badger State
Posted by checkmateking02 on Thursday, February 28, 2013 5:58 PM

Z Square 8

good find CMK, there are actually two stripes...red at the nose and sea foam green in the middle.

(polka dots...snicker)

Yup, and that means twice as much trouble to apply.Sad

But, modeling is a challenge, isn't it?

Well, while I cogitate on that, here are a couple of progress photos.

The first one shows the results of doodling around with the instruments I made from plastic bits.  I found an old decal of an instrument panel (B-17, I think), chopped it apart and applied the instruments randomly.  To my Fairey-Battle-uneducated eye, they look OK.

The next shot shows all the interior pieces and assemblies in place, and ready to be shut up into the fuselage.

One of the challenges here is to trap the propeller between the fuselage halves, and then glue them without immobilizing the prop; then sand the seam without damaging the painted prop; then paint the fuselage without getting overspray on the prop. 

It would have been nice to have a design that allows you to close up the fuselage, then insert the prop assembly from the outside after the fuselage is done.  According to the Airfix Tribute Forum the kit dates back to 1968, and this probably "just wasn't done" in those days.

Keep cool and carry on; and thanks for looking.


  • Member since
    December 2012
Posted by Z Square 8 on Thursday, February 28, 2013 3:04 PM

good find CMK, there are actually two stripes...red at the nose and sea foam green in the middle.

(polka dots...snicker)

--Rich

Site builder of CooksonTributeB29.com 


  • Member since
    September 2003
  • From: AandF in the Badger State
Posted by checkmateking02 on Thursday, February 28, 2013 11:57 AM

Stripes were a nice suggestion, Z.  I googled the web and came up with this.

The one on front-right looks pretty close to what Airfix put in the Battle kit.

Now, painting that stripe will be another issue.  Maybe I can use a painted decal?

Stripes and polka dots; what is modeling coming to?

Thanks.


  • Member since
    September 2003
  • From: AandF in the Badger State
Posted by checkmateking02 on Thursday, February 28, 2013 8:22 AM

Thanks, Z.  They are British bombs, I suppose.  Should probably look for info on the web, and see about stripes.


  • Member since
    December 2012
Posted by Z Square 8 on Wednesday, February 27, 2013 10:16 PM

What kind of bombs are they? GP 500's?

The reason I ask is a recall seeing some photos of GP bombs having one stripe encircling the casing near the rear, close to the tail...and another type having two stripes...now where did I see that??

Anywho,...stripes is one thing you could do and some ordnance crews used to write messages to the recipient like "you'll get a bang out of this one!" or "say hello to satan for us!" or "Special delivery-Hitler's Popcorn"

...a quick trip on Fold 3- see below:

--Rich

Site builder of CooksonTributeB29.com 


  • Member since
    September 2003
  • From: AandF in the Badger State
Posted by checkmateking02 on Wednesday, February 27, 2013 2:58 PM

Z Square 8

CMK- still chuckling with your response...stated very well! (polka dots...lol). Just the chuckle I needed this

 
"Mayhem is everywhere," they say.  Glad I could neutralize some of it Balloons.
 
Below is the gunner's position in Airfix's take on the Fairey Battle.  Not much to see here. . .so move along, move along.
 
 
While attending to these inner parts of the Battle, I attached the horizontal stabilizers. from the inside, before closing up the fuselage.
 
 
And masked the prop.  For some contrast, I used WEM Night on the blades and Floquil Model RR Grimy Black on the hub.  The latter is more like a dark gray (or, do you say "grey?).


Here are the bombs painted up, as the instructions command.  I used a Humbrol yellow for these.
 
 
I see the cat left a hair in the masking tape.
 
At this point, I could benefit from some advice.  These bombs look awfully bland and uninteresting.  What do you all think could be done to spruce them up, add some interest, vary this monotone scheme?  There doesn't seem to be much of a place on them for washes or dry-brushing or some kind of cosmetology, but I'd like to treat them to some kind of make-over.
 
I'd appreciate suggestions, if any of you care to take the time to give some.  And thanks for looking.


  • Member since
    December 2012
Posted by Z Square 8 on Wednesday, February 27, 2013 10:18 AM

CMK- still chuckling with your response...stated very well! (polka dots...lol). Just the chuckle I needed this morning!

Bish- thanks for the pics...they do tend to confirm covers and Pryman may have the answer. I'll have to push the question on to a couple of resources I have to see if I can get the mystery solved. Either way, I don't think red polka dots are historically accurate. <snicker snicker>

I took another look this morning at the molding and it is not a flat surface, rather a ridged surface area. Even as a 1/48th scale, it is very small and somewhat hidden by the cowling and prop. I'll retouch as aluminum and continue with masking...

Did I mention that masking is the bain of my existence?...already can tell the blister masking will be a big challenge. ( I have one of the 4 done with blue scotch). Will have to peruse the tips section to pick up some pointers...

Appreciate the input gents

**Post Edit**

- looks like regular scotch tape works ok or the Tamiya yellow is the way to go. I'll test regular scotch since it is on hand in the junk drawer...if not, a quick drop in at HobbyLand will be in order.

--Rich

Site builder of CooksonTributeB29.com 


  • Member since
    May 2005
Posted by pyrman64 on Wednesday, February 27, 2013 7:21 AM

Any chance those are exhaust ports?

Greg H

"There is many a boy here today who looks on war as all glory, but, boys, it is all hell." Gen. Wm T. Sherman (11 April 1880, Columbus, Ohio)

  • Member since
    December 2002
  • From: Bury St Edmunds, Suffolk, England
Posted by Bish on Wednesday, February 27, 2013 2:36 AM

Z, i think you might be right about those cover. These photo's might help.

On these one, there looks like pipe's coming off those ports. This is from the CAF's airworthy B-29 rather than a static enigine.

I am a Norfolk man and i glory in being so


On the bench: Airfix 1/72nd Harrier GR.3/Fujimi 1/72nd Ju 87D-3

  • Member since
    September 2003
  • From: AandF in the Badger State
Posted by checkmateking02 on Tuesday, February 26, 2013 8:33 PM

Don't know anything about engines; not mechanical in the least, but something about red polka dots on a B-29 engine just doesn't look right to me.


  • Member since
    December 2012
Posted by Z Square 8 on Tuesday, February 26, 2013 8:37 AM

want to get opinions...i used the below photograph as a general reference for engine painting. I have limited knowledge on aviation engines, so I am beginning to think the red are actually colored port covers of some kind for display to protect from debri intake. (this would mean a few minutes of color correction before assembly into the cowling once they have been painted). Any thoughts?

(The image came from the net and is a R-3350 on display at National Museum WPAFB in Dayton, Ohio. 

--Rich

Site builder of CooksonTributeB29.com 


  • Member since
    May 2005
Posted by pyrman64 on Tuesday, February 26, 2013 7:36 AM

ZS8: Yup, you got it right...water should clean it up.  Testors "clear cement" reminds me of a slightly thinned Elmer's glue.

Greg H

"There is many a boy here today who looks on war as all glory, but, boys, it is all hell." Gen. Wm T. Sherman (11 April 1880, Columbus, Ohio)

JOIN OUR COMMUNITY!

Our community is FREE to join. To participate you must either login or register for an account.

SEARCH FORUMS
FREE NEWSLETTER
By signing up you may also receive reader surveys and occasional special offers. We do not sell, rent or trade our email lists. View our Privacy Policy.