SEARCH FINESCALE.COM

Enter keywords or a search phrase below:

Gift GB

73678 views
605 replies
1 rating 2 rating 3 rating 4 rating 5 rating
  • Member since
    December 2002
  • From: Bury St Edmunds, Suffolk, England
Posted by Bish on Thursday, January 24, 2013 3:37 PM

Permission granted, welcome aboard. I am not familiar with this aircraft. Just did a search and i see its called F4. I didn't realise the US used the same designation twice. Was this a predecessor to the Phantom.

I am a Norfolk man and i glory in being so


On the bench: Airfix 1/72nd Harrier GR.3/Fujimi 1/72nd Ju 87D-3

  • Member since
    September 2003
  • From: Australia
Posted by Helo H-34 on Friday, January 25, 2013 4:05 AM

Another small update on my RAF Jaguar

Hasegawa don't mention anything about adding any nose weight but I decided to add some anyway

I glued and clamped the fuselage halves together and let dried overnight

One small issue is the fit of the lower engine cover

I cut the centre lugs flush as it caused the engine cover to sit a little high .

The wings were a nice snug fit

Next a little tamiya putty

For the desert pink colour I checked my Hasegawa RAF Desert Storm Tornado kit and it lists the colours of H-44 (Flesh) 95% + H-47 (Red Brown) 5% . The hobby shop was out of H-47 so I thought about using H-17 (Cocoa Brown) 5% instead .

I'll mix a small amount and try it on the insides of the engine intake pieces to see how it looks .

First thing in the morning I'll sand the putty and then add the tail fin and stabilizers .

John .


  • Member since
    August 2010
  • From: Weiden, Germany
Posted by Beckyhead on Friday, January 25, 2013 6:51 AM

Nope, but it did succeed the Skyray's and then some, but they did change the designation from F4D (which is why pilots called it the "Ford")to F6D when the Phantom II went into production and the US DoD ordered all the services to standardinze aircraft designations at the same time. This is why its an F-4 in Air Force and an F-4 in its sister-services. For example, the current Lightning II is the named successor of the famour P-38. If there was an actual predecessor, the F3H Demon would be the closest.

The Skyray was a delta-wing, single engine Navy/USMC fighter developed in the early 1950's and was based on delta-wing concepts developed by the Germans during WWII (the Komet). It's carrier based, but it had a primary role as an interceptor and had an excellent rate of climb. It was phased out of operations in 1964.

 photo group_build_zps4810f6a0.png

  • Member since
    December 2002
  • From: Bury St Edmunds, Suffolk, England
Posted by Bish on Friday, January 25, 2013 10:54 AM

John, nice work on that and some great tips to look out for.

Beckyhead, tahnks for that info. I found some pics and it looks a nice aircraft, looking forward to seeing your build.

I am a Norfolk man and i glory in being so


On the bench: Airfix 1/72nd Harrier GR.3/Fujimi 1/72nd Ju 87D-3

  • Member since
    April 2011
  • From: Silver Spring, MD
Posted by badlanguage on Friday, January 25, 2013 4:28 PM

Helo, nice work on the Jaguar so far! I think built this model (or one a lot like it) before, though it was a long time ago and my skills weren't worthy of the model. I'm modeling vicariously through you!

  • Member since
    September 2003
  • From: Australia
Posted by Helo H-34 on Friday, January 25, 2013 6:09 PM

Thank's guy's .

I was looking at the Model Alliance RAF Jaguar decal sheet and spotted a couple of other options for two more GR-1 Gulf War Jaguar's

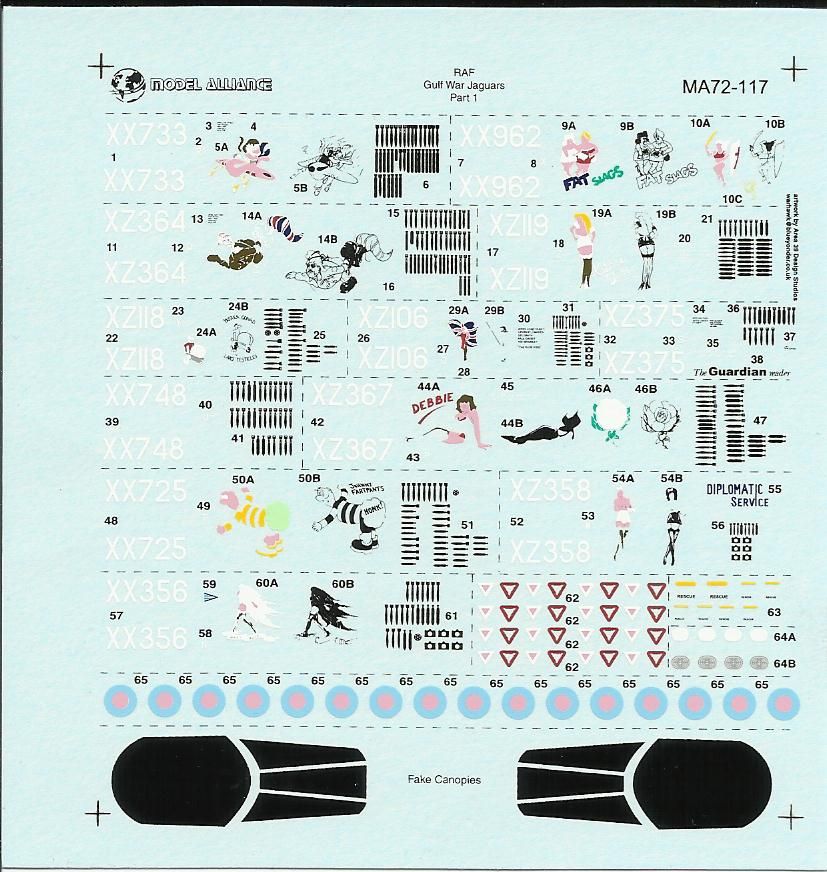
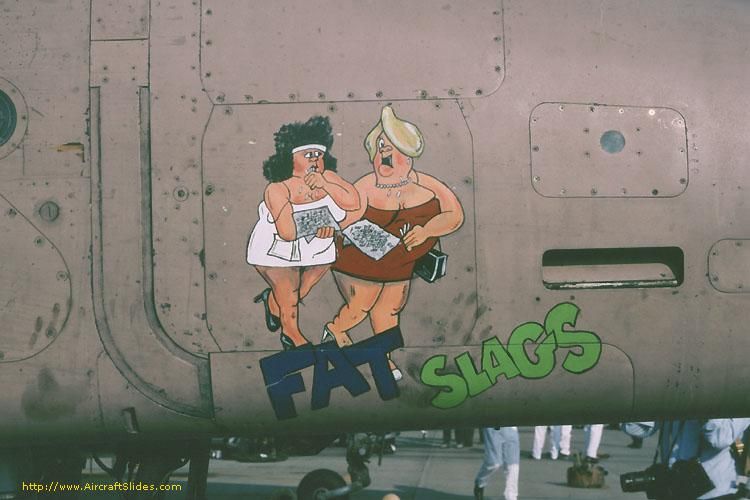
I like the 'Fat Slags' nose art and the 'Buster Gonad' is quite interesting . I think I found the site where Bish got the 'Johnny Fartpants' nose art from that's on the actual aircraft .

http://www.dstorm.eu/pages/en/gb/jaguar.html

I think it's okay to post the 'Fat Slags' nose art but I'm sure the FSM Moderaters would not allow for Buster Gonad .

Anyway I'm thinking of buying a couple of Italeri GR-1 Jaguars as this kit appears to have the external fuel tank included and the Hasegawa kit doesn't .

A pic from the web site above seems to show 'Johnny Fartpants' with an external tank under the port wing

I'm not sure if it was fitted during flight operations in the Gulf War .

In any case I was browsing Hannants web site and saw the Flight Path detail set for the GR-1 Jaguar , which includes bombs and pods for a Gulf War Jaguar and I ordered some ; I also picked up 2 Palva Jaguar seats and two of the Italeri GR-1 Jaguar Desert Storm kits .

Something else that got my attention while browsing the net for info on the RAF aircraft in the Gulf War was this site ;

http://www.scalemates.com/products/product.php?id=175630

That decal sheet seems to show the same markings for a RAF C-130 Hercules that's in the 1/72 Italeri C-130E/H kit

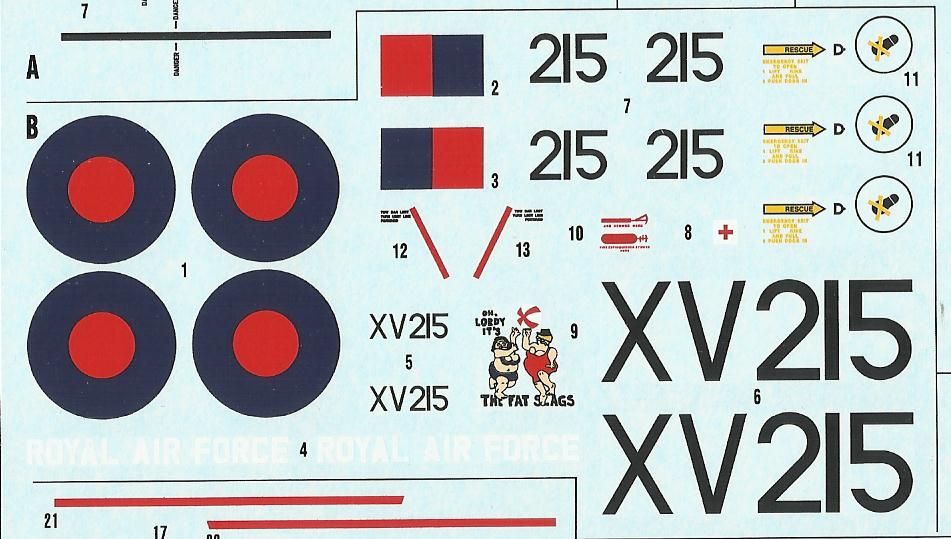
Sometimes Italeri get the paint colours wrong on their instruction sheets and I was wondering if the paint colours are correct as Italeri list them

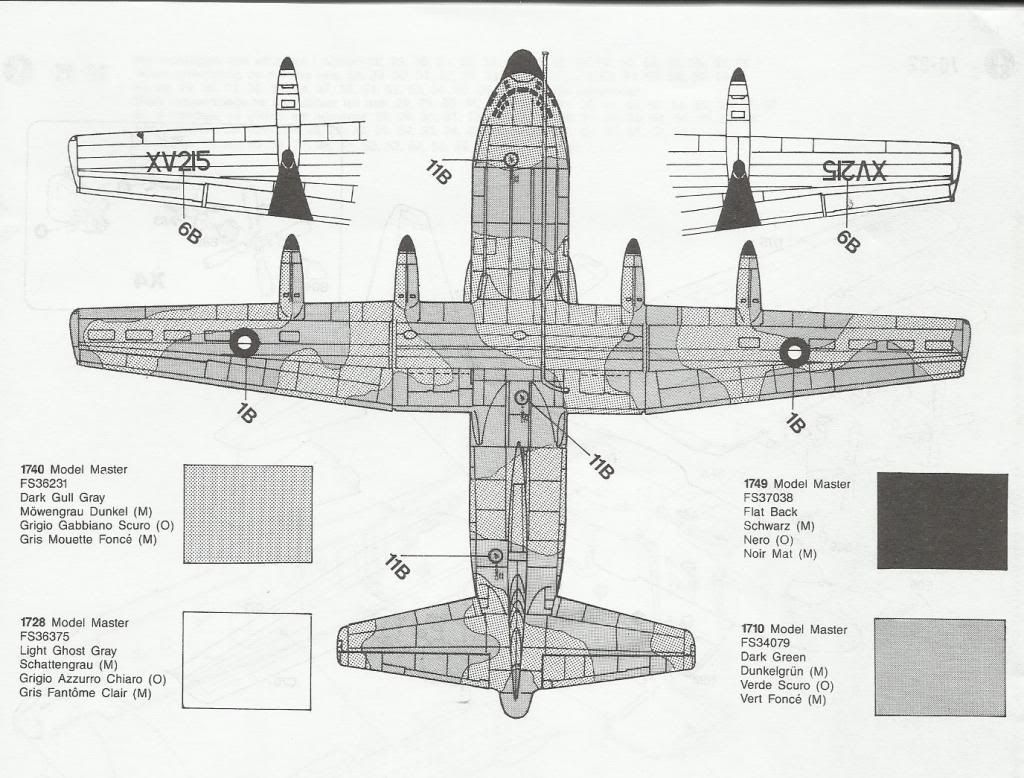
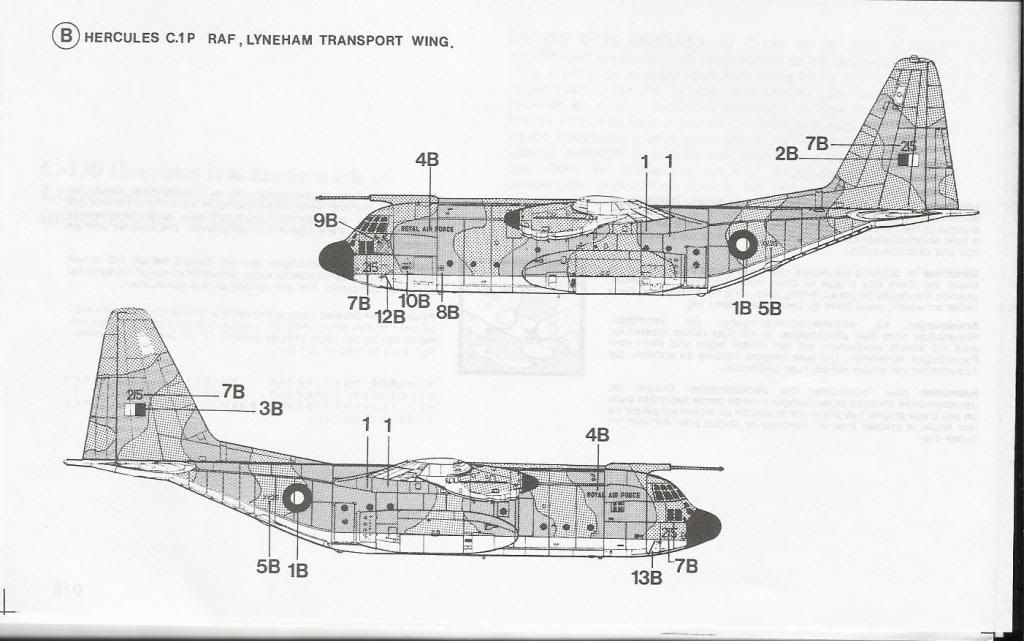
Can anyone confirm if the markings are correct in the Italeri C-130 kit for a RAF Gulf War Hercules .

I also ordered froma local hobby store the Airfix S2B Buccaneer kit as I would like to continue on building RAF Gulf War aircraft for the rest of 2013 . It's mum's birthday next thursday and apart from the obvious bottles of red wine and flowers , I'm sure she would like a kit as a "gift'' which would be finished in desert pink ... Whistling

John .

  • Member since
    December 2002
  • From: Bury St Edmunds, Suffolk, England
Posted by Bish on Saturday, January 26, 2013 3:06 AM

John, looks like your on a bit of an RAF Gulf War kick, i like it. As for the C-130, that paint scheme does look like the standard scheme used on C-130's. I can't imagine the RAF painting these aircraft is any scpeial scheme as they are not front like the Jaguars were. At most i should think the C-130's would have dropped suppliers to the advancing troops. This isn't really my specialtst area, but it seems right to me.

Looks like the RAF were on a Viz kick in the Gulf. The Fat Slags and Buster Gonad were also in Viz, which was more like an Adult Comic and was rather funny.

I have the Pavla seats for my jag's, so will be intertested to see how they work out, i have a few Pavla bits but never used any yet.

And i like the idea of buying your mum a kit and then building it on her behalf. Crafty, but nice Big Smile

I am a Norfolk man and i glory in being so


On the bench: Airfix 1/72nd Harrier GR.3/Fujimi 1/72nd Ju 87D-3

  • Member since
    September 2003
  • From: Australia
Posted by Helo H-34 on Sunday, January 27, 2013 2:27 AM

Yes , mum really like the desert pink colour scheme , so it's a perfect opportunity to gift wrap a couple more RAF jets and helicopter kits .

Anyway , here's another small update on the Jaguar .

I had a go at mixing some gunze acylic for the desert pink scheme

Firstly I tried a mix of H-44 90% + H-17 5% but this looked too brown on the paint stirring stick , so then I tried a mix of 2 parts H-44 flesh with 1 part H-19 pink .

It's close but maybe a shade too dark

I'll try lighting a little and see how that looks .

Something else I just noticed is that I forgot to sand down the wing fences on top of the wings where the missile pylons sit before glueing the wings on

I'll mask around the top of the wing to avoid any careless scratching while I file down the fences .

John .


  • Member since
    December 2002
  • From: Bury St Edmunds, Suffolk, England
Posted by Bish on Sunday, January 27, 2013 2:37 AM

John, i know your useing Acrylics there, but i just woundered if you knew that Xtracolor does an RAF desert Pink. As to those wing fences, i don't think they should be removed. I am pretty sure they are a part of the wing.

 i have never seen a pic with them not on. I have also found one of a model of the aircraft

your building with upper wing missiles on board.

To be honest, i didn't realise the RAF used this feature, but i did find some pics of real RAF Jag's with missiles up there.

Heres the model i found.

I am a Norfolk man and i glory in being so


On the bench: Airfix 1/72nd Harrier GR.3/Fujimi 1/72nd Ju 87D-3

  • Member since
    September 2003
  • From: Australia
Posted by Helo H-34 on Sunday, January 27, 2013 3:21 AM

To be honest , I'm a little reluctant to file off the wing fences as well Bish .

Hasegawa's instructions do suggest to do it though ;

I checked an online hobby store here in my neck of the woods where I buy most my acrylic paint from and they have a brand called LifeColour and there is a desert pink colour available . They also have a Italeri two seat jaguar kit available !

I like the pic of the finished model , particualry the intake doors in the open postition .

I'll hold off on removing the wing fences for the time being and look for some more reference pic's ;

Thank's for posting the pic's Bish ...Yes

John .

  • Member since
    December 2002
  • From: Bury St Edmunds, Suffolk, England
Posted by Bish on Sunday, January 27, 2013 3:46 AM

I see now. It says to remove them for the Jag International. This was the version sold to foreign nations. Your building the GR. Mk 1. It also says that upper wing missiles are fitted to the Internaional, but as the photo's show, these can be fitted to the Mk 1 as well.

It does look like that pic of the model, he seems to have got it wrong. This pic shows an RAF jag with the wing misslies which have been fitted to the wing fence. So if you wanted to add that missile, it would seem you just remove the bottom section of parts C15/16.

I am a Norfolk man and i glory in being so


On the bench: Airfix 1/72nd Harrier GR.3/Fujimi 1/72nd Ju 87D-3

  • Member since
    September 2003
  • From: Australia
Posted by Helo H-34 on Sunday, January 27, 2013 5:54 AM

This pic is from a wiki site and adds a little more confusion about what to do

On another note , while searching around google for GR-1 Jaguar images , I just spent the best part of two hours looking for a 1/72 Revell Handley Page Victor K Mk 2 kit . I can't believe there sold out everywhere I looked and ebay had two of the earlier Matchbox offerings up for grabs but their priced at $76.00 ...............WHAT ; is this what the kit is worth , are they that rare . I was hoping to get one for my RAF Gulf War stash but I'm not so sure now .

It's a nice looking aircraft and I would really like one but how much do I have to pay ?

John .

  • Member since
    December 2002
  • From: Bury St Edmunds, Suffolk, England
Posted by Bish on Sunday, January 27, 2013 6:21 AM

It certainly does add some confusion. I can't tell if the wing fence has been removed or if the missile rails are sitting over it.

I guess its worth as much as your willing to pay for it. £50 certainly does seem a lot. I have found a couple in the UK. One is the Revell kit at £50 buy it now, the other the Matchbox starting at £30.

I am not sure, but i think the two kits are one and the same. I believe Revell re boxed a lot of matchbox kits.

I am a Norfolk man and i glory in being so


On the bench: Airfix 1/72nd Harrier GR.3/Fujimi 1/72nd Ju 87D-3

  • Member since
    August 2010
  • From: Weiden, Germany
Posted by Beckyhead on Sunday, January 27, 2013 1:07 PM

Hey group, made some progress with the Skyray this week. I decided to work small until my detail kit from Eduards arrives. So, I focused on the ordinance, landing gear, and other stuff.

I assembled the ordiance external pylons, drop tanks, generator and AIM-9s. I painted them with Tamiya FLat Whte, then prtoected the finish with Future. When the Future dired, I did a panel wash with oils (Burnt Umber).

For the rocket pods, I painted the disks that represented the launching portion Valleyo Aluminum, and the casing Tamiya Dark Green then assembled the those pieces. I also made custom decals for the Sidewinders from decals ledt overfrom previous kits. The banding represents that AIM-9 from that particular era.

(Sorry about the bad pics!)

For the landing gear, I added hydraulic brake lines with copper wire, but I drilled to small holes at the base of the gear to insert the lines.

When complete, I painted the gears (main and nose) flat white, used Bare Metal Foil for the oleo and weathered with a mixture of Burnt Umber and Ivory black oils. (This picture kinda sucks, too. I will try to get better ones). The wheels where painted with a mixture of black, brown and grey to get a "tire" color.

 photo group_build_zps4810f6a0.png

  • Member since
    December 2002
  • From: Bury St Edmunds, Suffolk, England
Posted by Bish on Sunday, January 27, 2013 1:41 PM

Some nice work there. Just a point on adding the oils. You don't need to protect Acrylic paints before useing an oil wash. Might just save you one step in the future.

Nice work on the undercarrage as well, thats coming along nicely.

I am a Norfolk man and i glory in being so


On the bench: Airfix 1/72nd Harrier GR.3/Fujimi 1/72nd Ju 87D-3

  • Member since
    April 2005
  • From: Australia
Posted by taxtp on Sunday, January 27, 2013 4:48 PM

Interesting discussion on the Jag, as I'm doing one of these for the Gulf Wars GB at some stage. I had also intended to show the above the wing missiles.

Anyways, I'm into my Hasegawa Jaguar XJR-9LM, in 1/24.The kit I have includes the tobacco sponsorship decals, which is good.

I've just made a start on the wheels, cleaning up the rims and using a sanding stick to reduce the seam on the rubber tyres, and depict the 'grippy' look of racing tyres. Next I'll future the sidewalls and add the stencils. The rims have subsequently been sprayed flat black, as has the cockpit insert, dashboard, seat and steering wheel.

This is my fourth Hasegawa XJR Jag, and from experience the only internal that can really be seen is the seat.

Are there too many Jags in this GB ?.

Cheers

Tony

I'm just taking it one GB at a time.

  • Member since
    December 2002
  • From: Bury St Edmunds, Suffolk, England
Posted by Bish on Sunday, January 27, 2013 4:57 PM

To many Jags, no, i don't think so. That looks a nice kit, looking forward to this.

I am a Norfolk man and i glory in being so


On the bench: Airfix 1/72nd Harrier GR.3/Fujimi 1/72nd Ju 87D-3

  • Member since
    August 2010
  • From: Weiden, Germany
Posted by Beckyhead on Monday, January 28, 2013 12:44 PM

Bish, I've had too many problems with the oil wash actually being absorbed by the acrylics, hence changing the value. This is really bad with Tamiya flats. Maybe there is something I am doing wrong with the airbrush process. In addition, I use the future to strenthen the finish...I got tired of a finish wearing off in my hands through normal handling.

 photo group_build_zps4810f6a0.png

  • Member since
    December 2002
  • From: Bury St Edmunds, Suffolk, England
Posted by Bish on Monday, January 28, 2013 12:46 PM

interesting. I have not heard that before. I use enamels so if i am useing an oil wash, usualy on armour, i have to protect it with future. I know what you mean about protecting it, so it seems like a good practice anyway.

I am a Norfolk man and i glory in being so


On the bench: Airfix 1/72nd Harrier GR.3/Fujimi 1/72nd Ju 87D-3

  • Member since
    February 2006
  • From: Smithers, BC, Canada
Posted by ruddratt on Monday, January 28, 2013 8:22 PM

Great stuff fellas!

Tony - that's a sweet looking kit! I'll be watching that one closely - gloss finishes are not my strong suit, so I'm curious to see how you pull it off.

Beckyhead - great start on the Skyray! I'm another advocate for enamel washes, and a coat of Future works wonders underneath them. A friend of mine recently threw a few jars of Citadel washes my way. I've never used them before, but I'm willing to give them a shot.

John - the Jag looks better with every update! - and man, did I learn a ton just now playing catch-up here. It's probably my favorite aspect of GB's - the sharing of knowledge.

Been making slower progress than I'd like on the Fokker, but was able to get about 6 hrs into it today, mainly on the engine and the ignition wiring. Should have some pics up soon.

Mike

 "We have our own ammunition. It's filled with paint. When we fire it, it makes pretty pictures....scares the hell outta people."


  • Member since
    April 2005
  • From: Australia
Posted by taxtp on Monday, January 28, 2013 8:56 PM

Here's the latest on my Jag XJR-9LM. Just some flat black, rather boring really. I have glossed the tyre side walls ready to except the 'Dunlop Denloc' stencils.

I'll probably use a Tamiya rattle can for the gloss white, then airbrush and Humbrol enamel for the purple bits. Heaven help me when I get to the decals, the last time I build one of these they were very fragile. I think I'll protect them first.

For the record, I do use Future on my aircraft prior to applying an oil wash over acrylic paint base. I just figured it gives me a known, consistent result regardless of the paint brands I may be using. I also only use Humbrol enamel thinner in washes, as it seems less aggressive than some other brands. It also fits in the logical sequence of my finishing technique, as I like to apply the wash prior to decaling, to ensure the stupid wash doesn't think the decal edge is a panel line that it should highlight.

I don't think it's a must for me, but once I get onto something that works really well for me, I like to stay with it.

Cheers

Tony

I'm just taking it one GB at a time.

  • Member since
    September 2003
  • From: Australia
Posted by Helo H-34 on Tuesday, January 29, 2013 6:56 PM

Beckyhead , that's a great start on the underwing stores and landing gear struts from your F4D Skyray Yes

Tony , I'm looking forward to see how your Jaguar Racing Car comes together ; I certainly admire your modelling diversity !

I picked up the Squadron Signal book 'Air War Desert Storm'

Most of the photo's in the book are of U.S. military aircraft but there was a page with a couple of GR-1 Jaguars pic's

The top photo above doesn't have the over the wing missile racks fitted , so it appears some Jaguars did not have them .

The Lifecolor Desert Pink acylic paints just arrived

I'll have a test airbrush with some and see how it goes .

John .

  • Member since
    September 2003
  • From: Australia
Posted by Helo H-34 on Tuesday, January 29, 2013 9:46 PM

I had a go airbrushing the Lifecolor paint 

First I tried mixing the Desert Pink with some distilled water ( 2 parts paint + 1 part water) and sprayed the left rear stabilizer . Then I tried mixing the Lifecolor with isopropyl alcohol 50/50 for the right stabilizer

Although the right stabilizer is only a tiny shade darker than the left stabilizer , it seemed to me that the paint mixed with isopropyl alcohol airbrushed a lot smoother than the one mixed with water .

I thin all my Gunze Sangyo acrylics with isopropyl alcohol it appears so far from what I can tell the same can be done with the Lifecolor paint .

I'll glue the intakes into position next and shouldn't be far off airbrushing the Jaguar .

John .

  • Member since
    April 2005
  • From: Australia
Posted by taxtp on Thursday, January 31, 2013 7:00 PM

I've been wondering about Lifecolor, thanks for the investigation John.

Here's my update on the Hasegawa 1/24 Jaguar XJR-9LM

I've used the stencil decals on the tyres. These are different to normal decals, you apply the decal to the tyre and then add water to removed the film, which is actually on the front of the decals. They've had a subsequent coat of Future, but some tidy up and then a flat coat  is warranted. I like to add a droplet of black to the flat coat, it just tones the lettering down a bit.

Cheers

Tony

I'm just taking it one GB at a time.

  • Member since
    February 2006
  • From: Smithers, BC, Canada
Posted by ruddratt on Thursday, January 31, 2013 7:55 PM

Looks good John. I've never tried the Lifecolor line of paints, but your results are very convincing. Would you recommend a primer coat prior to spraying it?

Eric, very nice work on those tires. I've used that type of transfer before - have to say my results were nowhere near as good as yours.

Mike

 "We have our own ammunition. It's filled with paint. When we fire it, it makes pretty pictures....scares the hell outta people."


  • Member since
    September 2003
  • From: Australia
Posted by Helo H-34 on Thursday, January 31, 2013 8:26 PM

ruddratt

Looks good John. I've never tried the Lifecolor line of paints, but your results are very convincing. Would you recommend a primer coat prior to spraying it?

Eric, very nice work on those tires. I've used that type of transfer before - have to say my results were nowhere near as good as yours.

I will definitly be using an undercoat of flat white first , my test spray was done in a bit of a hurry as I was curious as the actual colour of desert pink . Even though I got reasonable coverage with the pink straight over the grey plastic , I'll still be using flat white first .

Also the on-line  hobby store I bought the Lifecolor paint from didn't have any of the Lifecolor thinner listed  in stock but gave a brief description of the paint range and mentioned about using the brand name thinner , water or alcohol . I ordered some more Lifecolor paints yesterday for other projects and back ordered some thinner and a short while ago this morning the next lot of paint arrived along with the thinner

There's no mention on the bottle about paint to thinners ratio , I'll try 2 parts paint and 1 part thinner and work things out from there . I glued my Jaguar engine intakes into position . All is needed now is a light sand around the top and bottom of the intake join (they were in two halves) , rescribe a few panel lines lost in sanding and I can then start the masking .

John . 

  • Member since
    April 2005
  • From: Australia
Posted by taxtp on Saturday, February 2, 2013 7:01 AM

I am looking forward to seeing your Jag with paint on, Jogn, should be a very interesting model.

I managed the flat coat on my Jaguar XJR-9LM tyres.

Cheers

Tony

I'm just taking it one GB at a time.

  • Member since
    December 2002
  • From: Bury St Edmunds, Suffolk, England
Posted by Bish on Thursday, February 7, 2013 2:03 AM

Coming along nicely there guys.

I am a Norfolk man and i glory in being so


On the bench: Airfix 1/72nd Harrier GR.3/Fujimi 1/72nd Ju 87D-3

  • Member since
    October 2008
Posted by eatthis on Thursday, February 7, 2013 11:15 AM

im in with a 72 scale tsr2 thats going to get chopped up


snow + 4wd + escessive hp = :)  http://www.youtube.com/watch?v=x7egUIS70YM

  • Member since
    December 2002
  • From: Bury St Edmunds, Suffolk, England
Posted by Bish on Thursday, February 7, 2013 2:27 PM

Is that the Airfix kit. What exactly are you going to do to it.

I am a Norfolk man and i glory in being so


On the bench: Airfix 1/72nd Harrier GR.3/Fujimi 1/72nd Ju 87D-3

JOIN OUR COMMUNITY!

Our community is FREE to join. To participate you must either login or register for an account.

SEARCH FORUMS
FREE NEWSLETTER
By signing up you may also receive reader surveys and occasional special offers. We do not sell, rent or trade our email lists. View our Privacy Policy.