SEARCH FINESCALE.COM

Enter keywords or a search phrase below:

FineScale Modeler Heroes & Villains Group Build 2014

81042 views
849 replies
1 rating 2 rating 3 rating 4 rating 5 rating
  • Member since
    April 2003
Posted by shivinigh on Friday, January 10, 2014 3:51 PM

instead of weighing the base I actually though of replacing it with a piece of hard wood. A friend of mine always has small pieces of oak or something lying around after one of his carpenter projects. Have to wait and see how it sits when all is said and done.


  • Member since
    April 2006
  • From: ON, Canada
Posted by jgeratic on Friday, January 10, 2014 4:11 PM

Tim - good use of the green stuff.  He does have a massive chest, could almost double for the Hulk.  The wood chest also looks right on, nothing beats the look of wood than actual wood itself.

Shiv - glad to see things are working out on the putty filler front, looks like you got it handled quite well.

-----------------------------------------------------------------

Red had her first primer coat last night.  Quite pleased with how the surgery turned out on the torso.  There are some rough spots in other areas requiring some further TLC - will post a few more pics soon.

regards,

Jack

  • Member since
    December 2002
  • From: Bury St Edmunds, Suffolk, England
Posted by Bish on Sunday, January 12, 2014 3:42 AM

Some major work there Tim, the chest looks great.

I am a Norfolk man and i glory in being so


On the bench: Airfix 1/72nd Harrier GR.3/Fujimi 1/72nd Ju 87D-3

  • Member since
    December 2002
  • From: Bury St Edmunds, Suffolk, England
Posted by Bish on Sunday, January 12, 2014 5:23 AM

Finally got round to getting some pics of Darth. Not much in the way of construction, especially when compared to what some of you guys are doing. But it is what it is. The legs where filled with plaster of paris, after getting the legs to the right position. It went together pretty well so far.

And these parts have been trimmed and will be painted separately.


But now I have a tricky bit. The bottom of the tunic doesn't line up very well to the rest. I think I need to soften it up to get it the right shape and maybe do a bit of trimming.


I am a Norfolk man and i glory in being so


On the bench: Airfix 1/72nd Harrier GR.3/Fujimi 1/72nd Ju 87D-3

  • Member since
    April 2006
  • From: ON, Canada
Posted by jgeratic on Sunday, January 12, 2014 4:46 PM

Bish, great to see Darth here.  If the material is pliable, and the heat treatment doesn't work out for the tunic bottom, drilling in some pins and forcing it to fit might work?

----------------------------------------------

Three sessions of primer and sanding, not perfect, but I'm ready to throw paint on this one.  I've also added the armour detail to the front section.  Dry fit for now to see how it looks...

regards,

Jack

  • Member since
    December 2002
  • From: Bury St Edmunds, Suffolk, England
Posted by Bish on Sunday, January 12, 2014 4:47 PM

Nice idea jack, hadn't thought of that. The cape covers it so it doesn't need to be 100% precise around the back.

That's looking really nice. Is that armour detail metal.

I am a Norfolk man and i glory in being so


On the bench: Airfix 1/72nd Harrier GR.3/Fujimi 1/72nd Ju 87D-3

  • Member since
    November 2009
  • From: SW Virginia
Posted by Gamera on Sunday, January 12, 2014 8:39 PM

Bish: Good to see Vader up and on his feet!

Jack: Wow, can't even see where you made the plastic surgery there. And great job there replicating the comic art!

"I dream in fire but work in clay." -Arthur Machen


  • Member since
    April 2006
  • From: ON, Canada
Posted by jgeratic on Sunday, January 12, 2014 11:14 PM

Gamera, Bish - thanks!

Yes, the armour discs are actual metal.  Plan is to leave them unpainted, hoping it won't end up looking too tacky.

As pictured above, I got the idea when I remembered one of my ankle weights had torn open.  The inside is filled with little round bits, about four or five different sizes.  So they are hand picked, and individually placed in position.   Vallejo flat base was used as an adhesive, brushing on a section at a time.

regards,

Jack

Moderator
  • Member since
    September 2011
Posted by Tim Kidwell on Tuesday, January 14, 2014 9:22 AM

Jack - Lookin' good!

Bish - Impressive. Most impressive.

Quick update on Conan:

He had plugs on his feet corresponding to depressions on the base. Because I'm making a solid wood deck on the base, those plugs aren't needed any more. So, out came the Dremel tool ...

... and in went the Apoxie Sculpt. After this dries 24 hours, I'll shape the bottom of the feet and add pins.

--

Timothy Kidwell
tkidwell@firecrown.com
Editor
Scale Model Brands
Firecrown Media


  • Member since
    November 2009
  • From: SW Virginia
Posted by Gamera on Tuesday, January 14, 2014 11:27 AM

Hey Jack, looks great! I'm a big fan of the nothing looks more like wood than wood and nothing looks more like metal than metal ideal. Lot easier than trying to get the look with plastic. Seems odd to me that they'd use the flat disks for weight than round ball bearing type weights but I guess there was some reason there.

Tim: Looks good too, hard to be a hero when you'd got a big hole in your boots!

"I dream in fire but work in clay." -Arthur Machen


  • Member since
    October 2011
  • From: Lake Villa, Illinois
Posted by Chuck Davis on Tuesday, January 14, 2014 12:37 PM

Wow...I'm jealous guys.  Nice work, everyone!

Tim - it looks like you have some mighty big boots to fill there, huh?  Nyuk nyuk

Chuck Davis

  • Member since
    September 2012
Posted by GMorrison on Tuesday, January 14, 2014 2:26 PM

 Here's the kit box and contents. It's really rough.. Since he's underwater, would it make sense to make him glossy?

 Modeling is an excuse to buy books.


Moderator
  • Member since
    September 2011
Posted by Tim Kidwell on Tuesday, January 14, 2014 3:04 PM

GMorrison - I can't wait to see Nemo come together. My gut reaction is not to paint him glossy. Maybe paint him as you normally would, and then make a small case for him out of tinted glass or Plexiglass to give that otherworldly feel when on display? No matter how you finish it, this is gonna be COOL!

In other news, I'm cross-eyed from working on Conan and Belit's hair today. 

--

Timothy Kidwell
tkidwell@firecrown.com
Editor
Scale Model Brands
Firecrown Media


  • Member since
    December 2002
  • From: Bury St Edmunds, Suffolk, England
Posted by Bish on Tuesday, January 14, 2014 3:18 PM

Jack, I see, I had assumed they were part of the kit. I think they look nice and will do the job perfectly.

Tim, thanks, he is rather large. Going to try and get it primed at the weekend. For the base, I am using Mike's article from the July issue as inspiration, doing the same for the big 88.

Conan is looking good. When you say the hair, I take it you mean painting it. Glad that's one think I don't have to worry about, not ready for that yet.

Gamera, thanks, and I am with you on that, nothing looks more like metal tan metal, and I think that's even more important in the scales we are dealing with.

GM, interesting looking kit. I have no idea on how best to finish him, but Tim's idea seems a good one to think about.

I am a Norfolk man and i glory in being so


On the bench: Airfix 1/72nd Harrier GR.3/Fujimi 1/72nd Ju 87D-3

  • Member since
    April 2005
  • From: Piscataway, NJ!
Posted by wing_nut on Tuesday, January 14, 2014 3:25 PM

jgeratic

Gamera, Bish - thanks!

Yes, the armour discs are actual metal.  Plan is to leave them unpainted, hoping it won't end up looking too tacky.

As pictured above, I got the idea when I remembered one of my ankle weights had torn open.  The inside is filled with little round bits, about four or five different sizes.  So they are hand picked, and individually placed in position.   Vallejo flat base was used as an adhesive, brushing on a section at a time.

regards,

Jack


Metal bits?  What metal bits?Stick out tongue

Marc  

Moderator
  • Member since
    September 2011
Posted by Tim Kidwell on Tuesday, January 14, 2014 6:10 PM

Bish
Conan is looking good. When you say the hair, I take it you mean painting it.

I haven't gotten to painting yet. More shaping and sculpting Green Stuff. I've fixed the hair where it hangs along Conan's shoulders and attached it to his head. Now he looks like Conan -- sort of. Belit's head had an extra hair piece that needed to be attached and made to look more natural. Now it does, I think.  I was going to post pics before I left the office, but I figured you boys were getting a bit tired of the "here's more of Tim's tiny steps toward some vague goal" entries. However, I will get you some pics tomorrow. And if Aaron and I are healthy, a new vlog on Friday--YAY!

--

Timothy Kidwell
tkidwell@firecrown.com
Editor
Scale Model Brands
Firecrown Media


  • Member since
    September 2012
Posted by GMorrison on Tuesday, January 14, 2014 6:22 PM

Can't wait to see...

So it turns out that there's a guy named Regan http://www.vulcaniasubmarine.com/  who makes Nemo suits, in Hawaii. His online catalogue includes a blog of the movie, the props plus of course all of the stuff he builds.

I think the suit will be shiny grey rubber, the helmet and other gear is brass, copper and dull grey metal, and the web straps and boots are kind of a olive drab/ khaki super heavy fabric.

Tim, I like the idea of a bell jar. That'll make him look mysterious!

 Modeling is an excuse to buy books.


  • Member since
    April 2003
Posted by shivinigh on Wednesday, January 15, 2014 12:39 PM

decided to paint spidey the way his costume looked in the third movie. Black with light grey lines. Using strip styrene to give the lines the raised look like it was in the movie.

this is from the movie

and here I am using the strips

have a feeling that I may have bit off more than I can chew


  • Member since
    November 2003
  • From: Nashville, TN area
Posted by bobbaily on Wednesday, January 15, 2014 6:46 PM

Shivinigh-Spidy is looking good-I like the idea of going with the black suit.  Just a thought on the silver ribbing-maybe look at some very thin fishing line or jewerly thread from a hobby shop?  Might be easier to work with than plastic.

Getting settled in and think I may get started on the Green Goblin soon-will post pics as soon as I start.

Great work by everyone-I'm amazed at the quality of work on kits that are far less than perfect

Bob


  • Member since
    April 2006
  • From: ON, Canada
Posted by jgeratic on Thursday, January 16, 2014 3:41 AM

hey Shive- whoa!

This is certainly taking it up a notch or two.  That is going to be a lot of work if you are going to cut in the smaller widths after applying the longer lengths in the opposite direction - or are you just going overlap the lines?

I can see Bob's suggestion looking really cool, if you can keep the translucent look of the fishing line.

regards,

Jack

  • Member since
    November 2010
  • From: Florida-West Central
Posted by Eagle90 on Thursday, January 16, 2014 7:05 AM

Hey everyone.  Haven't forgotten about the GB.  Lots of "life" stuff going on, but had some time last night to do some more on Mr. Scott.  This has been such a fun build!  Major fit issues, but nothing that can't be overcome.  I did the gold lacing on the shirt and black collar.  The gold went on over the red a lot better than I though it would.  Also , did some work on the head.  Now remember, this is my first ever figure, so it is a little rough.  I read up on and watched a few YouTube vids on figures, so I tried a couple of "techniques" I saw and read about.  I took the finest brush I have and put a VERY thin line of black on the mouth.  I also did some "shading" on the skin.  Using very slightly darker and lighter shades of the Tamiya Flesh, I experimented on the hands first, then tried a little on the face.  Not sure the pics show it off well, but I was surprised by the difference it made.  The hair was pretty easy to do (I know,one eyebrow has a holiday on it!).  I laid some white for the eyes and then realized I have no clue if Mr. Scott's eyes are blue or brown?!  Huh?  I'll have to research that.

Anyway, it is almost there!  I do have a couple of questions for you figure experts out there:

1.  Any other suggestions for the flesh tones?

2.  What about the fingernails?  What do you do for them?

3.  Ears.  Would some shading on the ears mess things up?

4.  Any pointers on the eyes before I do them?

5.  Why is his hands so freakishly big!  Indifferent

Thanks in advance for any help.

So here he is:


  • Member since
    November 2009
  • From: SW Virginia
Posted by Gamera on Thursday, January 16, 2014 9:21 AM

Shiv: Looks good! I agree that you have your work cut out for you though if you're going to do each and every line on his costume. Probably the best way would be to do a little each day rather than trying to do the whole thing in a couple of sessions IMHO.

Eagle: Looks good too! Great job on the face and the uniform looks good esp the red shirt.

James Doohan had medium brown eyes, and a bit of trivia was missing the tip of one finger- I forget which one. Doohan, a Canadian, went ashore on D-Day and had the tip shot off- which he joked 'I gave Hitler the finger'. Oddly on the show with the whole idea that everyone in the future is perfect they used someone else's hand or had him curl his fingers under the palm in most of the shots showing him operating the transporter or other close ups of his hands.

Personally I'd paint the fingernails ivory or 50% skintone and 50% white or so mixed to your personal taste. I'd do the eyes before I did much work on the face, so if you do colour outside the lines you can go back with your skin tone and cut them back down in size.

"I dream in fire but work in clay." -Arthur Machen


  • Member since
    November 2010
  • From: Florida-West Central
Posted by Eagle90 on Thursday, January 16, 2014 9:35 AM

Gamera, thanks so much for the great intel!  I did not know ANY of that!

I'm going to try the ivory/white mix tonight.  And I think I will concentrate on the eyes now.  With my shaky hands, I probably will color outside the lines!  Embarrassed  Couldn't stay in the lines as a kid coloring in color books either!  Wink

Thanks again for the info!  It is most useful!

Eagle90


  • Member since
    April 2006
  • From: ON, Canada
Posted by jgeratic on Thursday, January 16, 2014 10:28 AM

Scotty is looking really good there, Eagle.  

Gamera has offered good advice on the fingernails and eyes.

If you want a bit more detail, you've got excellent reference material right in front of you, you're own hands.  If you look, generally the nails are more pinkish and slightly lighter in colour.  You might notice a bit of a lighter crescent shape near the skin at the base end.  If you add that, make sure it is a subtle shift in colour.  Some other generalities:

- the palm side is slightly lighter

- the finger tips and knuckles/joints can do with a very slight redder tone

- veins, draw them in from a mixture of your skin tone and a grey/blue, then add some highlights with lighter skintone

EARS

- this one can easily be enhanced with a light application of a red/brown wash, the ear hole itself can be made slightly darker

- pick out some highlights such as the ear lobe, and the section just in front of the ear hole, and the top of the ear - just don't dry bush the whole thing in one swipe, at this scale it just won't look good

LIPS - they can basically be viewed as two planes.  You've got a good start with the dark separation line.  Next, the upper lip faces away from a light source, so it should be darker.  The lower lip is the opposite, and is exposed to light, so make it lighter and a bit more richer in colour.  Can also add a highlight here.

EYES - I always prefer using an offwhite as the base, mixed from skintone and blue.  This allows to put a highlight afterwards, and white itself is just too stark.  Add a spot of pinkish red on the inside corners, as well as a line along the lower eye lid.  A light red wash over the completed eye, (but before you add the white highlight in the iris/pupil) also does wonders.

---------------------------------------------------------

I think I've linked this before, maybe not this thread, but here's an excellent toot on painting eyes;

http://www.planetfigure.com/articles/eye_tutorial-mark_benette/eye-tutorial.html

Recently found this step by step for painting faces, and also includes the hands.  The author interestingly starts off with a black primer base...

http://lifeminiatures.kr/140178056263

From the main page, click the 'step by step' link, followed by the helmet wearing German w/white eyes.
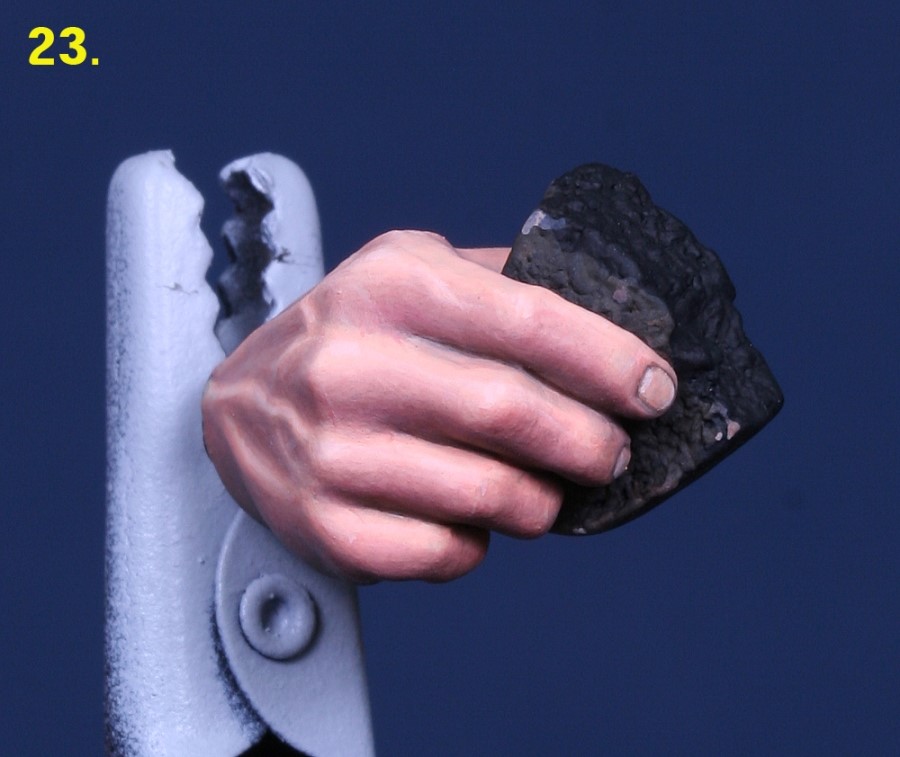
regards,

Jack

Moderator
  • Member since
    September 2011
Posted by Tim Kidwell on Thursday, January 16, 2014 11:30 AM

Gents,

FSM has ravaged by sickness this week. Aaron's been out all week; I missed Monday, and I'm trying to hang tough. Mark's been in and out, as has Matt. So, we're limping along. However, it means that I'll have to postpone vlog until such a time as I can drag Aaron into the office and at least mumble something, not matter how unintelligible. 

That said, Eagle, I can't agree more with Jack. He's offered some excellent advice and a nice tutorial. One thing I would caution (and it probably matters more if you decide to go on to build other figures): Skin-tone formulas are not strict rules and should be adjusted for your particular figure. For instance, the German soldier's skin would not work for Conan--it's too pale and cold. But the underlying process is sound.

Jack, I too use black primer, especially on 30mm and 54mm figs. I also do a combo (which I plan to do with Conan). I'll cover the entire figure in black primer then come through and spray gray primer, but only from directly overhead. This helps me see the "noon" light source for the figure and even acts as a bit of pre-shading. I know of some figure modelers who prefer red auto primer, which is something I've never tried. The thinking is, from what I understand, that the auto primer highlights imperfections really well and allows for better refinement of the model.

I've made his hair lay more naturally over his shoulders and have started to improve the Conan's fur kilt. I've also marked the belt for removal. I'm debating the media I'll use for the replacement belt. I made a proof of concept model of a single-hoop sword belt out of .010" plastic strip and a snippet of a paper clip I bent into a 1/4" diameter loop. I knotted it in a typical Medieval knot and it works. However, I'm not particularly enamored with how the plastic lays along the model. And the belt's tail jumps all over the place. I tried tape, but the results were poor. I'm considering metal foil. However, for scale purposes, I'm going to have to fold it a few times. So, I'm nibbling around the model as I contemplate my next major move. Once the Dremel tool hits the model, there's no going back.

Speaking of swords, here's the template traced. All I have to do is cut it out. I'm going to make a second one just in case the first sword sucks.

Belit's face ...

... and working on the hair.

--

Timothy Kidwell
tkidwell@firecrown.com
Editor
Scale Model Brands
Firecrown Media


  • Member since
    November 2010
  • From: Florida-West Central
Posted by Eagle90 on Thursday, January 16, 2014 12:07 PM

jgeratic

Scotty is looking really good there, Eagle.  

Gamera has offered good advice on the fingernails and eyes.

If you want a bit more detail, you've got excellent reference material right in front of you, you're own hands.  If you look, generally the nails are more pinkish and slightly lighter in colour.  You might notice a bit of a lighter crescent shape near the skin at the base end.  If you add that, make sure it is a subtle shift in colour.  Some other generalities:

- the palm side is slightly lighter

- the finger tips and knuckles/joints can do with a very slight redder tone

- veins, draw them in from a mixture of your skin tone and a grey/blue, then add some highlights with lighter skintone

EARS

- this one can easily be enhanced with a light application of a red/brown wash, the ear hole itself can be made slightly darker

- pick out some highlights such as the ear lobe, and the section just in front of the ear hole, and the top of the ear - just don't dry bush the whole thing in one swipe, at this scale it just won't look good

LIPS - they can basically be viewed as two planes.  You've got a good start with the dark separation line.  Next, the upper lip faces away from a light source, so it should be darker.  The lower lip is the opposite, and is exposed to light, so make it lighter and a bit more richer in colour.  Can also add a highlight here.

EYES - I always prefer using an offwhite as the base, mixed from skintone and blue.  This allows to put a highlight afterwards, and white itself is just too stark.  Add a spot of pinkish red on the inside corners, as well as a line along the lower eye lid.  A light red wash over the completed eye, (but before you add the white highlight in the iris/pupil) also does wonders.

---------------------------------------------------------

I think I've linked this before, maybe not this thread, but here's an excellent toot on painting eyes;

http://www.planetfigure.com/articles/eye_tutorial-mark_benette/eye-tutorial.html

Recently found this step by step for painting faces, and also includes the hands.  The author interestingly starts off with a black primer base...

http://lifeminiatures.kr/140178056263

From the main page, click the 'step by step' link, followed by the helmet wearing German w/white eyes.

regards,

Jack

Hey Jack,

Wow!  I got a free lesson on figures!  Thanks so much.  That is some really good stuff that I wouldn't think about never have done a figure before.  Great links too!  It may not turn out to be the best figure, but you know what....I'm having a blast doing it!  Thanks again Jack!

Eagle90


  • Member since
    November 2010
  • From: Florida-West Central
Posted by Eagle90 on Thursday, January 16, 2014 12:10 PM

Hey Tim!  Thanks!  You know, I have had a blast doing this build, and am learning tons of stuff!  The folks here on FSM forum have been awesome!  Like I told Jack, it may not turn out to be the best figure done, but I'm learning and have a great time!  As a matter of fact, I'm eying the other kits to eventually have a complete set of the crew!

Thanks everyone!

Eagle90


  • Member since
    November 2009
  • From: SW Virginia
Posted by Gamera on Thursday, January 16, 2014 12:44 PM

Hey Jack, thanks for the links! I think I said before I'm more used to small figures so this is kinda new to me and I didn't want to tell Eagle too much in case I was wrong.

Tim: Coming along nicely!

Lucky I didn't have to fool around with hair much on my figure!

"I dream in fire but work in clay." -Arthur Machen


  • Member since
    December 2002
  • From: Bury St Edmunds, Suffolk, England
Posted by Bish on Thursday, January 16, 2014 1:52 PM

shiv, that's some challenge you have set yourself there.

Eagle, Scotty is looking good. Looks like you have some great advice there, I am taking notes myself.

Tim, I see what you mean about the hair. Looking forward to seeing how you paint that.

And some great advice on painting skin you guys. The biggest I have done is 1/35th but I have never been happy with my results and its one of the things I really want to work on.

This is why I love GB's.

I am a Norfolk man and i glory in being so


On the bench: Airfix 1/72nd Harrier GR.3/Fujimi 1/72nd Ju 87D-3

  • Member since
    September 2012
Posted by GMorrison on Thursday, January 16, 2014 6:57 PM

Gamera

James Doohan had medium brown eyes, and a bit of trivia was missing the tip of one finger- I forget which one. Doohan, a Canadian, went ashore on D-Day and had the tip shot off- which he joked 'I gave Hitler the finger'. Oddly on the show with the whole idea that everyone in the future is perfect they used someone else's hand or had him curl his fingers under the palm in most of the shots showing him operating the transporter or other close ups of his hands.

Middle finger on the right, and the whole finger. 

He wasn't a Scot either- I should know. But we'll give him a pass on that accent- it made me smile.

 Modeling is an excuse to buy books.


JOIN OUR COMMUNITY!

Our community is FREE to join. To participate you must either login or register for an account.

SEARCH FORUMS
FREE NEWSLETTER
By signing up you may also receive reader surveys and occasional special offers. We do not sell, rent or trade our email lists. View our Privacy Policy.