SEARCH FINESCALE.COM

Enter keywords or a search phrase below:

Rommel vs Monty (North African GB 1941-43) Jan. 1 - Aug. 31 2014

137511 views
1455 replies
1 rating 2 rating 3 rating 4 rating 5 rating
  • Member since
    July 2008
  • From: Vancouver, the "wet coast"
Posted by castelnuovo on Thursday, January 23, 2014 12:34 AM

Gentlemen, thank you for the kind comments re panzerspahwagen Toast. I am also happy to say that my Katyusha will be published on FSM website in the next week or so Big Smile. I guess I am doing something right. Whistling

Best wishes for a quick recovery to Jester's wife...As a physio student I can't resist to ask what is broken?

Cheers...

  • Member since
    March 2003
  • From: Rain USA, Vancouver WA
Posted by tigerman on Thursday, January 23, 2014 1:45 AM

Jester, hope your wife makes a quick recovery, so you can get more bench time in.

   http://i7.photobucket.com/albums/y269/wing_nut_5o/PANZERJAGERGB.jpg

 Eric 

  • Member since
    April 2005
Posted by Thunderbolt379 on Thursday, January 23, 2014 2:45 AM

Jester, that goes for me too, so sorry I didn't spot your comment about your wife last time I was on!

Okay, promised progress pic time:
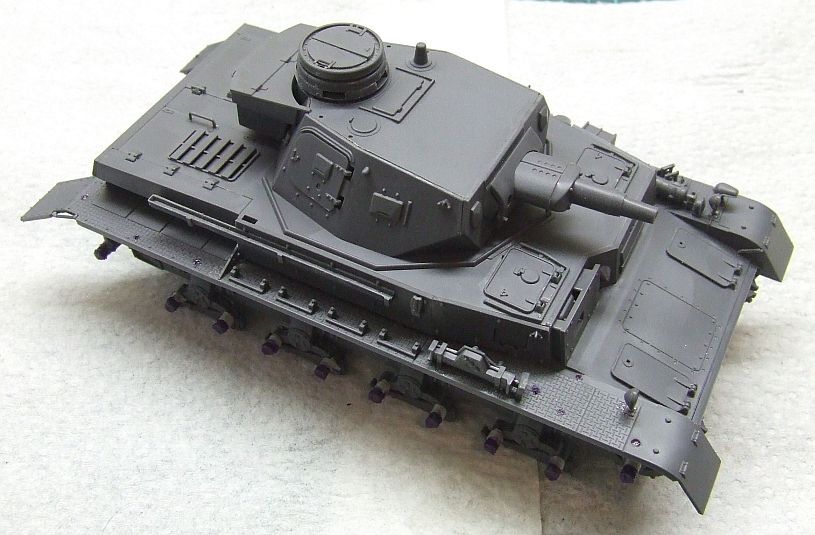
Apart from two tiny parts on the rear end that I always leave off until just before painting because they are too fragile to stand handling, every last part is on now that can be there at this point. The axles and locator holes for tools not overpainted are now treated with rubber solution. Next comes scratchbuilding -- the rack on the tail, applique armour under the bow, laminated armour in front of the driver's position, a few dozen missing bolt heads, wire grabhandles over the hatches and a cinch around the barrel that holds the antenna deflector.

I'll be ordering up paints and thinners from AK Interactive, including primer, and some extra decals from Archer (helmet flashes and other insignia). Hopefully the Verlinden crates will show up in the months ahead too, and if I can find a few kitbags I'll have the stowage complete.

Cheers, Mike/TB379

http://worldinminiature.blogspot.com/

  • Member since
    October 2010
  • From: Rockford, IL
Posted by AlanF on Thursday, January 23, 2014 8:11 AM

Armor86, tigerman, SchattenSpartan, Gamera, Pordoi, Jgeratic thanks for the kind comments.

Armor86 - Nice job on the lights.

Jester75 & Thunderbolt379 - nice progress.

Quick question. The Scout has 3 mounted machine guns. What is the best way to realistically paint these? Any favorite paint colors for them (acrylics if possible).

Thanks in advance.

  • Member since
    December 2006
  • From: N. Georgia
Posted by Jester75 on Thursday, January 23, 2014 8:18 AM

Thank you all for the comments on the build but moreso for the wellwishes for the wife!

Castlenuovo, she broke her fibula at the very bottom. It broke clean through at at angle from top to bottom, outside to in. Luckily there wasnt any surgery required and the doctor just put her in a removable hard boot!! Oh, and congrats on getting published in FSM!

Mike, your PzIV is looking nice! I too am looking to order some AK stuff and give it a try to hopefully move my weathering to the next level. Can't wait to see all the additions you are fixing to add to it.

Eric


  • Member since
    November 2009
  • From: SW Virginia
Posted by Gamera on Thursday, January 23, 2014 8:43 AM

Jester: Looks good! And best wishes for a swift recovery for your better half too!

CN: Congrads, I'll be looking for it!

Alan: Lots of different ways to paint machine guns. I generally go black and then rub a little pencil graphite/lead on them to get a metallic look, add this after you add the flat/matte coat though since it will kill the metallic sheen.

"I dream in fire but work in clay." -Arthur Machen


  • Member since
    March 2003
  • From: Rain USA, Vancouver WA
Posted by tigerman on Thursday, January 23, 2014 10:58 AM

Alan, I pretty much do it like Gamera, except I drybrush steel over the black.

   http://i7.photobucket.com/albums/y269/wing_nut_5o/PANZERJAGERGB.jpg

 Eric 

  • Member since
    October 2007
  • From: Louisville, KY
Posted by pordoi on Thursday, January 23, 2014 3:16 PM

Mike/TB379:  Your PzIV is looking might fine.  Sounds like there will be a lot of extras added to this.  I'm curious about the AK products and how they perform. 

Alan:  For painting MGs, I have used Tamiya Gun Metal acrylic, which gives a finish that probably looks very similar to painting black, then dry brushing with steel.  I have also used Tamiya metallic gray  which gives a lighter metal color.  Really up to your preferences. To illustrate the difference, in the photo below the jack mounted on the back plate was painted with Gun metal, and the cupola MG with metallic gray.

Don

  • Member since
    April 2005
Posted by Thunderbolt379 on Thursday, January 23, 2014 5:05 PM

Thanks, guys! There's certainly a lot to do and I'm looking forward to bringing it together. I need to get some fine hexagonal rod to represent bolt heads, I need to ring the LHS and see if they have it in their rack. I'll use the Chopper II to cut it so I'll hopefully end up with slivers that are regular in angle and thickness. Then it's 1mm and .5mm sheet stock for laminate armour additions, some stripstock for the cinch round the barrel, and so forth.

AlanF -- I usually spray gunmetal or a darkened silver, then drybrush with silver and use a dark wash on the details, but all the methods mentioned will give a very realistic look. I love working with graphite, too!

Cheers, Mike/TB379

http://worldinminiature.blogspot.com/

  • Member since
    February 2011
Posted by GreySnake on Thursday, January 23, 2014 9:19 PM

Wow, I have a lot of catching up to do!

Greg, I guess the color is kind of chocolate brown. Its Tamiya XF-10 flat brown.

Thanks Jack,Eric,Gamera,Spartan,Don

caslenova, Your panzerspahwagen looks great!

Alan, Keep up the good work. Same goes for you Mike on the PZ.IV

Jester, Hope you wife recovers quickly!

David

  • Member since
    April 2005
Posted by Thunderbolt379 on Friday, January 24, 2014 6:16 AM

Today I measured up some of the superdetailing and sent away for some Plastruct hex rod. It's a long weekend here, but I'll get the order for the AKI paints away in time to ship Tuesday. I also ordered some decals from Archers, providing the helmet insignia for the "coal scuttles" among the planned stowage. I'll probably start the extra detailing with the barrel cinch, and get the mast deflector into place.

M/TB379

http://worldinminiature.blogspot.com/

  • Member since
    April 2005
Posted by Thunderbolt379 on Saturday, January 25, 2014 6:48 AM

I had a fair day on superdetailing, I got more done than I expected to. The barrel cinch is done, with the exception of bolt heads on the raised lugs, and I also made some good progress of the jerry can rack. It came together quicker than anticipated. I cut and bent the six formers from etched steel, made the base of the rack from .020" card and edged it with strip. One more piece of strip will form the top rail about half way up the uprights. Tomorrow I'll mark up the back of the base with the locations for the verticals. I'm unsure if the original would have been steel sheet or timber, but as the stowage will completely hide it, it's no big deal. I also assembled the Italeri jerry cans which will ride the rack. Here's today's work:

Tomorrow I'll install the barrel deflector under the cinch, and hopefully complete the rack.

Updates as work occurs...

M/TB379

http://worldinminiature.blogspot.com/

  • Member since
    April 2013
Posted by SchattenSpartan on Saturday, January 25, 2014 7:43 AM

Eric: Looking really nice. I'm sorry about your wife.

Mike: Some nice scratchbuilding going on there!

  • Member since
    November 2009
  • From: SW Virginia
Posted by Gamera on Saturday, January 25, 2014 5:09 PM

Yeah, looks good Mike!

"I dream in fire but work in clay." -Arthur Machen


  • Member since
    December 2002
  • From: Bury St Edmunds, Suffolk, England
Posted by Bish on Sunday, January 26, 2014 3:29 AM

Can't believe we have 2 completed builds already, great work guys.

Jester, nice work on the Bison, I'd like to get one of these myself, so nice to see one coming together. Give your wife our best regards.

David, never seen my namesake being built before, its looking good.

Alan, some really nice work there, love the dashboard.

Mike, looking good. I am rather getting addicted to scratch building myself (I never thought I would be saying that).

I am a Norfolk man and i glory in being so


On the bench: Airfix 1/72nd Harrier GR.3/Fujimi 1/72nd Ju 87D-3

  • Member since
    April 2005
Posted by Thunderbolt379 on Sunday, January 26, 2014 5:44 AM

Thanks, Bish and SS!

Today's progress: Antenna deflector added under the barrel cinch; grab handkles over the turret hatches added from formed .020" rod (more accurate than the kit parts -- not in love with the starboard side one, I might replace it); and the welded laminate armour added under the bow from .020" sheet.

The rack is underway, with the six metal uprights now superglued to the base, but the fit is not terribly strong, they fall off if you breathe on them. I might have to do a bit of artistic-licence work under the rack to make things more secure.

More tomorrow,

Mike/TB379

http://worldinminiature.blogspot.com/

  • Member since
    March 2003
  • From: Rain USA, Vancouver WA
Posted by tigerman on Sunday, January 26, 2014 1:05 PM

That looks great Jibber. Did you do the hairspray method for chipping? One comment, it looks like you have a naval flag rather then the traditional swastika draped over the rear.

   http://i7.photobucket.com/albums/y269/wing_nut_5o/PANZERJAGERGB.jpg

 Eric 

  • Member since
    April 2013
Posted by SchattenSpartan on Sunday, January 26, 2014 1:16 PM

Mike: You are doing an awesome job on your Pz.IV!

Jibber: Thats a great looking Funkwagen you got there! What did you use for the flag?

  • Member since
    January 2013
Posted by jibber on Sunday, January 26, 2014 1:23 PM

Tigerman I think your right about the flag, I have a couple different ones and it never occurred to me. I used Heavy Chipping by AK. I've tried hairspray and other "chippers" but I like the AK. It's a little more work but I think you can control the amount you take off better.

  • Member since
    April 2005
Posted by Thunderbolt379 on Sunday, January 26, 2014 3:52 PM

Thanks, SS! Jibber, marvellous job on the 8-rad! I like the chipping, I have the AK heavy effects fluid and look forward to using it. Did you airbrush it on, or apply it with a brush/stipple method? The flag is very realistic -- did you make it from scratch? I'll be taking a shot at an air ID flag on the Pz. IV, another new technique to try!

Cheers, Mike/TB379

http://worldinminiature.blogspot.com/

  • Member since
    January 2013
Posted by jibber on Sunday, January 26, 2014 4:18 PM

Thanks guys, I brushed the AK on. I've tried it both ways and what I've found is that when I airbrush, it doesn't cover evenly so I brush it on the areas I want chipped. I ordered a set of flags from a small company Bish recommended in England. I picked up a set of German, Japanese and US, they were a little pricey about $40 total to Michigan all in 1/35. I thought about it for a while and decided I can't make a flag that good out of tissue or from a decal (I tried both), because these are printed on cotton and each package comes with a dozen or so assorted flags. More than I will ever use but I think they're very realistic except this one is a Kriegsmarine. Sorry I chose poorly.

I'll get the link and post it.    

I have to admit that this build was a real challenge. Eight wheels with articulating suspension and all the different angles for the body and fenders, it drove me crazy. I spent way to much time with the interior and didn't realize none of it would show even if I'd left all the hatches open. But it's a different type of  vehicle, very cool.

  • Member since
    January 2013
Posted by jibber on Sunday, January 26, 2014 4:22 PM

  • Member since
    April 2006
  • From: ON, Canada
Posted by jgeratic on Sunday, January 26, 2014 4:44 PM

Jibber - great job on this unique recon and communications vehicle.  

I like the flag, and I can see the benefits of that particular product.   As for being naval, it can be explained away as being picked up while transported across the Mediterranean.

regards,

Jack

  • Member since
    April 2005
Posted by Thunderbolt379 on Sunday, January 26, 2014 4:52 PM

Thanks, Jibber -- I have an Su-85 underway and will be using the AK fluid to try my first winter scheme -- I'll stipple it on, and maybe try flicking it from a stiff brush to create random sprays in specific areas, if that makes sense. If it works, I have a StuH 42 awaiting the same technique.

M/TB379

http://worldinminiature.blogspot.com/

  • Member since
    January 2013
Posted by jibber on Sunday, January 26, 2014 6:28 PM

Thunder, you can just brush it on after the primer's dried without affecting your top coat. Wait for it to dry, often times I'll let it sit overnight but thats just a guess on my part. To start chipping it, just brush on water and let it set a few seconds to penetrate then use a stiff brush to start. Very simple. I also use a toothpick for scratches.    

  • Member since
    April 2005
Posted by Thunderbolt379 on Sunday, January 26, 2014 6:40 PM

Jibber -- do you mean you let the chipping fluid or the topcoat dry overnight? It sounds pretty straight forward, I can see me using this method to good effect if I can get it to play! Russian armour, German armour, I imagine it would work for aircraft where the paint is through to bare metal -- Japanese planes, for instance, or the leading edges of US planes in the Pacific...

http://worldinminiature.blogspot.com/

  • Member since
    January 2013
Posted by jibber on Sunday, January 26, 2014 8:58 PM

Thunder here's my technique. First is a primer coat that I let dry, then I brush on the Chipping fluid to the areas I want chipped or you can brush the whole thing. I let it dry for several hours then spray on the top coat. To start the chipping, I brush on luke warm water to the areas I want chipped and then use a stiff brush to the area. Sometimes you have to work the brush a bit but stay at it it'll start coming off. Thats what I like about the AK fluid, it comes off slowly and I can control it better. I think this works on any kit.  

  • Member since
    December 2006
  • From: N. Georgia
Posted by Jester75 on Monday, January 27, 2014 1:31 PM

Mike, I love the scratchbuilding! Its nice to see the multimedia material on a kit before paint like resin, etch, and different colored styrene!!

Jibber, I hope to be able to achieve that chipping effect as yours looks great! Going to have to try some of that AK stuff.

I have a question for anyone that may know.I have the gun and carriage built (will post some pics later this evening). One problem I can see is that the gun cannot achieve 0 degrees elevation. I have built the carriage according to DML's instructions, which we all know really does not mean anything, and can see no way of reversing any parts in order to get it level. Most pics I have seen show it at about 10 degrees and that is about what the kit will sit at but the box plates and a very few pics show it level. I am wondering if this was the case on the real deal or if this is an engineering flaw in the kit???

Eric


  • Member since
    December 2002
  • From: Bury St Edmunds, Suffolk, England
Posted by Bish on Monday, January 27, 2014 1:41 PM

Eric, there is one pic on Acthung panzer which seems to show the gun at 0degrees.

www.achtungpanzer.com/sig33.htm

I am a Norfolk man and i glory in being so


On the bench: Airfix 1/72nd Harrier GR.3/Fujimi 1/72nd Ju 87D-3

JOIN OUR COMMUNITY!

Our community is FREE to join. To participate you must either login or register for an account.

SEARCH FORUMS
FREE NEWSLETTER
By signing up you may also receive reader surveys and occasional special offers. We do not sell, rent or trade our email lists. View our Privacy Policy.