SEARCH FINESCALE.COM

Enter keywords or a search phrase below:

Rommel vs Monty (North African GB 1941-43) Jan. 1 - Aug. 31 2014

137511 views
1455 replies
1 rating 2 rating 3 rating 4 rating 5 rating
  • Member since
    April 2005
Posted by Thunderbolt379 on Thursday, February 13, 2014 10:27 PM

RLM 78 done -- the wheel wells were masked with tape, tissue and rubber solution, the RLM 02 I put on yesterday is not holding the surface every well at all so I'll have to see what needs touching up when the masking comes off... I homebrewedthe 78 from XF-2, XF-23 and a single spot of XF-18, as the other mixes I've seen struck me as not quite blue enough or way too grey...

I'll mask and homebrew the 79 tomorrow, and this one is into the finishing stage...

M/TB379

http://worldinminiature.blogspot.com/

  • Member since
    November 2009
  • From: SW Virginia
Posted by Gamera on Friday, February 14, 2014 5:37 AM

Mike: Looking good!

Jack: Nice work there on your Tiger, I've been trying to get good dust effects, think I'll try something similar to your technique there.  

"I dream in fire but work in clay." -Arthur Machen


  • Member since
    May 2011
  • From: Illinois
Posted by armor86 on Friday, February 14, 2014 9:26 AM

Don - I use ak DAK  filter with the DAK Tiger and it lighten - tone down the camo. Armor86


Dan

  • Member since
    October 2007
  • From: Louisville, KY
Posted by pordoi on Friday, February 14, 2014 5:54 PM

jgeratic

Don - PzIII looking great, and nice workmanship on the scratchbuilt fuel rack.....

Jack:  Thanks for the comments and suggestions but I can't take credit for scratching the fuel rack.  I used the rack from the Dragon PzIIIN kit Wink

This weekend, will try to blend the camo with some dilute over sprays and do some weathering with pigments.  Hopefully, new photos in a day or two.

Don

  • Member since
    April 2005
Posted by Thunderbolt379 on Saturday, February 15, 2014 12:16 AM

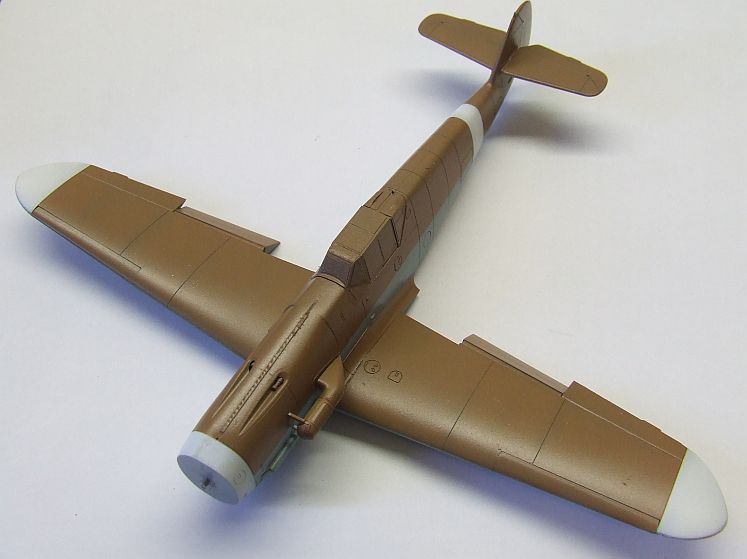
As promised, I masked the 78 and homebrewed the 79 (Tamiya's recommendation of XF-59 to XF-64 at 2:1), skewed a tiny bit in favour of the redbrown, and thinned a smidgeon over the odds to help with misting. Here's the mask job:

And the overall paintjob with primary masking away:

Demasking scuffed the right wingtip, I might need to remask and splash some extra white. I'm a bit concerned that too much preshade showed through the white areas -- what do you think?

Next job is to oil wash the oil and dirt streaks from the engine on the underside, maybe some subtle streaking of fluids elsewhere, then the first clearcoat and it's onto the finishing leg.

M/TB379

http://worldinminiature.blogspot.com/

  • Member since
    February 2014
Posted by sapper on Saturday, February 15, 2014 7:02 AM

Is it too late to join this GB?  I am new to the hobby and thought participating in a GB would be a good place to start.  I have a 1/35 Tamiya Pz IVD sitting on the shelf.

  • Member since
    December 2002
  • From: Bury St Edmunds, Suffolk, England
Posted by Bish on Saturday, February 15, 2014 3:14 PM

Mike, great work on the 109.

jibber, I think you may have joined the club of posting in the wrong GB. Big Smile Don't worry, I have done it myself.

I am a Norfolk man and i glory in being so


On the bench: Airfix 1/72nd Harrier GR.3/Fujimi 1/72nd Ju 87D-3

  • Member since
    January 2013
Posted by jibber on Saturday, February 15, 2014 4:15 PM

I did, my apologies.

  • Member since
    December 2002
  • From: Bury St Edmunds, Suffolk, England
Posted by Bish on Saturday, February 15, 2014 4:21 PM

At least your in this GB. I once posted progress pics in a GB thread I wasn't even part of.

I am a Norfolk man and i glory in being so


On the bench: Airfix 1/72nd Harrier GR.3/Fujimi 1/72nd Ju 87D-3

  • Member since
    April 2005
Posted by Thunderbolt379 on Sunday, February 16, 2014 2:33 AM

Hi Guys,

Jibber, love the 251, must build that one!

Right, today's progress -- I decided the white was too thin so remasked and firmed it up, then mounted the air filter and satin coated the whole aircraft. It doesn't sound like much but that's the day's work. Re the filter, my lesson is learned, I thought I was being so clever assembling and spraying it separately, so all I had to do was slap it into place afterward, avoiding the difficulties of masking behind it. Except the fit is hideous and there's a clear gap I can't do anything about because the paint's on now (and being homebrewed, I can't expect to spot it invisibly if I mix more)... Hmph! In future, when doing tropical aircraft, I'll mount the main intake before painting, and add the extended filter section later...
Decals coming up, also I can assemble the prop, panel wash and final seal, then it's into final assembly and detail panting.

Cheers, M/TB379

PS: Last night I did oil streaking on the underside using burnt umber in white spirit, and used the same mix for streaking behind filler caps and drains too.

http://worldinminiature.blogspot.com/

  • Member since
    December 2002
  • From: Bury St Edmunds, Suffolk, England
Posted by Bish on Sunday, February 16, 2014 5:02 AM

Nice work Mike.

I am a Norfolk man and i glory in being so


On the bench: Airfix 1/72nd Harrier GR.3/Fujimi 1/72nd Ju 87D-3

  • Member since
    April 2013
Posted by SchattenSpartan on Sunday, February 16, 2014 6:07 AM

Wayne: Fantastic work on that Bedford! I love the weathering!

Don: Your Pz.III is looking awesome! Very sharp work on the tools and sandbags!

Mike: Looking very good! I really like the look of that desert camo!

  • Member since
    May 2011
  • From: Illinois
Posted by armor86 on Monday, February 17, 2014 2:59 AM

Nice work everyone, update on the 232 RAD 8 - Monday's a holiday hope to finish up the PE and antenna and get some paint on it. Armor86


Dan

  • Member since
    April 2005
Posted by Thunderbolt379 on Monday, February 17, 2014 4:59 AM

Quick update -- the Bf 109 is currently moving into the last lap. I accented the panel lines and recoated with satin, and the Aeromaster decals are almost all on, just a few stencils left to go. Wash accenting on the landing gear is happening, and I have to back up and fix a couple of things. It turns out I got the top half of the split flaps the wrong way up -- I need to respray them so the 02 is inside and the 79 outside. The air filter cracked off during handling so this is a chance to refine the fit. It looks like the props for the forward section are a sliver too long and thus obstructing the fit of the base. Next pics hopefully tomorrow.

M/TB379

http://worldinminiature.blogspot.com/

  • Member since
    November 2009
  • From: SW Virginia
Posted by Gamera on Monday, February 17, 2014 8:52 AM

Mike: That looks great! Everything came out perfect.

Dan: Again, those weld beads are beautiful!

Jibber: The IR halftrack looks great, now I'm wishing I'd joined that GB too!

"I dream in fire but work in clay." -Arthur Machen


  • Member since
    October 2007
  • From: Louisville, KY
Posted by pordoi on Monday, February 17, 2014 11:12 AM

Mike and Dan:  nice work on the 109 and 8 rad, respectively.  Looks like two more builds are nearing completion.

Jibber:  Woohoo! for the Uhu!!

Spent the weekend dirtying up the PzIII.  Still have some work to do on the tracks, jerry cans and extra parts.  This is what it looks like today...

Don

  • Member since
    January 2013
Posted by jibber on Monday, February 17, 2014 12:17 PM

Thank you all, Armor any problems fitting the fenders on your Rad 8? I had to make a few adjustments to get them in tight to the body.

Don that looks like its right out of the field. The mantle, the fenders, all of it. Awesome finish and weathering and the sandbags really make it work.  

  • Member since
    April 2007
  • From: Schroon Lake, NY
Posted by SMJmodeler on Monday, February 17, 2014 12:47 PM

ARMOR86: WHOOOOOOA?!...hold on a minute!  p.33: Did I hear you say you applied AK products UN-thinned (I'm trying to get current on this GB but I wanted to be sure to get this clarified)

I'm a real fan of the AK products but I typically thin it, mostly as washes.   It's STRONG stuff!  I LOVE the dust effect you achieved on the Tiger!...is that straight-up effects?!

p.36: "The paints / washes can be used right out of jar, however I would use additional thinner to get the effects right"  I just got to this page, can you give me some ratio info on the dust effects?

pordoi:  She's looking good to me!...I don't think the finish is too dark, did you end up trying to lighten it up with washes?  BTW:  I gotta' try that pre-shading technique!

T379: I'm not used to seeing planes in the GB's I join, it's been fun to watch that one coming together, nice work!


  • Member since
    December 2002
  • From: Bury St Edmunds, Suffolk, England
Posted by Bish on Monday, February 17, 2014 4:11 PM

Don, that's looking very nice indeed.

SMJ, so far I have only used the streaking grime from AK, I have never thinned them, I have not read that you need to. I'm about to use the DAK wash and filters, I was planning on using them as they come. Would you suggest thinning those.

I am a Norfolk man and i glory in being so


On the bench: Airfix 1/72nd Harrier GR.3/Fujimi 1/72nd Ju 87D-3

  • Member since
    December 2002
  • From: Bury St Edmunds, Suffolk, England
Posted by Bish on Monday, February 17, 2014 4:12 PM

Dan, looking forward to seeing some paint on that, its coming along great.

I am a Norfolk man and i glory in being so


On the bench: Airfix 1/72nd Harrier GR.3/Fujimi 1/72nd Ju 87D-3

  • Member since
    May 2011
  • From: Illinois
Posted by armor86 on Monday, February 17, 2014 7:48 PM

Hello all - noted AK products - I've use the AK DAK filter straight up from the bottle and on the DAK Tiger applied 3 coats. However with the washes, dusting effects, engine grime, mud, DAK washes, other weathering products I will first apply it right from the bottle, but will go back over with thinner to soften the effects, taper it some. On the DAK Tiger I used the DAK Dusting effects, but will go back over with thinner to soften it - Also used a couple of Pigments (MIG, AK) both Gulf War Desert and North Africa pigments for dusting and mix them with water and applied letting them dry before using a brush to remove and create the decided effects. I also have the DAK / North Africa Camo paint set (AK550) and air brush them from the bottle adding something to keep the air brush tip from drying out while straying it. Armor86


Dan

  • Member since
    May 2011
  • From: Illinois
Posted by armor86 on Tuesday, February 18, 2014 12:38 AM

Is your 232 1/35 or 1/48 - I did some dry fitting and found the fenders had some extra play and had to double check once cemented there wasn't any gaps. I have the 1/35 Africa Corp version. Armor 86


Dan

  • Member since
    April 2005
Posted by Thunderbolt379 on Tuesday, February 18, 2014 5:57 AM

SMJ -- thanks! I'm one of those modellers who builds armor and planes with equal enthusiasm. My display case has alternating shelves of wings and tracks.

Promised WIP pics: as you can see, the decals are on, and the Aeromaster sheet was almost flawless in application, though I could have wished for them to snug into the detail tighter. Maybe my setting solution is getting old, but only one bit of detail was tight enough to accept panel wash right through the decal.


The subassemblies are nearly ready for mounting. Next up, fine detail painting and unmask the canopy, then I can rejig the intake, mount the flaps, get her up on her feet and mount the prop.

M/TB379

http://worldinminiature.blogspot.com/

  • Member since
    April 2005
Posted by Thunderbolt379 on Tuesday, February 18, 2014 6:00 AM

The third pic didn't post -- that's been happening a bit lately...

M/TB379

http://worldinminiature.blogspot.com/

  • Member since
    November 2009
  • From: SW Virginia
Posted by Gamera on Tuesday, February 18, 2014 7:23 AM

Woo hoo Mike, you're almost done now!

"I dream in fire but work in clay." -Arthur Machen


  • Member since
    December 2006
  • From: N. Georgia
Posted by Jester75 on Tuesday, February 18, 2014 7:33 AM

Man, there is some damn fine work being done in here. Dan, the 8rad is looking busy and almost ready for paint, nice work! Don, I love the weathering you have done so far on your panzer. Nice and dusty! Mike, your 109 is gorgeous! I have always like the desert scheme on them and plan to do one some day.

Eric


JOIN OUR COMMUNITY!

Our community is FREE to join. To participate you must either login or register for an account.

SEARCH FORUMS
FREE NEWSLETTER
By signing up you may also receive reader surveys and occasional special offers. We do not sell, rent or trade our email lists. View our Privacy Policy.