SEARCH FINESCALE.COM

Enter keywords or a search phrase below:

Hunters II - Official WW2 Tank Hunter GB 2014

60942 views
720 replies
1 rating 2 rating 3 rating 4 rating 5 rating
  • Member since
    November 2009
  • From: SW Virginia
Posted by Gamera on Sunday, March 16, 2014 7:52 PM

Jibber: :Looks good! I have no idea on the camo, from what I've seen of Marders they came at the middle of the war where the Wehrmacht was switching from the panzer grey to the mustard yellow and you can go with an enormous range of schemes there.

The M10 is mostly assembled. Sorry, I put a coat of gloss on her prior to hitting her with a whitewash so shes a little shiny. I've seen some cool photos of Battle of the Bulge M10s in washwash so I'm going to try to do her that way with the hairspray technique to slightly distress the the white. The hairspray is in place now but I forgot to add the tools first - so now I'm painting them to add since I assume the crew wouldn't remove the tools first so they'd stay nice and pretty.

"I dream in fire but work in clay." -Arthur Machen


  • Member since
    April 2013
Posted by SchattenSpartan on Monday, March 17, 2014 3:37 AM

Rob: Looks like you're off to a good start!

Jibber: Nice work so far! I've never seen a Marder III painted in gray, so I suppose you have to go with the later camo (yellow/green/brown). If you go for a beaten-up look, how about combining it with a whitewash? Whitewashed vehicles tend to look like crap after they've seen some action, so you have lots of possibilities regarding the weathering.

Cliff: You sure made quite some progress on your M10. I'm really interested in how the whitewash effect with the hairspray Looks like when she's finished.

  • Member since
    April 2005
Posted by Thunderbolt379 on Monday, March 17, 2014 6:20 AM

I made some progress on the Tamiya Jagdpanther today, for the first time in months. Today's job was to apply the Aber etched grill set:

Like so:

I also set up the driver's vision port with a standard job of dark blue plus clear, and masked, here's the port with styrene blanking the empty hole. The box art shows a transparency, though no photos I could find were clear enough to know what it amounted to, so I'm basically winging it:

She's now ready for the paintshop, more or less.

Cheers, Mike/TB379

http://worldinminiature.blogspot.com/

  • Member since
    January 2013
Posted by jibber on Monday, March 17, 2014 7:02 AM

SS I never considered a whitewash over a 3 tone camo, I'l research that.  Ive used it over German Grey before but I do have some pics of Marder III's in grey

Great idea thanks.  

Terry

  • Member since
    April 2013
Posted by SchattenSpartan on Monday, March 17, 2014 7:29 AM

I can write you a short tutorial on how I painted the whitewash on my King Tiger if you want me to...

  • Member since
    November 2009
  • From: SW Virginia
Posted by Gamera on Monday, March 17, 2014 7:42 AM

Mike: Looks good!

Terry: Whitewashes are easy since there wasn't any real standard way to apply them- some crews just dumped buckets of lime over the vehicle and used brooms to spread it around. I spray some hairspray on before the whitewash and then scrub it from the top down esp around the areas where the crew climbs on and off the AFV with a slightly moist rough brush to wear a little off. I'll let Clemons go into more detail here.

"I dream in fire but work in clay." -Arthur Machen


  • Member since
    January 2013
Posted by jibber on Monday, March 17, 2014 11:51 AM

Guys I appreciate that, I used a white wash on a grey Panzer and honestly is came out less than what I'd hoped for, I'll gladly take the tips. Thanks

  • Member since
    April 2013
Posted by SchattenSpartan on Monday, March 17, 2014 4:03 PM

I'll post a link to the tut here once it's finished...

  • Member since
    April 2013
Posted by SchattenSpartan on Monday, March 17, 2014 5:41 PM

I'm done with the tutorial, so here it is:

cs.finescale.com/.../159184.aspx

  • Member since
    January 2013
Posted by jibber on Monday, March 17, 2014 7:49 PM

Clemons, you weren't kidding about some instructions…Thank You. I'll get into them tomorrow, a lot of us can use this information.  

  • Member since
    November 2009
  • From: SW Virginia
Posted by Gamera on Tuesday, March 18, 2014 7:45 AM

Clemons that's a great tutorial! I learned a few tricks there I didn't know! Biggest difference I do is using hair spray as an undercoat instead of thinner to remove the whitewash- it seems a bit more gentle on the undercoat but if you've added the clear undercoat as you said it shouldn't make much difference either way.  

"I dream in fire but work in clay." -Arthur Machen


  • Member since
    November 2009
  • From: SW Virginia
Posted by Gamera on Friday, March 21, 2014 9:09 AM

Terry the Marder looks great there. I thought the exposed gun on my M10 was complex, yours is a kit in itself! And that PE rack looks terrific! 

Ok, I finished painting the tools and attached them to the rear hull and am now working on the tow cable. Sheesh, not sure why I took all the time trying to get the wood grain when I'm covering them with whitewash but ah whatthehell. Still need to add a little 'stucco' paint to the lower side of the tools to match the splattered 'mud' on the hull.  

"I dream in fire but work in clay." -Arthur Machen


  • Member since
    January 2013
Posted by jibber on Friday, March 21, 2014 5:54 PM

I see you pre paint your add ons like shovels and the like but a lot of guys set them in, prime/paint and THEN take care of them, seems like thats the more difficult way to go. I treat each piece and sub assemblies like a completed piece then install them, at least to me that make sense but I'm sure there's an argument to the contrary. Anyway I like the coloring on the wood and the way you laid out a rough surface. Looks like a couple coats of Mr. Surfacer 500?  

  • Member since
    December 2002
  • From: Bury St Edmunds, Suffolk, England
Posted by Bish on Saturday, March 22, 2014 6:32 PM

Nice work there guys, that gun looks really nice jibber.

I am the same with my vehicle tools and other items, I paint them off the kit and then add them after painting the vehicle and before weathering.

I am a Norfolk man and i glory in being so


On the bench: Airfix 1/72nd Harrier GR.3/Fujimi 1/72nd Ju 87D-3

  • Member since
    November 2009
  • From: SW Virginia
Posted by Gamera on Saturday, March 22, 2014 7:24 PM

Yeah, I always paint stuff like that separate too, it's a bear to try to get in there and paint the details once attached. The wood is just tan paint, then I take a Prisma brand brown pencil and draw the grain lines in. Then take a little Tamiya translucent yellow with a drop of red added for an amber colour and paint the wood areas. It looks a little toned down when the matte overcoat hits it.

The rough areas are just 'Stucco' paint (this seems the Marta Steward brand!?!) daubed on with a heavy brush. I paint the whole thing olive drab (or whatever colour it should be) and then shoot the rough areas with mud/dirt coloured paint. I find it easier this way instead of adding the 'dirt' later.

"I dream in fire but work in clay." -Arthur Machen


  • Member since
    January 2013
Posted by jibber on Saturday, March 22, 2014 9:32 PM

Really nice effect, I've used Mr Surfacer 500 on turrets, mantles etc and ended up with something similar to your finish. I think I'll try it out, I never would have thought of using stucco paint on a model. Always learning….Thanks

  • Member since
    April 2013
Posted by SchattenSpartan on Sunday, March 23, 2014 5:49 AM

Jibber: Nice progress on your Marder!

Cliff: That wood effect looks great! I paint my tools separately as well. It makes things much easier... I  actually don't like using hairspray because it causes a chipping effect instead of the paint looking washed off

  • Member since
    May 2005
Posted by pyrman64 on Sunday, March 23, 2014 7:46 AM

Gamera: I like what you're doing with that M10.  I have an old Tamiya M36 calling to me from the closet.....and it's your fault! Wink

Jibber: your Marder's looking good. Yes

Greg H

"There is many a boy here today who looks on war as all glory, but, boys, it is all hell." Gen. Wm T. Sherman (11 April 1880, Columbus, Ohio)

  • Member since
    January 2013
Posted by jibber on Sunday, March 23, 2014 3:35 PM

Gamera I picked up some Vallejo White Stucco, so far I'm very impressed with it. I used it on an old Panzer IV that had been sitting on my bench partially finished. I applied it to the underbody and wheel wells along with a little on the wheels, idler and sprockets. I think it's going to paint up very nice but I do have a question. Do you think its better before or after the primer? I've thought about it and I really don't think it matters, but then again maybe over the primer works better?

Terry  

  • Member since
    November 2009
  • From: SW Virginia
Posted by Gamera on Sunday, March 23, 2014 6:30 PM

Thanks guys but I can't claim credit for the stucco- this I learned from Steven Zaloga. I've never used the Vallejo brand but it's probably better than this though I think the cheaper stuff works ok.

Jibber, I have no idea if it matters at all. I apply the stucco and then primed with the first coat of Tamiya olive drab in this case.

Clemons: I'm going to have to try it your way too. I love how your Royal Tiger came out!

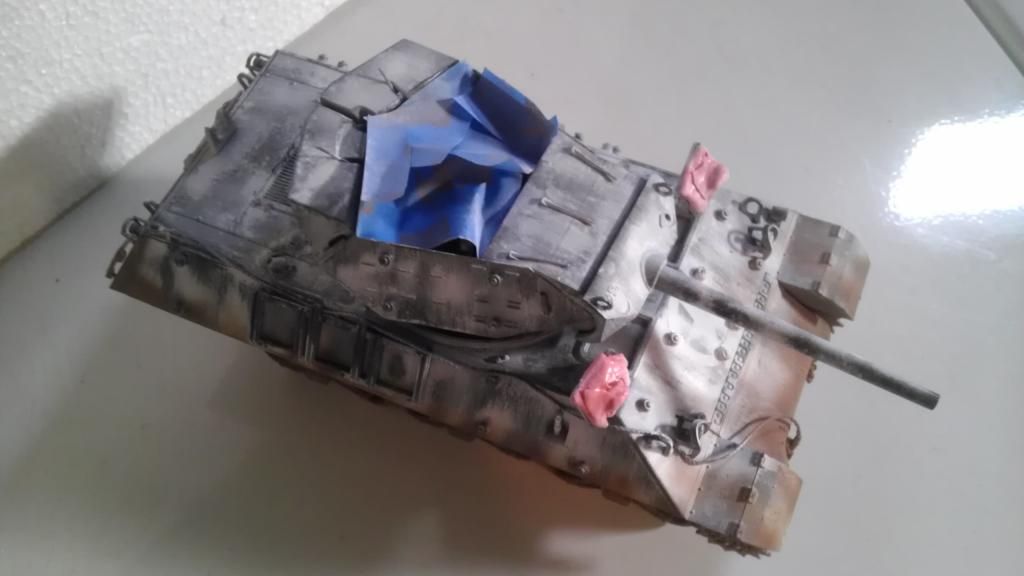
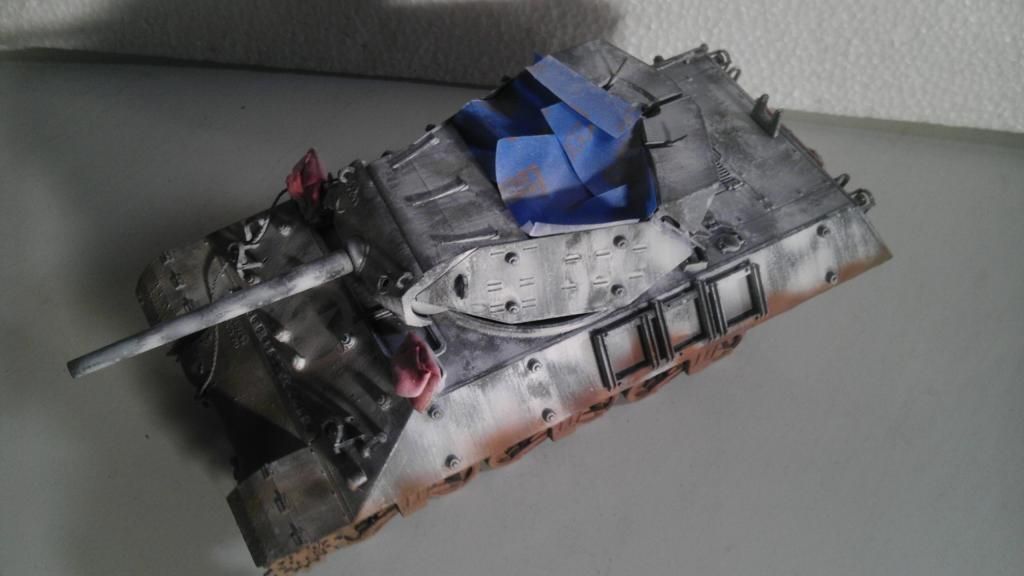
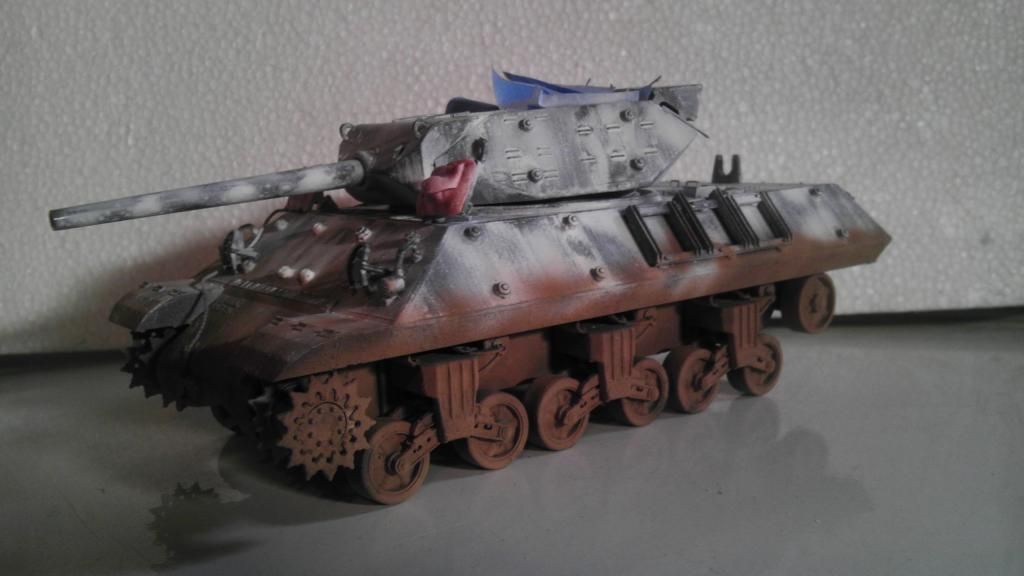
Anyway a few photos with the whitewash on and some of the mud (Tamiya dark earth) applied to the lower areas. When I get the tracks on I'll add some highlighting to the mud. I still need to add the muffler to the back on the thing too. Sorry about the photos, I took them late in the day and the lighting wasn't so great.

BTW: The pink stuff on the hatches is Silly Putty. The hatches would have been closed when they hit her with the whitewash so they should stay olive drab.

"I dream in fire but work in clay." -Arthur Machen


  • Member since
    January 2013
Posted by jibber on Sunday, March 23, 2014 10:26 PM

Gamera thanks for the info, she's looking great.

  • Member since
    November 2009
  • From: SW Virginia
Posted by Gamera on Monday, March 24, 2014 7:44 AM

Thanks Jibber, now that I look at the photos the mud on the upper hull looks a little regular - going to have to rough it up a bit too now!

"I dream in fire but work in clay." -Arthur Machen


  • Member since
    April 2013
Posted by SchattenSpartan on Monday, March 24, 2014 12:45 PM

Looking great, Cliff!

  • Member since
    November 2009
  • From: SW Virginia
Posted by Gamera on Tuesday, March 25, 2014 7:44 AM

Thanks! Painted the treads grey yesterday, think I'll pre-mud them before attaching and then hit the whole thing.

"I dream in fire but work in clay." -Arthur Machen


  • Member since
    January 2013
Posted by jibber on Wednesday, March 26, 2014 3:53 PM

The PE tool box on the fender looks like I messed it up, but my plan is to give the entire build a roughed up winter look.  

  • Member since
    April 2013
Posted by SchattenSpartan on Wednesday, March 26, 2014 5:12 PM

Looking really nice, Jibber!

I hear ya on the parts count on those Dragon kits. It's tedious work, but it is very rewarding too! Wink

May I ask what the hairspray/chipping fluid is for?

  • Member since
    January 2013
Posted by jibber on Wednesday, March 26, 2014 6:27 PM

SS I'm going to chip off some paint in certain areas after I paint the 3 color camo, just like I would any other build, then spray on the gloss coat. If I understand your method, I don't think it matters if I chip a little paint as long as I cover the entire vehicle is a spray gloss, that should seal everything. Please tell me if I'm wrong.

JOIN OUR COMMUNITY!

Our community is FREE to join. To participate you must either login or register for an account.

SEARCH FORUMS
FREE NEWSLETTER
By signing up you may also receive reader surveys and occasional special offers. We do not sell, rent or trade our email lists. View our Privacy Policy.