SEARCH FINESCALE.COM

Enter keywords or a search phrase below:

1944 Group Build

132072 views
1959 replies
1 rating 2 rating 3 rating 4 rating 5 rating
  • Member since
    February 2014
  • From: Michigan
Posted by silentbob33 on Tuesday, March 11, 2014 8:29 PM

Got a bit of time to do some work tonight. Got those pesky ropes scraped off and added some details.  Would anyone know what, if any, kind of instrument panels there are on an LCVP? I've tried looking, but I'm not having any luck.

On my bench: Academy 1/35 UH-60L Black Hawk

  • Member since
    August 2009
  • From: MOAB, UTAH
Posted by JOE RIX on Tuesday, March 11, 2014 11:39 PM

Looking good there sb. Maybe this pic may be of some help:

1.bp.blogspot.com/.../Higgens1.jpg

"Not only do I not know what's going on, I wouldn't know what to do about it if I did". George Carlin

  • Member since
    February 2014
  • From: Michigan
Posted by silentbob33 on Wednesday, March 12, 2014 7:47 AM

Thanks Joe, that's the first picture I've seen from that angle.  Hopefully I can find something in my spares bin that looks similar

On my bench: Academy 1/35 UH-60L Black Hawk

  • Member since
    January 2013
Posted by jibber on Wednesday, March 12, 2014 9:43 AM

Silentbob, Joe nailed it, thats the only control panel and note the throttle on the right side. I liked the idea of removing the molded rope, I think that may be something you can do with some rigging line that would look great. It's looking good.

  • Member since
    August 2009
  • From: MOAB, UTAH
Posted by JOE RIX on Wednesday, March 12, 2014 12:28 PM

Hey Silentbob, Glad I could help out. I simply Googled "LCVP images" and that particular photo was amongst the plethora of pics that came up. I'm sure you may find many other helpful pics there.

"Not only do I not know what's going on, I wouldn't know what to do about it if I did". George Carlin

  • Member since
    April 2013
Posted by SchattenSpartan on Wednesday, March 12, 2014 4:07 PM

I finally got the front page up to date. I wanted to do it yesterday, but PB was screwing up again (no big news, eh?) and the pics wouldn't show up...

Schmidty: I changed your entry to the 163. I love those little rockets with wings, so I'm really interested in watching your build Smile

  • Member since
    December 2013
Posted by schmidty on Wednesday, March 12, 2014 5:55 PM

Thanks SS.  I'm excited to do it!  I really like those "out of the ordinary" German aircraft.  I have an Uhu in the stash that I keep looking longingly at too...someday. 

--Mike

On the Bench: 1:72 Academy P-51B

On Deck: 1:72 Hobby Craft DHC-3 (U-1A) & 1:72 Academy Ju 87G-1

  • Member since
    October 2013
Posted by Big Blue on Wednesday, March 12, 2014 11:55 PM

Quick update with pictures.

The pictures show the model after oil washes, chipping and flat coat.  The flat coat over virtually eliminated any but the most subtle effects of the oil wash over the olive surfaces, but the results can be seen clearly over the grey and the white letters and stripes. 

I tried my hand at chipping using a fine brush and Citadel silver paint (er... Runefang Steel actually.)  I plan on going over the heavier areas at the wing root with some dirt colored pigments to hopefully give it a more realistic appearance.  The exhaust stains and soot from the ejection ports are airbrushed (clumsily).

I am far enough along that I have started to remove masks and add on the delicate undercarriage bits.  For example, the tail wheel doors and their actuators are photo etch, as are the hinges for the main doors.  I have also added the mounting hardware for the bombs and belly tank.

Thanks to everyone for the kind words along the way.  I have really enjoyed building this and participating in the group build.  I don't think she'd win any awards, but I am reasonably happy with how it has progressed so far.  I have tried a number of new things, and the results generally look like I had intended (with some notable exceptions along the way.)  Still lots of room for improvement.

That's all for now.   I hope to have more soon (and maybe a completed build before the week ends!)

  • Member since
    April 2013
Posted by SchattenSpartan on Thursday, March 13, 2014 1:00 AM

Great work, Blue! I'm totally digging the weathering! I'm about as far as you are with my Jug (still fine-tuning all the weathering). I think the exhaust stains look really nice, but you might want to add some more staining behind the supercharger exhaust. Most of the exhaust fumes were used to power the supercharger, so i think that area would be a bit dirtier. Unlike most other aircraft, Thunderbolts don't seem to show a lot of staining around the exhausts (supercharger and normal ones) BTW. Don't get me wrong, I love how the staining on your model looks, but I think the back end is a bit too clean compared to the nose Wink

  • Member since
    October 2008
  • From: Georgia
Posted by Rigidrider on Thursday, March 13, 2014 4:43 AM

Beautiful work Blue!

Doug

When Life Hands You A Bucket Of Lemons...

Make Lemonade!

Then Sell It Back At $2 Bucks A Glass...

G-J
  • Member since
    July 2012
Posted by G-J on Thursday, March 13, 2014 7:43 PM

Big Blue

I don't think she'd win any awards, but...

Holy Moly that's looking good.  You would get my vote.

On the bench:  Tamyia Mosquito Mk. VI for the '44 group build.  Yes, still.

On deck: 

  • Member since
    August 2009
  • From: MOAB, UTAH
Posted by JOE RIX on Thursday, March 13, 2014 11:27 PM

Blue, That looks fantastic! Do not downplay your work there friend. That there would be an attention getter at any contest. I really like your chipping. It turned out great.

"Not only do I not know what's going on, I wouldn't know what to do about it if I did". George Carlin

  • Member since
    December 2002
  • From: Bury St Edmunds, Suffolk, England
Posted by Bish on Friday, March 14, 2014 3:15 AM

That's looking sweet there Blue.

I am a Norfolk man and i glory in being so


On the bench: Airfix 1/72nd Harrier GR.3/Fujimi 1/72nd Ju 87D-3

  • Member since
    October 2013
Posted by Big Blue on Friday, March 14, 2014 10:01 AM

Thanks guys!  You are WAY too kind, but much appreciated.  

Clemens, good point about the turbo exhaust, and I plan on giving it another shot or two.  I notice that the exhaust stains up front look much much darker in that picture than they do in person, so I don't think the difference is as dramatic as it looks.  Something about the viewing angle and shadows has magnified it.

I've been using pigments to give the wing surfaces some foot traffic dirt, and working on putting it all together.  I'll put pics up when there is real progress to show.

Thanks again for all the encouragement.  Like I've said before, I've been lucky enough to see all your work, so the compliments mean something to me.  

  • Member since
    January 2014
  • From: Toronto
Posted by Rob S. on Friday, March 14, 2014 10:20 AM

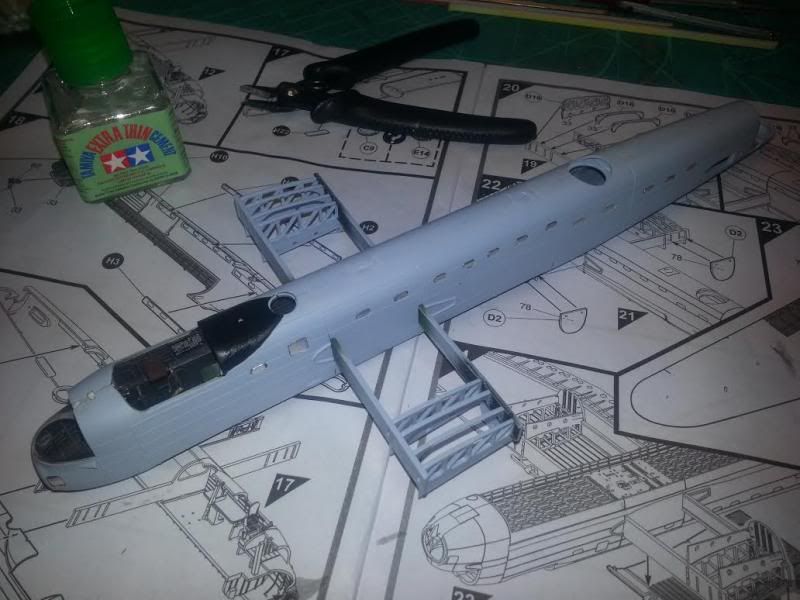
Update: Not much painting going on yet. Lots of sanding and sealing was required (really, more than I thought for Airfix`s new tooling). Anyway, no probs. Some initial pre-shading was (on top, didn`t take a pic though)  done to test the polishing I did on the softer Airfix plastic. I love the wheelbay-wing support structure of the Airfix version. The Revell Lanc had a large plastic contraption that worked well, but, wasn`,t as effective as the Airfix.

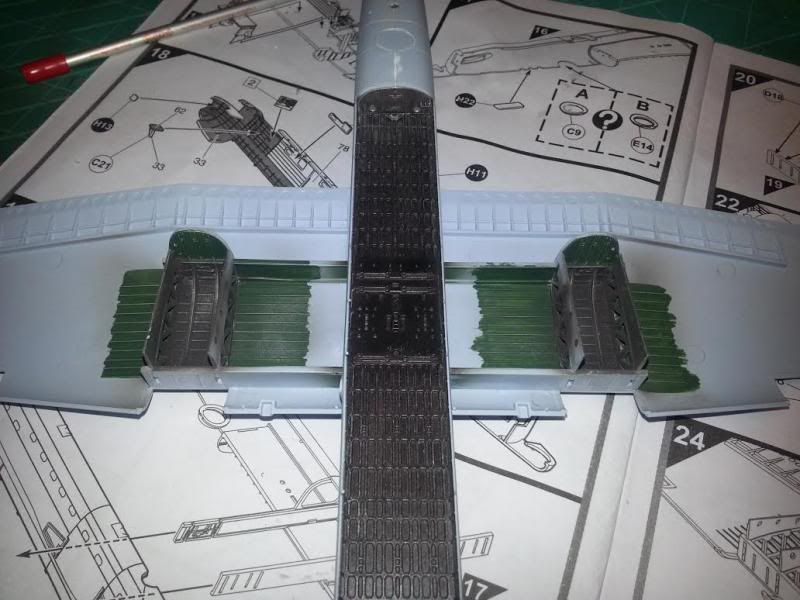
Some light detailing on the wheel bays prior to sealing them in with the massive wing halves:

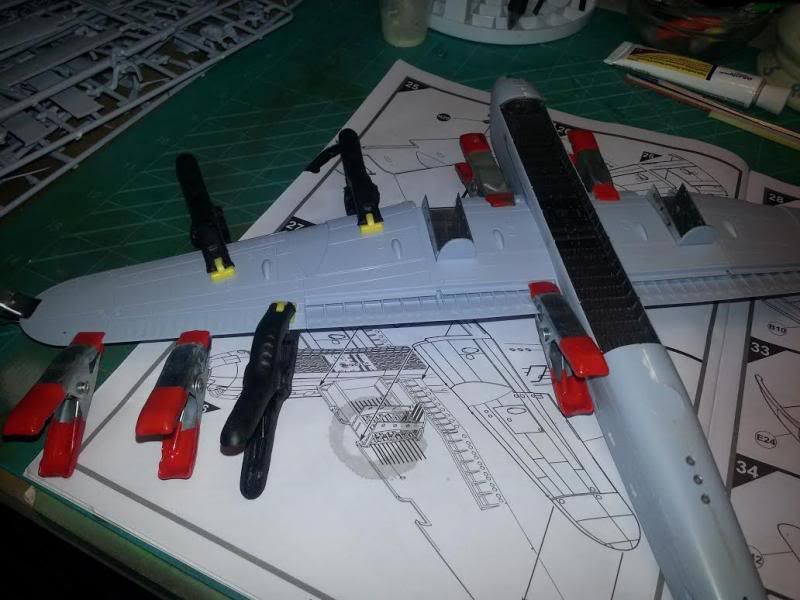
I think I used all my clamps for the wing halves!

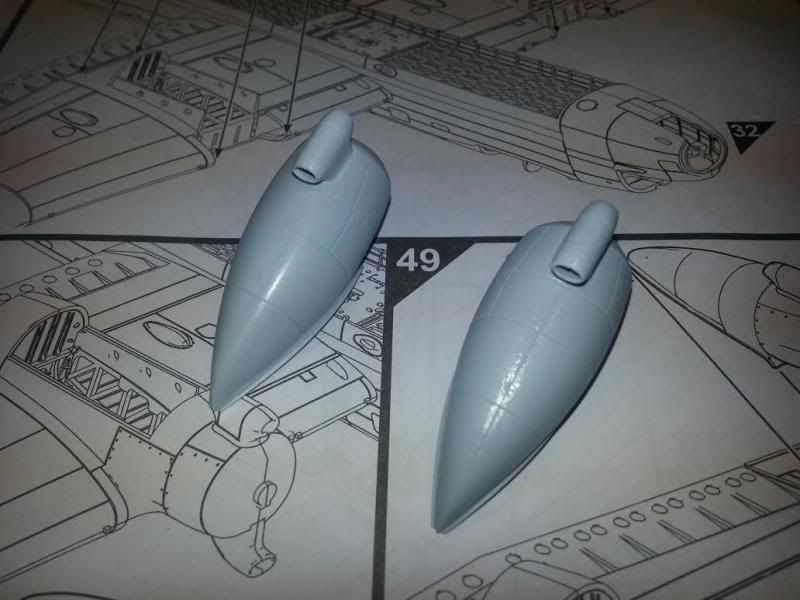
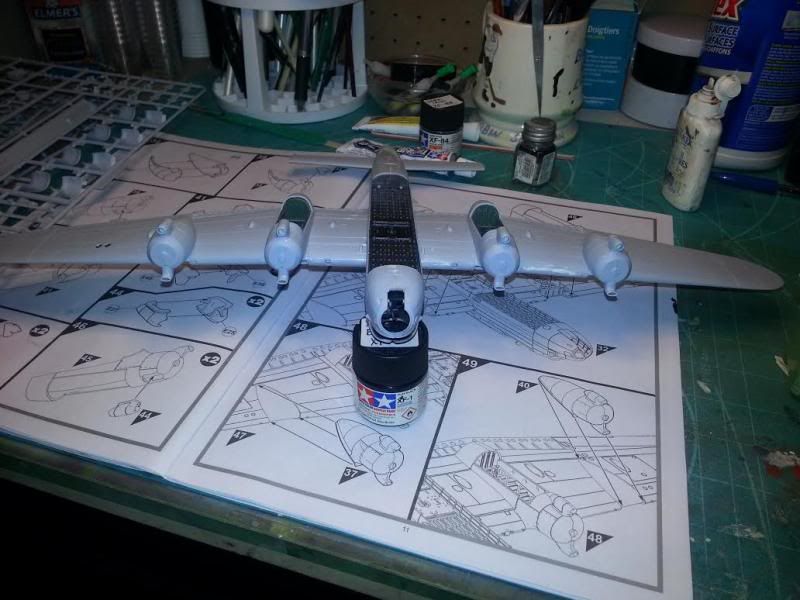
Some intense sanding and polishing of the Hercules nacelles, just one example below of a `ready`nacelle and one waiting for polishing (have to say, Airfix plastic polishes up well Big Smile):

Here she is with all four nacelles mounted, sanded, polished and all intake plastic thinned out. You can see Tamiya filler on the left wing: this is the thing I find about Airfix`s soft plastic, thin cement softens it up and with a slight shrinkage, caused me to have to fill in the gap. Looks rough, but, she`s smooth and shiny in better light. Will be going to Montreal Saturday to pick up supplies and try to find some interior green (Model Master?) and will get back at her.

______________________________________________________________________________


On the Bench: Nothing on the go ATM

  • Member since
    January 2013
Posted by jibber on Friday, March 14, 2014 10:36 AM

Rob it's looking good, thats a big airframe..looks fun may have to add this to the shelf.

GAF
  • Member since
    June 2012
  • From: Anniston, AL
Posted by GAF on Friday, March 14, 2014 1:01 PM

Blue>  The detail work on your P-47 is wonderful!  She's going to be a beauty.

Silentbob>  You know, the question about controls for the LCVP got me to searching, and I ran across this:

http://www.history.navy.mil/library/online/surfskill.htm#contents

This is a good reference if you want to build a landing craft.

Rob>  Big Lanc!  Looks like a man's work is being done.  Surprise

  • Member since
    August 2009
  • From: MOAB, UTAH
Posted by JOE RIX on Friday, March 14, 2014 1:13 PM

Rob, It appears to me that all that sanding and polishing is paying off in spades. Really nice work so far. I often ask myself if I would have the patience to tackle a 4 engine job. The repetition might cause me to go a bit goofier than I already am.

"Not only do I not know what's going on, I wouldn't know what to do about it if I did". George Carlin

  • Member since
    December 2002
  • From: Bury St Edmunds, Suffolk, England
Posted by Bish on Friday, March 14, 2014 1:19 PM

Rob, the Lanc is looking great.

I am a Norfolk man and i glory in being so


On the bench: Airfix 1/72nd Harrier GR.3/Fujimi 1/72nd Ju 87D-3

  • Member since
    January 2014
  • From: Toronto
Posted by Rob S. on Friday, March 14, 2014 1:35 PM

JOE RIX

Rob, It appears to me that all that sanding and polishing is paying off in spades. Really nice work so far. I often ask myself if I would have the patience to tackle a 4 engine job. The repetition might cause me to go a bit goofier than I already am.

Yes, it does get repetitive, you are building the engines 4 parts at at time. I just finished the Revell version very recently, so, I am feeling it. I just couldn`t resist those big Herc engines on a Lanc!

______________________________________________________________________________


On the Bench: Nothing on the go ATM

  • Member since
    May 2005
Posted by pyrman64 on Friday, March 14, 2014 4:02 PM

Bish: can you add me to this GB with a Tamiya M4 (Mid-production) Sherman(1/35)?

Greg H

"There is many a boy here today who looks on war as all glory, but, boys, it is all hell." Gen. Wm T. Sherman (11 April 1880, Columbus, Ohio)

  • Member since
    December 2002
  • From: Bury St Edmunds, Suffolk, England
Posted by Bish on Friday, March 14, 2014 4:16 PM

Clemans with have to add you to the roster, but of course Greg, more than welcome.

I am a Norfolk man and i glory in being so


On the bench: Airfix 1/72nd Harrier GR.3/Fujimi 1/72nd Ju 87D-3

  • Member since
    October 2013
Posted by Big Blue on Friday, March 14, 2014 7:24 PM

That Lancaster looks great so far, Rob.  Looking forward to seeing your build progress.

Found some unexpected time to work on my Jug today.  I am definitely in the home stretch now.  Here are a few shots of where I left off:

The cowl assembly and the canopy and windscreen are still unattached; I just put them in place for a few pictures. 

I have added all the p/e to the bombs and drop tank, and have begun to assemble the struts and gear doors.  I hope to get more work in this evening.

  • Member since
    February 2014
  • From: Michigan
Posted by silentbob33 on Friday, March 14, 2014 9:16 PM

GAF: Thanks!  That's an amazing resource.  It will definitely help out with my build, and I think I can scratchbuild the different things I need.  

On my bench: Academy 1/35 UH-60L Black Hawk

  • Member since
    October 2009
  • From: Oil City, PA
Posted by greentracker98 on Friday, March 14, 2014 9:30 PM

Big Blue What color is that is?

A.K.A. Ken                Making Modeling Great Again

  • Member since
    October 2013
Posted by Big Blue on Friday, March 14, 2014 10:26 PM

Ken,

The olive?  It's mainly Tamiya XF-62 Olive Drab, mixed with XF-4 Yellow Green in the panel centers.  Base layer of the olive, another layer adding blotchy faded areas, and a final layer of highly thinned olive to tie it together.  There are pictures a bit further back in this thread if it isn't clear.

The actual color does not look as green as it does in the last picture, nor as brown as it does in the others (at least on my monitor).  IPhone pictures under a mixed variety of lights is not ideal for color reproduction.

Blue

  • Member since
    January 2014
  • From: Toronto
Posted by Rob S. on Saturday, March 15, 2014 6:23 AM

Thanks Blue, I too am waiting for your big finish..almost there. My photography isn't that great I'm afraid: Samsung Gal3 under my fluorescent desk lamp, so, apologies to all for my dark pics.

______________________________________________________________________________


On the Bench: Nothing on the go ATM

  • Member since
    December 2013
Posted by schmidty on Saturday, March 15, 2014 9:59 AM

That's looking really good Blue!

I know what you mean about color reproduction.  My cellphone (Nokia) is the same.  No matter which white balance I selected, it just wouldn't accurately reproduce colors.  Switching to my cheap point-and-shoot camera helped a lot.

--Mike

On the Bench: 1:72 Academy P-51B

On Deck: 1:72 Hobby Craft DHC-3 (U-1A) & 1:72 Academy Ju 87G-1

  • Member since
    April 2013
Posted by SchattenSpartan on Saturday, March 15, 2014 2:14 PM

Fantastic work, Blue! I hear ya about OD being hard to photograph. It either looks too brown or too green in the pics...

Greg: Welcome, nice to have you on board as well! I'll put you on the list.

Rob: Your Lanc is coming along nicely!

  • Member since
    October 2008
  • From: Georgia
Posted by Rigidrider on Saturday, March 15, 2014 2:54 PM

Finbally finished... After seeiung some of the amazing work going on here I'm a bit hesitant to post my megar attempt! I'll be starting another shortly and promis to try to do better!

Take care all...

Doug

When Life Hands You A Bucket Of Lemons...

Make Lemonade!

Then Sell It Back At $2 Bucks A Glass...

JOIN OUR COMMUNITY!

Our community is FREE to join. To participate you must either login or register for an account.

SEARCH FORUMS
FREE NEWSLETTER
By signing up you may also receive reader surveys and occasional special offers. We do not sell, rent or trade our email lists. View our Privacy Policy.